As we get deeper into the iOS 14 beta and closer to iOS 14’s final release this Fall, users are discovering more and more obscure features that Apple has added in the latest version of iOS, one of which is Sound Recognition.
With a name like that, it’s not too hard to figure out what Sound Recognition does. It’s an accessibility feature that allows your phone to detect and notify you of various sounds that your phone’s microphone picks up. And unlike the smart home eavesdropping fiasco of a year ago, this is a time when you want your phone to listen to you.
For people who are deaf or hard at hearing, Sound Recognition is an extremely valuable feature. It allows you to still be notified by things like doorbells, fire alarms, and crying children without needing any other equipment than your phone. Other tools fill this purpose as well, but being able to accomplish this with just your phone makes the iPhone and even greater tool for the disabled.
What Sounds Can Be Recognized?
In iOS 14, the iPhone is only able to recognize various different sounds, though they’re some of the most common a person would need to have recognized, and it’s a safe assumption that Apple will add more sounds in future versions of iOS. This feature is built on machine learning, so it’s only a matter of time before it improves and broadens.
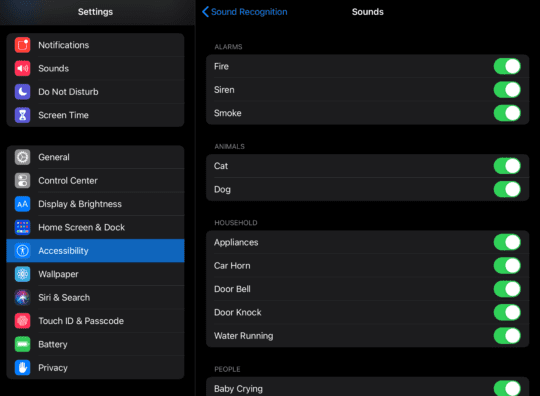
Those various sounds are:
Alarms
Fire
Siren
Smoke
Animals
Cat
Dog
Household
Appliances
Car Horn
Door Bell
Door Knock
Glass Breaking
Kettle
Water Running
People
Baby Crying
Coughing
Shouting
Again, it’s certainly not an exhaustive list, but it’s hard to imagine any other critical sounds that a deaf person might need to hear. Apple’s done a great job of hitting all the most important sounds, making the feature a great addition to the platform.
How to Enable Sound Recognition on iPhone
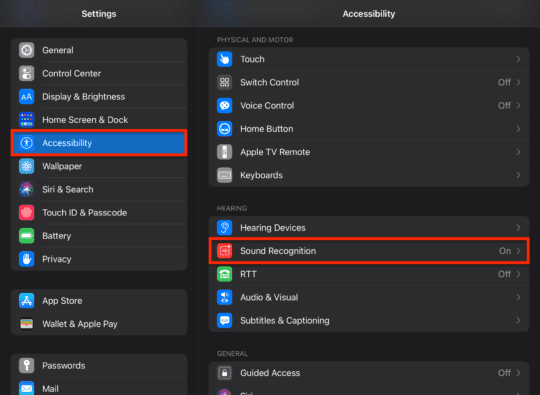
For those running iOS 14 or above, enabling Sound Recognition is a cinch. First, open the Settings app, then tap on Accessibility. From there, scroll down a bit until you see Sound Recognition and tap it.
On the next screen, tap the switch to turn Sound Recognition on.
It’s important to note that your phone will not start recognizing sounds yet. First, you need to turn on the sounds you want your device to recognize. To do this, tap Sounds on the same screen and then tap the switch next to each sound you want your device to recognize. You can, of course, turn on all of these switches.
And that’s it!
How to add Sound Recognition to your Control Center
Another handy aspect of Sound Recognition that you might not have discovered yet is that you can add it to your Control Center. This allows you to turn it on and off whenever you need it, which is particularly in situations where loud sounds are a given, such as going to a movie theater or sporting event.
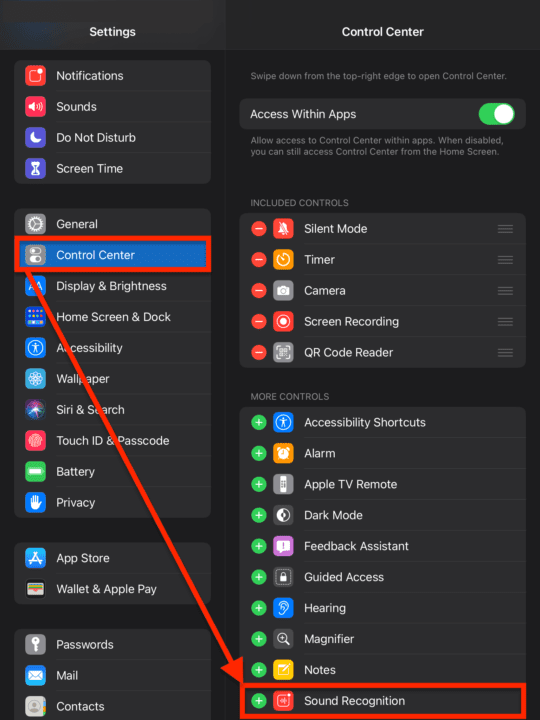
To add Sound Recognition to Control Center, first, make sure that Sound Recognition is turned on using the steps outlined in the previous section. Once that’s done, open the Settings app on your device and tap Control Center.
On the next screen, you’ll see a list of everything you can add and remove from the Control Center by tapping plus and minus symbols. To add Sound Recognition, scroll down to the list of things you can add to the Control Center and tap the “+” symbol next to Sound Recognition. You should now see the Sound Recognition icon when you swipe open Control Center.
When you first tap it, you’ll be able to choose which sounds you want to recognize. After that, turning it on and off will only turn your selected sounds on and off. To change which sounds you would like to recognize, you’ll need to revisit the Sound Recognition settings in the previous section.
And that’s it!
How to Set Up Custom Sounds to Use Sound Recognition on iPhone and iPad
Setting up custom sounds for Sound Recognition on iPhone and iPad can be a great way to personalize your device’s response to specific sounds. The ability to set up and use custom sounds for Sound Recognition was introduced with the release of iOS 16. Additionally, the Alarms and Household categories have a “Custom” option that you can enable. Selecting either of these will require an audio recording of the sound so that your iPhone can properly recognize it.
Open the Settings app.
Scroll down and tap Accessibility.
Scroll down again until you reach the Hearing section.
Tap Sound Recognition.
At the top of the page, make sure that Sound Recognition is enabled.
If so, tap the Sounds button at the bottom.
Scroll through the various options and select one of the following:
Custom Alarm
Custom Appliance or Doorbell
When prompted, tap Continue.
Enter a name for the alarm, appliance, or doorbell.
Tap the Continue button.
From here, your iPhone will need to listen to the sound five different times in order to properly recognize it. So you’ll need to get your appliance ready to make the sounds, and then tap the Start Listening button. From there, you’ll be able to have your iPhone recognize when something like your washing machine or dryer has finished running so you can switch the laundry. All without needing to try “guess” when it’ll actually be done.
Now, whenever your iPhone recognizes the custom sound that you set up, you’ll receive a notification on your iPhone, letting you know that it was detected. And you can always jump back into the settings and options if you find yourself getting a new alarm or a new appliance that has a different sound than the one that you had before.
How to Use Sound Recognition on HomePods
Despite being introduced to the iPhone and iPad back in 2020, Apple didn’t bring the ability to use Sound Recognition on HomePods until the release of the improved Home app with iOS 16.4. That being said, it’s now possible to have your HomePod notify you if it recognizes certain sounds, in the same way that your iPhone and iPad can do so. But in order to use this feature, you’ll first need to enable Sound Recognition on HomePods.
Open the Home app on your iPhone or iPad.
Tap the three horizontal dots in a circle found in the top right corner.
From the drop-down menu, tap Home Settings.
Scroll down and tap Safety & Security.
At the top of the page, tap Sound Recognition.
Tap the toggle next to Smoke & CO Alarm to the On position under the Sounds section.
If you have multiple HomePods, tap the toggle next to the HomePods that you want to have Sound Recognition enabled for.
Keep in mind some important considerations when using Sound Recognition. The feature analyzes audio locally on the HomePod and does not send it to Apple’s servers, ensuring privacy. Make sure both the HomePod and your iOS device are running compatible software versions and are connected to the same Wi-Fi network. Also, be aware that Sound Recognition may not recognize all occurrences of the selected sounds, and it might mistake other sounds for the selected ones.
Apple’s stance on accessibility features
Thanks to modern regulations, every company is required to meet certain accessibility standards that enable disabled users to still participate and benefit from their products. However, most companies only do the bare minimum, making most solutions feel like unintuitive workarounds.
This is something that Apple has always worked against, and since Tim Cook’s time as CEO, it’s a mission Apple has been pursuing more aggressively. Almost every version of iOS over the last few years has included multiple accessibility features, including a VoiceOver system that won Apple a Helen Keller award in 2015. During a speech to Auburn University in his home state of Alabama, Cook had this to say on the value of accessibility features:
“People with disabilities often find themselves in a struggle to have their human dignity acknowledged. They frequently are left in the shadows of technological advancements that are a source of empowerment and attainment for others. But Apple’s engineers push back against this unacceptable reality. They go to extraordinary lengths to make our products accessible to people with various disabilities from blindness and deafness to various muscular disorders.”
It’s an eloquent speech, and one we hope Apple stands behind for many years to come.
FAQs
What is Sound Recognition on iPhone?
Sound Recognition is an accessibility feature in the upcoming release of iOS that detects sounds like alarms, pets, and children, notifying the user when these sounds are detected.
How good is Sound Recognition?
In our testing, Sound Recognition was shown to be reliable at not only detecting sounds, but distinguishing them from other sounds, too. However, as Apple warns in the Settings app, it is not a perfect feature and should not take the place of more stringent devices and services.
What happens when iPhone or HomePod recognizes a sound?
When iOS 14 recognizes a sound with Sound Recognition, the user receives a push notification to their phone that says “Sound Recognition”. The user then needs to swipe down on this notification or long-press to see which sound was recognized and to optionally snooze notifications for that sound for five minutes, twenty minutes, or two hours.


Write a Comment