The “verifying Microsoft Outlook Mac stuck” error can be pretty annoying, especially when accessing important emails during a live meeting. If you want to get rid of it for good, keep reading!
MacBooks and iMacs pack extraordinary security systems that make these devices safer than Windows PCs. The operating system behind these Mac devices is macOS, and it boasts some tough device security policies. One such policy is to check all the apps randomly for their integrity whenever you launch apps on your iMac or MacBook.
The policy seems alright for lesser-known apps. But you may not appreciate it if your Mac is constantly verifying and checking apps from Microsoft 365 like Outlook, Word, Excel, etc. Microsoft apps are for productivity, but waiting to use the app for minutes doesn’t seem to be much productivity done during the workday.
Hence, you must try the following troubleshooting methods, if you want to learn how to get rid of verifying Microsoft Outlook.
Also read: Why is macOS Catalina verifying applications?
Contents
- Force Quit Microsoft Outlook and Relaunch the App
- Update Security & Privacy Settings for Outlook
- Update Microsoft Outlook
- Check the Device for Any Malware or Virus
- Right-Click to Open Microsoft Outlook
- Set Allow Apps Downloaded From Anywhere
- Reboot macOS Into Safe Mode
- Create a New macOS User Account
- Deactivate System Integrity Protection Briefly
- Reinstall Microsoft Office Package
- Restore macOS to a Previous Version
- Verifying Microsoft Outlook Mac Stuck: Final Words
Force Quit Microsoft Outlook and Relaunch the App
When you’re stuck for minutes on the verifying Microsoft Outlook screen for a while, simply force-stop the app and start it fresh. Here’s what you can do:
- Click the Launchpad app on the Dock and then select Other folder inside Launchpad.
- You should see Activity Monitor in this folder. Click on it.
- Inside Activity Monitor under the Process Name column, look for the Microsoft Outlook app by scrolling up or down.
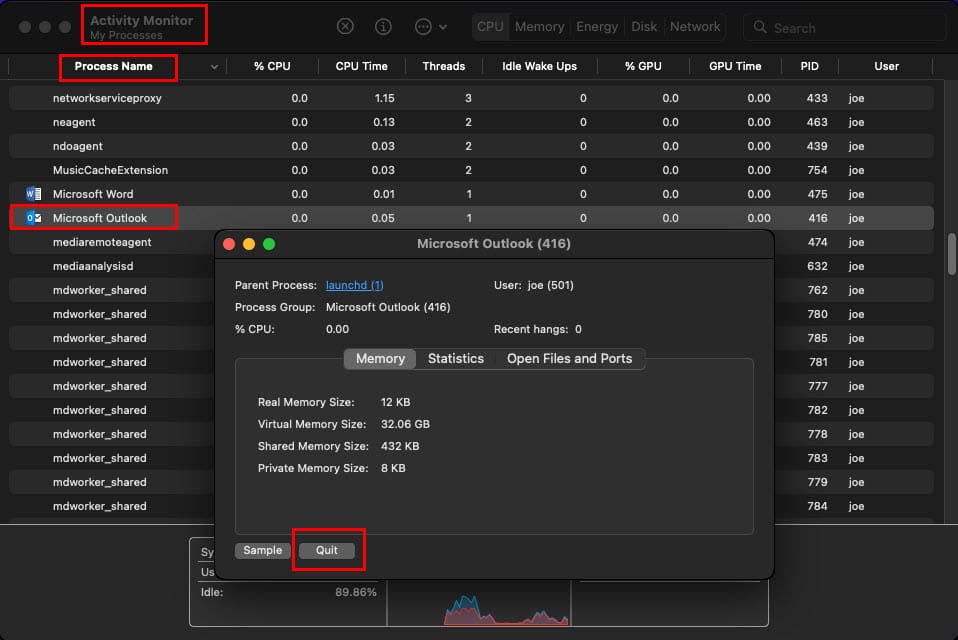
- Once located, double-click the app’s process name and select Quit on the Microsoft Outlook dialog box that shows up.
- Now launch Outlook again, and you should be able to access the app interface.
If the method isn’t working, move on to the next one.
Update Security & Privacy Settings for Outlook
You need to refresh the Full Disk Access permission for Microsoft Outlook by following these instructions:
- Click the Apple icon on the Mac toolbar and then select System Preferences.
- Open Security & Privacy option.
- Now, click the lock icon on the left bottom corner of Security & Privacy to unlock the tool.
- Go to the Privacy tab and then find Full Disk Access.
- Click on this menu to see the list of apps with full disk access permission.
- If Outlook isn’t here, click the plus (+) icon to add it.
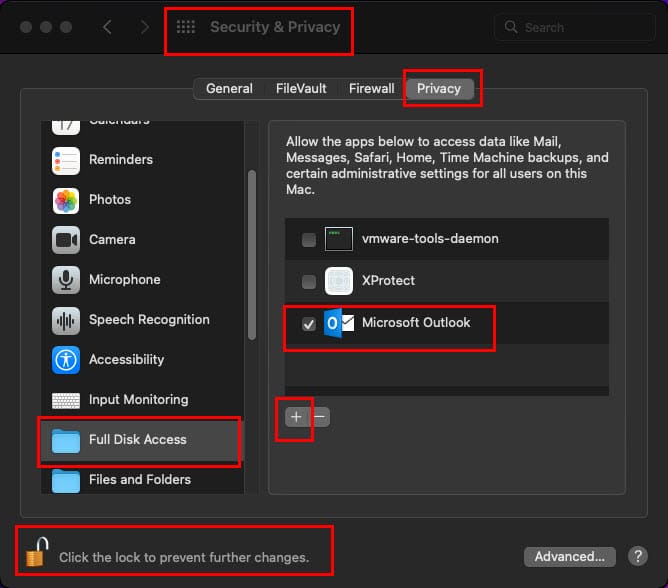
- If Outlook is there and check-marked, uncheck the checkbox and recheck.
- Each time you do the above, you need to click the Quit & Reopen button shown as a pop-up.
Update Microsoft Outlook
Microsoft releases monthly updates for its Microsoft 365 apps like Outlook, Word, Excel, etc. If you haven’t updated these apps lately, it’s a good time to update. Here’s how updating Outlook is done on macOS:
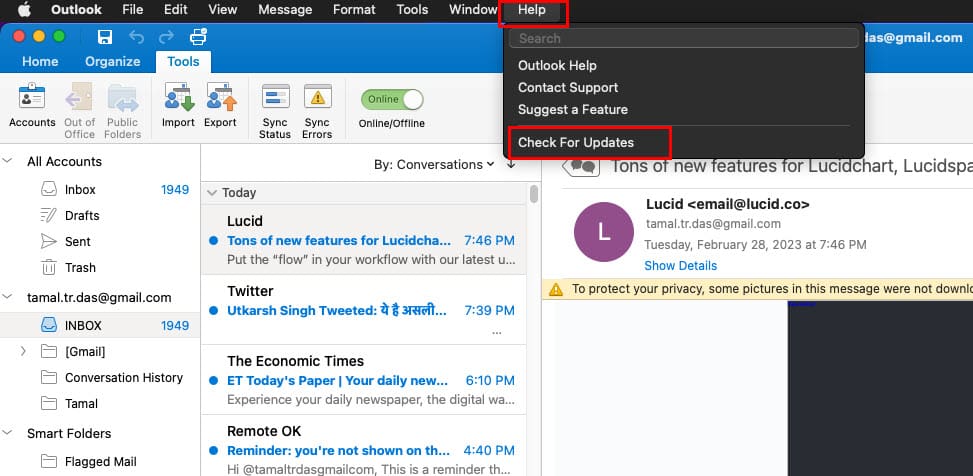
- Open the Outlook app and click the Help menu on the macOS toolbar.
- You should see the Check for Updates option. Click on that.
- The Microsoft Auto Update tool will open.
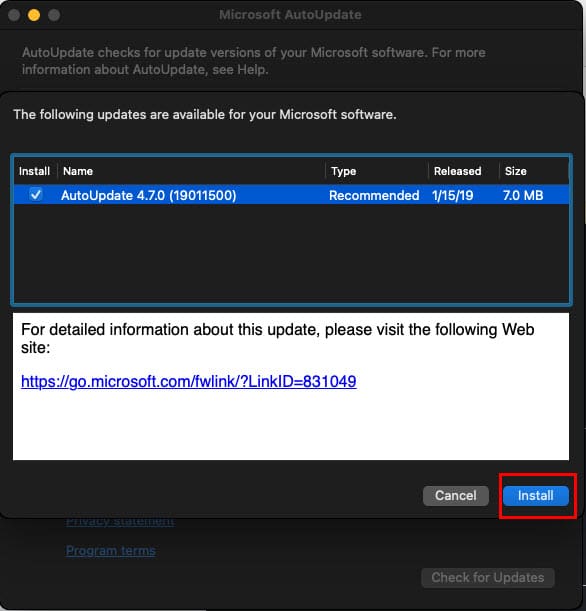
- Click Install to apply the update.
If Outlook isn’t opening, you can try to open any other Microsoft apps like Word or Excel to apply updates. Microsoft Auto Update will apply pending updates to all the software in this package.
Check the Device for Any Malware or Virus
Though macOS doesn’t really need any antivirus software still you can use the following free macOS apps to scan your device. This step will inform you if there are any malware or other system issues that might be stalling the Microsoft Outlook verification process.
Scan Using Malwarebytes
- Go to the Malwarebytes software portal and download the free version of the app.
- Install it on your MacBook or iMac.
- Open the app from Launchpad to run a system-wide scan for viruses, malware, etc.
- The app will also crush all detected malware, spyware, and viruses.
Scan the Device Using EtreCheckPro
- Download the freemium version of EtreCheckPro from its official website.
- Install the software on macOS.
- Now run it to find reports on any macOS system issues that you need to fix before you can resolve the verification stuck issue with Outlook.
Related reading: Can’t Close CoreServicesUIAgent Verifying App
Right-Click to Open Microsoft Outlook
If you’re seeing the “verifying Microsoft Outlook Mac stuck” error repeatedly and you want to bypass this annoying pop-up, simply do the following:
- Force stop Microsoft Outlook from Activity Monitor.
- Right-click on the app icon on Dock.
- Alternatively, you can press Ctrl on the Mac keyboard and click the app icon.
- Now, simply hold the Option key on the keyboard and click the Open option on the context menu.
- You’ll still see the verifying Microsoft Outlook message. But, this time there will be a button like Open or OK to ignore the warning.
Set Allow Apps Downloaded From Anywhere
By default Allow applications downloaded from: Anywhere option won’t be available on your MacBook or iMac. Here’s how you can get the Anywhere option in Security & Privacy tool:
- Open Terminal from Spotlight or Launchpad > Other folder and run the following command:
sudo spctl --master-disable
- Hit Return to execute the above code.
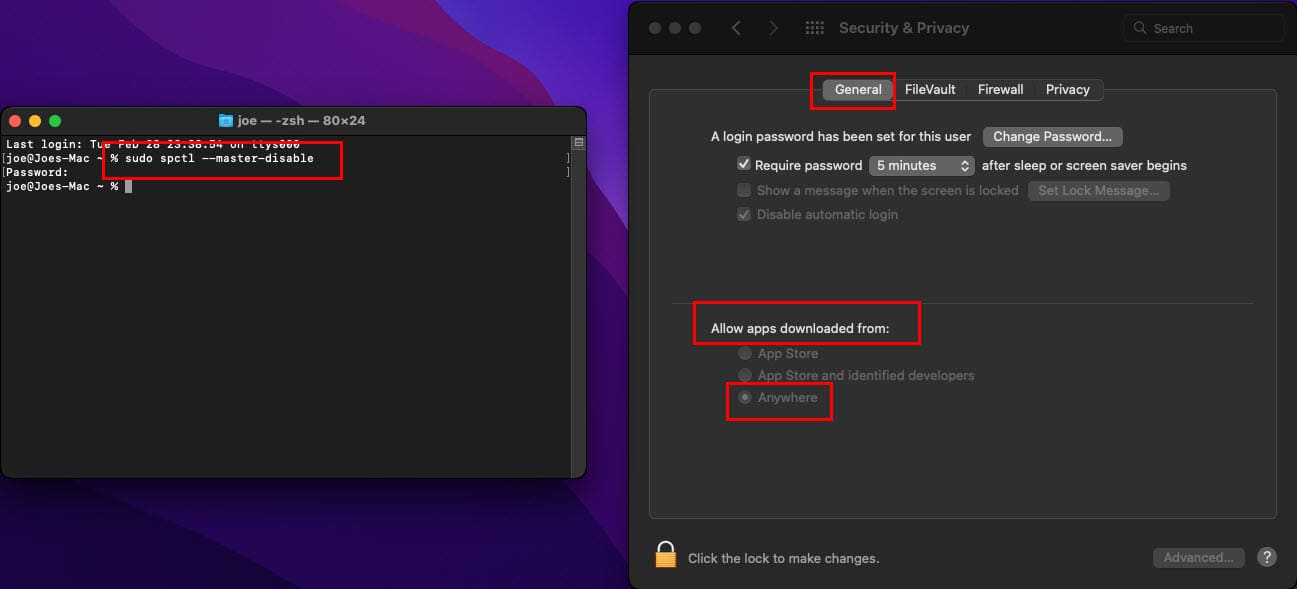
- Now, open Settings & Privacy and go to the General tab.
- You should see the Anywhere option selected under Allow applications downloaded from option.
Try running the Outlook app now, and the problem should be fixed. If the verifying Outlook issue persists, continue to the next method.
Reboot macOS Into Safe Mode
You must restart the macOS in Safe Mode to rule out any third-party app interference. Here are the steps you can follow to access your Mac in safe mode:
macOS Safe Mode Process for Apple Silicon
- Power down the macOS.
- Now, press and hold the power button until the Startup Options dialog box is visible.
- Here, choose the Startup Disk.
- Now, click Continue in Safe Mode while pressing and holding the Shift key.
- After the login, the Mac should be in Safe Mode.
macOS Safe Mode Process for Intel Processor
- Restart your macOS and simultaneously press and hold the Shift key.
- Keep pressing the Shift button on the keyboard until you see the login screen.
- There could be more than one login prompt.
- You’re now operating your Mac in Safe Mode.
Try to run the Outlook app now. If the issue doesn’t show up, it means a third-party app might be causing the verifying issue. You’ll need to reboot the Mac and then uninstall any recently added apps.
Create a New macOS User Account
Sometimes the “verifying Microsoft Outlook Mac stuck” issue could be linked to a specific user account. In that case, you may need to create a new user account on Mac and check if the issue surfaces or not. Here’s how you can create a new user account on macOS:
- Open System Preferences from the Apple menu on the Mac toolbar.
- You should see Users & Groups in the second row of all the apps in the System Preferences tool.
- Double-click Users & Groups to open it.
- Click the padlock and enter the Mac password to unlock the Users & Groups settings.
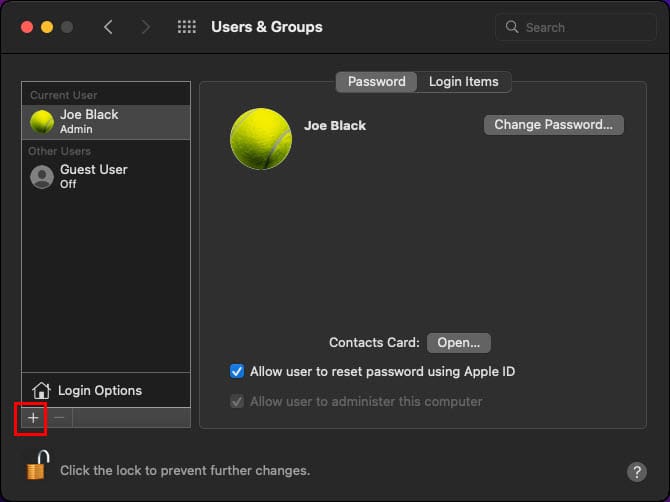
- Below the Login Options, you should see a plus (+) icon. Click on it.
- Select the New Account drop-down arrow and set the choice to Administrator.
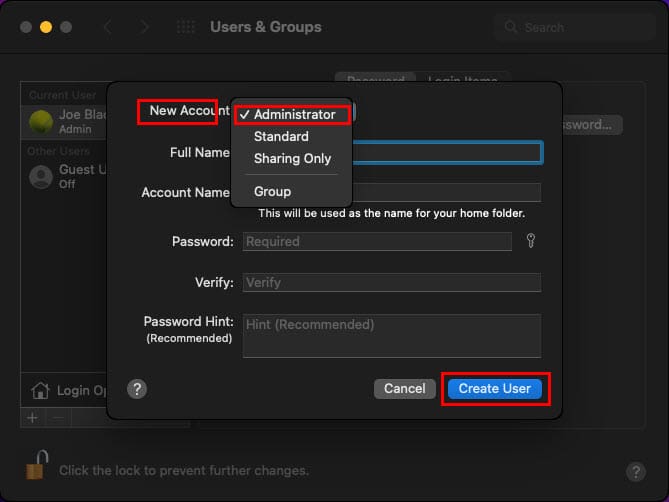
- Now, fill in the other fields as per your choice, and finally click Create User.
- Restart MacBook or iMac.
- Now, the login screen will show two user accounts. Select the new one and log in using your password.
Now is a good time to check if the Outlook verification stuck error is still happening or not.
Deactivate System Integrity Protection Briefly
System Integrity Protection (SIP) defends your macOS from unauthorized code execution and malicious programs. However, it’s also the responsible module that randomly performs the verification of Microsoft apps like Outlook, Word, etc.
You may follow these steps to disable this security system briefly. Then, test the Outlook app. If the issue is fixed, you need to uninstall and reinstall the Microsoft 365 apps including Outlook.
- First, you need to bring the system to Recovery mode. For this, on Apple Silicon Mac devices, shut down the device. Then press the power button to turn on Mac and keep the power button pressed until you get to the Startup Options screen.
- For a Mac running on an Intel chip, shut down the device. Press the power on button and simultaneously press the Command (⌘) + R keys until you see the Apple logo.
- In the Utilities menu of the Recovery mode, you should find the Terminal tool. Launch Terminal.
- Run the following command on the Terminal:
csrutil disable
- Now, reboot Mac to disable the SIP.
Once you tested your Outlook app, immediately activate the SIP feature by following the same steps mentioned above. This time, the SIP activation code will be as mentioned below:
csrutil enable
Reinstall Microsoft Office Package
If the above method determines that you must reinstall Outlook, follow the below-mentioned instructions:
- Click the Go menu on the Mac toolbar.
- Select Applications from the context menu that shows up.
- Inside the Applications window, you should find all the installed Microsoft apps.
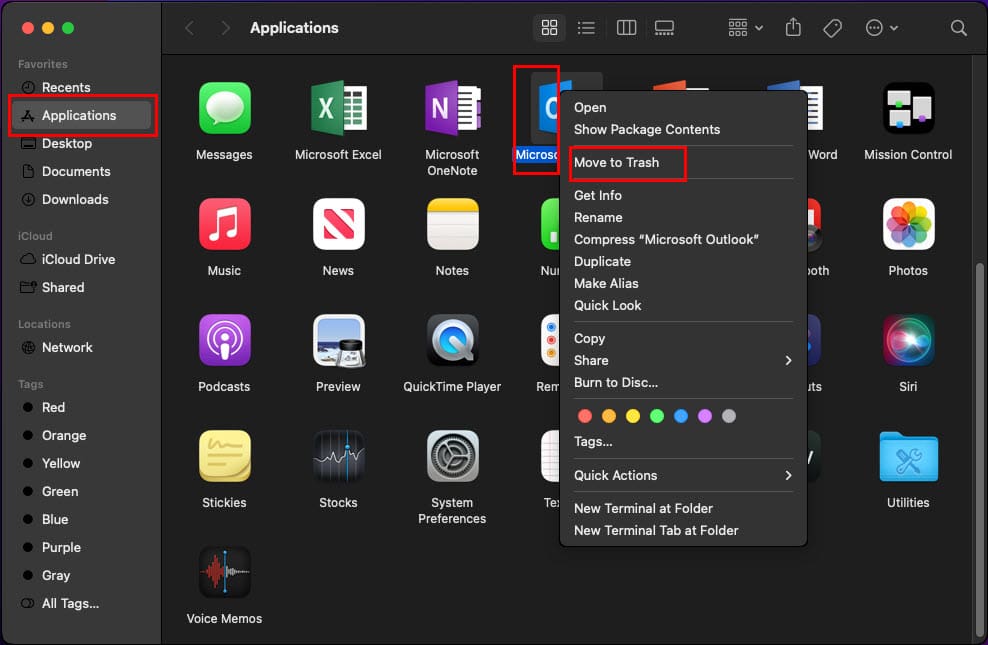
- Select Outlook, right-click, and then choose Move to Trash on the context menu.
- Follow the same steps for all other Microsoft apps.
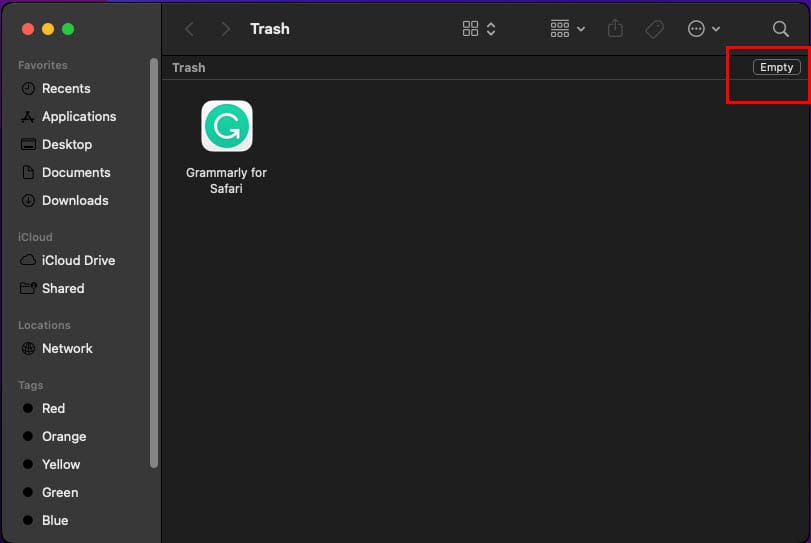
- Now, open the Trash app from Dock and click Empty on the top right corner of the app.
You successfully uninstalled Microsoft apps. Now, follow these steps to reinstall from a fresh and approved source:
- Log in to the Microsoft Office web portal using the same Microsoft or any other email that you used during Microsoft 365 app purchase.
- Look for the Install apps button on the top right corner of the web portal.

- Click the button and then select Microsoft 365 apps.
- From the Finder tool go to Downloads to locate the Microsoft Office installer.pkg file.
- Double-click and follow the onscreen guidance to install Microsoft 365 apps.
- Once installed, open Outlook from Launchpad and click Get started to activate your product.
- Usually, you just need to log in to the account linked to Microsoft 365 purchase.
After a fresh installation of Microsoft apps, you can run Outlook or any other Microsoft 365 software on Mac without any issues.
Also read: How to Switch from New Outlook to Old on Mac
Restore macOS to a Previous Version
The ultimate troubleshooting step is restoring your macOS setup to an instance when it didn’t show any verification window for Outlook. To do that, try these steps on MacBook or iMac:
- Click the Time Machine icon on the Mac toolbar.
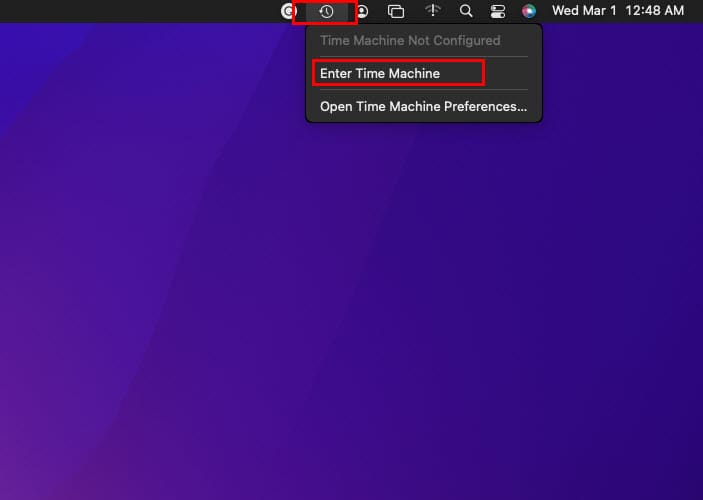
- Select Enter Time Machine.
- Now, choose a restore point from the options shown on the screen.

- Click the Restore button to start the process.
Verifying Microsoft Outlook Mac Stuck: Final Words
So far, you explored various methods to fix the “verifying Microsoft Outlook Mac stuck” issue. Give these methods a try and mention in the comment which one worked for you. If you know of any other troubleshooting method, do mention it in your comment.
Next up, What’s New in macOS Ventura.






Thank you for your thoughtful, thorough and helpful instructions on clearing this annoying daily experience. Much appreciated!