I love my Mac’s Utilitiesfolder (Applications > Utilities)! It’s one of Apple’s hidden treasures. Tucked away inside your Mac’s Applications folder, Utilities is the land of Apple’s most dependable apps that never get to your Mac’s main stage, the Applications folder.
It’s the place where you find the guts! Where apps like Disk Utility, Terminal, Activity Monitor, Console, and Keychain Access live. Talk about your powerhouses! Alongside its brothers and sisters is a little known Mac app called Grab.
Follow These Quick Tips To Take Screenshots on Your Mac Using Grab
Grab is no longer available for macOS Mojave (10.14) and above. Instead, Apple introduced its new Screenshot App
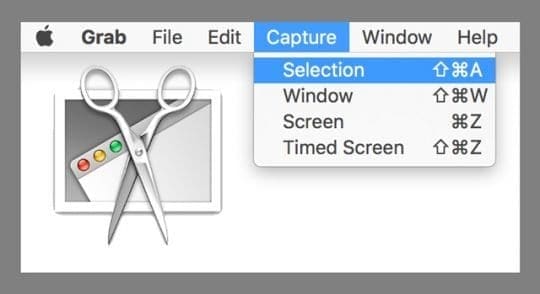
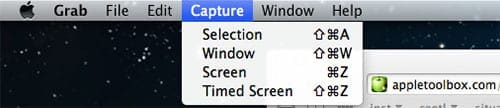
Use Grab to Capture the entire screen. Just open Grab and choose Capture > Screen
Want just a part of the screen? Choose Capture > Selection and drag the pointer across the area you want to capture, then release
Or take a screenshot of just one window by using Grab > Capture > Window
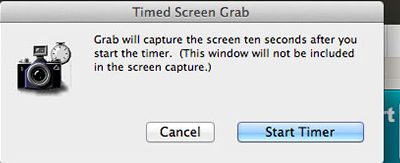
Need some time to set-up your shot? Use Choose Capture > Timed Screen and click Start Timer
Even include your pointer in the screenshot! Choose Grab > Preferences and select a pointer you like
Wanna share your screenshot immediately? Just press File > Share
Easily save your Grab screenshots by choosing File > Save, enter a name, even add a tag, then select a destination folder and select your file type (JPEG, PNG, or TIFF)
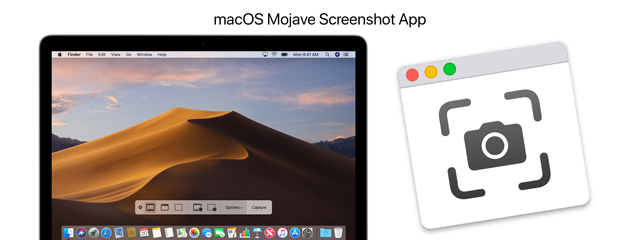
In macOS Mojave and above, the Screenshot app replaces the Grab app from earlier versions of macOS and Mac OS X.
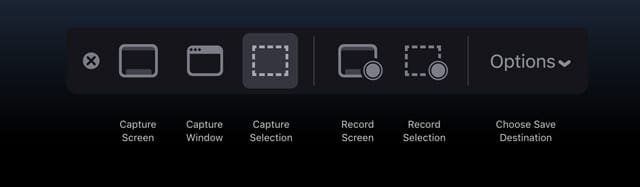
When you press Command+Space keys and type in “Grab”, it now brings up the new ScreenShot app that was introduced with macOS Mojave. You can use CMD+Shift+5 to open the new Screenshot app.
When using the new Screenshot app that replaced Grab in macOS Mojave, you will find these shortcuts very handy:
CMD+Shift+3 Takes a screenshot of the entire screen
CMD+Shift+4 lets you choose an area for the shot
CMD+Shift+4+Space keys to toggle the area selection to window selection
CMD+Shift+6 on MacBook Pros will help screenshot the Touch Bar
One important tip here is to add CTRL to any of the above key combinations when you want to save the screenshot to your clipboard.
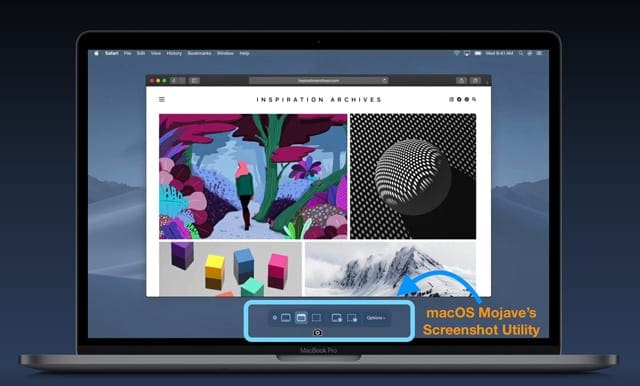
Taking Screenshots Using macOS Mojave
With macOS Mojave, Apple introduces a new way to capture screenshots. This new method (Command-Shift-5) allows you not only to record static screenshot images but also lets you to video record your screen in real-time (a feature previously available in QuickTime.)
For video, macOS Mojave offers options to either record your entire screen or record a selected portion of your screen.
And if you want to capture sound as well, you’ll need to add a plugin like Soundflower to record the internal audio.
Want Grab for macOS Mojave?
You can still use Grab in macOS Mojave, but you need to have an earlier macOS version backup available–like High Sierra or Sierra.
Also, this appears to work in macOS Mojave’s current version (10.14.2).
However, some readers had difficulties getting Grab to install and operate using macOS Mojave 10.14.2+ but were able to get it to work with earlier macOS Mojave versions.
Restore Grab from a previous macOS Time Machine backup, if available
Open Time Machine or open your backup drive’s backups.backupdb folder
If using Time Machine, go to a past snapshot from a previous macOS version like High Sierra or Sierra
If opening your backup folder, select a backup date before you updated to macOS Mojave
Locate Grab in the Utilities folder inside the Applications folder of your backup
If using Time Machine, command-click on Grab and select Restore “Grab” to… and choose your Applications > Utilities folder as the folder for the restored item
Enter your admin password, if asked
If searching your backup drive without Time Machine, locate Grab and paste it in your Mac > Applications > Utilities folder
Once complete, verify that Grab is on your Mac running macOS Mojave in the Applications > Utilities folder, open it, and conduct a test screenshot using Grab
You can also copy it from another person’s Mac running macOS Sierra or High Sierra or from their Time Machine or another backup macOS Sierra or High Sierra.
Then save it to a thumb drive and install on your Mac using macOS Mojave.
What Makes Grab So Special
Grab is an app for macOS and Mac OS X that lets you take screenshots of your screen. This little utility supports capturing the entire window, the whole screen, or only a portion of your screen.
Although other apps and utilities do similar things, Grab is a decent chap. Sure the built-in Command-Shift–3 and Command-Shift–4 shortcuts are good, but this little app is great! So why settle for just good when we can have great, all from Grab.
So here’s what Grab does
Captures part of the screen
Takes screenshots of a window on the screen
Captures a Timed Screen
This gives you 10 seconds to set-up and move any windows or open any menus, so they’re all included in your screenshot
Provides option to show or not show a pointer in screenshots
Access Preferences, then select a different pointer type or no pointer
Capture your entire screen
Save screenshots in various formats–JPEG, PNG, even TIFF
Screen captures include a small tooltip showing your pointer’s exact coordinate location on-screen
Let’s Take Some Screenshots!
Launch IT
You access Grab in various ways
Grab is in the Utilities folder under Applications
Or type /Applications/Utilities/Grab.app in Finder
Or Launchpad > Other > Grab
Open Spotlight Search and type in Grab
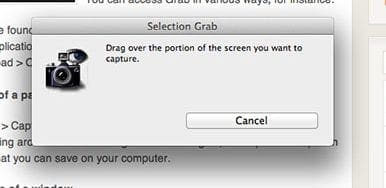
Take a picture of a part of your screen that you select
By clicking Grab > Capture > Selection or using the keyboard shortcut Shift+Command+A, you capture a specific region of your screen by dragging around. After selecting the desired area, the capture opens in a new window that you save on your computer.
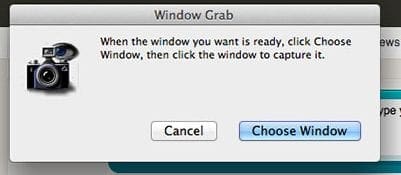
Taking a picture of a window
By clicking Grab > Capture > Window or using the keyboard shortcut Shift+Command+W, you take a picture of a window that you select. A prompt instructs you to choose the window you want to capture and click the “Choose Window.”
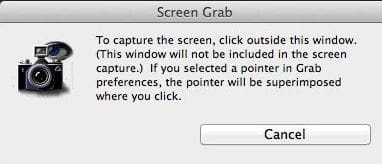
Taking a picture of the entire screen
By clicking Grap > Capture > Screen, using the keyboard shortcut Command+Z, you can take a picture of your whole screen. A prompt instructs you to click the screen when you are ready to capture your screen.
The Coolest Feature: Taking a picture of a Timer on screen
By clicking Grab > Capture > Timed Screen using the keyboard shortcut Shift+Command+Z, you start a 10-second timer, activate part of your screen, and then take a screenshot. Grab app captures ten seconds after you start the timer.
When you are ready, click the “Start Timer” button, and you have ten seconds to stage your shot before the screen is captured. After ten seconds, the entire screen is being captured. Timed Screen is usually used to take pictures of your Mac’s menu and menu options.
After taking your screenshot, you see information about it by choosing Edit > Inspector or using the keyboard shortcut Command+1. Here you find your image’s view size and depth.
All screenshots default to the TIFF format; however JPEG and PNG are options you select when saving. Then use the Preview app to see and crop or make any other changes to your screenshots.
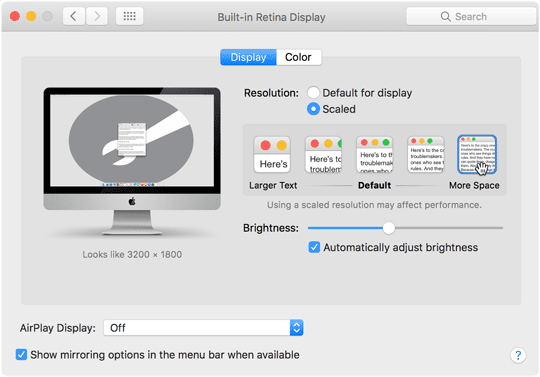
Image Quality
A lot of people want to change the image resolution. This app natively captures in the TIFF formats, but you can save any image to either TIFF, JPEG, or PNG using File > Save.
Since Grab is making screenshots of your display, its resolution is limited to your display’s resolution.
Think of it this way–it’s capturing the actual pixels on your screen. So for the best image quality, make sure you are viewing at the highest resolution your display allows.
Go to System Preferences > Displays and check that you’re getting the highest pixels available for your monitor.
Screenshot Picture Format
The default format for saving screenshots is usually PNG.
However, using Terminal, it’s easy to change that to whatever supported format you want–with simple commands. Currently, Mac support PNG, JPG, TIFF, GIF, and PDF formats. So take your pick.
Open Terminal ( /Applications/Utilities)
To change to JPEG, type in defaults write com.apple.screencapture type jpg
For TIFF, type in defaults write com.apple.screencapture type tiff
Change to GIF with defaults write com.apple.screencapture type gif
Update to PDF by typing in defaults write com.apple.screencapture type pdf
Return to PNG and type in defaults write com.apple.screencapture type png
These changes don’t take effect until you restart your Mac OR use this additional Terminal command killall SystemUIServer
Grab Not Working After macOS or OS X Update?
If this utility isn’t working after an update, your Grab preference file might have gotten corrupted. To check, open Finder, navigate to the top menu bar, and select Go > Go to Folder.
Type in the following: ~/Library/Preferences/com.apple.Grab.plist and press return.
Move that file to the Trash or onto your Desktop. Then, restart your Mac. After your computer is fully restarted, try Grab again. If it works, delete that old preference file.
If updating the preference file did not work, reinstall it using macOS Recovery and reinstall macOS or OSX.
Other Options for Screen Capture on macOS and OS X
If you just plain don’t want to use Grab, try using your keyboard commands. Press Command+Shift+3 and capture your entire screen. Command+Shift+4 performs a screen capture that allows you to select a specific area of your screen using crosshairs.
The picture files are saved as screenshots to your desktop. Don’t want to save to the desktop, just press control and the screen captures to your clipboard for easy pasting into other applications (via Edit > Paste or Command+C.)
If your keyboard shortcuts aren’t working, verify that they are enabled in your default keyboard shortcut menu. Open System Preferences, select Keyboard, then the tab Shortcuts, and look at the left panel for the Screen Shots option. Scan the right-side panel and check the boxes next to the options for screen captures.
Obsessed with tech since the early arrival of A/UX on Apple, Sudz (SK) is responsible for the original editorial direction of AppleToolBox. He is based out of Los Angeles, CA.
Sudz specializes in covering all things macOS, having reviewed dozens of OS X and macOS developments over the years.
In a former life, Sudz worked helping Fortune 100 companies with their technology and business transformation aspirations.
Big mistake to eliminate the ‘grab’ option… I am totally crushed! Also, my small hand does not stretch to press the 3 diverse, far-apart keys simultaneously. I sure hope Apple is adding the function, even post-production via internet…
When I click on record a selection This app freezes an can not remove the highlighted selection unless I restart my Mac… the does not appear as open it does not show I force quit and there is an error when I click on the app button…. “not responding”
Now that the Grab application has unfortunately disappeared after updating to Mojave, I’d like to reinstall it from somewhere, somehow. Is there any way of downloading it?
John, Looking into it to see if we can get a copy from old time machine backup and then run it on a different partition. Will keep this post updated as we explore options. Miss the plain old Grab here as well!
Thanks, and I hope that you can come up with something, for yourselves and for many others.
I did manage to transfer a copy of Grab from the hard disk out of the previous computer, but when I try to open it the small window appears to tell me that the application can’t be opened because PowerPC applications are no longer supported.
I now have Mojave 10.14.1 and I think that Grab still worked with 10.14, maybe.
I like some features of the new screen capture but I was missing the “save as…” from Grab.
Fortunately, I’ve got another mac, not upgraded to Mojave.
I just copied the Grab application from it and pasted it in the new /Applications/Utilities folder.
Now in my Dock, I have both the old Grab and the new screen capture!
HTH
Dale, Thanks for pointing that out. Not been able to locate the Grab utility on macOS Mojave either. The screenshot feature now has enhanced features that might be worth trying.
I like Grab but cannot seem to adjust the margin when I print a grab. It has no page set up box and currently only prints on one page when the grabbed image is scaled down to about half the size of the page with a lot of wasted white space.
Any ideas how to adjust Grab image margins to make the image better fit the page?
To adjust margins while printing and have access to a page set-up dialog, use the Grab function that’s built-into Preview.
It’s a little known feature that’s not often used but sounds perfect for what you want.
1. Open Preview (instead of grab)
2. Choose File > Take Screenshot
3. Make your screenshot choice from selection, window, or the entire screen
4. Take the screenshot based on your selection
5. To print, go to File > Print
6. Print Dialog opens with opens to change scale, scale to fit, paper size, and so forth
I used to love Grab, but now, every time I select the app from my dock, it switches away from my browser window to the desktop screen. So now I don’t have any choice but timed screen… and selection is not a possibility. Any suggestions?
I use Grab all the time! But after a long session of grab-and-copy (rather than saving the images), and I want to close Grab, it makes me cycle through every image to press Delete before it will shut down.
Does anybody know of a way to close it with an option of ‘delete all and quit’ or some-such?
Yes, we love Grab too! I found that by quitting Grab using the shortcut Command+Q or File > Quit, it offers an option to Delete and Quit. In my experience, none of those images are saved.
I have a few icons “stuck” at the top of the menu. When I select these, nothing happens. There is no option to delete and I cant find where they’re stored. Any ideas?
Grab does support PNG. After you capture an image using Grab, the options to save include jpeg, png, and tiff. To save as png, just select that as your file format. If you’re not seeing these option, use Terminal to change the default format. Open Terminal and type in defaults write com.apple.screencapture type png
I’m not sure what’s going on. I just did a test to make sure no new updates impacting Grab–and it’s working fine on my end. Let’s go through the steps together:
Open Grab
Once Grab is opened, navigate to the top menu
Choose Capture and then underneath Capture, choose Selection
A Grab Window Message appears instructing you to capture part of the screen
You mouse turns into a pointer–place it on the top left corner of the item you want to grab and press down
Then while pressing down, drag to the lower right corner–a red box outlines what’s captured
Once you select the area you want, release
A Grab window appears with the capture info
To save it, go to the File Menu and Select Save
If capturing a selection still isn’t working for you, try capturing a window instead and then opening up in preview to crop (if necessary).
Unless you really know your way around a Mac this is of no help. I found the Grab but can’t find any Capture or anything else. Mac is proving to be much more frustrating than the standard desk top system which has the Snipping Tool. Wish Mac could just use that – it’s so easy to find and use!!!
Hi Kadon,
I have used Grab for years and with several updates of OSX but since updating to Sierra, it has ceased to work. Like you, I get a blank screen after going through the “Selection” or “Window” process.
Make sure that you are staying within Grab when creating your screenshot. The upper left corner Menu (to the right of the Apple logo) should be the Grab app menu not Finder or another program–even the program you want to make a screenshot from.
Is there any way to save the grabbed image as a jpg rather than a tiff? Many of the people I would be sending this to don’t have the ability to view tiffs.


Big mistake to eliminate the ‘grab’ option… I am totally crushed! Also, my small hand does not stretch to press the 3 diverse, far-apart keys simultaneously. I sure hope Apple is adding the function, even post-production via internet…
I have a MacBook Pro with Catalina Versioin 10.15.5. It’s only 3.5 months old. When I try to use the new grab app my computer locks up. What to do?
When I click on record a selection This app freezes an can not remove the highlighted selection unless I restart my Mac… the does not appear as open it does not show I force quit and there is an error when I click on the app button…. “not responding”
Now that the Grab application has unfortunately disappeared after updating to Mojave, I’d like to reinstall it from somewhere, somehow. Is there any way of downloading it?
John, Looking into it to see if we can get a copy from old time machine backup and then run it on a different partition. Will keep this post updated as we explore options. Miss the plain old Grab here as well!
Thanks, and I hope that you can come up with something, for yourselves and for many others.
I did manage to transfer a copy of Grab from the hard disk out of the previous computer, but when I try to open it the small window appears to tell me that the application can’t be opened because PowerPC applications are no longer supported.
I now have Mojave 10.14.1 and I think that Grab still worked with 10.14, maybe.
They f’n deleted grab?!?! WTF?!?!
Thanks for Mojave sucking Apple. Excel is all buggy now and the one truly useful app is gone.
#MojaveSucks
I miss Grab. Looks like Mojave’s latest version deletes it. Unless I’m missing some way to get it back (which I’d love to do).
I like some features of the new screen capture but I was missing the “save as…” from Grab.
Fortunately, I’ve got another mac, not upgraded to Mojave.
I just copied the Grab application from it and pasted it in the new /Applications/Utilities folder.
Now in my Dock, I have both the old Grab and the new screen capture!
HTH
Thats a great Suggestion!! Thanks.
maybe Grab.app was in beta releases of Mojave, but it looks like the general release has removed it
Dale, Thanks for pointing that out. Not been able to locate the Grab utility on macOS Mojave either. The screenshot feature now has enhanced features that might be worth trying.
I like Grab but cannot seem to adjust the margin when I print a grab. It has no page set up box and currently only prints on one page when the grabbed image is scaled down to about half the size of the page with a lot of wasted white space.
Any ideas how to adjust Grab image margins to make the image better fit the page?
Hi Mervyn,
Thanks for the great question!
To adjust margins while printing and have access to a page set-up dialog, use the Grab function that’s built-into Preview.
It’s a little known feature that’s not often used but sounds perfect for what you want.
1. Open Preview (instead of grab)
2. Choose File > Take Screenshot
3. Make your screenshot choice from selection, window, or the entire screen
4. Take the screenshot based on your selection
5. To print, go to File > Print
6. Print Dialog opens with opens to change scale, scale to fit, paper size, and so forth
Hope that helps
And grab is going away on macOS 10.4 Mojave, to be replaced by something else
I used to love Grab, but now, every time I select the app from my dock, it switches away from my browser window to the desktop screen. So now I don’t have any choice but timed screen… and selection is not a possibility. Any suggestions?
I use Grab all the time! But after a long session of grab-and-copy (rather than saving the images), and I want to close Grab, it makes me cycle through every image to press Delete before it will shut down.
Does anybody know of a way to close it with an option of ‘delete all and quit’ or some-such?
Hi Britt,
Yes, we love Grab too! I found that by quitting Grab using the shortcut Command+Q or File > Quit, it offers an option to Delete and Quit. In my experience, none of those images are saved.
Give it a try and let us know.
Sam
I have a few icons “stuck” at the top of the menu. When I select these, nothing happens. There is no option to delete and I cant find where they’re stored. Any ideas?
Hi Dave,
We’re not sure what you mean–can you send a screenshot to info@appletoolbox.com and use the subject line “icons stuck on top menu.”
Hopefully, once we see what you’re seeing, we’ll have some ideas to help you get rid of them.
SK
Thanks for sharing useful article. I found the article useful for taking print screen on macs
Can you please update grab so that it can directly be set to save png instead of tiff files?
Hi Timonthy,
Grab does support PNG. After you capture an image using Grab, the options to save include jpeg, png, and tiff. To save as png, just select that as your file format. If you’re not seeing these option, use Terminal to change the default format. Open Terminal and type in defaults write com.apple.screencapture type png
Hope this helps!
SK
When I take a Grab Selection of something on my screen the image is all white. What am I doing wrong?
Thanks,
RM
Hi Rose,
I’m not sure what’s going on. I just did a test to make sure no new updates impacting Grab–and it’s working fine on my end. Let’s go through the steps together:
Open Grab
Once Grab is opened, navigate to the top menu
Choose Capture and then underneath Capture, choose Selection
A Grab Window Message appears instructing you to capture part of the screen
You mouse turns into a pointer–place it on the top left corner of the item you want to grab and press down
Then while pressing down, drag to the lower right corner–a red box outlines what’s captured
Once you select the area you want, release
A Grab window appears with the capture info
To save it, go to the File Menu and Select Save
If capturing a selection still isn’t working for you, try capturing a window instead and then opening up in preview to crop (if necessary).
I hope this helps you out.
Liz
Unless you really know your way around a Mac this is of no help. I found the Grab but can’t find any Capture or anything else. Mac is proving to be much more frustrating than the standard desk top system which has the Snipping Tool. Wish Mac could just use that – it’s so easy to find and use!!!
Hi Kadon,
I have used Grab for years and with several updates of OSX but since updating to Sierra, it has ceased to work. Like you, I get a blank screen after going through the “Selection” or “Window” process.
Hi Christine,
You might have a corrupted Grab preferences file. Open the Finder and click Go > Go to Folder. Type in ~/Library/Preferences/com.apple.Grab.plist
Click Go then trash that current file.
Restart your Mac and once fully restarted, try Grab again.
If that didn’t help, you may need to reinstall Grab using macOS Recovery and reinstalling macOS.
best of Luck,
Sk
When I used the selection Grab appeared OK but it did not work after that. I dragged it to the selected spot, released the mouse and nothing happened
Hi Kadon,
Make sure that you are staying within Grab when creating your screenshot. The upper left corner Menu (to the right of the Apple logo) should be the Grab app menu not Finder or another program–even the program you want to make a screenshot from.
Be Well,
Liz
Easy to use and now you really know when you take a screen-shot, not like before that i was guessing..Thank you
thank you….helpful
Is there any way to save the grabbed image as a jpg rather than a tiff? Many of the people I would be sending this to don’t have the ability to view tiffs.
very useful guide; easy to follow.
thank you 🙂
Excellent! Thank you for your help.