Today, we’re going to be covering what is, in my opinion, one of the most underutilized features available on all of your Apple devices. Seriously, I always find myself trying convince others to take advantage of this feature. And that feature is Keychain.
Keychain is a built-in password manager on all of your Apple devices. And when used properly, it can be a great tool for securing your accounts and protecting your data.
In this post, we’re going to cover the basics of using Keychain on your Apple devices. That way, you can start reaping its benefits asap.
First, let’s look at what Keychain is. As mentioned, it’s a feature on your Apple devices that manages your passwords and usernames for all of your online accounts. It can even keep track of the username and password combinations you use in certain apps, though apps have to enable this feature. So it isn’t always available.
On iOS and iPadOS devices, Keychain is available in your Settings app. Just open Settings, scroll down and tap Passwords, and you’re now accessing Keychain.
On Mac, Keychain is actually an app called Keychain Access. You can press command + spacebar, type “Keychain”, then press return to open the Keychain Access app.
With iCloud syncing (which we’ll cover further down in this post) all of these devices will be sharing your passwords with each other. So no matter what Apple device you’re using, you’ll have access to your passwords.
How does Keychain work?
On Apple devices, Keychain works automatically in certain apps and always in Safari. Just try to log into one of your accounts. If you already have a password, Keychain will ask if you want to save that password. If you’re creating an account, Keychain will recommend a new password for you. And if you’ve recently changed or are changing a password, Keychain will ask if you want to update your password.
As mentioned, iCloud syncing ensures that your passwords are saved and accessible across all of your devices. If you need to access an account on a non-Apple device (such as a gaming console or Windows computer) you can pull the password up on one of your Apple devices in the Settings or Keychain app.
Since you do need to have an Apple device nearby to log in with Keychain on non-Apple devices, I do recommend using Keychain only if you have an iPhone or iPad. Otherwise, you may have a hard time logging in to certain accounts. If you don’t have an iPhone or iPad, then I’d look into grabbing a third-party password manager like LastPass.
How to start using Keychain to manage and secure your passwords
Alright, so now that you know what Keychain is and have an idea of how it works, let’s cover how to actually start using it. Below are the steps you’ll want to follow to enable and start using this feature on your Apple devices.
Enabling Keychain and syncing it with iCloud
First, you’re going to want to enable Keychain on each of your Apple devices. To do this on iPhone or iPad, start by opening the Settings app. Then, tap your name and profile picture at the very top of the Settings app.
Next, tap iCloud. Then, tap Keychain. Then, tap the switch next to iCloud Keychain. This turns Keychain on and enables iCloud syncing all at once. This is important, because if you don’t turn this switch on then the passwords you save to your iPhone or iPad are going to be locked to that device. You won’t be able to see those passwords when you start using another Apple device, which removes a big chunk of what makes Keychain useful.
If you’re using a Mac, click the symbol in the top-left of the screen. Then, choose System Preferences. Click the Apple icon in the top-right of the System Preferences window that’s labeled Apple ID. It’s grey with an Apple logo on it.
From there, click the checkbox next to Keychain to place a check there. If there’s already a checkmark there, you can leave it alone.
And that’s it! Keychain now works on your Apple devices. Be sure that you check that it’s enabled on all of your devices, not just the first device you enable it on.
Adding existing passwords to Keychain
The first thing I recommend doing after enabling Keychain on your Apple devices is to start adding existing passwords to your Keychain. There are a few ways to do this.
The simplest way is to simply log in to your various online accounts on your Apple devices. You’ll see a prompt asking if you want to save the password. Accept the prompt, and it’ll store that password in Keychain. You won’t see this prompt again for that website.
Another way is to go into the Keychain app/settings (depending on your device) and add it manually.
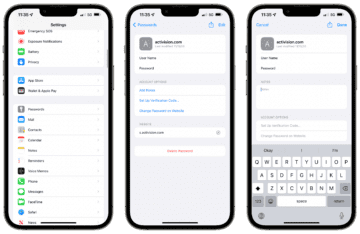
To do this on iPhone, open the Settings app and scroll down to Passwords. It’s a ways down, so don’t be surprised if you don’t see it right away. Tap it and enter your passcode or use Face ID/Touch ID to view your passwords.
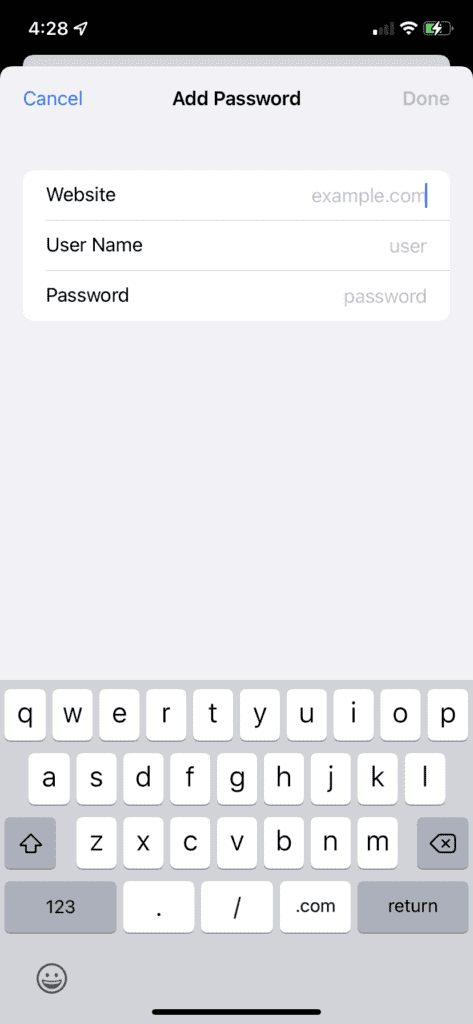
In the top-right of your password settings, you’ll see a + symbol right next to the Edit button. Tap the + symbol.
You’ll then be prompted to enter the website for the password. You actually have to enter the URL, you can’t just type “Facebook”. You have to type “Facebook.com”. Then, put in your username (which could be an email or phone number), and finally, your password.
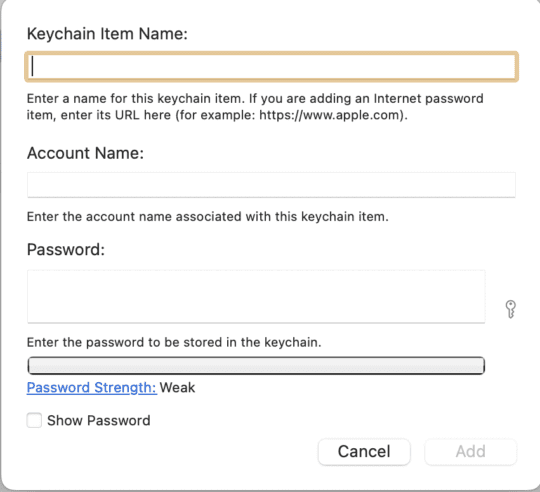
The process is very similar on a Mac device. The main difference, though, is that you’ll want to open the Keychain Access app instead of the System Preferences app. To do this, go ahead and press command + spacebar, type “Keychain”, then press return.
Instead of clicking a + button, you’re going to click the compose button, which looks like a square with a pencil hovering over it. When you do, you’ll see this popup:
Fill it in just like before. You don’t have to put in a URL on the Mac version of Keychain, but it’s recommended that you do. Otherwise, the password might not show up automatically whenever you visit the corresponding website.
And that’s it! That’s how you add existing passwords to Keychain.
Creating new passwords and accounts with Keychain
Next, we’re going to cover how you can create new passwords and accounts with Keychain. This is probably the easiest and simplest thing you can do with Keychain.
To do this, just go to a new website or app that you haven’t created an account with yet. Then, go through the “Sign Up” process for that website. You should be able to find the sign up button or link on the homepage of the website.
Then, when you do get to the “Create Username/Password” form, Keychain should automatically detect this. It doesn’t always, but 99% of the time it will.
Put in your email/phone number/desired username, then click the password form. Keychain will instantly suggest a randomized and highly secure password for you. Go ahead and use it, since Keychain will remember it for you. Using duplicate passwords or guessable passwords (combinations of words and numbers) puts your account at serious risk.
Whenever you choose to go with the suggested password from Keychain, it’ll automatically store that password in Keychain for you. And that’s it! You’ve now added a brand new account to Keychain instantly.
Removing duplicate passwords
By now, we’ve essentially covered the core features of Keychain. So now we’re going to move on to removing duplicate passwords. This is an extra feature of Keychain on mobile devices like iPad and iPhone. From what I can tell, this feature hasn’t yet been copied to Mac.
Anyway, what this feature does is highlight whenever a password is being shared between accounts. If you’re using the same password on multiple accounts, you’re far from alone. However, the risk this poses to your online safety is substantial. This means that it only takes one data leak, one successful hack, one password shared with the wrong person, and suddenly, all of your accounts are compromised.
To avoid winding up in this position, go through your duplicate passwords in Keychain and start removing them. You can find duplicate passwords easily by opening the Settings app on iPhone, scrolling down and tapping Passwords, then tapping Security Recommendations.
Here, you’ll be informed of whether a password was revealed in a data leak (it’s much more common than you might think!) and/or whether you’re reusing that password. Go through and change each of these passwords, updating them in Keychain, until all of your security recommendations are gone.
Going the extra mile with Hide My Email
Before closing out this post, I wanted to mention two other ways you can protect your online accounts with Apple-exclusive features. These work well with Keychain, and I highly recommend you use both of them whenever you can.
The first of these features is Hide My Email. For those that don’t know, Hide My Email is a feature that iCloud subscribers can use. iCloud is only a few bucks a month, less than $5 for most users. And with it you get access to a bunch of cool features, including Hide My Email.
As the name implies, Hide My Email allows you to use an email with online accounts without needing to give away your email. iCloud will generate a random email for you that forwards to your actual email.
This way, you can easily prevent spam from coming your way by pinpointing what email that spam is being sent to. Additionally, if your data is leaked in a hacking incident, hardly any of your login data will be exposed.
In other words, if you’re using a randomized email and randomized password, there won’t be anything that hackers can use to access your other accounts or even really identify you in most data leaks. So definitely use this feature if you’re subscribed to iCloud!
Using Sign In with Apple is more secure as well
Lastly, there’s Sign In with Apple. This feature is more like a substitute for Keychain rather than a concurrent feature. Some websites will allow you to “Sign In with Apple”, which means that you just use Face ID or Touch ID to log in.
You can create an account this way and then log in with just your face or fingerprint from now on for that account. And you can even choose to hide your email, which works the same was as Hide My Email. Except with Sign In with Apple, you don’t need to be subscribed to iCloud.
Another benefit of this feature is that the information shared with the website is super minimal. You don’t have to create a password, your real email isn’t shared, so you’re protected to a large extent.
My only recommendation with this feature is that you only use it if you’re a dedicated Apple user. As in, you only use an iPhone, don’t plan on changing anytime soon, and have or plan on purchasing a Mac. Because without an Apple device, signing in with Sign In with Apple can be difficult.
Keychain is one of the best and easiest ways to protect your online accounts
And that’s it! That’s everything you need to know about how to use Keychain. Again, this is one of the best features offered by Apple. It’s totally free, syncs between your devices, and can seriously help protect your accounts. If you aren’t using it, you’re making a mistake!


Write a Comment