If you have upgraded to the iPhone 11 or iPhone 11 Pro, the main reason is probably because of the camera. It’s easily the best feature of the new iPhones. In this article, we will look at different tips to help you get the most out of taking pictures and videos on your new iPhone 11.
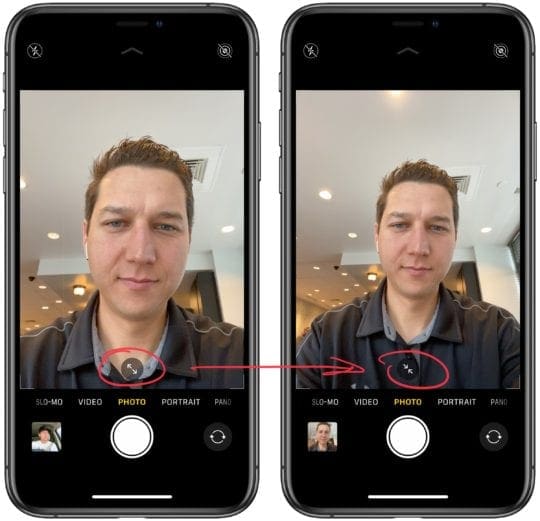
The first thing I want to look at is expanding the field of view of the front-facing camera. If you jump into taking a selfie on the iPhone 11 Pro, there are two arrows you’ll see at the bottom. If you tap those, the field of view will expand, which makes it easier to take selfies of multiple people. What else is cool is if you rotate the phone, then the field of view will expand automatically.
Night Mode Photos
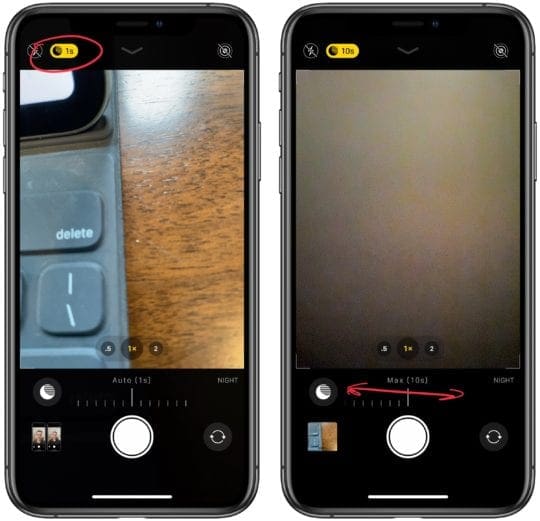
The second thing I want to look at is taking Night Mode photos. One of the things that Apple has done an excellent job of is making Night Mode something that turns on automatically when you’re in low light situations. However, you can still make some adjustments to Night Mode to take some different style shots.
When Night Mode turns on, you’ll see a yellow indication towards the top of the screen, which will show you how many seconds the shutter will stay open. Press the button, and you can scroll to select that amount of time. Night Mode will go all the way up to 30 seconds. However, you will only see that 30-second max if the phone is very stable on something like a tripod.
Setting a Timer
So in iOS 13, Apple made some changes to how you set a timer. At the top of the camera app, you will see a Chevron icon. If you tap it, you will see some options pop up towards the bottom of the screen. One of those is the timer option. Here, you can select your three-second or ten-second intervals.
Live Video Filters
Another neat option in the menu is live photo filters. If you select this option, you can see kind real-time photo and video filters applied. You can scroll through the different options. I think the best part of this feature is getting a preview of what the effects will look like in real-time.
Quick Take Video
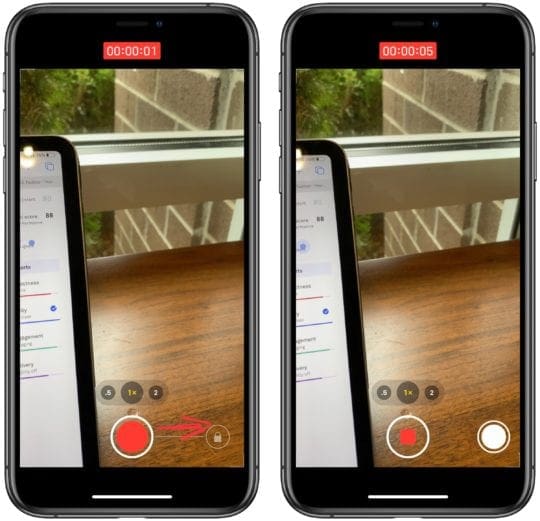
The Camer app in iOS 13 also adds a feature Apple is calling Quick Take video. When you hold the shutter button down, the iPhone will begin capturing video rather than take burst shots. I’ve enjoyed this feature because it allows you to capture video without missing a beat. Also, you can slide to the right to take a video instead of holding down the shutter button.
Slide Left for Burst Shots
Of course, you might ask, “how do I take burst photos?” In iOS 13, rather than sliding to the right, you need to hold down on the shutter button and immediately slide to the left. So it’s a little different here than an iOS 12.
For iPhone and iPads older than iPhone 11, you tap and hold the shutter button at the bottom of the Camera to take burst photos.
This change is on the iPhone 11 series only–press the shutter button and then slide it left and hold it for as long as you want to take a burst of photos. To stop taking photos, release your finger.
Change Frame Rate in Camera App
Changing the frame rate directly in the camera app has been a long-requested feature for iPhones. It’s finally here. With the integrated camera app, you used to have to dig into settings to change the frame rate of a video. Now, if you switch over to video mode, there’s the option towards the top right of the screen to finally change both resolution and frame rate directly in the camera app.
You can also change the video resolution back and forth from 4K and 1080p.


Write a Comment