All Macs except Mac Mini come with a built-in camera. These webcams are known as iSight Cameras. You may also find people referring to them as FaceTime Camera but this is an unofficial name.
The iSight camera has many uses; you can use it for more official purposes like meetings and updates using Skype or FaceTime or simply use it for some fun time with Photo Booth or other 3rd party apps. As we all know, Apple doesn’t like to mess around too much with the design and placement, so you can always find this cute little guy (camera) at the top center of the screen.
Despite being fun and useful, many users would like to disable the iSight Camera for various reasons. Privacy is one of those top reasons that push users to get rid of their cameras. Some network administrators even go on to remove the part entirely from the machines.
Luckily, there are many ways that can disable the built-in camera on your Mac or MacBook without having to physically take it off.
Let us start with a few non-technical and easy ways.
Disable Built-in MacBook Camera via Non-Technical Ways: Tape it up
Now, this might sound a little funny but it serves the purpose.
When trying to disable your camera, you actually want it to stop taking pictures or recording videos, so placing tape over the camera can achieve the end result.
Your machine might look a little patched up but the best thing about this method is that it is quick. You can put a tape on the camera when you don’t want it and simply remove it to put it back to use.
You would be surprised to know that people like Mark Zuckerberg of Facebook and James Comey, the former director at FBI are fond of this quick tip.
Note: You can also disable the microphones on your MacBooks using the same technique. The little holes at the side of the chases are the actual microphones.
Limit third-party app access via Privacy settings
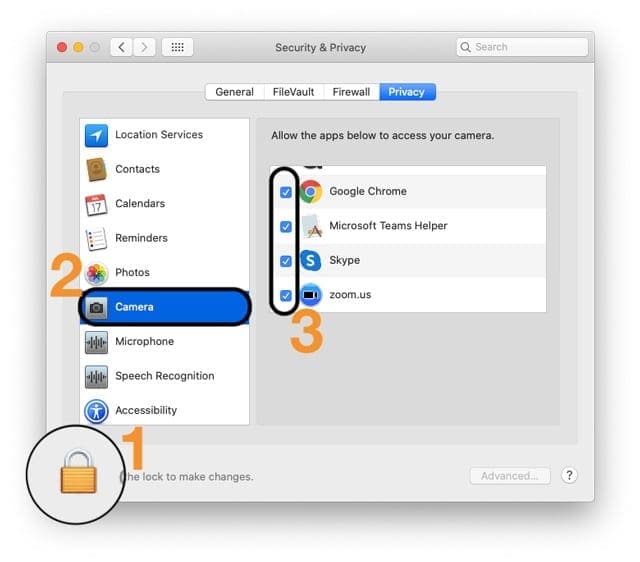
In macOS Mojave and above, you can pick and choose what apps you allow access to your camera and microphone.
Close the app that you want to use the camera with and go to System Preferences > Security & Privacy > Privacy
If you lock your Mac’s settings, tap the lock icon and enter your device password to unlock it
Tap Camera
Deselect the checkbox next to the app you do not want to give camera access to
Repeat these steps for Microphone if desired
When done, tap the lock icon to lock your settings again
Reopen the app and run a test to see if the camera works
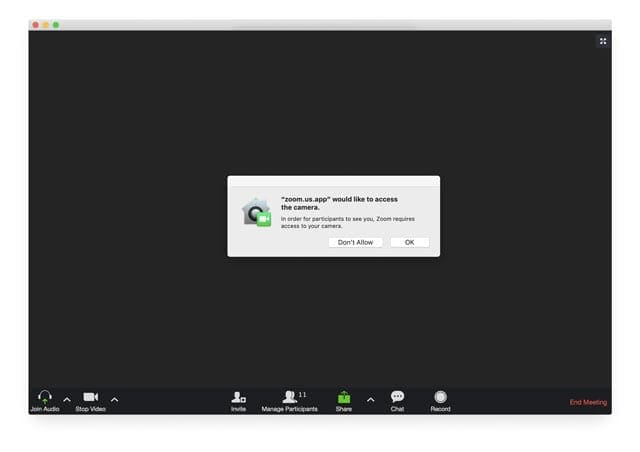
When you turn off access for an app, the next time that app tries to use your camera you see a prompt asking to turn it on again.
Be sure to tap OK to allow your conference app to access your camera & microphone
When you allow third-party apps or websites to use your camera, any information collected is governed by the app’s terms and privacy policies–not Apple’s. We recommend that you read through the privacy practices of these apps before agreeing.
Use a Proven Third-Party App
Objective-See ‘s OverSight monitors a mac’s mic and webcam, alerting the user when the internal mic is activated, or whenever a process accesses the webcam.
Malware such as OSX/FruitFly, OSX/Crisis, OSX/Mokes, and others, are known to attempt to spy on Mac users.
OverSight constantly monitors a system, alerting a user whenever the internal microphone is activated, or the built-in webcam is accessed.
Disable the Built-in MacBook Camera via Terminal Utility
Disabling the Hardware of the Camera:
Through this method, the hardware is completely disabled, which means that you won’t be able to use the camera for any purpose. No application, whether built-in or 3rd party would be able to access the camera until you reverse the process.
In this step, we will create a backup of the file. Open the terminal and type in the following command. Remember that you can skip this step if you don’t want a backup created. But it is advisable to keep a backup so that you can reverse the process in case you want to use the camera again.
mkdir /System/Library/QuickTime/ .iSightBackup
It’s now time to move the Quick Time component of the iSight camera (which enables apps to access it) to the backup folder we created in step 1. Use the following commands:
In case you want to use the camera again, just put the file QuickTimeUSBVDCDIgitizer.component in the following directory /system/library/QuickTime and reboot.
Use Safari Controls to Prevent Camera Access
If and when you upgrade your Mac/Macbook to macOS High Sierra+, you will be also able to use the new Privacy features in Safari. Apple has made some interesting upgrades to benefit the users.
Two of these updates pertain to preventing camera and microphone access to external sites. You can prevent external sites from accessing your MacBook’s camera and microphone. Setting up is quick and easy.
Open your Safari and click on the Safari Menu > Preferences.
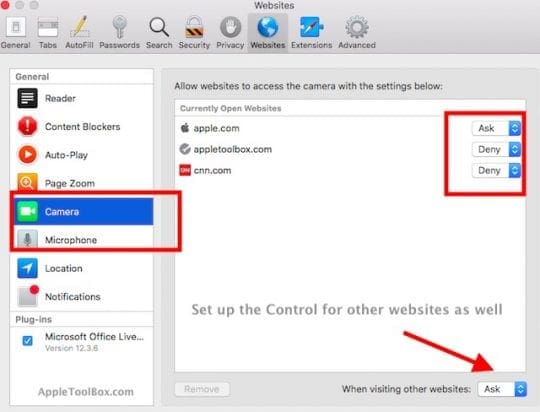
Click on the Websites tab on the top. Here you can set up permissions by each website as well as your overall browsing session.
Click on Camera on the left panel and choose ‘Deny’ to disable camera access.
Follow the steps for Microphone access too!
We hope that you find these tips helpful in protecting your Privacy. Please feel free to share the article with your fellow MacBook users!
How do you get around 1400$ MacbookAir ¨WORTHLESSITHAT¨ cannot enable a build in camera unless with a photo/video or image app? Nonsense! Under which GDRP Im forced to install an app, save my images and photos/videos into ¨whatever¨ server and downloaded into my device when all I want is to keep it all ¨personal to my öwned¨ device¨? What is the right to preserve confidentially. Im personally giving up these ¨smart¨concepts and even ¨smartphones¨. Its seams to be only ¨smart¨ for whom your personal data is convenient to access and should not be solely blamed to hacking.
Hello, i’ve tried to disable through the camera through the “privacy” section and had no camera option. But I found another way!!
Go into “Facetime” and it will give you the option to disable the mac camera to another camera. Even Apple support couldn’t figure it out.
Hi, can anyone help me reverse the process of removing the component file? I am unable to just drag and drop it, and I do not know how to use terminal.
The easiest way, that also makes it very quick to re-enable.
Step 1: Cut a 5mm x 5mm piece of cardboard, paper or any other “light-blocking device”.
Step 2: Cut a piece of scotch tape in half, about 5mm x 2-3 cm
Step 3: Fold over one end of the scotch tape, about 3mm of at least one end, for easy removal.
Step 3: Attach the light-blocking device to the adhesive side of the scotch tape, approximately in the middle. This step is critical, take extra precautions to do this correctly. Calipers and metric ruler are optional.
Step 4: Attach light-blocking device over iSight camera on your monitor.
Although this may sound fool proof, hackers are smart, so I advise that you test to make sure it is working by opening the “Photo Booth.app” testing utility program and make sure that the camera is in fact inoperable.
Should you decide you want to re-enable the camera, simply use the folded end of the scotch tape to remove the light-blocking device. Conveniently store to one side of the camera.
(FYI the light-blocking device ingeniously doubles as an adhesive blocker, to ensure the iSight camera is not affected by the Scotch Tape’s glue.)
I cannot for the life of me understand why your website was flagged. I am glad I did ‘proceed anyway’ because you provided a solution to a nagging problem. Thank you


How do you get around 1400$ MacbookAir ¨WORTHLESSITHAT¨ cannot enable a build in camera unless with a photo/video or image app? Nonsense! Under which GDRP Im forced to install an app, save my images and photos/videos into ¨whatever¨ server and downloaded into my device when all I want is to keep it all ¨personal to my öwned¨ device¨? What is the right to preserve confidentially. Im personally giving up these ¨smart¨concepts and even ¨smartphones¨. Its seams to be only ¨smart¨ for whom your personal data is convenient to access and should not be solely blamed to hacking.
Hello, i’ve tried to disable through the camera through the “privacy” section and had no camera option. But I found another way!!
Go into “Facetime” and it will give you the option to disable the mac camera to another camera. Even Apple support couldn’t figure it out.
Hi, can anyone help me reverse the process of removing the component file? I am unable to just drag and drop it, and I do not know how to use terminal.
Thanks,
Apple should have an easy toggle!!!!!
The easiest way, that also makes it very quick to re-enable.
Step 1: Cut a 5mm x 5mm piece of cardboard, paper or any other “light-blocking device”.
Step 2: Cut a piece of scotch tape in half, about 5mm x 2-3 cm
Step 3: Fold over one end of the scotch tape, about 3mm of at least one end, for easy removal.
Step 3: Attach the light-blocking device to the adhesive side of the scotch tape, approximately in the middle. This step is critical, take extra precautions to do this correctly. Calipers and metric ruler are optional.
Step 4: Attach light-blocking device over iSight camera on your monitor.
Although this may sound fool proof, hackers are smart, so I advise that you test to make sure it is working by opening the “Photo Booth.app” testing utility program and make sure that the camera is in fact inoperable.
Should you decide you want to re-enable the camera, simply use the folded end of the scotch tape to remove the light-blocking device. Conveniently store to one side of the camera.
(FYI the light-blocking device ingeniously doubles as an adhesive blocker, to ensure the iSight camera is not affected by the Scotch Tape’s glue.)
QuickTimeUSBVDCDigitizer.component is not in my system, and never had have. The only one is QuickTimeVDCDigitizer.component
ok
This does not work with the new System folder security features in (High) Sierra. You cannot modify System folders now, even with sudo or root user.
Scott, Thanks for the update. We will explore and see if there is anything else tht can be done to achieve the results in H.Sierra.
FYI. this is also not working in Sierra (10.12.6), not just High Sierra.
Nope. Nothing’s working!! And I don’t HAVE any tape!!
I cannot for the life of me understand why your website was flagged. I am glad I did ‘proceed anyway’ because you provided a solution to a nagging problem. Thank you
Thanks for information. I worry about security so having these steps is good for me.