The continuity features have come a long way since its release with iOS 8. New features have made their way into the Apple ecosystem. In this article, we will focus on how you can use the continuity camera features with macOS Mojave and iOS 12.
In particular, we focus on steps you can take when you find the continuity camera feature not working on your MacBook.
This feature is available to you via your MacBook and makes it easy to trigger the camera on your iPhone or iPad to take a quick photo or scan a document upon which the photo/document is immediately available on the MacBook.
No need to Airdrop, No e-mailing the photo from your iPhone to your MacBook and no waiting for the photo to sync via iCloud. As soon as the camera clicks on your iDevice, the image is immediately made available on your MacBook.
You can use this feature directly on the Finder or any Apps such as KeyNote.
You can trigger the camera action via your MacBook.
Why Use the Continuity Camera Feature with your Apple Devices
There are times when you want to integrate your iPhone photos via adding in new pictures or scanned documents to your keynote presentation on your MacBook.
The new continuity camera feature on your MacBook makes it super easy and cool to incorporate this functionality. Here is how to get going!
Requirements for using Apple’s Continuity Camera Feature
The basic requirement for using this feature is that your MacBook must be on macOS Mojave and your device must be on iOS 12 or higher.
Both the Apple devices must be using the same Apple ID, and your Apple id is setup with 2FA (Two –Factor Authentication). This feature also requires that your Bluetooth is working fine on your Apple devices.
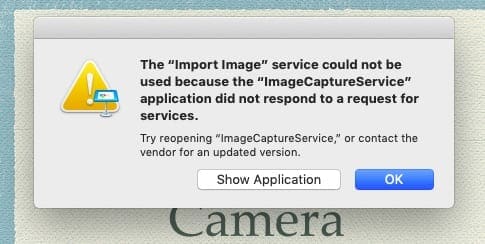
Continuity Camera Stuck when Clicking on ‘Import Image’
This message is an annoying problem with this feature when it doesn’t cooperate. When you click on the ‘Import Image’ on your MacBook to trigger the continuity camera, it simply freezes and doesn’t respond.
Sometimes, the force quitting doesn’t work either. You will need to open up ‘Activity Monitor’ and Kill the App before you can proceed further.
Continuity Camera Feature Not Working, How-To Fix
In this section, we will look at some of the potential reasons that might cause the continuity camera not to work and provide some helpful tips. Please check each of these steps until the issue is resolved on your device.
Checking Apple ID on connected devices
On your MacBook, open the AppStore app.
Click on Store on the top menu and choose ‘View My Account’.
Make a note of the Apple ID.
Now on your iPhone, tap on Settings > Your Account name and check the Apple ID.
Make sure you are using the same Apple ID on both your devices.
Check the connected Wi-Fi Network on both the devices
Make sure to connect to the same Wi-Fi network on both the devices and then test.
Check if your Handoff feature is turned ON on your MacBook
Since basic continuity requires handoff, you can tick this.
On your MacBook, click on > System Preferences > General.
Scroll down and turn on. Allow Handoff between this Mac and Connected iCloud devices.
Note – This is probably not a required setting for this feature since we have turned off Handoff and seen the continuity camera feature work. We just want to make sure we covered all the bases
Turn Handoff off and then back on
Try deselecting and then reselecting Handoff on your Mac and see if this makes a difference
The Bluetooth Setting on the MacBook appears to be most sensitive to the continuity camera feature
Use the steps in this section to Reset the MacBook Bluetooth.
Turn OFF and ON the Bluetooth on your MacBook and iPhone a few times.
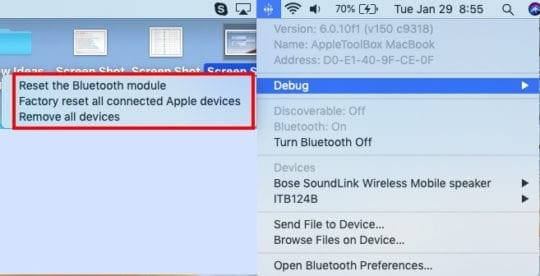
Press and hold Shift + Option keys and click the Bluetooth icon simultaneously.
Select Debug->Remove all devices.
Click “Remove” in the pop-up box.
Now your Mac forgets all paired devices & accessories.
Next step is to Reset the Bluetooth module on your MacBook.
Press down the Option and Shift keys together on your MacBook and at the same time click on the Bluetooth icon at the top of the screen.
Next Select Debug > Reset The Bluetooth Module
Open up Finder App on your MacBook and Click on Go->Go to Folder.
Enter ~/Library/Preferences in the pop-up box and then click “Go.”
Scroll down to find com.apple.bluetooth.plist (the program you have problems with)
Drag it into Trash Folder.
Restart your Mac via Apple menu->Restart.
Restart your iPhone or iPad.
Make sure they are connected via Bluetooth and connected to the same Wi-Fi.
Now you can test out the Continuity Camera Feature.
You can test it out using the Finder App itself.
Right-Click and choose ‘Import from iPhone or iPad’ to start the process.
Next, Click on ‘Take Photo’ or ‘Scan Document’ to begin the process.
If you have done the steps above, you should see these available options as opposed to Grayed Out Options.
Once you click on the ‘Take Photo’ it will trigger the connected iPhone camera.
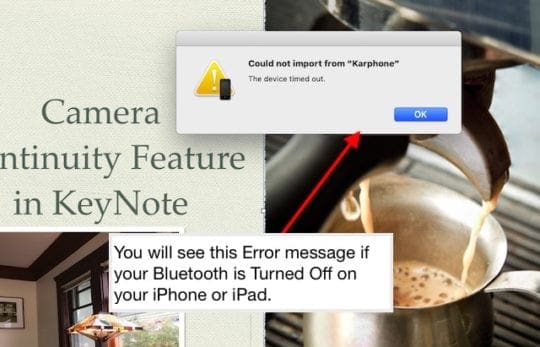
If you see a message saying ‘Could Not Import, Device timed out’; this means that your Bluetooth is switched off on your iDevice and not connected to your MacBook.
Once you turn it on and it is paired with your MacBook, it should work without issues.
Summary
We must admit that the Continuity camera feature is a little finicky much like some of the other continuity features.
When it works, it works like a charm, and then there are times when you cant get it to work at all, and it becomes super annoying.
We hope that our troubleshooting steps provide some direction and guidance to overcome the challenges with the continuity camera feature.
Obsessed with tech since the early arrival of A/UX on Apple, Sudz (SK) is responsible for the original editorial direction of AppleToolBox. He is based out of Los Angeles, CA.
Sudz specializes in covering all things macOS, having reviewed dozens of OS X and macOS developments over the years.
In a former life, Sudz worked helping Fortune 100 companies with their technology and business transformation aspirations.
There is another scenario that needs to be considered. That is if a person is using a MacMini which has no existing camera.
Due to privacy concerns with Macs that don’t have any other cameras available, you don’t want camera applications to start streaming from their phone simply because it is the only camera on the system. To indicate a level of intent to use the continuity camera before it is published for applications to use, the phone must either:
(A) be plugged into the Mac with a wired connection (e.g. lightning to USB cable on the Mac), or
(B) satisfy the wireless Automatic Camera Selection requirements:
– landscape left or landscape right orientation, aligned with horizon
– locked, screen off
– motionless (not handheld)
– both front/back cameras unobstructed
– nearby “strong” bluetooth signal strength
Macs which have a built-in or USB camera available will publish Continuity Camera devices for manual selection outside of those requirements, but will only automatically switch between cameras (in supporting applications) based on meeting those requirements.
I have had this issue for quite a while and have tried to research everywhere with no luck… until I came across this page! I went through all the steps and lo and behold, the continuity feature now works again! even Apple community couldn’t figure it out
Hi,
there is also a handoff option on the iphone which in my case was switched off and continuity therefore not available on the MacBook. Maybe this can be added in the article above as a check. To be found on the iphone: settings/general/handoff


There is another scenario that needs to be considered. That is if a person is using a MacMini which has no existing camera.
Due to privacy concerns with Macs that don’t have any other cameras available, you don’t want camera applications to start streaming from their phone simply because it is the only camera on the system. To indicate a level of intent to use the continuity camera before it is published for applications to use, the phone must either:
(A) be plugged into the Mac with a wired connection (e.g. lightning to USB cable on the Mac), or
(B) satisfy the wireless Automatic Camera Selection requirements:
– landscape left or landscape right orientation, aligned with horizon
– locked, screen off
– motionless (not handheld)
– both front/back cameras unobstructed
– nearby “strong” bluetooth signal strength
Macs which have a built-in or USB camera available will publish Continuity Camera devices for manual selection outside of those requirements, but will only automatically switch between cameras (in supporting applications) based on meeting those requirements.
I have had this issue for quite a while and have tried to research everywhere with no luck… until I came across this page! I went through all the steps and lo and behold, the continuity feature now works again! even Apple community couldn’t figure it out
thanks a lot!
it took me a while, but yes this actually worked for me. thanks! i was having the exact problem mentioned.
Hi,
there is also a handoff option on the iphone which in my case was switched off and continuity therefore not available on the MacBook. Maybe this can be added in the article above as a check. To be found on the iphone: settings/general/handoff
Thanks,
C
Great article. It worked for me! I phoned Apple and they tried all sorts but never reset the Bluetooth on the Mac. This definitely worked!!
I did try it all. but no result it all ended up being the same.
Thanks for the tips!
Sadly, I didn’t work out for me.
And so you know, what fixed my issues with Handoff was to unselect and then reselect the Handoff option on my Mac!