Replacing or upgrading the hard drive on your Mac can be a transformative experience, breathing new life into your machine with increased storage or speed. However, one of the critical steps in this process is installing macOS on the new hard drive. Whether you’re a seasoned Mac user or undertaking this for the first time, the process can seem daunting.
But fear not! In this guide, we will walk you through each step of the installation process, from preparing your Mac for the hard drive swap to the final touches of setting up your new macOS. This article aims to provide clear, concise, and easy-to-follow instructions to ensure a smooth and successful installation of macOS on your new hard drive.
Before installing macOS or OS X on your new hard drive, it may be necessary to reformat it. This process will erase all the contents of the drive. To avoid losing any valuable data, it’s important to export or back up any existing data on the hard drive before proceeding.
The Disk Utility application in macOS or OS X is a versatile tool that not only formats internal drives but also external ones. Refurbishing your hard drive using Disk Utility is a straightforward process. If your primary Mac is not operational, you can still format the new hard drive by connecting it to a secondary Mac using an external hard drive enclosure or caddy. If you have access to a functioning Mac, you can also perform this formatting step as part of the macOS or OS X installation process, directly from the Utilities menu.
Connect your new hard drive to your Mac.
Open the Disk Utility app on your Mac.
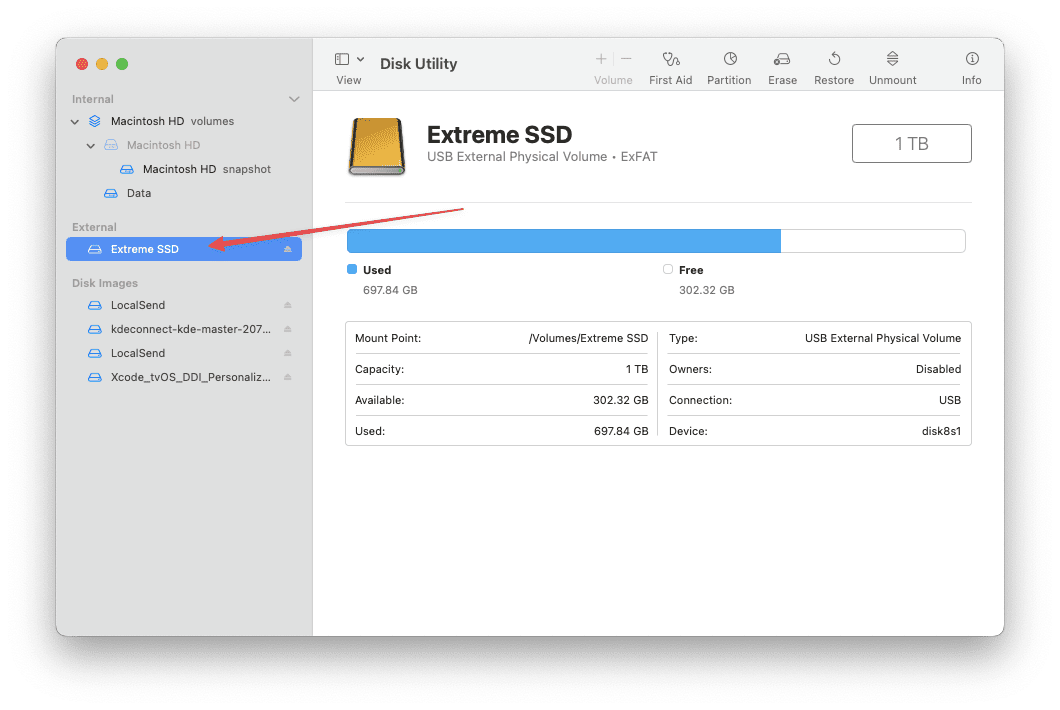
Select the new hard drive from the list of options in the sidebar on the left.
In the event that you don’t see the hard drive listed, click the View button in the Menu Bar.
From the drop-down menu that appears, highlight and select Show All Devices.
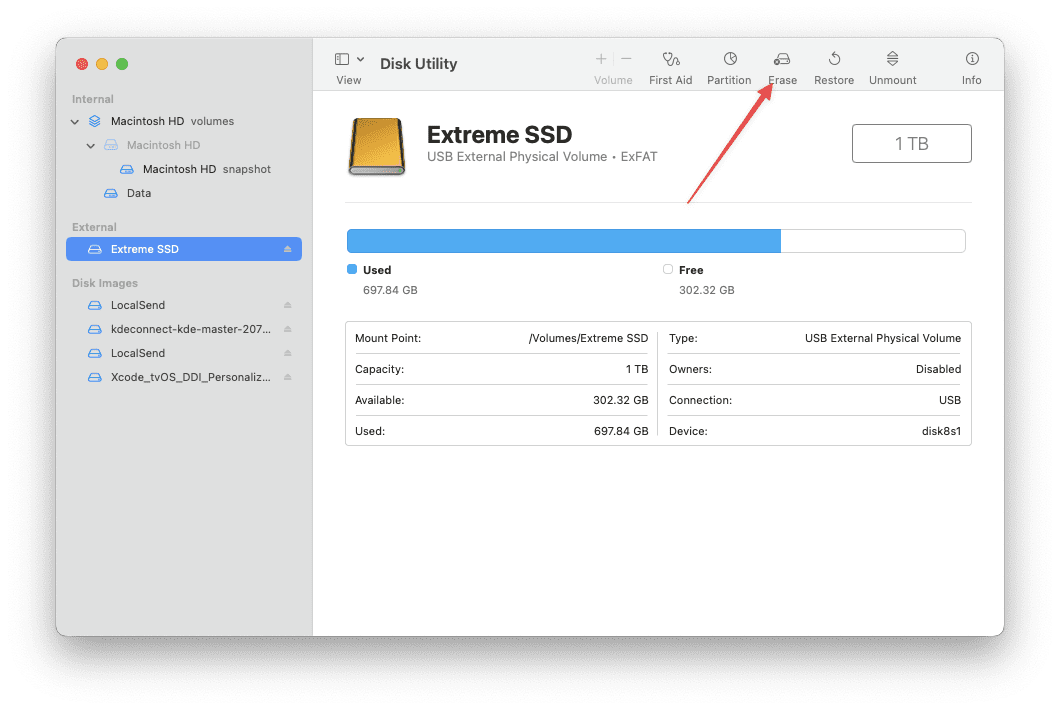
With the new hard drive selected, click the Erase button in the top right corner.
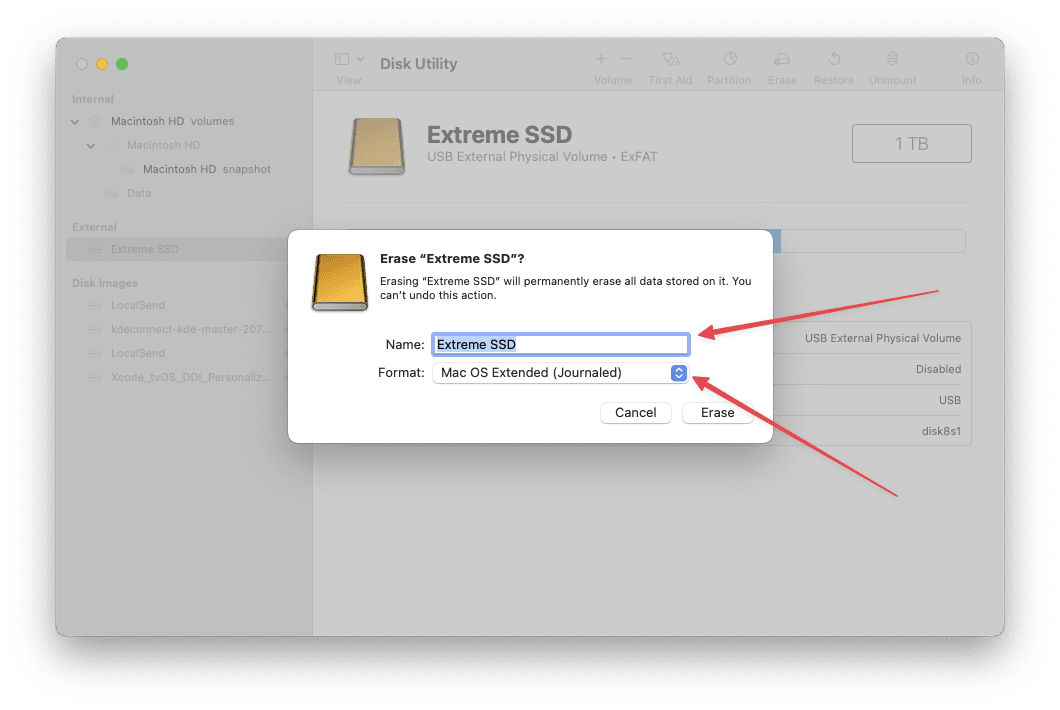
In the dialog box, you’ll need to enter a few details:
Name: This will be the name of your hard drive after it’s been erased
Format: Choose a file system format. You can choose APFS or Mac OS Extended (Journaled), as recommended by Disk Utility. If you plan to use the drive with both Mac and PC, you can choose FAT32 or exFAT, but be aware of their limitations
Scheme: Choose GUID Partition Map.
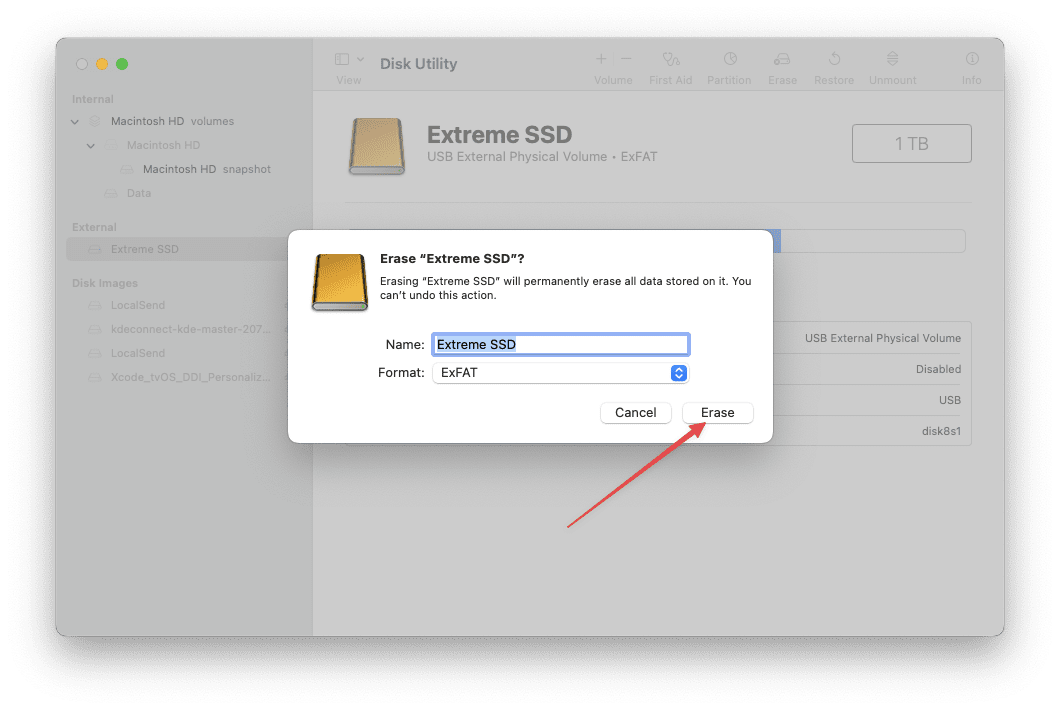
Click the Erase button to start the process. This will delete all data on your hard drive and reformat it with the settings you’ve chosen.
Wait for the process to complete. Disk Utility will notify you when the erase process is complete.
Remember to ensure that you’re erasing the correct drive, as this process will delete all data on the hard drive. If you’re reformatting your startup disk, you will need to do so from macOS Recovery.
Install macOS using Internet Recovery Mode
Internet Recovery mode can take a long time to start, depending on your connection.
The easiest method to install macOS or OS X on a new hard drive involves utilizing Internet Recovery Mode. This feature is accessible exclusively on Apple computers manufactured post-2009, which initially operated on OS X Lion or a more recent version.
Internet Recovery Mode downloads the latest compatible version of macOS or OS X over the Internet and installs it to your hard drive. The entire process may take several hours depending on the quality of your Internet connection.
How do I use Internet Recovery Mode to install macOS or OS X on my hard drive?
Make sure your Mac is connected to the internet. This can be a wired or wireless connection. If you’re using Wi-Fi, you might need to select a network and enter a password.
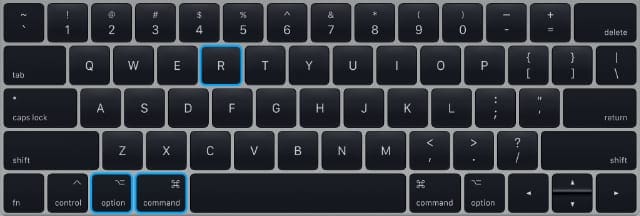
Power off your Mac from the menu or by holding the power button.
Briefly press the power button, then immediately hold the command+option+R keys while your Mac boots up.
Release the keys when a spinning globe appears onscreen.
Connect your Mac to the Internet by choosing a Wi-Fi network.
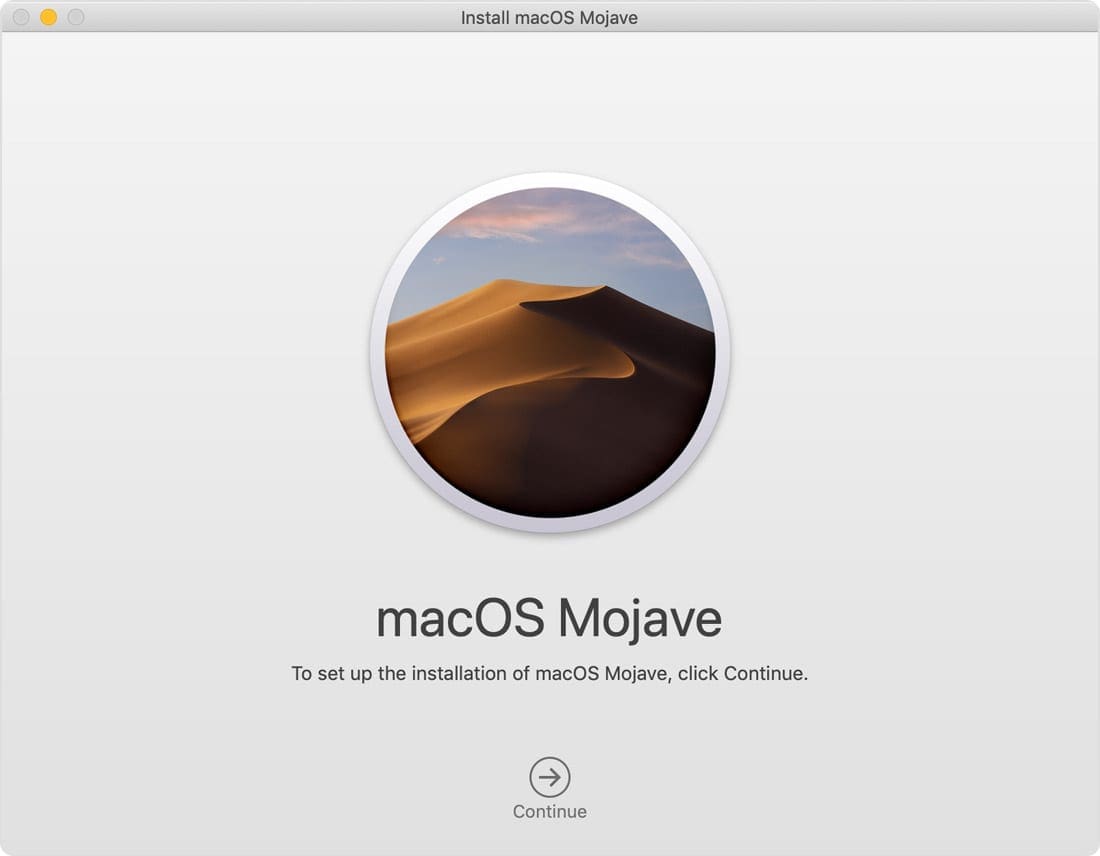
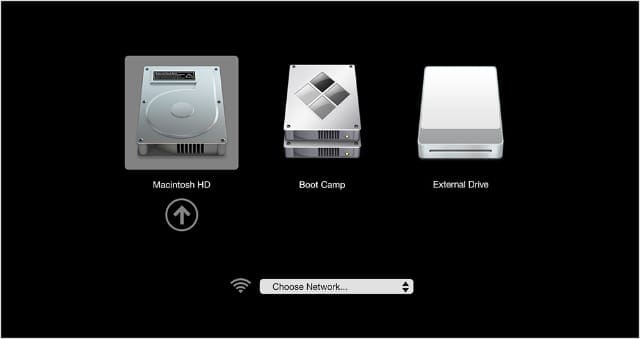
After a short while, the macOS Utilities window should appear.
Click ‘Install’ and select your hard drive as the destination.
Your Mac downloads the latest compatible version of macOS or OS X over the Internet and installs it on your hard drive. It may take some time.
Follow the onscreen prompts to complete your macOS or OS X installation.
Remember, the version of macOS that gets installed depends on the key combination you used to start up from macOS Recovery. Command + Option + R installs the latest macOS that is compatible with your Mac, while Command + Option + Shift + R reinstalls the macOS that came with your Mac, or the closest version still available[1][7].
If you’re using a Mac with Apple silicon, the process is slightly different. You need to press and hold the power button until you see “Loading startup options”, then select “Options” and click “Continue”.
Please note that Internet Recovery requires an internet connection and the process can take longer than a local recovery.
Create a Bootable USB Installer for macOS
If Internet Recovery Mode is not an option for you, an alternative is to create a bootable USB installer. This involves using a USB flash drive, onto which you load a specific macOS or OS X installer. By booting your Mac from this USB drive, you can install the operating system onto your Mac’s hard drive.
Requirements
USB Drive Preparation: The USB flash drive you intend to use should have at least 12 GB of available storage space. Be aware that the process will erase all existing data on the drive, so back up any important files beforehand.
Access to a Working Mac: You’ll need access to a functional Mac to prepare your bootable USB drive. This step involves using some basic Terminal commands. If you don’t have access to a working Mac, consider borrowing one or scheduling an appointment at your nearest Apple Store.
How to Find What Versions of macOS Are Compatible With My Mac
When it comes to upgrading or reinstalling macOS, one of the key considerations is compatibility. Not every version of macOS is compatible with every Mac, and installing the wrong version can lead to performance issues or even prevent your Mac from functioning properly.
The compatibility of macOS versions with your Mac depends on the model and year of your Mac. Here are some general guidelines:
macOS Sonoma (14.x): This version is compatible with iMac Pro (2017), MacBook Air (2018 and later), MacBook Pro (2018 and later), Mac Mini (2018 and later), Mac Pro (2019 and later), iMac (2019 and later), and Mac Studio (2022 and later).
macOS Ventura (13.x): This version is compatible with Mac models dating back to 2013, including certain MacBook Air, MacBook Pro, and iMac models.
macOS Monterey (12.x): This version is also compatible with Mac models dating back to 2013, including certain MacBook Air, MacBook Pro, and iMac models.
macOS Big Sur (11.x): This version is compatible with most Mac models introduced in 2012 or later.
macOS Catalina (10.15): This version is compatible with MacBook (2015 or later), MacBook Air (2012 or later), MacBook Pro (2012 or later), Mac mini (2012 or later), iMac (2012 or later), iMac Pro (all models), and Mac Pro (2013 or later).
macOS Mojave (10.14): This version is compatible with MacBook (2015 or later), MacBook Air (2012 or later), MacBook Pro (2012 or later), Mac mini (2012 or later), iMac (2012 or later), iMac Pro (all models), and Mac Pro introduced in 2013, plus mid-2010 or mid-2012 models with a recommended Metal-capable graphics card.
macOS High Sierra (10.13) and macOS Sierra (10.12): These versions are compatible with MacBook (late 2009 or later), MacBook Air (late 2010 or later), MacBook Pro (mid 2010 or later), Mac mini (mid 2010 or later), iMac (late 2009 or later), and Mac Pro (mid 2010 or later).
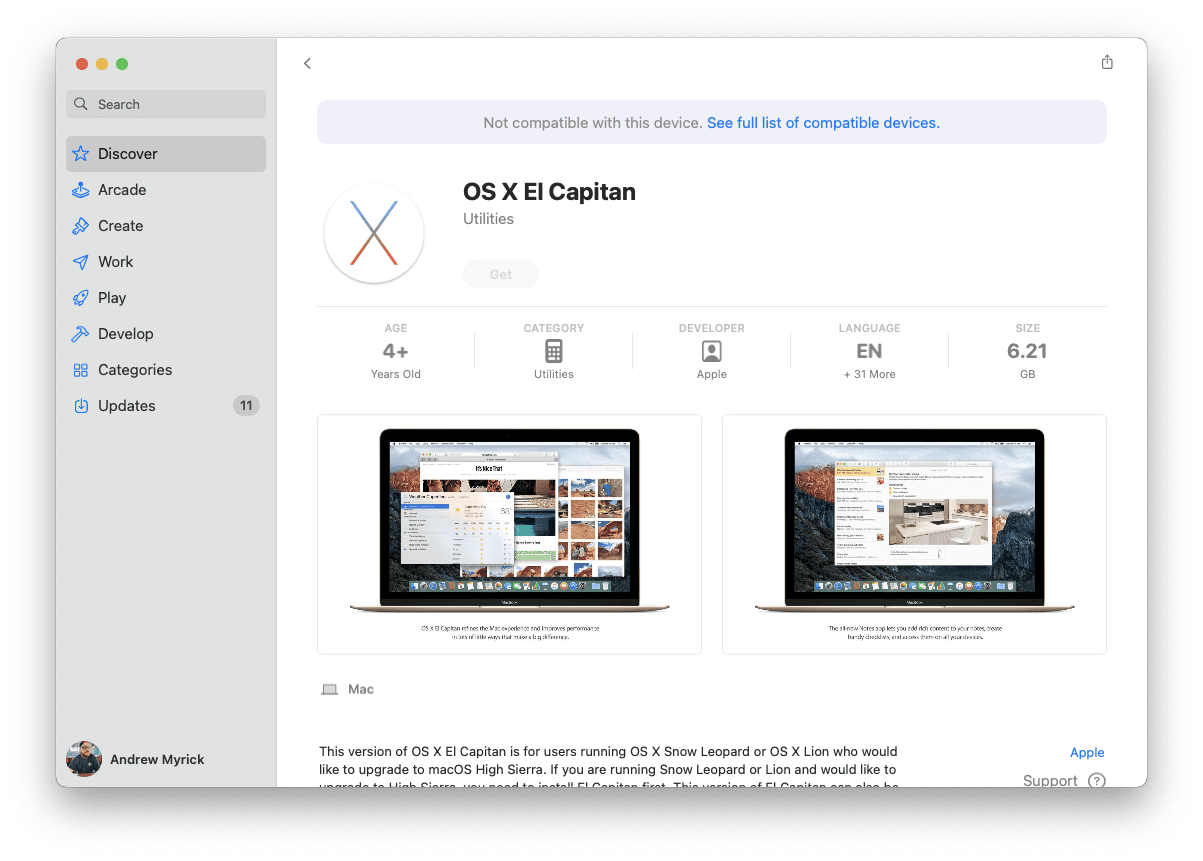
OS X El Capitan (10.11): This version is compatible with MacBook (2009 or later), plus mid-2010 or later models of MacBook Air, MacBook Pro, Mac mini, iMac, and Mac Pro.
To check the exact model and year of your Mac, select the Apple menu > About This Mac. Your Mac model and year will appear in the window that opens. Please note that these are general guidelines and there may be exceptions. Always check the specific compatibility information for each macOS version before upgrading.
How do I create a bootable USB Installer?
Creating a bootable USB installer for macOS involves several steps, including obtaining the macOS installer, preparing the USB drive, and using Terminal to create the bootable installer. Here’s a step-by-step guide:
Obtain the macOS Installer: You can download the macOS installer from the App Store or System Preferences > Software Update. The installer will be stored in the Applications folder as an app named “Install macOS X” (where X is the version of macOS).
Prepare the USB Drive: Plug your USB flash drive into your Mac. It should have at least 14GB of available storage and be formatted as Mac OS Extended. You can use Disk Utility to format the drive if necessary
Use Terminal to Create the Bootable Installer: Open Terminal, which is in the Utilities folder of your Applications folder. Type or paste the appropriate command for your macOS version into Terminal, replacing “MyVolume” with the name of your USB drive, then press Return to enter the command.
The command should look something like this, but replace “X” with the name of the macOS version you’re installing. For example, if you’re installing macOS Big Sur, the command would be:
sudo /Applications/Install\ macOS\ Big Sur.app/Contents/Resources/createinstallmedia –volume /Volumes/MyVolume
Please note that the createinstallmedia command erases anything on your external disk, so make sure to back up any important data before you start.
How do I use a bootable USB installer to install macOS or OS X?
Embarking on the task of installing macOS on a new hard drive can initially seem like a technical challenge, especially for those who may not be familiar with the intricacies of Mac hardware and software interactions. A bootable USB installer stands as a reliable and versatile tool in this endeavor, providing a straightforward solution for installing macOS, particularly when traditional methods like Internet Recovery are not feasible.
Connect the bootable USB installer to your target Mac.
Power off your Mac from the menu or by holding the power button.
Briefly press the power button, then immediately hold the option key while your Mac boots up.
Release the key when a startup disk selection screen appears.
Choose to boot up from your USB installer.
After a short while, the macOS Utilities window should appear.
Click ‘Install macOS’ and select your hard drive as the destination.
Your Mac installs macOS or OS X from the USB installer. It may take some time.
Choose to boot up from your external USB installer from the selection screen.
Contact Apple Support
Photo by Trac Vu on Unsplash
It’s time to contact Apple Support if you’ve tried the standard installation methods, such as using a bootable USB installer or Internet Recovery, and still encounter errors. Common issues might include installation errors, the inability of the Mac to recognize the new hard drive, or software compatibility problems.
Preparing for the Call or Visit
Before reaching out to Apple Support, it’s essential to have certain information at hand:
Mac Model and Year: Know the specific model and year of your Mac. This information helps the support team to provide model-specific advice.
Hard Drive Details: Be ready to describe the new hard drive, including its brand, capacity, and how it was formatted.
Error Messages: Note any error messages that appear during installation. If possible, take a screenshot or write down the exact wording.
Previous Steps Taken: Be prepared to explain the steps you’ve already tried. This prevents repeating procedures and aids in diagnosing the issue more efficiently.
There are several ways to get in touch with Apple Support:
Online Support: Visit the Apple Support website, where you can chat with a support representative or email your query.
Phone Call: Call the Apple Support hotline. Phone support is often immediate and can be very helpful for quick troubleshooting.
In-Person Appointment: For hardware-related issues, it might be best to visit an Apple Store or an authorized Apple service provider. You can book an appointment through the Apple Support website.
Apple Support is known for its customer service and technical expertise. The support team will likely guide you through a series of troubleshooting steps. If the issue is complex, they might advise sending in your Mac for repair or visiting a store for in-person assistance.
Conclusion
Upgrading your Mac with a new hard drive and installing macOS might initially seem like a challenging task, but with the right guidance, it can be a rewarding and straightforward process. Throughout this article, we’ve covered everything from the initial preparations to the actual installation and setup of macOS. The key to a successful installation lies in careful preparation and following the steps methodically.
Remember to back up your data, have a stable internet connection, and ensure your Mac is compatible with the version of macOS you intend to install. With these considerations in mind, you are now equipped to breathe new life into your Mac with a fresh installation of macOS on your new hard drive. This upgrade not only enhances the performance of your machine but also extends its lifespan, making it a worthwhile endeavor for any Mac user.
Andrew Myrick is a freelance writer based on the East Coast of the US. He enjoys everything to do with technology, including tablets, smartphones, and everything in between. Perhaps his favorite past-time is having a never-ending supply of different keyboards and gaming handhelds that end up collecting more dust than the consoles that are being emulated.
Hi. I have a vintage Macbook Pro 1.1 A1150 laptop with a completely blank hard drive.
I have followed your step by step instructions without success.
Can you help?
I have installed a new SS D Dr. on my mid 2009 MacBook Pro. I have the original macOS X install disk when I put it into the computer the icon for the disk shows up I click the arrow and nothing happens it seems to freeze is this something you can help me out with. Thank you very much
I have been able to boot to Internet Recovery and also create a bootable usb to install Big Sur. However, I keep getting an error that says support.Apple.com/Mac/startup -1008f. I get this regardless of the method I use. This is not a new HD. But when I was doing a format to install or reinstall OS, which I have done so may times, I am not sure if I deleted the wrong partition. Is there a way to boot to usb disk utility and partition or check them? Any help would be appreciated. This is a 2019 model Intel 13” MacBook Pro. Thx
After getting the spinning globe, it was possible to connect to my WiFi
Then I got to a menu and chose: “Install MacOS”
Thereafter I had to connect my Book with an ethernet cable; WIFI was no longer accessible
Installation is ongoing now, I don’t know if it will succeed
ALSO : do format you SSD PRIOR to attempting the installation. If you don’t, the SSD will not be detected. I had to backtrack to DISK UTILITY and format my brand new virgin SSD. Then , back to “Install MacOS”, my SSD was detected.
I replaced hard drive on Mac Pro and I am having a problem following steps to install operating system.
I have a late 2013 I have Catalina os 10.15.3 and Big Sur system drives
I can’t get either of these steps to work, any suggestions?
Type sudo into Terminal, including the whitespace at the end.
Open Finder and go to the ‘Install macOS’ app in your Applications folder.
Apple has LOCKED me out of downgrading. I just want to install an M.2 into my ANCIENT SLOW beyond belief 2014 Mac Mini that is MUCH more capable than Apple allows. I’m not beholden to Apple in any way (but, I’d kinda like to use Logic, just not tied to it, fortunately found that out in time!).
Arguments–volume, A path to a volume that can be unmounted and erased to create the install media.
–applicationpath, A path to copy of the OS installer application to create the bootable media from.
–nointeraction, Erase the disk pointed to by volume without prompting for confirmation.
Example: createinstallmedia –volume /Volumes/Untitled –applicationpath “/Applications/Install OS X El Capitan.app”
Adrians-MBP:~ adrianhenderson$
Nothing loads to the USB. I would really appreciate any ideas as I’m am installing a new ssd on a mid 2007 iMac
Thanks
Thank you Dan! I followed your instructions like a road map and they worked perfectly for me; and then I used Migration Assistant to transfer my data to it. Typing this while my Mac is running on its upgraded hard drive!
Oh my gosh, you have no idea how much you have helped me! I installed a new hard drive in my MBP and could not figure out how to re-install the OS….internet recovery wasn’t working, so reading your easy instructions for creating a bootable disk saved my day! Thank you!!
Hi Dan – I was really excited to find your pages about installing OSX with a bootable USB – I’ve just bought a bare bones MacPro 3.1 to achieve an upgrade with parts from an earlier MacPro 1,1. I’m not very experienced with Terminal commands so I found your instructions really clear and easy to follow. Sadly they didn’t work as described….. I checked the example syntax for createinstallmedia and spotted that I needed to add in –applicationpath to the the install app. It’s now busy churning through copying El Capitan on to the USB so I thought I’d let you know about the glitch. I’ll certainly look more at your really very helpful website with language that’s very accessible.
Regards
Have read your article on how to get mac OS onto a blank SSL (in my case in a 2011 Mac mini that won’t boot into Recovery mode*) with an installer USB drive. Unfortunately, you do not address the problem of being unable to download the High Sierra installer from the App Store to a working Mac running under Catalina.
It won’t allow me to D/L software to my working computer because it is running under Catalina.
I also have a Snow Leopard installation disc that I could try to use, but, with no disk drive in the 2011 Mac mini, I don’t know how to clone the SL installer disc on a bootable USB stick, which might just do the trick.
* Cannot get beyond the grey screen with ‘no entry’ icon and flashing ‘?’ folder.


Hi. I have a vintage Macbook Pro 1.1 A1150 laptop with a completely blank hard drive.
I have followed your step by step instructions without success.
Can you help?
I have installed a new SS D Dr. on my mid 2009 MacBook Pro. I have the original macOS X install disk when I put it into the computer the icon for the disk shows up I click the arrow and nothing happens it seems to freeze is this something you can help me out with. Thank you very much
I have been able to boot to Internet Recovery and also create a bootable usb to install Big Sur. However, I keep getting an error that says support.Apple.com/Mac/startup -1008f. I get this regardless of the method I use. This is not a new HD. But when I was doing a format to install or reinstall OS, which I have done so may times, I am not sure if I deleted the wrong partition. Is there a way to boot to usb disk utility and partition or check them? Any help would be appreciated. This is a 2019 model Intel 13” MacBook Pro. Thx
my macbook pro A1278 hard drive is locked
After getting the spinning globe, it was possible to connect to my WiFi
Then I got to a menu and chose: “Install MacOS”
Thereafter I had to connect my Book with an ethernet cable; WIFI was no longer accessible
Installation is ongoing now, I don’t know if it will succeed
ALSO : do format you SSD PRIOR to attempting the installation. If you don’t, the SSD will not be detected. I had to backtrack to DISK UTILITY and format my brand new virgin SSD. Then , back to “Install MacOS”, my SSD was detected.
BTW: I am upgrading a mid 2012 MAcBook
I replaced hard drive on Mac Pro and I am having a problem following steps to install operating system.
I have a late 2013 I have Catalina os 10.15.3 and Big Sur system drives
I can’t get either of these steps to work, any suggestions?
Type sudo into Terminal, including the whitespace at the end.
Open Finder and go to the ‘Install macOS’ app in your Applications folder.
Apple has LOCKED me out of downgrading. I just want to install an M.2 into my ANCIENT SLOW beyond belief 2014 Mac Mini that is MUCH more capable than Apple allows. I’m not beholden to Apple in any way (but, I’d kinda like to use Logic, just not tied to it, fortunately found that out in time!).
Hello Dan
Thanks for writing this guide I have run into a problem. After I entered my password the following came up on terminal:
Adrians-MBP:~ adrianhenderson$ sudo /Applications/Install\ OS\ X\ El\ Capitan.app/Contents/Resources/createinstallmedia –volume /Volumes/AAH
Password:
Usage: createinstallmedia –volume –applicationpath [–force]
Arguments–volume, A path to a volume that can be unmounted and erased to create the install media.
–applicationpath, A path to copy of the OS installer application to create the bootable media from.
–nointeraction, Erase the disk pointed to by volume without prompting for confirmation.
Example: createinstallmedia –volume /Volumes/Untitled –applicationpath “/Applications/Install OS X El Capitan.app”
Adrians-MBP:~ adrianhenderson$
Nothing loads to the USB. I would really appreciate any ideas as I’m am installing a new ssd on a mid 2007 iMac
Thanks
Thank you Dan! I followed your instructions like a road map and they worked perfectly for me; and then I used Migration Assistant to transfer my data to it. Typing this while my Mac is running on its upgraded hard drive!
Oh my gosh, you have no idea how much you have helped me! I installed a new hard drive in my MBP and could not figure out how to re-install the OS….internet recovery wasn’t working, so reading your easy instructions for creating a bootable disk saved my day! Thank you!!
Hi Dan – I was really excited to find your pages about installing OSX with a bootable USB – I’ve just bought a bare bones MacPro 3.1 to achieve an upgrade with parts from an earlier MacPro 1,1. I’m not very experienced with Terminal commands so I found your instructions really clear and easy to follow. Sadly they didn’t work as described….. I checked the example syntax for createinstallmedia and spotted that I needed to add in –applicationpath to the the install app. It’s now busy churning through copying El Capitan on to the USB so I thought I’d let you know about the glitch. I’ll certainly look more at your really very helpful website with language that’s very accessible.
Regards
Tim
Hello.
Please how should i create a bootable usb drive of MacOS using Windows.
Have read your article on how to get mac OS onto a blank SSL (in my case in a 2011 Mac mini that won’t boot into Recovery mode*) with an installer USB drive. Unfortunately, you do not address the problem of being unable to download the High Sierra installer from the App Store to a working Mac running under Catalina.
It won’t allow me to D/L software to my working computer because it is running under Catalina.
I also have a Snow Leopard installation disc that I could try to use, but, with no disk drive in the 2011 Mac mini, I don’t know how to clone the SL installer disc on a bootable USB stick, which might just do the trick.
* Cannot get beyond the grey screen with ‘no entry’ icon and flashing ‘?’ folder.