If you are one of the many folks working from home, you likely get on a lot of conference calls during each workweek. And sometimes, it’s hard to keep track of what everyone is saying and what tasks need taking care of. So what can you do to keep track of the contents of those calls? We think recording those calls is a great idea to revisit what assignments are doled out and make sure you understood everything from that call.
Sure you can have someone in who’s primary focus is to take notes on the important aspects. But it’s much easier to record them locally on your Mac. Doing so provides a way for you to keep better track of what the calls entailed, and then use them again later for reference.
There are a few different apps and services that allow you to not only create these calls but also record them. Let’s take a look at a few of these apps and how you can record them directly to your Mac.
For Apple fans, FaceTime is the most obvious answer when it comes to using an app for either voice or video calls
We love using Group FaceTime on our Mac and it’s really easy to use QuickTime’s screen recording options to capture both the audio and video from that FaceTime call!
Plus, Apple continues to push out various updates to improve the reliability and usefulness of FaceTime.
Here’s how to record those FaceTime calls and save them to your Mac.
Open QuickTime on your Mac.
Click on File in the Menu Bar.
Select New Screen Recording.
In the pop-up box at the bottom, next to the Record button, tap the Options button.
Choose the device that you are using under Microphone.
With the Options button, you will be able to select exactly where the recording is saved to. There are a few default options, but if you click Other Location… then you can select the destination of where the file saves.
Here’s how to start recording after you have set up QuickTime to record:
Open FaceTime on your Mac.
Click the Record button in QuickTime.
Tap on the screen if you want to record your entire screen, or tap on the FaceTime window to only record FaceTime.
Start your FaceTime Call.
After the call has ended, tap the Stop Recording button in the Menu Bar. This will automatically save your file to the pre-determined destination.
Now that the file has been saved, you can play it back, video or audio, and use it for reference. Although FaceTime does not have a native recording functionality, QuickTime is also included with every Mac and makes it easy.
You can also use your Mac to record FaceTime calls from your iPhone, iPad, or iPod
The steps are similar, except instead of choosing Quicktime’s New Screen Recording, select New Movie Recording and then choose your iPhone, iPad, or iPod touch.
Connect your iPhone, iPad, or iPod to your Mac
Turn your Mac’s speakers off to avoid feedback when recording
Open QuickTime
Go to File >New Movie Recording
Unlock your iPhone, iPad, or iPod touch if it’s locked
On your Mac, tap the arrow next to Quicktime’s red record button
Choose your iDevice from both the Camera and Microphone settings
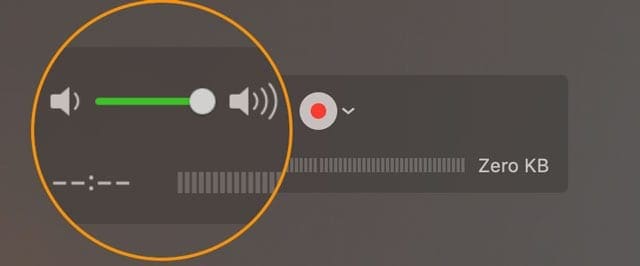
Once you select your device, turn QuickTime’s volume slider all the way up so it captures your iDevice’s sound
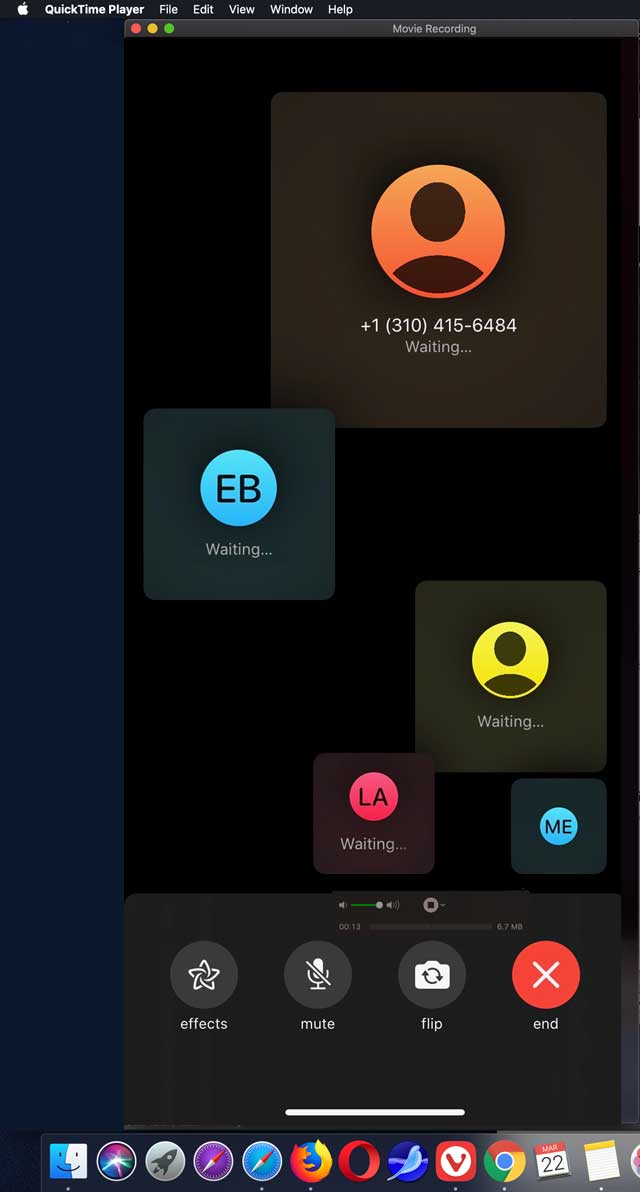
Press Quicktime’s red recording button to start recording before you place or accept a call
The recording button turns gray once it starts recording your device’s screen and audio. Watch for seconds to elapse to ensure QuickTime is recording your iDevice’s screen. You also see the file size increase over time
Launch FaceTime on your iDevice to place a call or accept a call when it comes in
When the call finishes, exit the call on your iDevice and then press the gray recording button to stop
Quicktime automatically creates a video file
To save it and rename it, press File > Save
Name your recording and choose where you to save it
Select Save
What about the screen recording feature on your iPhone, iPad, or iPod?
When you try and record a FaceTime call using iOS and iPadOS Screen Recording, you get great video but unfortunately no audio! Once a person answers a FaceTime call, there is no sound!
That’s because iOS and iPadOS automatically disable the microphone when using screen recording. This includes not recording audio when using apps like Phone, FaceTime, or Skype, and others.
Skype
Skype is one of the video conferencing apps that is quite popular for many considering that it’s free to use. After downloading the app on your Mac and creating an account, you can find your contacts and get the call started. Here’s how to record those calls that you need to take while working from home:
Image courtesy of Skype
Open the Skype app on your Mac.
Locate the contact that you plan to video chat with.
Begin the Skype Video Call.
During the call, tap the four-dot overflow button.
Select Start Recording.
A banner will appear letting all of the participants know that you are recording.
When it comes to saving, Skype will automatically post the recording to the chat where it will be made available for 30 days. During this time, you will be able to save the recording directly to your Mac. Here’s how you can save it:
Image courtesy of Skype
Open the Skype app on your Mac.
Click More Options.
Select Save to “Downloads” if you want the file saved to your Downloads folder.
If you want to choose where the file is saved, click More Options and select Save as.
Then choose where you want the file to be saved and rename the file itself.
While Skype is easy to use, the app does run into issues from time to time, especially when recording. Sometimes you just need to check for an update or restart your Mac, but then the issues should resolve themselves.
Zoom
While Skype and FaceTime are primarily used for personal video chats, Zoom was made with businesses in mind. This is the perfect service for those that need to get some work done with a video or audio meeting. And best of all, Zoom still makes it easy to record those calls.
Image courtesy of Zoom
Open the Zoom app on your Mac.
Select the contacts you wish to include in the call
Begin the video chat.
Click the Record button
After the call has ended, the conference will be converted to a recording.
Once the conversion has been completed, the default folder will automatically open with the recoding. The file will automatically be named Zoom_0.mp4 and you can then rename it to whatever you want.
What if I just want to record audio?
Image Courtesy of Audio HiJack
There are times when you need to record a conference call, but it’s audio-only. The recording still comes in handy, but not every app makes it easy to record what’s going on.
That’s where third-party software comes into play, and there are a few options for the Mac. In the event that the app you are using does not allow for native recording, here are some alternatives:
Audio Hijack – This is a popular app for podcasters as it makes the recording process extremely easy. You can choose which app to record the audio from, including Skype, Hangouts, and even Safari.
FonePaw Screen Recorder – If you are presenting during a meeting, FonePaw’s Screen Recorder might be the best option. This app allows you to record the call, while also recording your desktop at the same time.
Snagit – Snagit is available for both Mac and Windows and does so much more than provide screen recordings. You can create recording templates, with various visualizations to use, and even use it to annotate screenshots.
Conclusion
Even if you aren’t working from home, being able to record video and audio calls from your Mac is extremely useful. And we are long gone from the days of having to use tape-recorders with the call on speakerphone.
If you run into issues when recording these calls, let us know and we’ll be happy to help. Also, we want to know what you’re using to record these calls on your Mac while working from home.
Andrew Myrick is a freelance writer based on the East Coast of the US. He enjoys everything to do with technology, including tablets, smartphones, and everything in between. Perhaps his favorite past-time is having a never-ending supply of different keyboards and gaming handhelds that end up collecting more dust than the consoles that are being emulated.
HI Andrew,
I don’t know if you’ve written about this topic yet but here is an issue I came across . After recording my screen using Quicktime for a zoom session while wearing my ear pods, unfortunately I can only hear my own voice when I responded to the person I was talking to on the screen. I later tried FaceTiming and selecting the option in recording “Isaure’s ear pods..” and yet the same problem occurred again. So it is not possible to record sound from a Mac Pro screen while using your pods. Thanks
Isaure
Is it possible to record a FaceTime audio call recording from AirPods mic and the system sound? Quicktime only picks up the AirPods mic.