As you spend more time in quarantine, you may have noticed that you’re using iMessage more and more. You may also have realized that iMessages sent to other Apple devices share a particular default feature: read receipt.
The sender receives a read receipt after their message is sent, indicating exactly when the recipient has seen the message. For instance, if John sent an iMessage to Claudia asking, “When are you free this week?” John would be able to see the time at which Claudia read the message. This is indicated directly below the message.
In some cases, Claudia, or the recipient, might not want John to know that he/she has read the message. Perhaps she needs more time to formulate a proper response. Maybe she wants to ignore the message for a bit longer. Or maybe she simply dislikes the idea of John knowing precisely when she read the message.
If you’re like Claudia and want to turn off read receipts, follow the instructions outlined below.
This method is best when you simply dislike the idea of the sender knowing when you read their message. By turning off read receipts for all senders, no one will be able to see when you read their messages on iMessenger.
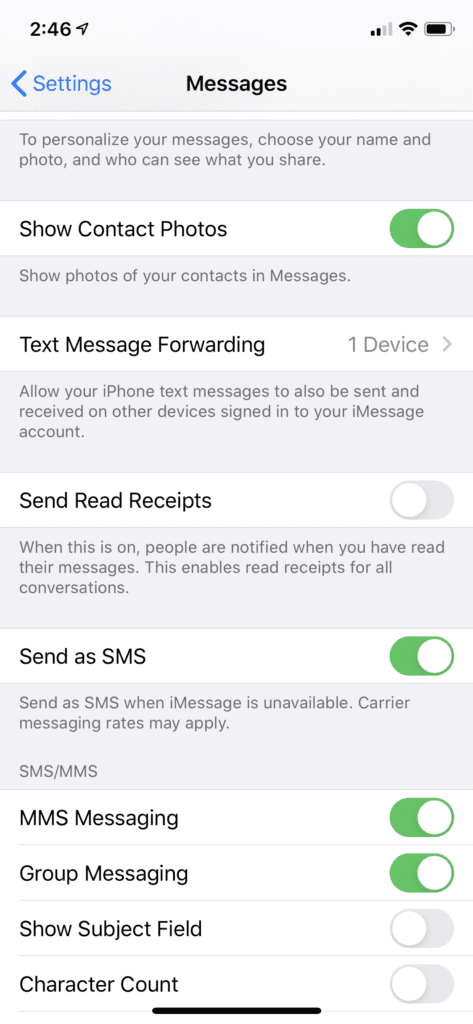
Open Settings on your Apple device.
Scroll down to Messages.
Toggle Send Read Receipts off.
When the toggle slides to the left, iMessage will no longer notify people when you have read their message.
When the toggle is green and to the right, iMessage will notify the sender when you have read their message.
You have the freedom to switch back and forth between these two options by going back into your Settings and following the same steps.
Disable Read Recipients for Specific Individuals
If you want to disable read receipts for a specific person, you can easily do so. By doing this, you exclude only that one person, not everyone with whom you are texting. You can, however, apply this feature to multiple senders. This makes it easy to cherrypick the contacts for which you’ll disable read receipts.
There are two ways to disable read recipients for specific individuals. The first is as follows.
On your Apple device, open Contacts.
Search for the name of the sender or the contact with whom you would like to disable read recipients.
Tap on the person’s name to open the person’s contact page.
Tap Message. This has a messaging icon directly above it.
Tap Info. The Info icon appears as a lowercase-i.
Toggle Send Read Recipients off.
When the toggle is gray and positioned to the left, this person will not receive read receipts.
When the toggle is green and positioned to the right, this person will receive read receipts.
You can easily toggle between on/off by going back into the person’s contact page.
While it involves some of the same steps, the second method is more direct. It is better for when the conversation you are having with this other contact is more recent.
On your Apple device, open Messages.
Tap on the chat with the contact. Make sure this is the chat for which you want to disable the read receipts feature.
Tap Info, which has a lowercase-i icon directly above it.
Toggle Send Read Recipients off.
Like with the other options, the position of the toggle slider will tell you whether or not read receipts has been enabled or disabled. If the toggle is grey, then it is turned off. If it is green, then it is turned on. You can switch between the two options by following the same steps above.
Conclusion
Whenever you don’t feel like replying to a sender right away, disabling read recipients is an extremely valuable option. No longer will you be asked why you didn’t get back to them immediately. But turning off read receipts is not just beneficial for personal conversations; it can also make workplace communication less stressful and heighten your sense of privacy.
So, who will get the boot? Will you disable read receipts for one specific sender or multiple senders? Maybe you just want to disable them all! Just remember these steps and set up iMessage with the discretion you want.


Write a Comment