In most cases, you’ll want to figure out how to get from point A to B as soon as possible when making a journey. But in some instances, you’ll need to do other things along the way.
In iOS 16, Apple introduced the opportunity to add multiple stops to your route in the Maps app. But how do you do this, and which forms of transportation can you add these stops for? What iPhones support the feature?
Keep reading; we’ll discuss all of the steps in this article.
Which iPhones Support Adding Multiple Stops to Your Route in Maps?
While some iOS 16 features are only available on the iPhone 14, that is not the case for adding multiple stops to your route in Maps. As long as you can download iOS 16 or later, you can use the multi-stop routing tool.
If you have an older iPhone and you don’t know whether you can download iOS 16, fear not. You can read our article outlining which devices are compatible with iOS 16.
How Many Stops Can You Add to a Route?
When adding multiple stops in the Maps app, you might want to include more than one. Good news: you’ve got a bit of wiggle room in this respect.
If you use the Maps app to plan your journey, you can add 13 extra stops – alongside the place you begin and your end destination. Unless you’re planning a scenic day trip, you probably won’t need to use all of those.
Can You Add Stops for All Forms of Transportation?
While driving is the main method of getting around in many parts of the world, you might prefer to take public transportation or use your bike. Unfortunately, adding multiple stops to your route is not available for all kinds of transportation right now.
At the time of writing in October 2022, you can only use multi-stop routing in Maps for driving. If you walk, cycle, or use public transportation, you will still see the standard A to B routing method. You can, however, use Google Maps as an alternative for adding multiple routes.
How to Add Stops to Your Route in Maps
Now that you know a little more about how adding multiple routes in Maps works, let’s discuss how to add them. Doing so is pretty simple; follow the steps listed below.
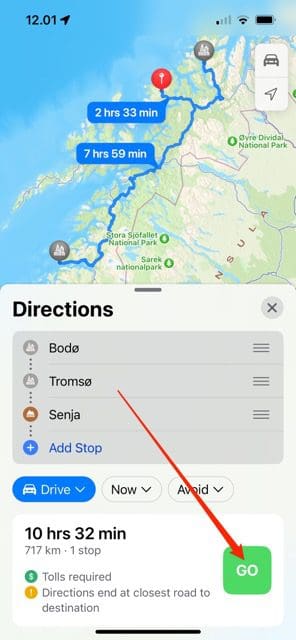
Open the Maps app on your iPhone.
Enter your starting point and end destination. Make sure that Drive is selected.
When you’ve added your beginning and end spots, you’ll see an option titled Add Stop; select this.
Enter the stop you’d like to add to your route. After doing that, you can drag it using the three lines icon to move it further up if you need to. Repeat this process for all of the stops you’d like to add.
When you’re happy with your route, Select GO at the bottom to begin proceedings.
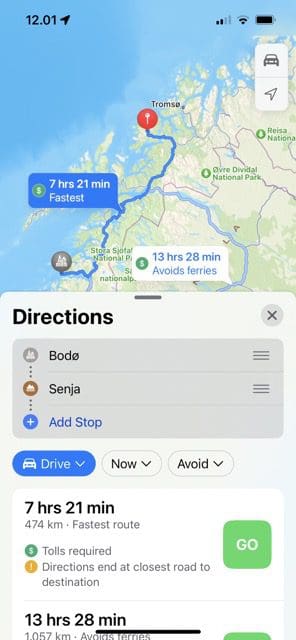
You can also choose whether you’d like to avoid tolls and highways by going to Avoid and toggling your options – before selecting Apply.
If you decide to add stops while you’re driving, you can do so by asking Siri.
How to Remove Stops From Your Route in Maps
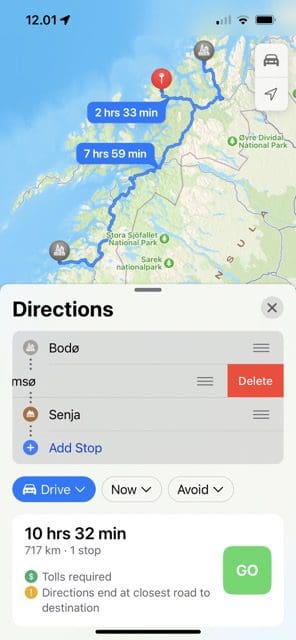
If you decide that you’d like to remove stops from your route, doing so is pretty simple. Follow the steps listed below.
Go to the stop you’d like to delete. Then, swipe to the left.
You will see a red Delete button appear; click on this.
Your stop will delete straight after you’ve selected that particular option. Once you’ve done that, your app will revise the route – including how long it’ll take you to get to your final destination.
Adding Stops to Your Route: Ideal If You Need to Do Things on Your Way
Regardless of whether you need to pick up friends or you’d like to take the scenic route on a big trip, adding multiple stops to your route in Maps is easy.
You can get a realistic suggestion of how long it’ll take you when you add more stops, allowing you to determine whether you should book overnight accommodation or not. Similarly, you’ll ensure that you manage to run all of your errands in one go.
If you later decide to remove stops from your route in Maps, doing so is even more simple. And with this article, you’ve got everything you need for both. Google Maps and Apple Maps both do a similar job if you’re driving; pick whichever is the most convenient for you.
Danny has been a professional writer since graduating from university in 2016, but he’s been writing online for over a decade. He has been intrigued by Apple products ever since getting an iPod Shuffle in 2008 and particularly enjoys writing about iPhones and iPads. Danny prides himself on making complex topics easy to understand. In his spare time, he’s a keen photographer.


Write a Comment