Tried to download photos from Apple’s iCloud’s website and discovered that, for some reason, you cannot download more than one photo from your iCloud Photo Library at a time? Yeah…it’s frustrating especially for folks with large photo libraries. For most of us, that’s hours and hours of tedious and pointless work!
But finally, after numerous user complaints, Apple now allows us to download multiple or even all our photos from its iCloud website making it a heck of a lot easier to share and save photos.
And sometimes, you just want to download pictures from iCloud onto your personal flash or thumb drive or another external drive (USB drive.) This article shows you how to do that in simple five steps.
With the advent of iCloud and it’s potential, many people have started using it to store different types of information such as photos and music.
iCloud Photo Library stores every photo and video you take and keeps them up to date on all your devices. Any edits you make are automatically updated everywhere. iCloud Photo Sharing makes it easy to share photos and videos with exactly the people you want to see them.
The iCloud library stores the original resolution photos and videos and stores a lightweight version on your device. This feature has been an excellent addition as it saves a lot of storage space on your device.
As a result, many users have seen their number of photos in their iCloud account grow over the last few years. Although the iCloud makes it easy to share the images with your friends and family, sometimes you just want to download them to your personal drive and keep them handy ..Just-in-Case…You never know.
How can I download photos from iCloud to external hard drive?
Here are the necessary steps to download all your photos from iCloud and store it on a USB or a zip drive:
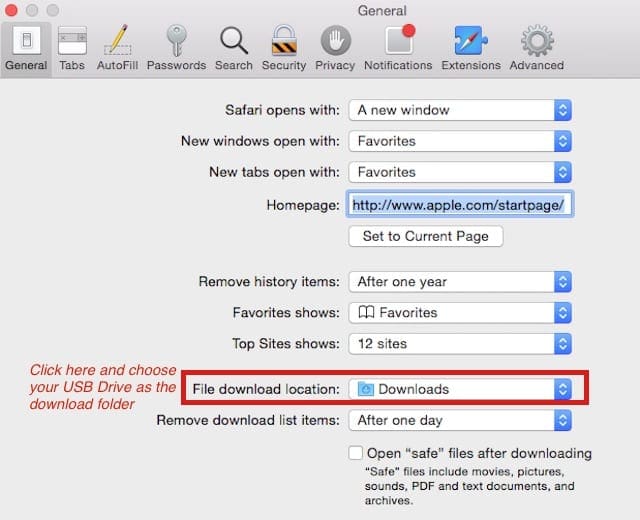
Step – 1. Change Default Download Location
If you are using Safari to access icloud.com, first modify the default download library and point it to your USB drive. Go to Safari > Preferences > General. And remember to switch that default download folder location back to its original position once you complete the download of all your iCloud photos.
All browsers allow you to change your default download location. Most often that setting is found in the browser’s preferences usually located underneath the browser’s name in the menu bar.
Also, pressing the command key (⌘) + comma (,) key brings up the preference menu for most browsers, including Safari and Chrome as well as others.
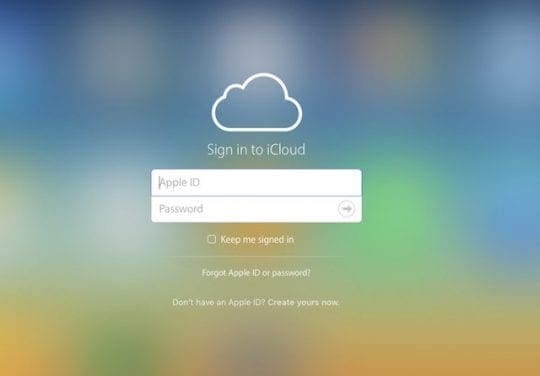
Step – 2. Log into iCloud
Log into icloud.com using your computer and provide your Apple credentials (ID and password)
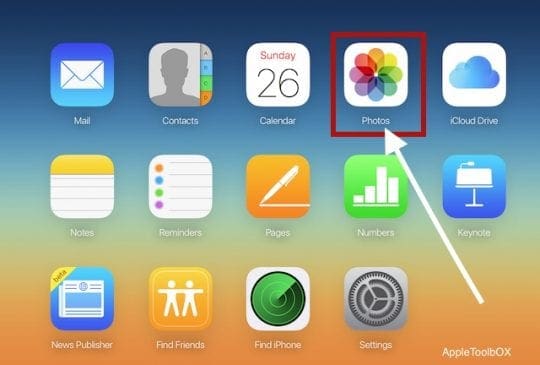
Step – 3. Open Photos App
Once you have logged in into your iCloud account, you see the screen with all the various iCloud folders. Click on Photos
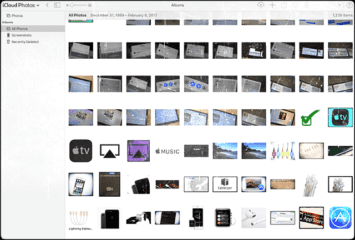
Step – 4. Select Photos to Download
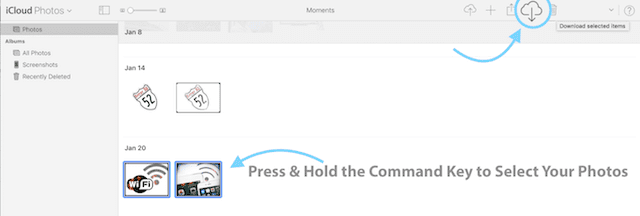
Click your selected photo to highlight for download. To select multiple images, hold down the command key (⌘) and continue holding until all photos are selected.
If you highlighted a photo that you don’t want to download, press the command key (⌘) again on that photo to deselect.
How do I download all photos from iCloud? How to select multiple iCloud Photos using a Mac
Select all your photos from your library for download
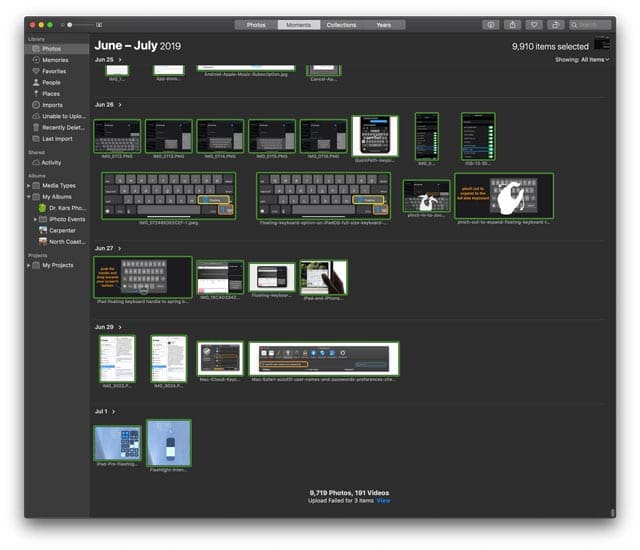
Press Command + A to choose every image in your library
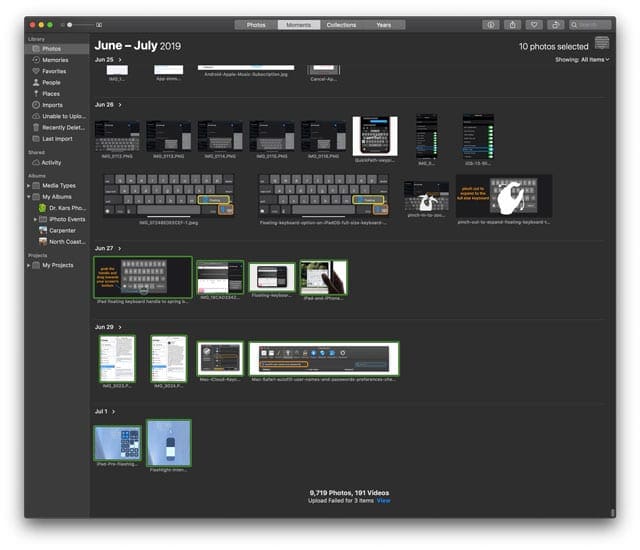
Select a range of consecutive photos from your library
Choose the first photo you want
Hold down the Shift key
Choose the last photo you want
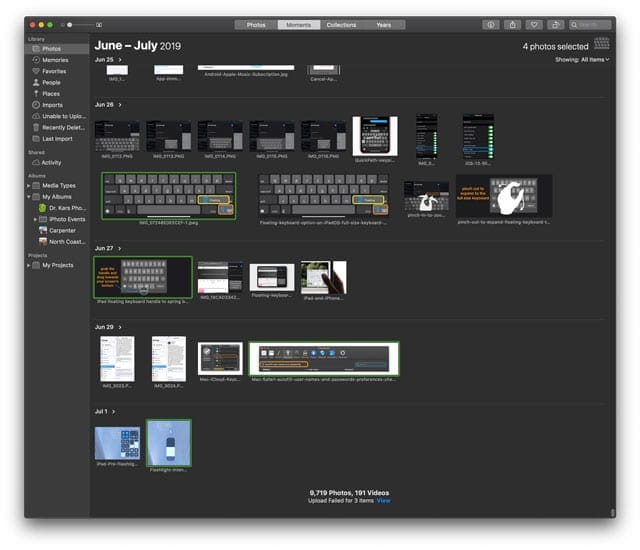
Choose non-consecutive pictures from your library
Select the first photo you want
To add others, hold down the Command button and click on the other photos you want
Step – 5. Download Photos
After selecting all those pictures that you want to download, click on the Download Cloud (cloud with the arrow facing down.)
Now, all your chosen photos download to your default location (usually the default download library for your browser.) If using Safari, follow the steps listed above to change that place to your external drive.
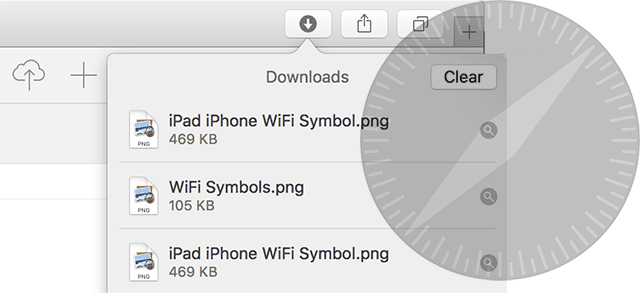
And if you can’t find those downloads, click on the downloads button to open recent downloads and select the magnifying glass to discover its location.
Don’t forget to switch that default download folder location back to its original position once you complete the download of all your iCloud photos
Want another way? Transfer your photo library using your Mac’s Photos App
Open the Photos app on your Mac
Select all your photos using Command + A
Choose Export from the File menu
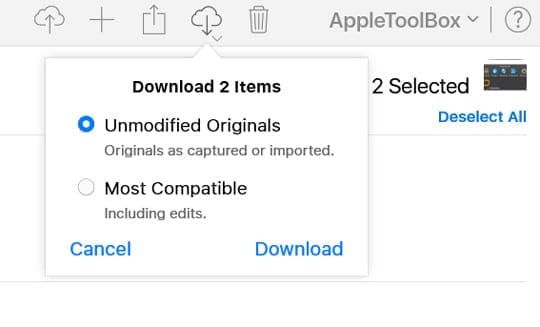
Decide if you want to export edited (default) or unmodified original versions of your photos (recommended)
Edited versions retain their edits when you import them and you can’t revert to their earliest pre-import version
Unmodified originals don’t show any edits that you made in the source library. You would need to recreate any edits
Navigate to your external drive, create a new folder on your drive if necessary and export your photos
Manually copy your Photos app library to your external drive
Drag your Photos app library (usually in the user’s Pictures folder) to your storage device to create a copy for archiving
It’s a good idea to rename the photo library so you know it’s an archive
Any new photos added to your system library are NOT automatically synced–you’ll need to add them manually
Use multiple photo libraries on your Mac?
Some folks have different photo libraries, like separate libraries for personal photos and work photos.
iCloud Photos only uploads and syncs the photos and video in your System Photo Library. So if you have additional photo libraries in the Photos app, you need to back those up manually to an external drive or manually upload them to iCloud.
Download iCloud Photos using a Windows PC
Manually download all the files from Apple’s iCloud website to a folder on your PC and then copy/paste or move them to your USB drive
Download iCloud for Windows and find the iCloud folder in your File Explorer. Then, copy the photos from your PCs’ iCloud folder and paste them to your USB Drive
In this case, Windows and Mac use almost the same process
Open iCloud’s website
Sign in with your Apple ID and password
Enter the security code for two-factor authentication, if enabled
Tap to open the Photos App
Select the photos you want to download to your Windows PC
Tap the download icon in the iCloud’s website interface
Choose the small arrow underneath the cloud icon to select options for unmodified originals (does not include any edits) or most compatible (that includes any edits)
Press the download button
iCloud creates a zip file of your selected photos
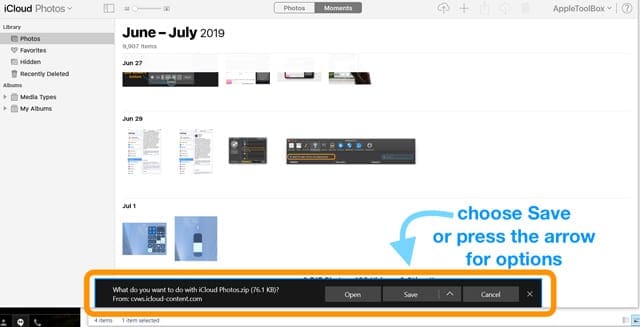
A banner appears in the bottom of your screen with options to open, save, or cancel the download–choose save to store in your PC’s downloads folder or tap the arrow next to save to choose a different location, including your external drive
Another banner lets you know iCloud completed the download–choose open to see the photos or open folder to locate them
Once you download all the photos you want from iCloud, look for a folder called iCloud Photos in your Downloads folder
Unzip the folder and transfer them to your external hard drive
How to select multiple iCloud Photos using a Windows PC
Select all your photos from your library for download
Press CTRL + A to select every image in your library
Select a range of consecutive photos from your library
Select the first photo in the group
Hold down the Shift key
Choose the last photo you want
Choose non-consecutive pictures from your library
Select the first photo you want
To add others, hold down the CTRL button and click on the other photos you want
Summary
Apple’s iCloud is a safe and secure drive for the most part. The risk of losing your favorite images and photos could be huge if something happened to your iCloud account. Some people have thousands and thousands of photos that have been stored for over several years.
Follow this process if you want to save some of your photos on an external drive. It’s best to be safe and sure that you have a backup for a rainy day. And if something happens to your iCloud account, you’re covered and can retrieve your images at any time.
Obsessed with tech since the early arrival of A/UX on Apple, Sudz (SK) is responsible for the original editorial direction of AppleToolBox. He is based out of Los Angeles, CA.
Sudz specializes in covering all things macOS, having reviewed dozens of OS X and macOS developments over the years.
In a former life, Sudz worked helping Fortune 100 companies with their technology and business transformation aspirations.
I found these instructions helpful. I did a test run with only a few photos and videos to see if it worked. It does! But, I noticed that when you select the newly downloaded photo/video and click “Get Info” the original data, like the date of when the photo/video was taken, is gone. Now, the date is reflective of when the photo/video was downloaded/transferred to the external hard drive (ie. todays date). Is there any way to download images from iCloud but have them keep their original “Get Info” data? I don’t want to lose the dates of when my photos were taken. Thank you!
I downloaded all of my more than 32 000 photos. As expected there are many duplicates. I need to clean that mess. What would you suggest for a good an safe cleaning ?
Hi! I am following these steps properly but I get a message that pops up saying safari could not download the file “iCloud photos.zip” because the disk doesn’t have enough free space. I checked and my 1T hard drive still has like 500gb of storage…I am getting this message even when trying to do one photo!? Any ideas?! TIA!
Hallo,
I just follow the instructions above to download files from iCloud to external disk with success and easy to execute. It is marvellous, clear and user-friendly. Thanks a lot.
Is there a simple instruction to empty icloud to Mac air? I do not wish to let it flow in icloud could somebody help with easy method? Thank you in advance.
I select All (18,000) photos. I get a photos alsert that I am trying to move too many photos at a time. See below ,sg:
Unable to download more than 1,000 items at a time. Please reduce your selection.
Suzanne, there is a way to do all at once, using a sufficiently large external drive. Google exactly that.
I had 121,000 photos. Yes, I have been around a long time, and have travelled!
At 1000 a time the conventional way, that is 121 downloads, each taking quite a while.
I’m curious if this works with videos too? I’ve got about 20 videos (about 20 minutes long each) that I’d like to take off my iCloud as they are really taking up space. Have you tried videos?
Hi there,
The process was fairly easy and the photos transferred.
However, once I transferred the amount of photos differed. I originally selected 638 items and when I highlight the photos in the external hard drive it reads 940, not sure how this happened.
There aren’t any duplicates and as I scrolled through them it seems as though they are all there, any thoughts?
how the downloads appear on your USB drive depends on how you sort the drive contents. To see the photos in chronological order, open the drive and choose to sort the contents (photos) of that drive by date modified.
hi,
i downloaded photos on my windows 10 laptop..a zip file was downloaded but the file wont open..it gives error as ! C:\Users\My DeLL\Downloads\iCloud Photos(1).zip: Unexpected end of archive.. please help..
If you have WinRAR installed on your computer: close that dialog, then right-click on that zip file and choose Open with WinRAR. Navigate to WinRAR’s Tools Option from its top menu and select repair archive.
If you don’t have WinRAR, download a free evaluation copy which gives you a trial period with a certain number of days to try it out.
This is very confusing to me. It sounds like you are telling me to do all of the steps above. But I don’t think that is necessary. Don’t I just choose one of the options?
I’m sorry that you find the steps confusing. These steps are for downloading photos from iCloud’s website to an external USB drive.
People mainly use this method when they want to save a handful of photos from iCloud to that external drive. And it’s fairly straightforward: go to iCloud’s website and open the Photos app in the browser. Then select the photos and videos you want to download and click the cloud icon.
However, if you already have all your photos on your Mac or PC, then you can select them from your computer and drag and drop them onto your USB drive.
Using a Windows 7 here, and logging into icloud.com through google chrome, though I did download the desktop version but find it rather useless. First time I endured the treacherous selecting one by one, all was fine and copied over completely. This time, however, only half of the photos I download show up in the downloads folder… the rest vanish and never wish to download. Help.
Thanks for answering my question. I guess the best is to go to Apple directly and tell them my grievance. The problem I face when working with images on the Apple photo App is that they are low resolution. That’s why I want to be able to go into iCloud and select full size images and edit them like I use to do when everything was uploaded to my camera roll in dropbox. Anyway, I will call them again tomorrow and see what whats.
There is a preference setting in Mac Photo’s App that always downloads the full resolution photos to your Mac—of course that applies to all photos and not just selected ones. If that’s a setting you’d like to change, open the Photos App on your Mac and choose Photos > Preferences from the top menu. Tap the iCloud tab and then under iCloud Photo Library, Tick the Download Originals to This Mac.
If you make this change, your Mac starts downloading all those photos in full res—this could take quite a bit of time depending on how many photos you store on iCloud.
Unfortunately, at this time there isn’t any option to download full res for certain photos while keeping others at Optimize.
If time allows, I’d love to hear what Apple suggests to you. Your issue with the iCloud website is one that many users, especially avid photographers, often complain about—why Does Apple make it so difficult to download photos from its iCloud website!
Best of luck and thanks for sharing your adventures with us!
A few days ago I spend about two hours on the phone with a very good, and I must add, very patient gentleman at Apple to help me create a harmonic convergence between all my Apple products (IMac, MacBook and iPhone). Now that everything is running smooth I don’t understand why I have to select photos in the iCloud by pressing down on the command key and clicking each photo one at a time. Is there a way to select the first and the last photo you want and then download all of the ones selected at once ?? Sometimes I need only a few and other times I need to select 50 hi rez images. Before when I had everything send to my camera roll on dropbox I would just press shift and the first photo and press shift for the last photo and then copy them all with one click.
I probably should have asked the kind gentleman at Apple but I didn’t realize it until I got off the phone and started exploring the wonderful world of the iCloud.
Unfortunately, Apple no longer has options to select all or a range of photos from the iCloud website. It’s a feature that used to be available but is no longer offered. Instead, Apple prefers people use the Photos App on their Macs (or iCloud Photos on PC) and manage their photo sharing or copying from there. On your Macs, you should easily be able to select mutiple photos using the SHIFT key by clicking on the first then holding the Shift key and Clicking on the last image you want. All photos between those two are then selected. You can also use a mouse or your trackpad and press and drag to select a range of photos.
Yes, it’s now a total pain to use Photos on iCloud’s website when working with more than a couple of images.
It may also be worthwhile to contact Apple Support again and ask them directly to walk you through the steps of selecting and sharing photos.
What if you don’t have an IPAD or a MAC or any other apple product except for an IPHONE, how do you download from the I Cloud to a usb using a bog standard Dell Laptop, been trying for 3 hours now!!!! and quite frankly ready to hang myself!!!!!
Sorry to hear all that frustration on getting photos from iCloud to a USB drive via a Windows PC. Apple does not make it easy! Try the following:
1) Manually download all the files from Apple’s iCloud website to a folder on your PC and then copy/paste or move them to your USB drive
2) Or download iCloud for Windows and find the iCloud folder in your File Explorer. Then, copy the photos from your PCs’ iCloud folder and paste them to your USB Drive
Thank you SK. That was a really great reply . For a learner I think I got the gist of most of it. No,I haven’t got a Mac or access to one nor have I got access to an Apple store as I live in a small country town. But I can get to a phone provider called Telstra in Australia who sell Apple ipads with a plan. Whether they will have a USB drive for I pad and whether they will sell one is my next move.
I will then look at an app to easily download photos to this USB external device
Will let you know if and when I am successful. I got another apple or itunes bill today so I have a month to fix things up.
I’m glad to help! Since you live in a smaller town, backing up your photos to Google Photos might your best go to option right now. Google photos allows unlimited storage for all your images and videos, as long as each photo or video is under 16MB (per photo) and shot at no greater resolution than 1080p (for video.)
So during this month that you already paid for iCloud, you could move everything over to Google Photos and then when time allows (and budget) clone all those over to an iPad thumb drive.
If you shop online, those iPad Flash drives are available for purchase to ship right to your home. Most of them are pretty easy to use and come with bundled apps for easy downloading of photos, videos, etc to that external device.
Yes, please keep us posted. Your story is sure to resonate with many others!
Please I am an old bloke trying to learn things on the computer. I have accidentally put all my photos to Icloud and will now have to pay a monthly fee forever. How can I transfer photos from Icloud to a USB stick. Then I can progressively reduce Icloud photos by deleting them as I know I will have a copy. When I go to Safari under settings in my Ipad I cant see how to get to preferences and general as per your instructions Step1.
I’m sorry that you’re having some troubles getting your iCloud photos onto a USB stick. The instructions you mention–going to Safari Preferences are for Safari on a Mac computer rather than an iPad. Do you have access to a Mac? It doesn’t have to be your own computer. And if an Apple Store is nearby, they always let you use their Macs to do tasks like this–as long as it’s not a busy time like late afternoons and weekends. Best to visit during the morning on weekdays.
If using a mac is not feasible, they do sell USB drives for iPad/iPhones specifically. These plug into your lightning power port and allow you to expand your physical, on-site storage OR offload large items, like photos, so you can free up space on your iDevice. There’s quite a few manufacturers out there–like SanDisk, Kingston, and so forth.
Many of these also include apps to easily download your photos to that USB external device.
To find the best iPad USB stick, look at online reviews at sites like Amazon and any other merchants you trust. And of course, always read user reviews–that’s where you really find out if a product lives up to its promises.
So, yes, you can avoid the monthly iCloud storage plan charges by investing in an iPad USB stick or moving pictures off your device to a flash device using a Mac. It’s a solid plan–just make sure you keep your iCloud monthly storage until you confirm that all your photos are on that device…and of course, it’s always best to have some kind of redundancy so your pix are stored in two locations.
Consider uploading your photos to a different cloud account, like Google Drive or Dropbox. Or if you are an Amazon Prime Member, they offer completely free and unlimited Photo Storage (called Prime Photos) through the Prime Service.
We love our old blokes! Keep us posted on your photo migration from iCloud. And best of luck,
Thank you so much for helping me out, I found the problem. My new external hard drive need install to use it on Mac and after I following your step by step it works. I hold command key then select one by one photo that I want but it doesn’t worry me as long as I can move photos from Icloud to my storage device so I don’t need to buy more and more iCloud storage. Thanks again 🙂
Thanks for letting us know. I’m glad you’re able to move all those photos–and yes, what a pain to have to do that one-by-one. I don’t know why Apple doesn’t include a Select ALL button on the iCloud site. Good going!
Hi…Firstly I have 11,000 photos that I cant select all even though I hold down the command key, I still need to hold the command key and select one by one. Secondly I changed the default download location to my external hard drive but when i download a photo it didn’t save in the external hard drive, it saved in download folder in finder. Is anything that I have done is wrong? Please help me?
I access my icloud from Macbook.
If you’re doing it from http://www.icloud.com, it’s a bit cumbersome but you can hold down the Command key and select all the photos you want by hovering over them and clicking which one you want. If you’re doing it from the Photos app in the dock, you can hold the Command + A keys.
To download those photos to an external drive, you need to change the default download location in your browser. If that’s Safari, go to Safari > Preferences > General > File Download Location and set that to your external hard drive or set it to Ask for each download.
Hi Kari,
There the old option to Select All within iCloud on Macs using the Shift Key used to work but doesn’t appear to anymore. One method that sometimes works for Macs is to highlight the word “Photos” from the left-hand column and then click the download cloud–sometimes, this opens a message that asks permission to download multiple photos–if you see this message, select OK.
Some users found the following method to work for Windows 10:
To download all photos and videos using Windows OS:
1) Download and install iCloud Photos on your machine (www.apple.com/icloud/photos/)
2) Open “My Computer” and click on the icon for iCloud Photos
3) In the upper-right corner, find the options to Download and Upload photos
4) Chose the “Download Photos and Videos” and a new dialogue box opens
5) Select “All Photos” OR select an album and click download
This is not ok as there is only 1861 items available for download, my iCloud. I did finally get a selection window to select what year of pictures I want to download but it did not work to my PC. Still looking for a solution.
I too am having trouble! Thought this would be such an easy task, but it seems Apple just wants us to pay for more and more storage. I have followed the steps above and the videos don’t transfer to my thumb drive. Photos worked, but not videos. Any suggestions?
Hi Jamie,
This usually works the same exact way for videos. I just did a test with both Safari and Chrome and was able to download a video to an external thumb drive following these directions. Are these videos home movies that you filmed on your iDevice or are they other types of video content?
No response I notice to the others above with this issue but I as well cannot choose “select photos” as stated in the article. There is no way to transfer photos from icloud to my external hard drive. Please help with what to do!!!!!!
Sorry that these steps are not working for you. It looks like the icloud site changed its interface a bit. Instead of select photos, there is now a download button (cloud with the arrow facing downwards.) Select multiple photos by holding down the command key and continue holding until all photos are selected. After selecting all those photos you’d like to download, click that download cloud (arrow facing down.) Now, all the selected photos download to your default location. If using Safari, follow the steps listed in the article to change that location to your external drive.
Apologies for not updating this article sooner. We’ll update it now.
Is frustrating how difficult it is… to copy photos form I Cloud to flash drive or else… I have no option to select photos button as described on instructions…” scroll down to the end of the photos and select photos” Even after selecting one by one there is no option to copy and paste or save as into my flash drive that I could find…please somebody help us.
For some reason I don’t have an option to select photos at all! Do you know why this is or how I can select them another way. I have almost 1000 pictures so one at a time is not an option lol. Thanks
I have over 7000 photos I want to back up. I tried this method and it just crashes Safari as it actually tries to open and save each individual picture. Know of any other way?
James, If you are using a Macbook, Simply open the photos App, Go to Preferences on the menu > Download Originals to this Mac. That will back up your photos into your local machine assuming your photos are synced with iCloud. The direct download from iCloud.com works well when you have a manageable set of photos or videos. Good Luck and Thank You for your comment. We will make sure to update the article to show the steps.


I found these instructions helpful. I did a test run with only a few photos and videos to see if it worked. It does! But, I noticed that when you select the newly downloaded photo/video and click “Get Info” the original data, like the date of when the photo/video was taken, is gone. Now, the date is reflective of when the photo/video was downloaded/transferred to the external hard drive (ie. todays date). Is there any way to download images from iCloud but have them keep their original “Get Info” data? I don’t want to lose the dates of when my photos were taken. Thank you!
I downloaded all of my more than 32 000 photos. As expected there are many duplicates. I need to clean that mess. What would you suggest for a good an safe cleaning ?
Hi! I am following these steps properly but I get a message that pops up saying safari could not download the file “iCloud photos.zip” because the disk doesn’t have enough free space. I checked and my 1T hard drive still has like 500gb of storage…I am getting this message even when trying to do one photo!? Any ideas?! TIA!
Hallo,
I just follow the instructions above to download files from iCloud to external disk with success and easy to execute. It is marvellous, clear and user-friendly. Thanks a lot.
These steps are freaking confusing…
Super helpful, thanks!!
Is there a simple instruction to empty icloud to Mac air? I do not wish to let it flow in icloud could somebody help with easy method? Thank you in advance.
I select All (18,000) photos. I get a photos alsert that I am trying to move too many photos at a time. See below ,sg:
Unable to download more than 1,000 items at a time. Please reduce your selection.
Suzanne, there is a way to do all at once, using a sufficiently large external drive. Google exactly that.
I had 121,000 photos. Yes, I have been around a long time, and have travelled!
At 1000 a time the conventional way, that is 121 downloads, each taking quite a while.
I’m curious if this works with videos too? I’ve got about 20 videos (about 20 minutes long each) that I’d like to take off my iCloud as they are really taking up space. Have you tried videos?
Hi there,
The process was fairly easy and the photos transferred.
However, once I transferred the amount of photos differed. I originally selected 638 items and when I highlight the photos in the external hard drive it reads 940, not sure how this happened.
There aren’t any duplicates and as I scrolled through them it seems as though they are all there, any thoughts?
Thanks again for making this article!
is there a way to have the downloads in the order (chronological) you have it in your icloud. thank you
Hi Nana,
how the downloads appear on your USB drive depends on how you sort the drive contents. To see the photos in chronological order, open the drive and choose to sort the contents (photos) of that drive by date modified.
hi,
i downloaded photos on my windows 10 laptop..a zip file was downloaded but the file wont open..it gives error as ! C:\Users\My DeLL\Downloads\iCloud Photos(1).zip: Unexpected end of archive.. please help..
Hi Pretti,
If you have WinRAR installed on your computer: close that dialog, then right-click on that zip file and choose Open with WinRAR. Navigate to WinRAR’s Tools Option from its top menu and select repair archive.
If you don’t have WinRAR, download a free evaluation copy which gives you a trial period with a certain number of days to try it out.
This is very confusing to me. It sounds like you are telling me to do all of the steps above. But I don’t think that is necessary. Don’t I just choose one of the options?
HI Pamela,
I’m sorry that you find the steps confusing. These steps are for downloading photos from iCloud’s website to an external USB drive.
People mainly use this method when they want to save a handful of photos from iCloud to that external drive. And it’s fairly straightforward: go to iCloud’s website and open the Photos app in the browser. Then select the photos and videos you want to download and click the cloud icon.
However, if you already have all your photos on your Mac or PC, then you can select them from your computer and drag and drop them onto your USB drive.
Let us know if it’s still a problem.
Sam
Using a Windows 7 here, and logging into icloud.com through google chrome, though I did download the desktop version but find it rather useless. First time I endured the treacherous selecting one by one, all was fine and copied over completely. This time, however, only half of the photos I download show up in the downloads folder… the rest vanish and never wish to download. Help.
Hi Elizabeth,
Thanks for answering my question. I guess the best is to go to Apple directly and tell them my grievance. The problem I face when working with images on the Apple photo App is that they are low resolution. That’s why I want to be able to go into iCloud and select full size images and edit them like I use to do when everything was uploaded to my camera roll in dropbox. Anyway, I will call them again tomorrow and see what whats.
Agent thanks
Norbert
Hi Norbert,
There is a preference setting in Mac Photo’s App that always downloads the full resolution photos to your Mac—of course that applies to all photos and not just selected ones. If that’s a setting you’d like to change, open the Photos App on your Mac and choose Photos > Preferences from the top menu. Tap the iCloud tab and then under iCloud Photo Library, Tick the Download Originals to This Mac.
If you make this change, your Mac starts downloading all those photos in full res—this could take quite a bit of time depending on how many photos you store on iCloud.
Unfortunately, at this time there isn’t any option to download full res for certain photos while keeping others at Optimize.
If time allows, I’d love to hear what Apple suggests to you. Your issue with the iCloud website is one that many users, especially avid photographers, often complain about—why Does Apple make it so difficult to download photos from its iCloud website!
Best of luck and thanks for sharing your adventures with us!
Liz
Hi SK,
A few days ago I spend about two hours on the phone with a very good, and I must add, very patient gentleman at Apple to help me create a harmonic convergence between all my Apple products (IMac, MacBook and iPhone). Now that everything is running smooth I don’t understand why I have to select photos in the iCloud by pressing down on the command key and clicking each photo one at a time. Is there a way to select the first and the last photo you want and then download all of the ones selected at once ?? Sometimes I need only a few and other times I need to select 50 hi rez images. Before when I had everything send to my camera roll on dropbox I would just press shift and the first photo and press shift for the last photo and then copy them all with one click.
I probably should have asked the kind gentleman at Apple but I didn’t realize it until I got off the phone and started exploring the wonderful world of the iCloud.
Thanks
Norbert
Hi Norbert,
Unfortunately, Apple no longer has options to select all or a range of photos from the iCloud website. It’s a feature that used to be available but is no longer offered. Instead, Apple prefers people use the Photos App on their Macs (or iCloud Photos on PC) and manage their photo sharing or copying from there. On your Macs, you should easily be able to select mutiple photos using the SHIFT key by clicking on the first then holding the Shift key and Clicking on the last image you want. All photos between those two are then selected. You can also use a mouse or your trackpad and press and drag to select a range of photos.
Yes, it’s now a total pain to use Photos on iCloud’s website when working with more than a couple of images.
It may also be worthwhile to contact Apple Support again and ask them directly to walk you through the steps of selecting and sharing photos.
Good Luck,
Liz
What if you don’t have an IPAD or a MAC or any other apple product except for an IPHONE, how do you download from the I Cloud to a usb using a bog standard Dell Laptop, been trying for 3 hours now!!!! and quite frankly ready to hang myself!!!!!
Hi Lackers,
Sorry to hear all that frustration on getting photos from iCloud to a USB drive via a Windows PC. Apple does not make it easy! Try the following:
1) Manually download all the files from Apple’s iCloud website to a folder on your PC and then copy/paste or move them to your USB drive
2) Or download iCloud for Windows and find the iCloud folder in your File Explorer. Then, copy the photos from your PCs’ iCloud folder and paste them to your USB Drive
Not intuitive at all!
SK
Thank you SK. That was a really great reply . For a learner I think I got the gist of most of it. No,I haven’t got a Mac or access to one nor have I got access to an Apple store as I live in a small country town. But I can get to a phone provider called Telstra in Australia who sell Apple ipads with a plan. Whether they will have a USB drive for I pad and whether they will sell one is my next move.
I will then look at an app to easily download photos to this USB external device
Will let you know if and when I am successful. I got another apple or itunes bill today so I have a month to fix things up.
Kind Regards
Bruce
Hi Bruce,
I’m glad to help! Since you live in a smaller town, backing up your photos to Google Photos might your best go to option right now. Google photos allows unlimited storage for all your images and videos, as long as each photo or video is under 16MB (per photo) and shot at no greater resolution than 1080p (for video.)
So during this month that you already paid for iCloud, you could move everything over to Google Photos and then when time allows (and budget) clone all those over to an iPad thumb drive.
If you shop online, those iPad Flash drives are available for purchase to ship right to your home. Most of them are pretty easy to use and come with bundled apps for easy downloading of photos, videos, etc to that external device.
Yes, please keep us posted. Your story is sure to resonate with many others!
Cheers,
SK
Please I am an old bloke trying to learn things on the computer. I have accidentally put all my photos to Icloud and will now have to pay a monthly fee forever. How can I transfer photos from Icloud to a USB stick. Then I can progressively reduce Icloud photos by deleting them as I know I will have a copy. When I go to Safari under settings in my Ipad I cant see how to get to preferences and general as per your instructions Step1.
Hi Bruce,
I’m sorry that you’re having some troubles getting your iCloud photos onto a USB stick. The instructions you mention–going to Safari Preferences are for Safari on a Mac computer rather than an iPad. Do you have access to a Mac? It doesn’t have to be your own computer. And if an Apple Store is nearby, they always let you use their Macs to do tasks like this–as long as it’s not a busy time like late afternoons and weekends. Best to visit during the morning on weekdays.
If using a mac is not feasible, they do sell USB drives for iPad/iPhones specifically. These plug into your lightning power port and allow you to expand your physical, on-site storage OR offload large items, like photos, so you can free up space on your iDevice. There’s quite a few manufacturers out there–like SanDisk, Kingston, and so forth.
Many of these also include apps to easily download your photos to that USB external device.
To find the best iPad USB stick, look at online reviews at sites like Amazon and any other merchants you trust. And of course, always read user reviews–that’s where you really find out if a product lives up to its promises.
So, yes, you can avoid the monthly iCloud storage plan charges by investing in an iPad USB stick or moving pictures off your device to a flash device using a Mac. It’s a solid plan–just make sure you keep your iCloud monthly storage until you confirm that all your photos are on that device…and of course, it’s always best to have some kind of redundancy so your pix are stored in two locations.
Consider uploading your photos to a different cloud account, like Google Drive or Dropbox. Or if you are an Amazon Prime Member, they offer completely free and unlimited Photo Storage (called Prime Photos) through the Prime Service.
We love our old blokes! Keep us posted on your photo migration from iCloud. And best of luck,
SK
A person with 11’000 photos to download is not going to select the images one by one… Just saying.
Thank you so much for helping me out, I found the problem. My new external hard drive need install to use it on Mac and after I following your step by step it works. I hold command key then select one by one photo that I want but it doesn’t worry me as long as I can move photos from Icloud to my storage device so I don’t need to buy more and more iCloud storage. Thanks again 🙂
Nia,
Thanks for letting us know. I’m glad you’re able to move all those photos–and yes, what a pain to have to do that one-by-one. I don’t know why Apple doesn’t include a Select ALL button on the iCloud site. Good going!
Cheers,
Liz
Hi…Firstly I have 11,000 photos that I cant select all even though I hold down the command key, I still need to hold the command key and select one by one. Secondly I changed the default download location to my external hard drive but when i download a photo it didn’t save in the external hard drive, it saved in download folder in finder. Is anything that I have done is wrong? Please help me?
I access my icloud from Macbook.
HI Nia,
If you’re doing it from http://www.icloud.com, it’s a bit cumbersome but you can hold down the Command key and select all the photos you want by hovering over them and clicking which one you want. If you’re doing it from the Photos app in the dock, you can hold the Command + A keys.
To download those photos to an external drive, you need to change the default download location in your browser. If that’s Safari, go to Safari > Preferences > General > File Download Location and set that to your external hard drive or set it to Ask for each download.
Hope this helps!
SK
do you need a MacBook todo this ?
The article uses MacBook but We are sure you can do this using your PC and accessing iCloud.
Isn’t there an easy way to “select all” and then download????
Hi Kari,
There the old option to Select All within iCloud on Macs using the Shift Key used to work but doesn’t appear to anymore. One method that sometimes works for Macs is to highlight the word “Photos” from the left-hand column and then click the download cloud–sometimes, this opens a message that asks permission to download multiple photos–if you see this message, select OK.
Some users found the following method to work for Windows 10:
To download all photos and videos using Windows OS:
1) Download and install iCloud Photos on your machine (www.apple.com/icloud/photos/)
2) Open “My Computer” and click on the icon for iCloud Photos
3) In the upper-right corner, find the options to Download and Upload photos
4) Chose the “Download Photos and Videos” and a new dialogue box opens
5) Select “All Photos” OR select an album and click download
Apple is certainly NOT making this one easy!
Cheers,
SK
This is not ok as there is only 1861 items available for download, my iCloud. I did finally get a selection window to select what year of pictures I want to download but it did not work to my PC. Still looking for a solution.
I too am having trouble! Thought this would be such an easy task, but it seems Apple just wants us to pay for more and more storage. I have followed the steps above and the videos don’t transfer to my thumb drive. Photos worked, but not videos. Any suggestions?
Hi Jamie,
This usually works the same exact way for videos. I just did a test with both Safari and Chrome and was able to download a video to an external thumb drive following these directions. Are these videos home movies that you filmed on your iDevice or are they other types of video content?
Liz
No response I notice to the others above with this issue but I as well cannot choose “select photos” as stated in the article. There is no way to transfer photos from icloud to my external hard drive. Please help with what to do!!!!!!
Hi Jade,
Sorry that these steps are not working for you. It looks like the icloud site changed its interface a bit. Instead of select photos, there is now a download button (cloud with the arrow facing downwards.) Select multiple photos by holding down the command key and continue holding until all photos are selected. After selecting all those photos you’d like to download, click that download cloud (arrow facing down.) Now, all the selected photos download to your default location. If using Safari, follow the steps listed in the article to change that location to your external drive.
Apologies for not updating this article sooner. We’ll update it now.
Best of luck and keep us posted,
Liz
Is frustrating how difficult it is… to copy photos form I Cloud to flash drive or else… I have no option to select photos button as described on instructions…” scroll down to the end of the photos and select photos” Even after selecting one by one there is no option to copy and paste or save as into my flash drive that I could find…please somebody help us.
For some reason I don’t have an option to select photos at all! Do you know why this is or how I can select them another way. I have almost 1000 pictures so one at a time is not an option lol. Thanks
I have over 7000 photos I want to back up. I tried this method and it just crashes Safari as it actually tries to open and save each individual picture. Know of any other way?
James, If you are using a Macbook, Simply open the photos App, Go to Preferences on the menu > Download Originals to this Mac. That will back up your photos into your local machine assuming your photos are synced with iCloud. The direct download from iCloud.com works well when you have a manageable set of photos or videos. Good Luck and Thank You for your comment. We will make sure to update the article to show the steps.