It’s absolutely wonderful being able to always have a device with you that is able to capture the most precious and exciting moments in your life. But just because you wanted to take or save a picture of something, doesn’t mean that it should be available and accessible for anyone to see. There are ways to hide folders, documents, and files from your devices in various ways, and that includes being able to hide photos on iPhone, iPad, and Mac.
The steps you need to take in order to hide Photos on iPhone and iPad is about as straightforward as you could want. The best part about it all is that you don’t need to rely on third-party apps or services in order to do so. Thanks to Apple building this feature into the Photos app, you can hide Photos on iPhone and iPad as soon as you snap (or save) a picture.
Open the Photos app on your iPhone and/or iPad.
Locate and open the album that you want to view.
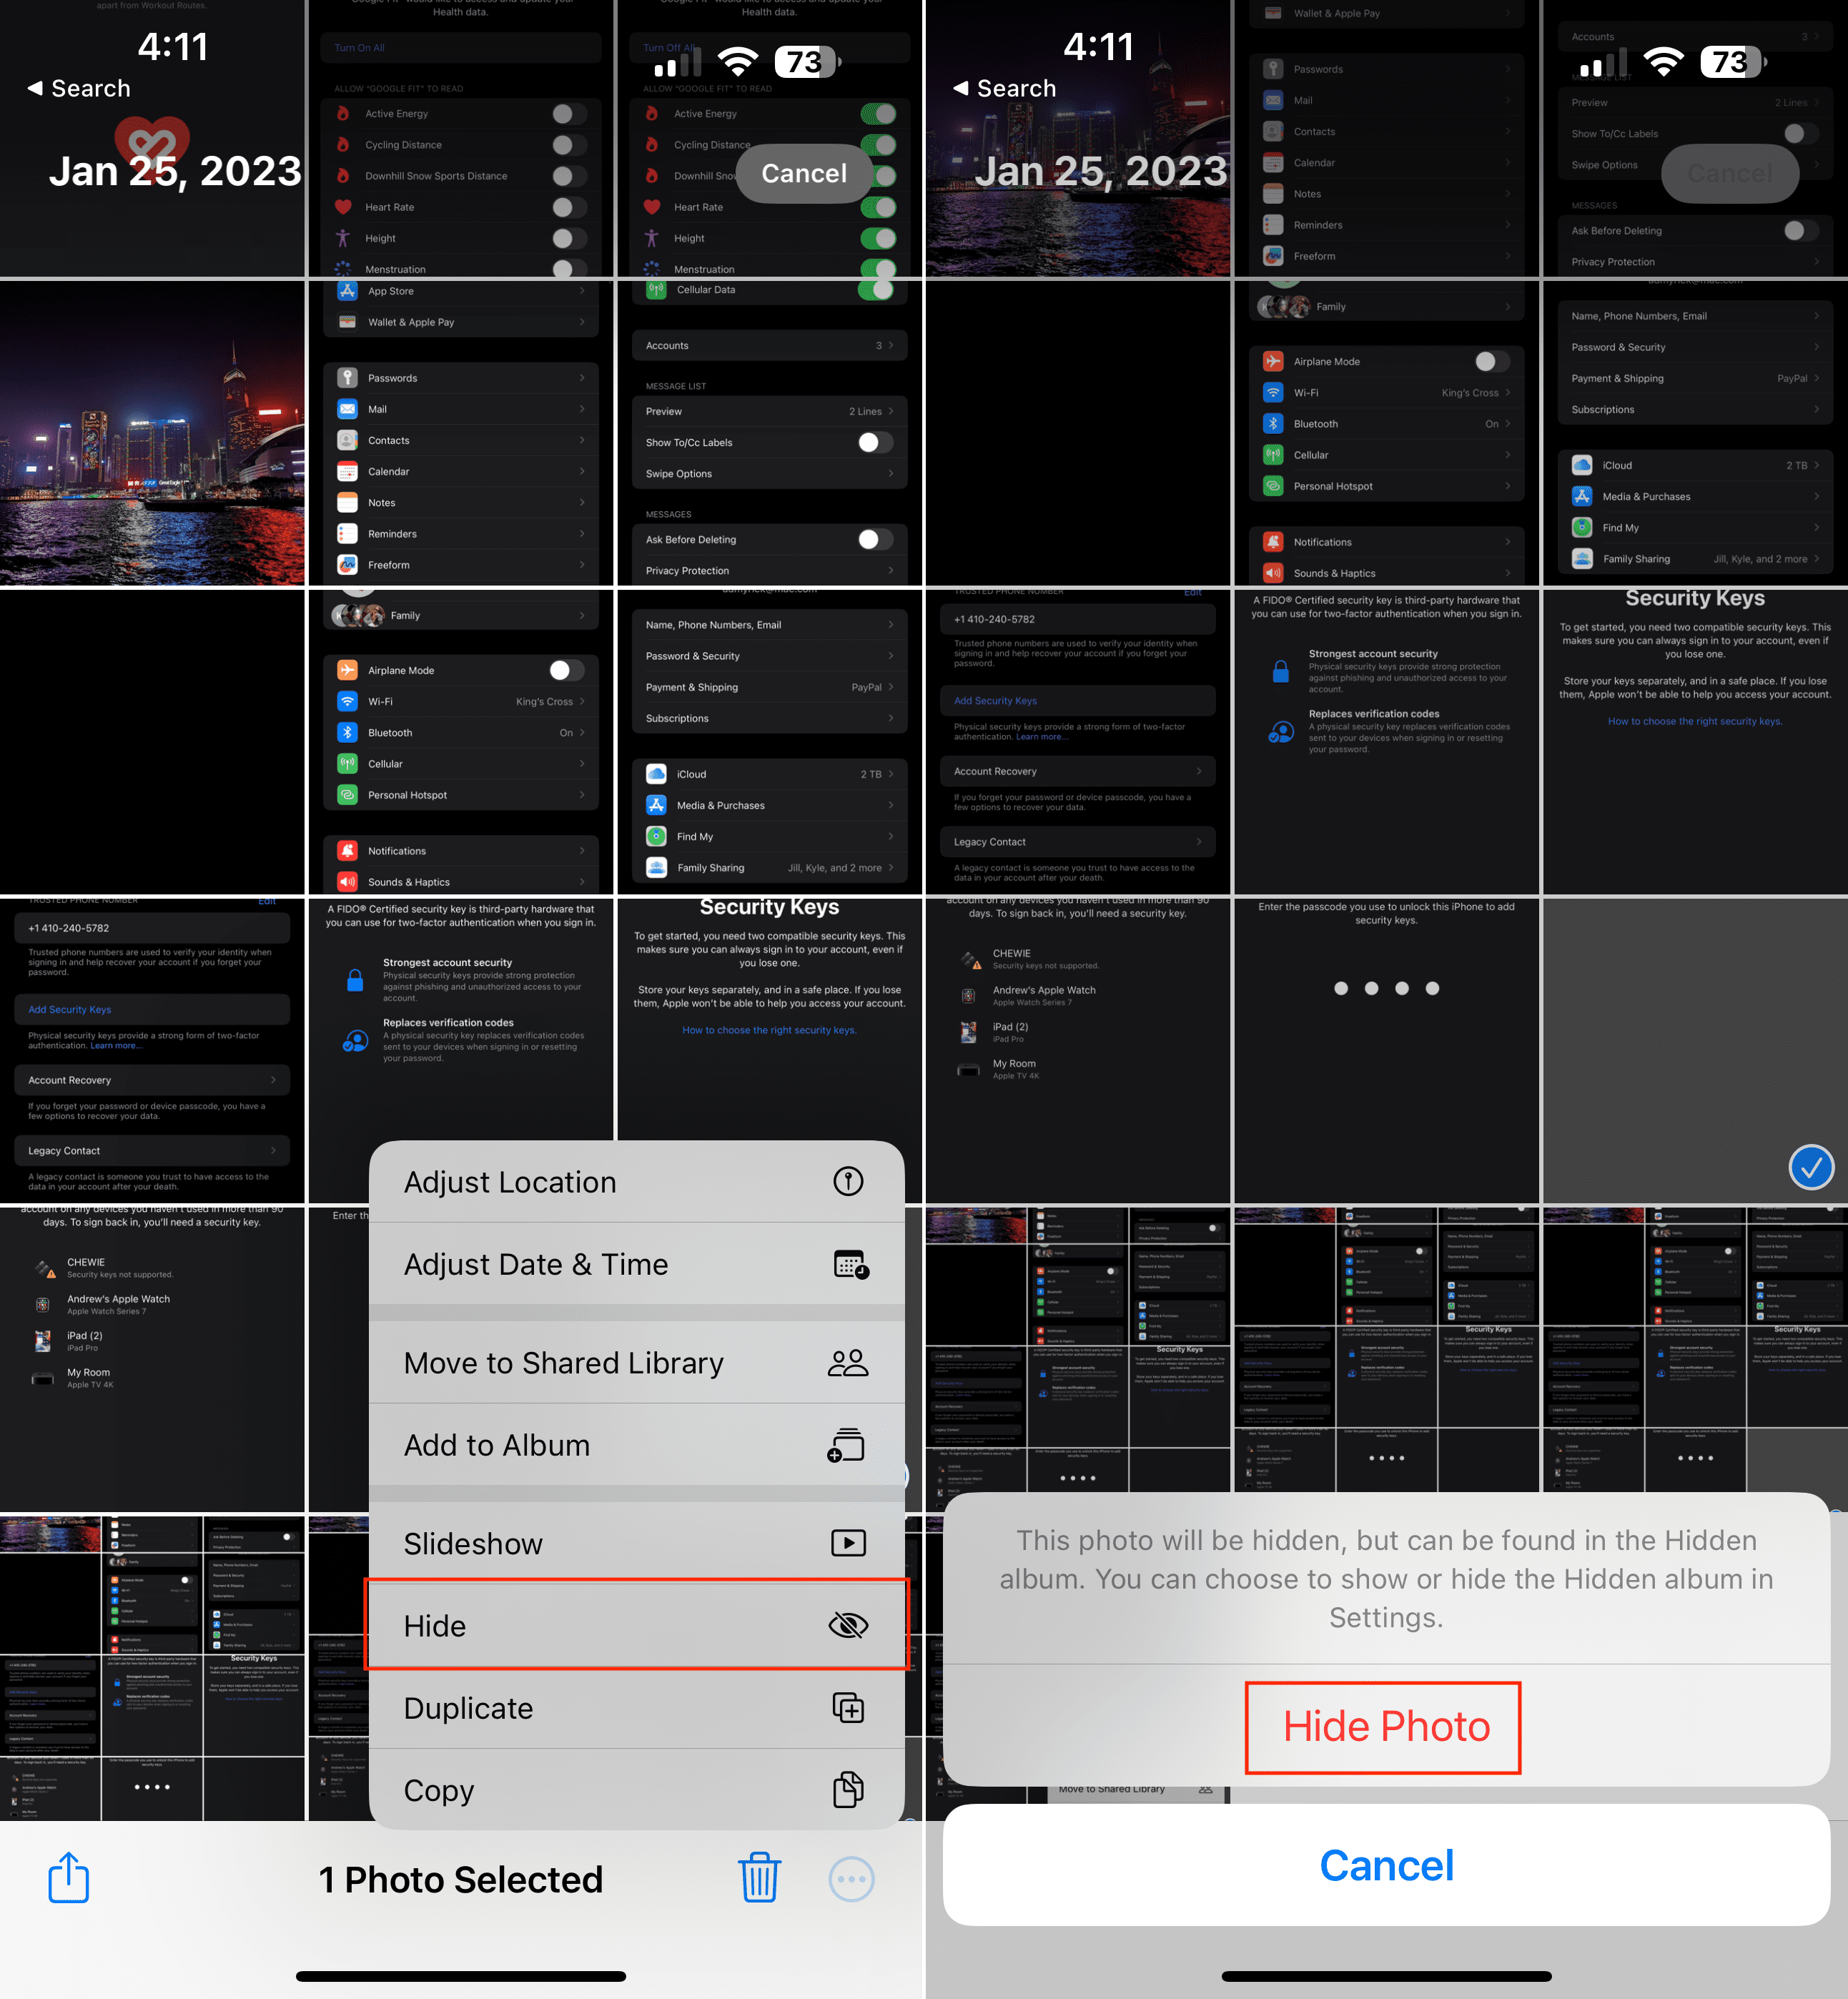
Tap the Select button in the top right corner.
Select the photos and videos that you want to hide.
Tap the Ellipsis (…) button in the bottom toolbar.
From the context menu that appears, tap the Hide button.
Tap the Hide [#] Photos button.
As soon as you tap the Hide Photos button, whatever images or videos that you selected will be removed from the main Library view in the Photos app. They aren’t deleted from your device, but are instead moved to a different album entirely, and one that is secured with Face ID, Touch ID, or a passcode.
How to Hide Photos on Mac
If you’re someone who prefers to manage their Photos library on the Mac, Apple makes this extremely easy thanks to the built-in Photos app. With the help of iCloud Photos, all of the photos and videos that you capture will sync across your devices. Plus, you can also hide Photos on Mac.
Open the Photos app on your Mac.
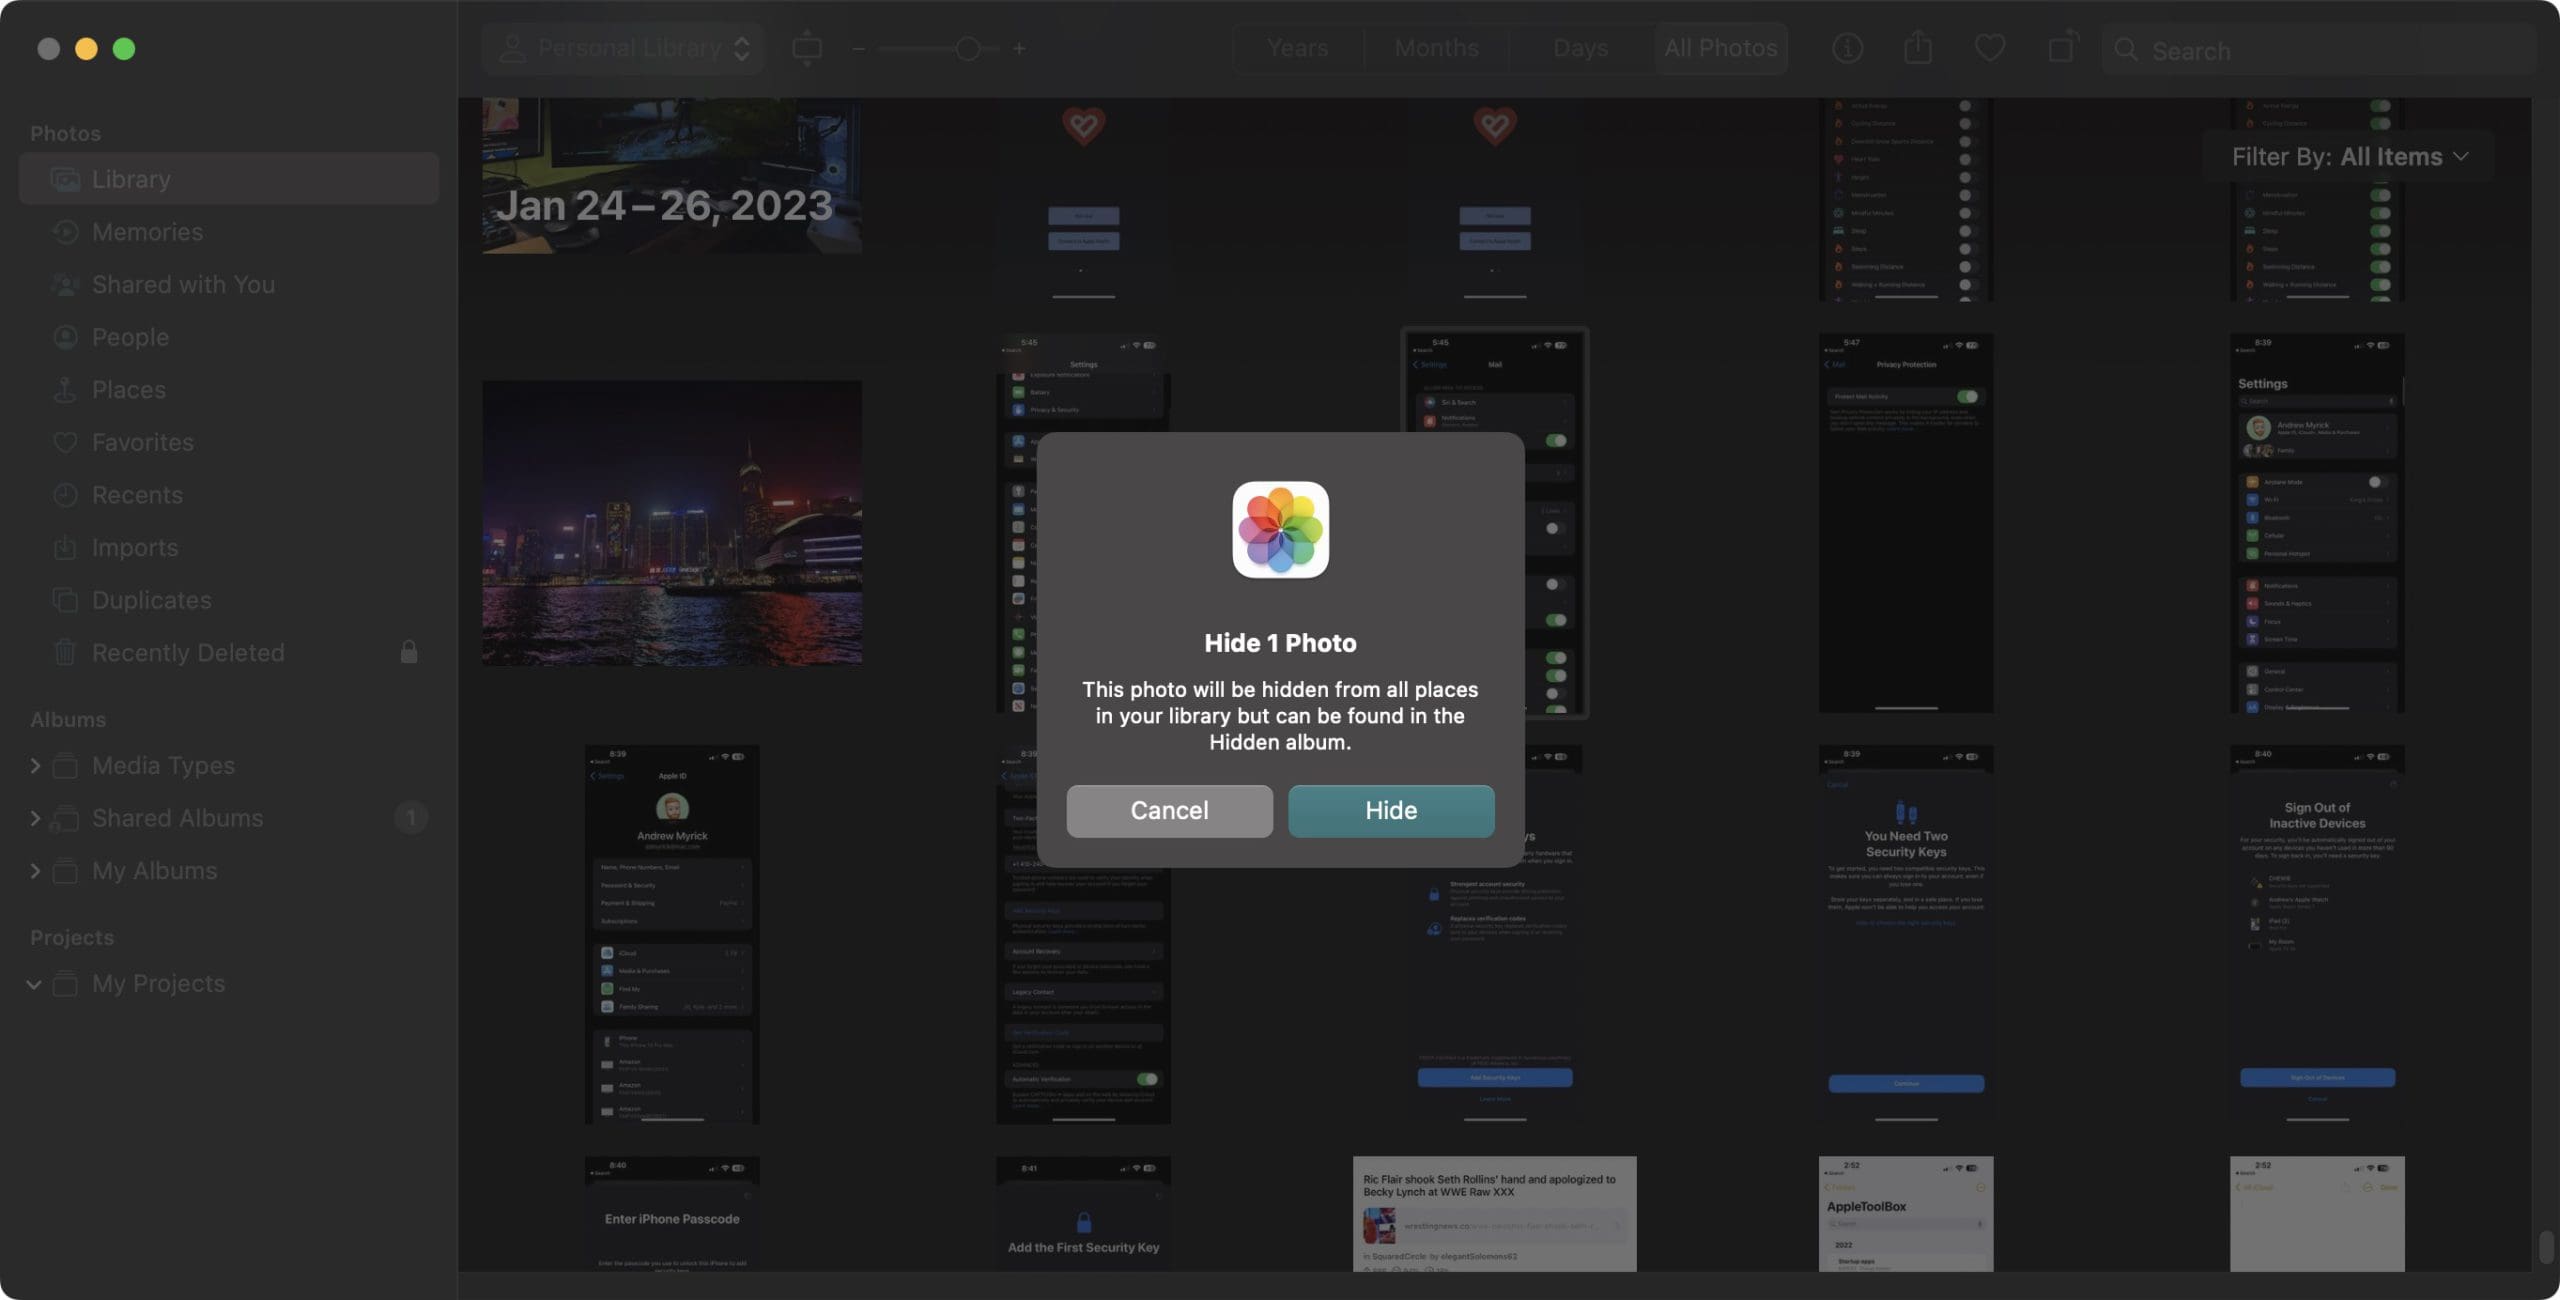
Click Library under the Photos section in the sidebar on the left.
Locate the photo(s) and/or video(s) that you want to hide.
Right-click the photo you want to hide.
From the drop-down menu, highlight and select Hide [#] Photos.
Click the Hide button to confirm.
How to View Hidden Photos
No matter whether you hide photos on iPhone, iPad or Mac, performing the steps above will move the images and videos to a new “Hidden” album. This is accessible across all of your devices, and also syncs in the same way that the rest of your iCloud Photo Library does. Nevertheless, here’s how you can view hidden photos:
Open the Photos app on your iPhone and/or iPad.
Tap Albums in the bottom toolbar.
Scroll all the way to the bottom of the list of Albums until you reach the Other Albums section.
Tap Hidden.
Authenticate using Face ID, Touch ID, or your iPhone’s passcode.
Once you’ve provided authentication, you’ll be able to view all of the photos and videos that are hidden from any of your other albums within the Photos app. You can go so far as to unhide these by selecting the image or video, tapping the Share button, then tapping the Unhide button. Then, it will be moved back into the “Main” album with your Photos app.
How to Hide Photos on iPhone and iPad with Apple Notes
Apple has allowed you to lock your notes in Apple Notes for a while now, but the process was rather frustrating. Currently, it requires you to create a unique password in order to lock and unlock any notes. Needless to say, it’s not exactly the quickest way to get into a note that you need to access. But with iOS 16 and iPadOS 16, you can finally, use your device’s passcode in order to lock notes. Here’s how you can set up that feature:
Open the Settings app on your iPhone or iPad.
Scroll down and tap Notes.
Tap Password.
If using this setting for the first time, you’ll see a new prompt appear.
Tap either Use iPhone Passcode or Create Password.
Authenticate the changes using the method offered (Face ID, Passcode, or Touch ID).
Once you’ve completed the steps above, you’ll be able to lock notes using your iPhone’s passcode, Face ID, Touch ID, or with a created password. The ability to use your iPhone’s passcode is one of the latest features to arrive in the Apple Notes app. Previously, you could only lock notes behind a self-created password.
Obviously, before you can hide Photos on iPhone, iPad, and Mac using the Notes app, you’ll need to actually add an image to a Note. Here are the steps you’ll need to take in order to add an image to Apple Notes:
Open the Apple Notes app on your iPhone or iPad.
Tap the Compose Note button in the bottom right corner.
When the keyboard appears, tap the Camera button in the toolbar above the keyboard.
From the context menu, select one of the following:
Choose Photo or Video
Scan Documents
Take Photo or Video
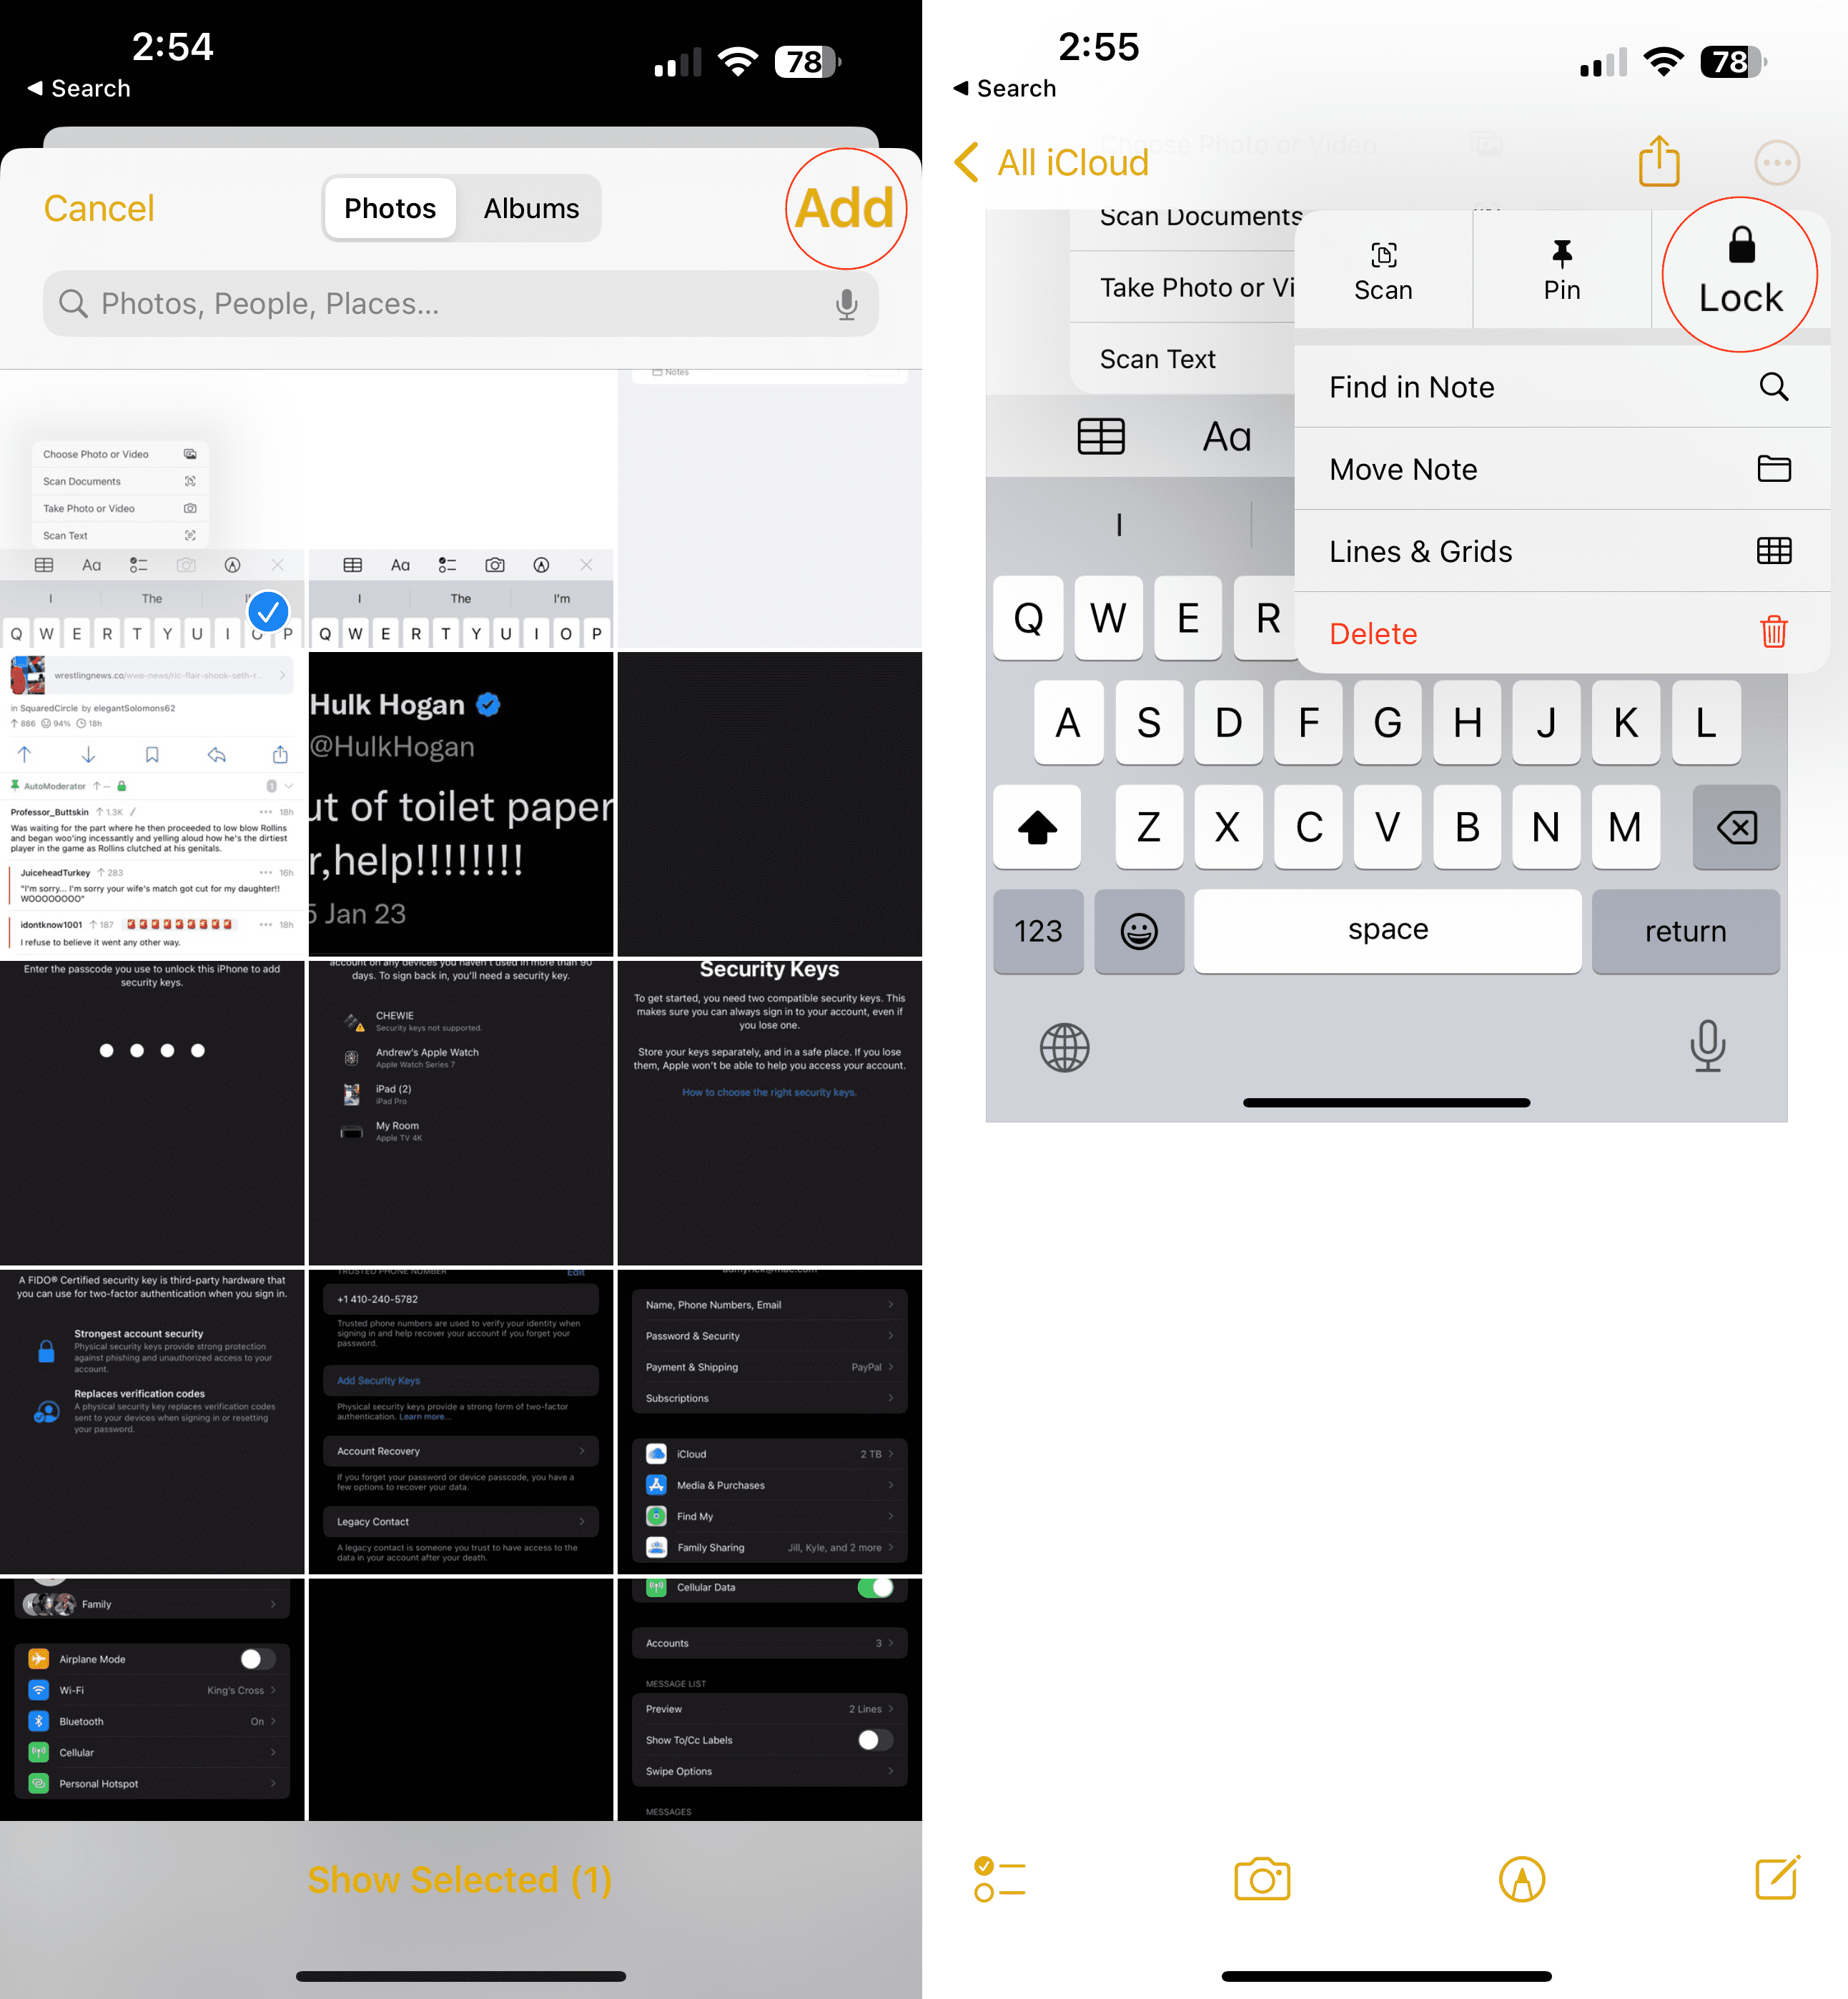
If you opted for Choose Photo or Video, select the image(s) or video(s) that you want to hide.
Tap the Add button in the top right corner.
After the photos or videos have been added, tap the Ellipsis (…) icon in the top right corner.
At the top of the drop-down menu, tap the Lock button.
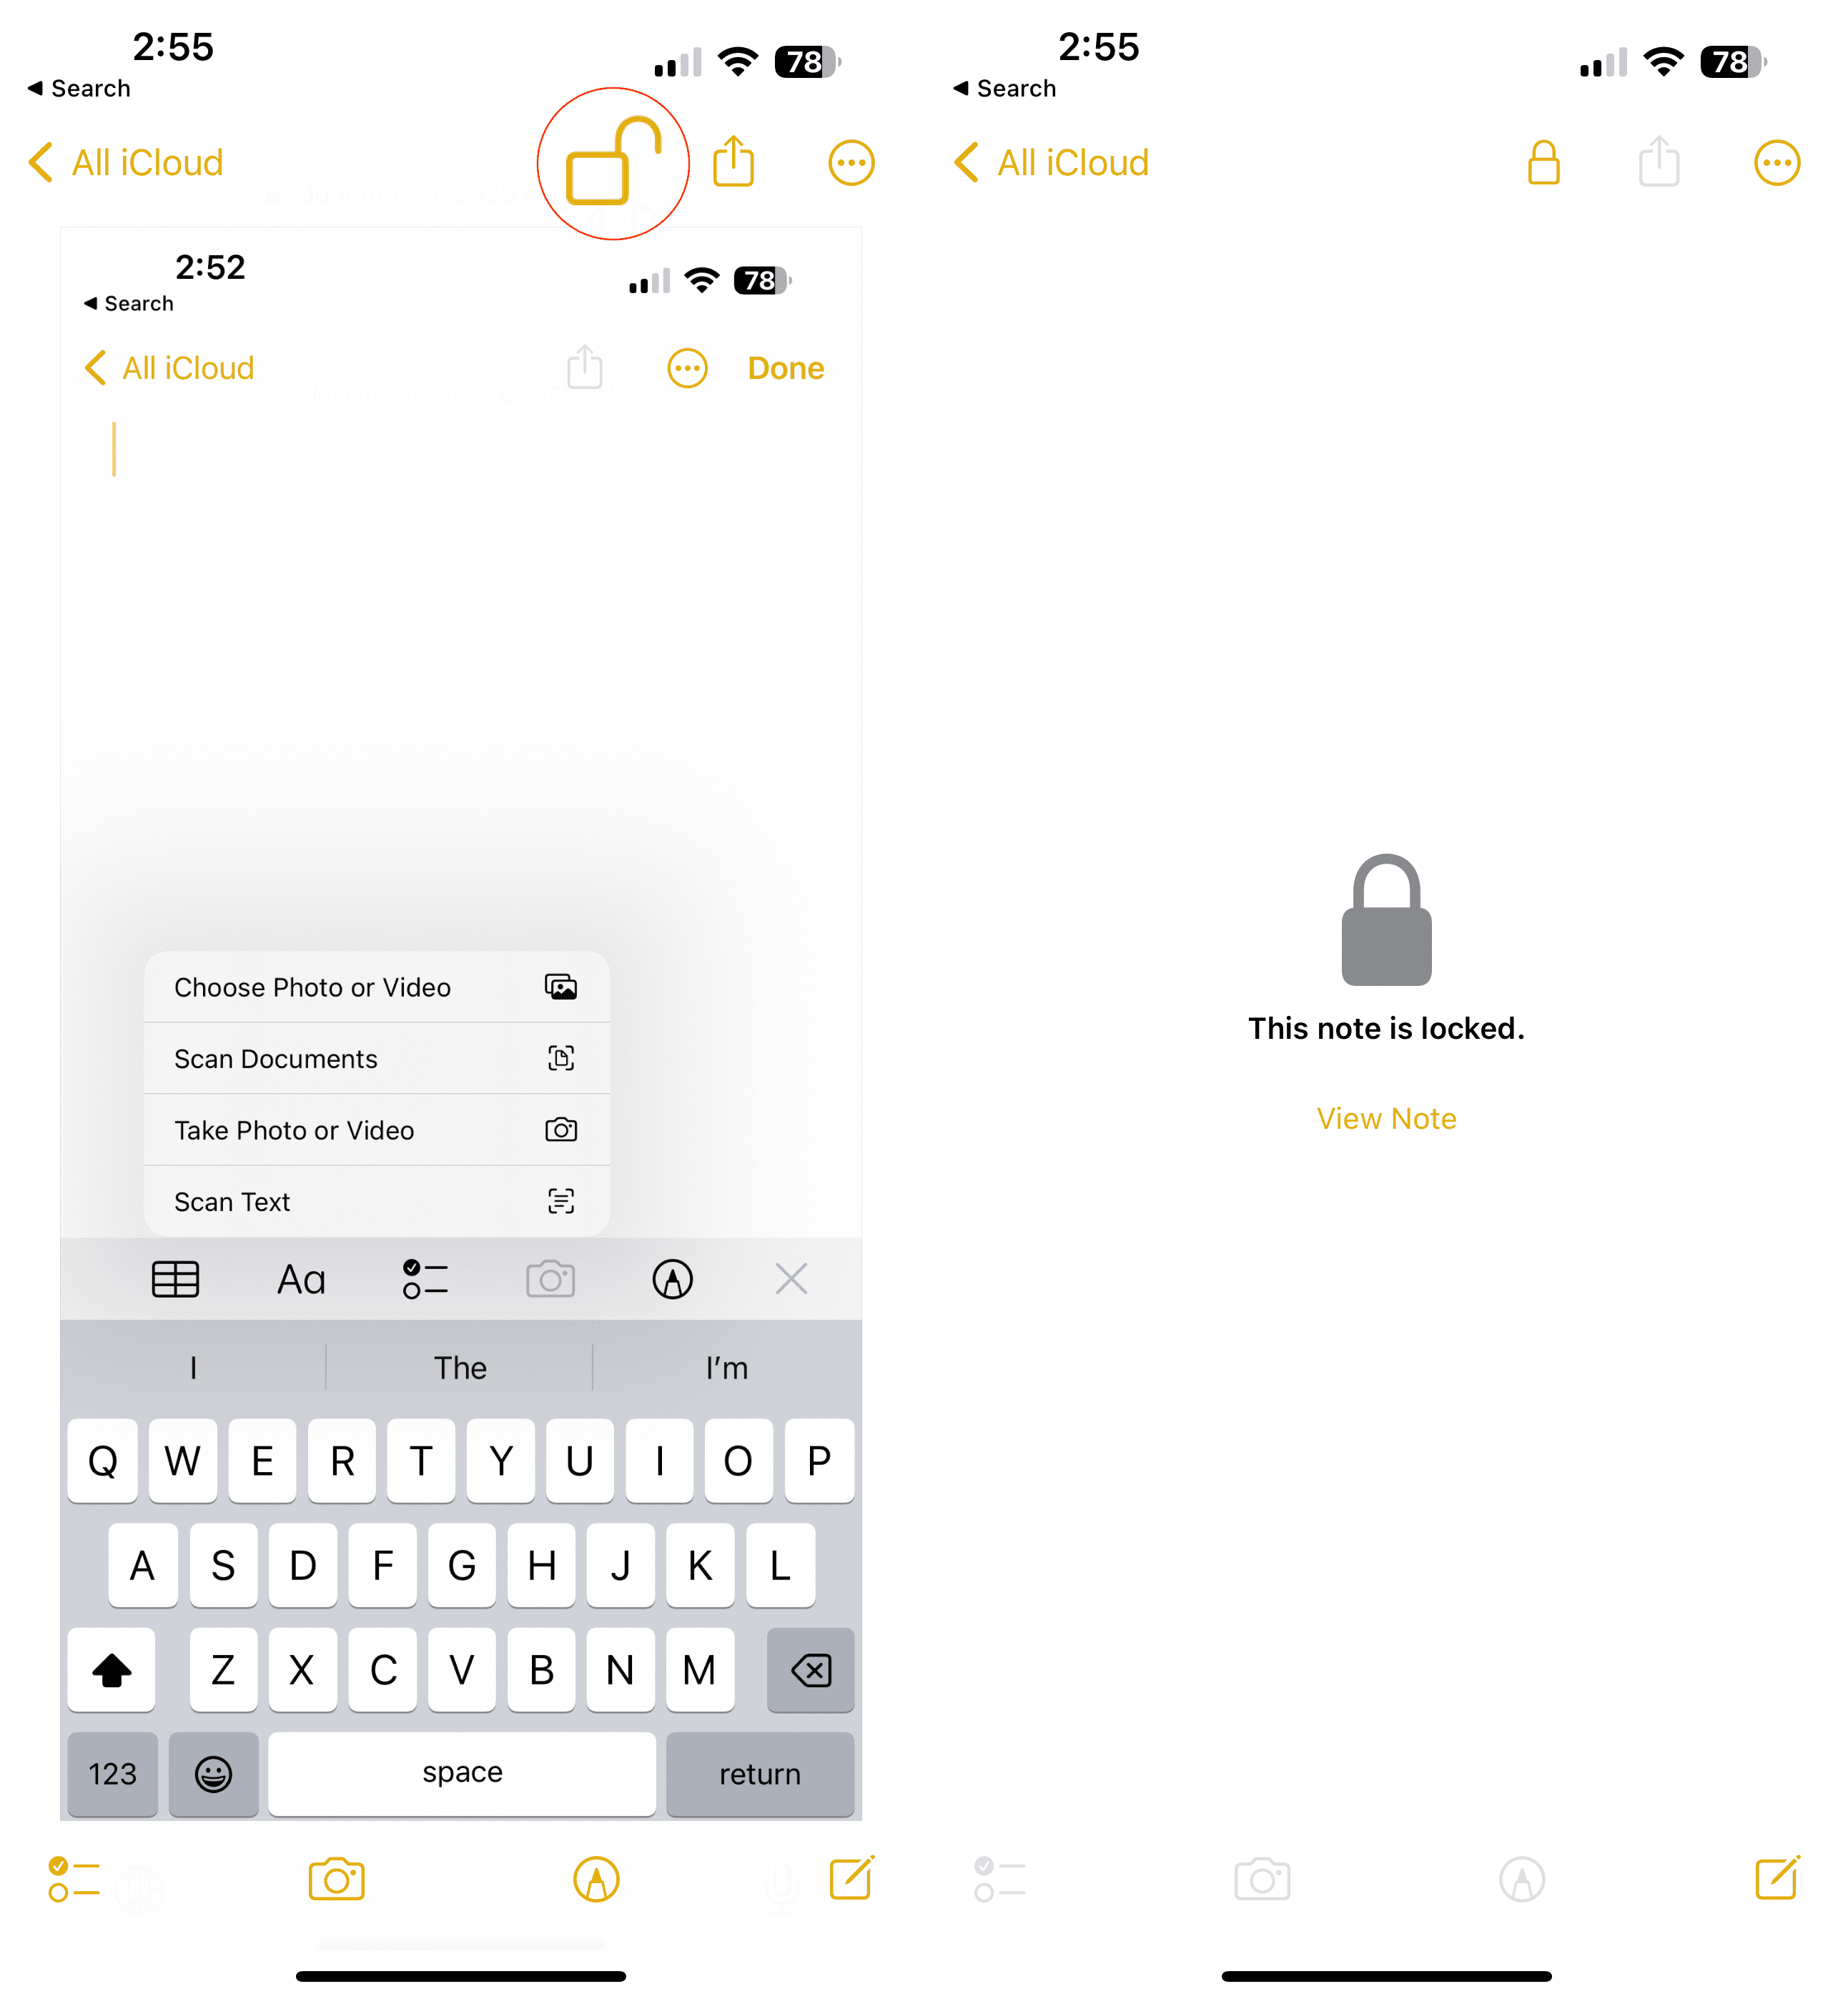
Authenticate using Face ID, Touch ID, or your Passcode / Password.
Tap the Lock icon in the toolbar to lock the note.
Now you are able to lock your notes right from the Notes app. You will not be able to see a preview of them from the Notes overview, and authentication is required in order to unlock them. And thanks to the improvements to Smart Folders in iOS 16 and iPadOS 16, you can even create a Smart Folder that houses only notes that are locked.
Andrew Myrick is a freelance writer based on the East Coast of the US. He enjoys everything to do with technology, including tablets, smartphones, and everything in between. Perhaps his favorite past-time is having a never-ending supply of different keyboards and gaming handhelds that end up collecting more dust than the consoles that are being emulated.


Write a Comment