How to Import Videos from iPhone to Windows: Method 1
This first method uses a USB cable. Make sure you use the correct Lightning Cable with an end that attaches to your iPhone.
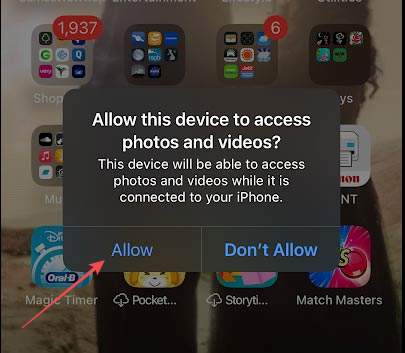
Step 1. Plug Your iPhone into Your Windows PC or Laptop
Plug the Lightning end of the cable into your iPhone and the other end into your Windows PC USB socket. Wait a few moments and you should see a message on your iPhone asking you if you want to allow the device to access photos and videos. Click “Allow.”
Step 2. Open File Explorer on Your Windows PC
Click the Start button (the one that looks like a window in four squares) then click File Explorer. This opens up every folder you can access from your Windows PC. Look for “This PC” on the left-hand side. Click here, then double-click the “Apple iPhone” icon in the main box.
Step 3. Find Videos You Want to Import
From here, you may have to double-click an Internal Storage logo and then a folder called DCIM. This stands for Digital Camera Images, so you know you’re in the right place. Now, you’ll see folders with dates indicating the month and year. Double-click the date you want and you’ll see all the videos and photos you took during that month.
Step 4. Right-click the Video You Want to Save
If you want to save individual videos, right-click each one to see a menu similar to the one pictured above. Choose “cut” or “copy” to move them to a location of your choice. Alternatively, you can right-click anywhere in the folder, click “Select all,” and follow the same step.
Once you’ve finished moving the videos you want to keep, simply disconnect the iPhone cable from your PC.
How to Import Videos from iPhone to Windows: Method 2
You can also use a photo-sharing/storage app like Dropbox or Google Photos to import videos to your PC.
Step 1. Install a Photo-Sharing App on Your iPhone
Choose your favorite photo-sharing app and ensure it offers an iOS version for iPhone. Google Photos, Dropbox, and Microsoft OneDrive are all viable options. You can also simply use the iPhone’s iCloud option for this.
Step 2. Make Sure Your Videos are Backing Up to the Photo-Sharing App
The instructions for this will vary from app to app. Most apps will automatically ask you if you want to back up images and videos. Simply allow this when prompted. Above you can see how Google Photos looks when it’s backing up — below this, you would normally see your Gmail address.
Step 3. Open the Photo Sharing App on Your PC
Go to the web-based version of the same app on your Windows PC. You will see an interface similar to the one for Google Photos, shown above. Simply click “Photos” to see all your pictures and videos. Click the video you want to keep and look for the “Download” button.
Top tip: On Google Photos, pressing Shift and D together will automatically download any video or photo.
Benefits of Importing Videos from Your iPhone to Your PC
No matter the capacity of your iPhone, it will eventually fill up if you keep taking videos. Importing them to your Windows PC helps free up space and keep your iPhone running more smoothly.
It’s also a great way to ensure you never lose any precious memories. You may even find it easier to share your videos from your PC.
If you need to repeat the process, simply retrace the steps above for your preferred method.
As an avid gamer, I’ve run into my fair share of error codes and weird faults that have forced me to find fixes to problems I never anticipated. That gave me a passion for sharing those fixes with others so we can all game without feeling like our hardware is rebelling against us.


Write a Comment