What if there was a little-known iPhone setting that could actually speed up your device and protect your privacy? There is and it’s called a DNS resolver.
What it is and how it works is a bit complicated, but it’s actually extremely easy to set up. Here’s what you need to know.
To understand what a DNS Resolver does, and how it could help you, we’ll need to explain a couple things as best as we can.
Domain Name System (DNS)
First of all, DNS is an acronym for Domain Name System (DNS). And any discussion about them is bound to get really techy, really fast.
Basically, DNS is how a domain name — like appletoolbox.com — is translated to the IP address on the server in which it’s hosted.
Computers and servers have unique IP addresses assigned to them, like an address or a phone number. But thankfully, we don’t have to remember these addresses to get to our favorite sites.
DNS, which is basically the directory or “phonebook” of the internet, does all of this in the background. Basically, you type in a web address, hit enter, and DNS automatically brings you to the proper location.
A DNS resolver, then, is basically the system responsible for actually taking your query — a domain name — and resolving it to what you’re looking for.
In other words, it translates that domain name into a tangible IP address. Typically, the DNS resolver server is tied to your internet service provider (ISP).
But not all DNS servers are created equally. Depending on the entity that owns them, their privacy practices can vary wildly. That’s especially worrying because a DNS resolver could basically allow these entities to “see” and possibly log every single website you’ve ever visited.
Thankfully, you’re not stuck with your default DNS service. And as an added bonus, some third-party DNS resolvers actually boast faster speeds and quicker resolutions.
What are the Options?
There are a wide variety of free DNS resolvers available today and they each have different benefits. But, in the end, they’re probably all superior to the default DNS you’re using.
OpenDNS (208.67.222.222), for example, is a free DNS service that lets users block malicious domains and filter out adult content automatically. You can read about OpenDNS by clicking the link below.
Google also has its own free DNS service appropriately dubbed Google Public DNS. It’s an extremely popular unfiltered option that boasts better privacy features than other DNS services. You can learn more about that option below.
For the purposes of this article, however, we’ll focus on Cloudflare’s new DNS service.
It’s a relatively new service, as it just launched a few days ago. But it might just be the best one currently available.
Cloudflare’s DNS server (1.1.1.1) never stores any data that can be used to identify an end user (including your IP address). Similarly, it wipes any logs collected by its resolver within 24 hours. This probably goes without saying, but your data will also never be sold to advertisers or used for targeted advertising.
But, arguably, its best feature is its speed. Currently, Cloudflare is probably the fastest free DNS server available — it even outperforms Google’s Public DNS.
It achieves this speed through a variety of factors, including what the firm calls an “innovative distributed cache.” Either way, it results in a faster browsing experience for you.
You can learn more about Cloudflare 1.1.1.1 by clicking the link below.
As of iOS 11, Apple has made it relatively easy to add and edit your device’s DNS settings. If you’re running at least iOS 11, you can use the steps below. If not, then skip ahead to the “note.”
How to Switch to a New DNS Server
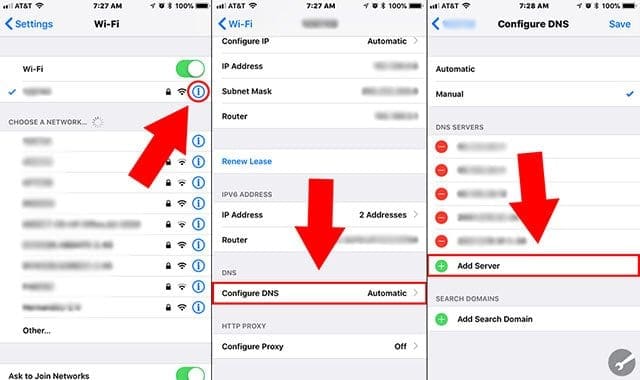
Open Settings.
Tap on Wi-Fi.
Tap on the small “i” icon next to the Wi-Fi network that your device is currently connected to.
Under the DNS menu, tap on Configure DNS.
If you’ve never messed with this setting, it’ll likely be set to Automatic. Tap on Manual.
You should then see an Add Server option pop up on the screen next to a green plus sign. Tap on it.
Type in 1.1.1.1 and confirm.
Tap on Add Server again.
Type in Cloudflare’s backup resolver: 1.0.0.1
Tap Save. Optionally, you can delete the previously stored DNS server. That way, Cloudflare’s DNS will be the only server your device uses.
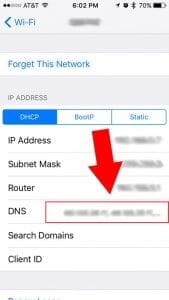
Note: In iOS 10 and previous versions, you’ll need to add the DNS addresses manually. Follow the steps below.
Open Settings.
Tap on Wi-Fi.
Tap on the small “i” icon next to your current Wi-Fi network.
Tap on the text field labeled DNS.
Delete the existing DNS Servers by hitting Backspace until they’re gone.
Enter 1.1.1.1 and 1.0.0.1 into the field.
Tap on Wi-FI in the top-left corner to go back to the previous menu. The changes will be saved automatically.
We hope that you found this article helpful. Since security and privacy have become hot topics these days, we think that understanding DNS and being able to change it is an essential skill. Please let us know if you have any questions in the comments below.
Mike is a freelance journalist from San Diego, California.
While he primarily covers Apple and consumer technology, he has past experience writing about public safety, local government, and education for a variety of publications.
He’s worn quite a few hats in the journalism field, including writer, editor, and news designer.
I updated my DNS to this 1111 and 1001 and noticed a day later somehow it was back to “ automatically “ detect with the old DNS. How could this happen?
i purchased old iphone with locked find my phone and apple id of some one, i try to erased all setting but is now asking me to enter apple id and password to activate it.
how can i activate it ?


")


I updated my DNS to this 1111 and 1001 and noticed a day later somehow it was back to “ automatically “ detect with the old DNS. How could this happen?
Hi Julie,
If you connect to a different WiFi network, you can see this behavior. Or updating your device’s iOS.
i purchased old iphone with locked find my phone and apple id of some one, i try to erased all setting but is now asking me to enter apple id and password to activate it.
how can i activate it ?
Hi Ochan,
Please take a look at this article for more information
I followed this but there is also an entry for search domain. What is the appropriate entry for Cloudflare?