• Skip to primary navigation
  • Skip to main content
  • Skip to primary sidebar
  • Skip to footer

AppleToolBox

Tools and Fixes for Mac, iPad, iPhone & iWatch

Search posts

  • About
  • Contact

CONNECT WITH US

CATEGORIES

  • iPhone
  • iPad
  • iPod
  • Apple Watch
  • Mac/MacBook
  • AirPods
  • Apple TV
  • News
  • Apple Services
  • HomePod
  • Reviews

SITE

  • Home
  • About Us
  • Contact
  • Advertise

Search posts

You are here: Home / Mac / How to Transfer Data From PC to Mac via Cable

How to Transfer Data From PC to Mac via Cable

By Louis Roundtree 0 comments Last updated November 21, 2025

Things to Know
  • Using a cable to transfer data is possible between specific MacBooks with Silicon cores, Thunderbolt Port hardware, Thunderbolt Bridge software, and some PCs. Mac to PC connections require an interface (such as the cloud or a USB device), Ethernet, or Bluetooth.
  • Most Thunderbolt cables can be used for data transfer, including the stock one you might receive with your device.
  • This method uses a Thunderbolt cable, so you may need a port on your PC that accepts it.

Typically, when you need to transfer files between different PCs, your first thought might be to use cloud storage or a USB. But if you have a lot of files to pass between a MacBook and a PC that are in the same room, you can use a cable instead. Here’s how to transfer data from PC to Mac via cable.

Contents

  • How to Transfer Data From PC to Mac via Cable
    • Part 1: Changing Windows Settings
    • Part 2: Connecting and Changing Mac Settings
    • Part 3: Undoing Settings Changes

How to Transfer Data From PC to Mac via Cable

Using a cable to transfer data from PC to Mac without internet still technically emulates a local area network (LAN), just with the Thunderbolt acting as the old Ethernet cable. This means you’ll need to set up your PC to act as the server, where the Mac will connect as the client and “see” a folder to copy files.

Part 1: Changing Windows Settings

The first thing you have to do is change how your PC acts with a Thunderbolt cable attached to it.

Step 1. For convenience, put all files that you want to share in a single folder, then go to its parent (the folder that contains that folder).

Step 2. Right-click on the folder you want to share and select “Properties.”

How to Transfer Data From PC to Mac via Cable 1

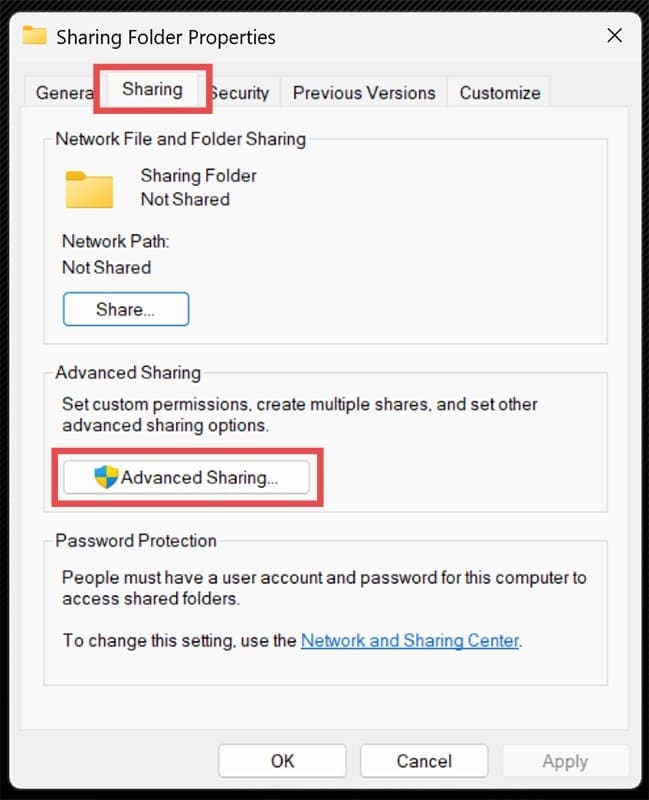
Step 3. Go to the “Sharing” tab at the top and select “Advanced Sharing.”

How to Transfer Data From PC to Mac via Cable 2

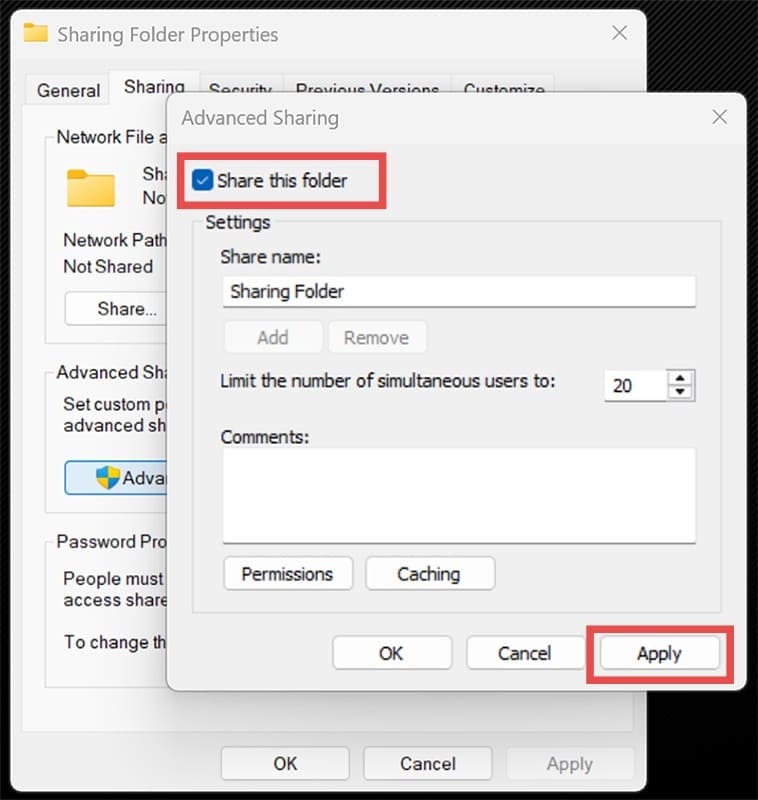
Step 4. In the new dialog, check the “Share this folder” box and select “Apply.”

How to Transfer Data From PC to Mac via Cable 3

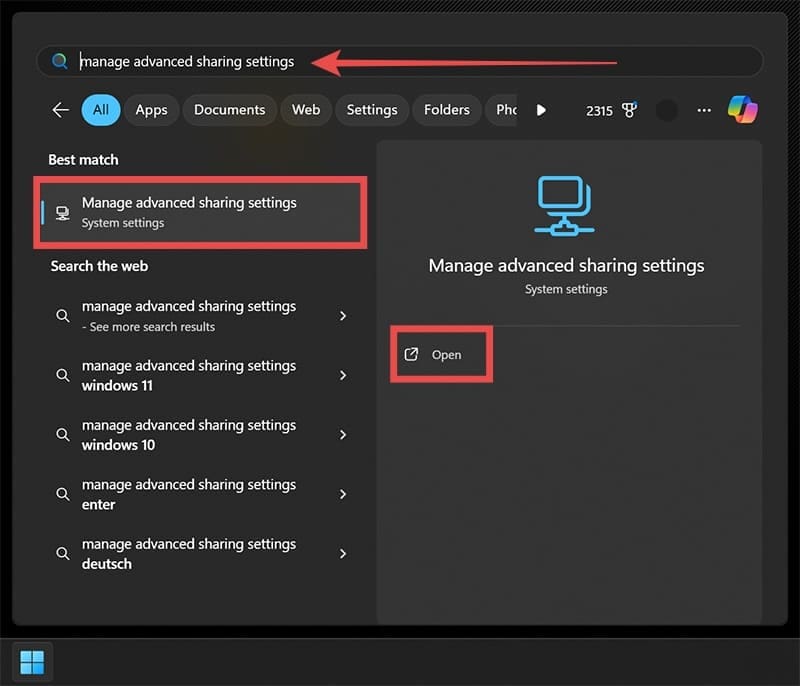
Step 5. Go to the search bar and enter “Manage advanced sharing settings,” then select the result. Alternatively, go to Settings, choose “Network and internet” on the left, click on “Advanced network settings,” then select “Advanced sharing settings.”

How to Transfer Data From PC to Mac via Cable 4

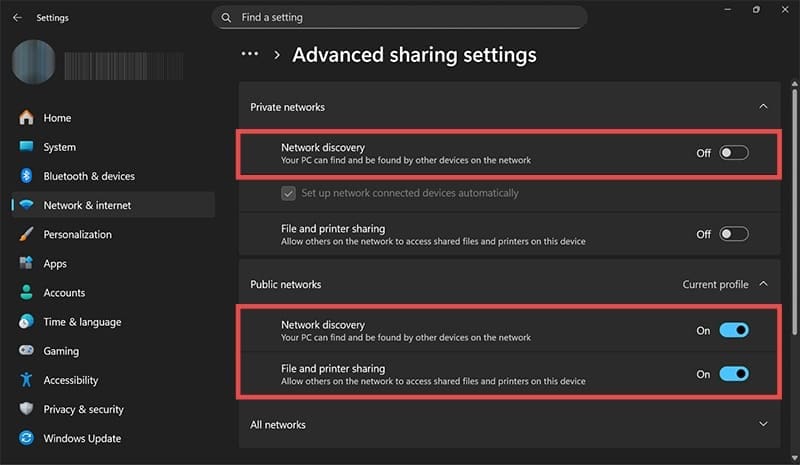
Step 6. Expand the listing for “Current profile” (to be safe, opt for a Private network) and enable both “Network discovery” and “File and printer sharing.”

How to Transfer Data From PC to Mac via Cable 5

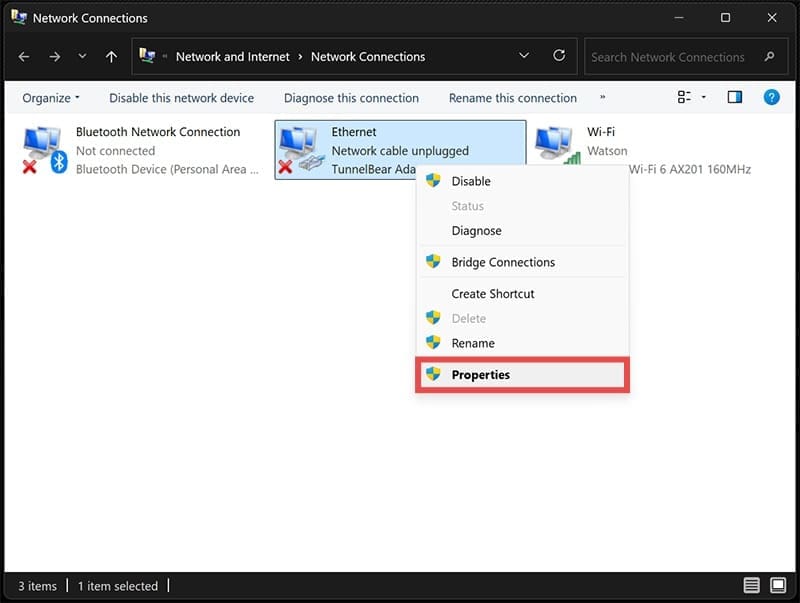
Step 7. Search for “View network connections” (with the Thunderbolt plugged in).

How to Transfer Data From PC to Mac via Cable 6

Step 8. The Thunderbolt connection may be labeled as “Ethernet” or “Unidentified network connection” if your PC detects the cable (i.e., has a Thunderbolt port) but not what it’s connected to. Right-click on it and select “Properties.”

How to Transfer Data From PC to Mac via Cable 7

Step 9. From the list, toggle on “Internet Protocol Version 4 (TCP/IPv4)” then click on “Properties” below the list.

How to Transfer Data From PC to Mac via Cable 8

Step 10. Enter the following values:

  • IP address: 192.168.10.2
  • Subnet mask: 255.255.255.0
  • Preferred DNS server: 8.8.8.8

How to Transfer Data From PC to Mac via Cable 9

Part 2: Connecting and Changing Mac Settings

You’ll need to partially replicate these changes on your MacBook.

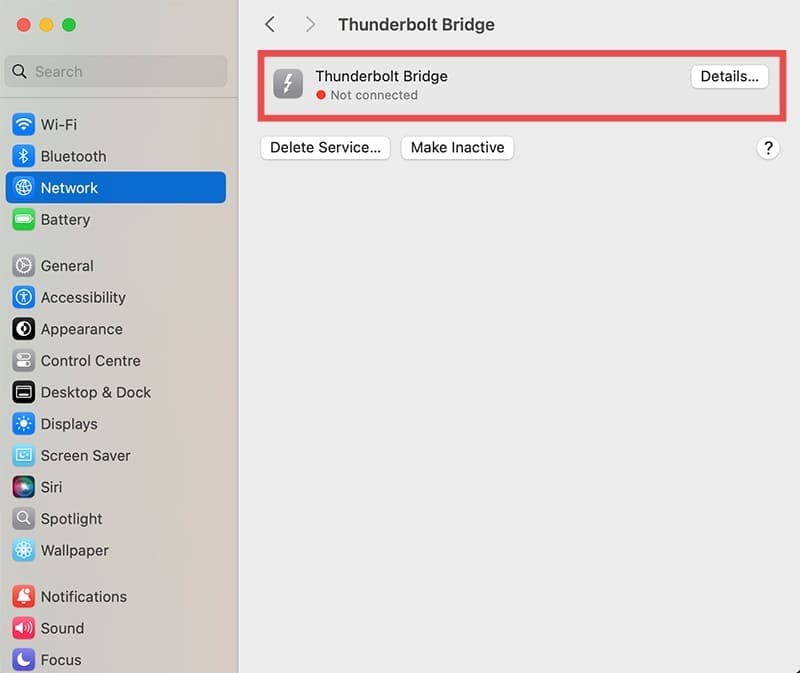
Step 1. Go to System Settings and click on “Network.”

How to Transfer Data From PC to Mac via Cable 10

Step 2. Find “Thunderbolt Bridge” that reads as “Not connected” and open it.

How to Transfer Data From PC to Mac via Cable 11

Step 3. Go to “Details” and select “TCP/IP” from the tabs.

How to Transfer Data From PC to Mac via Cable 12

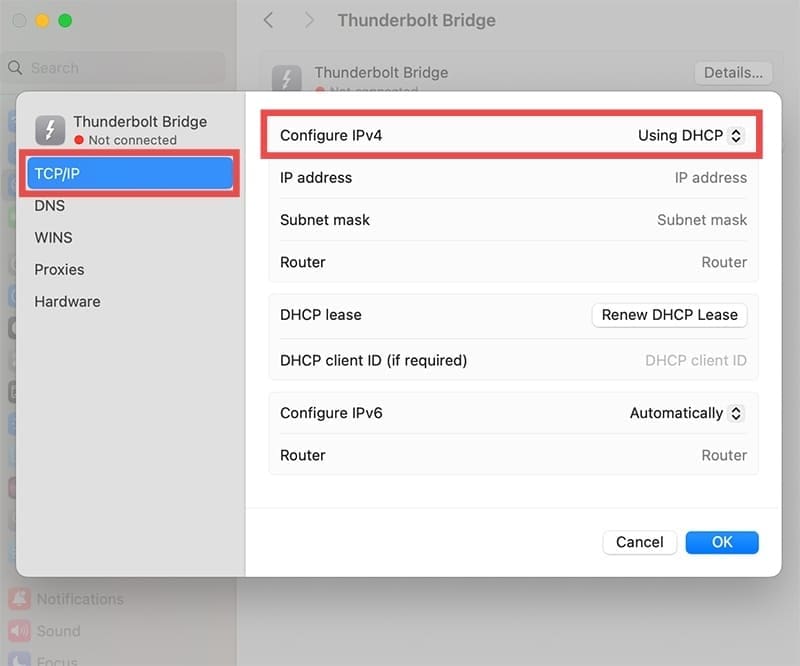
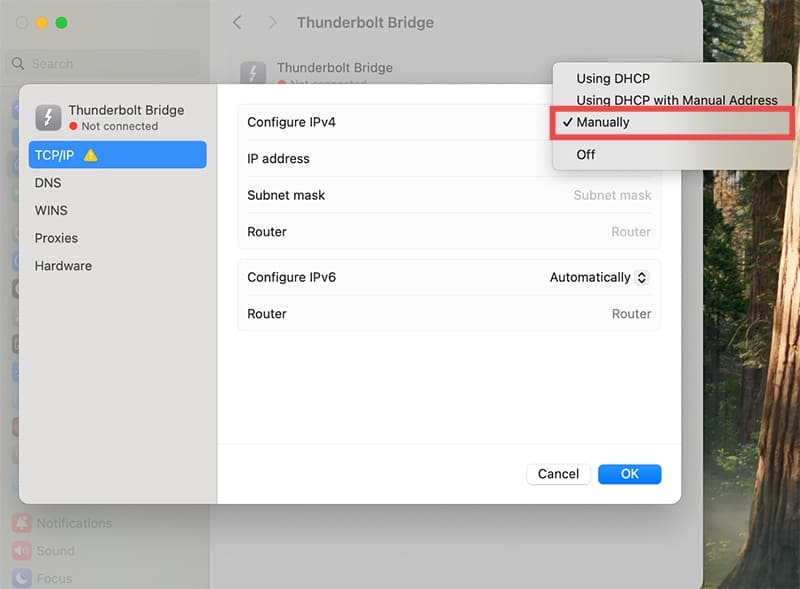
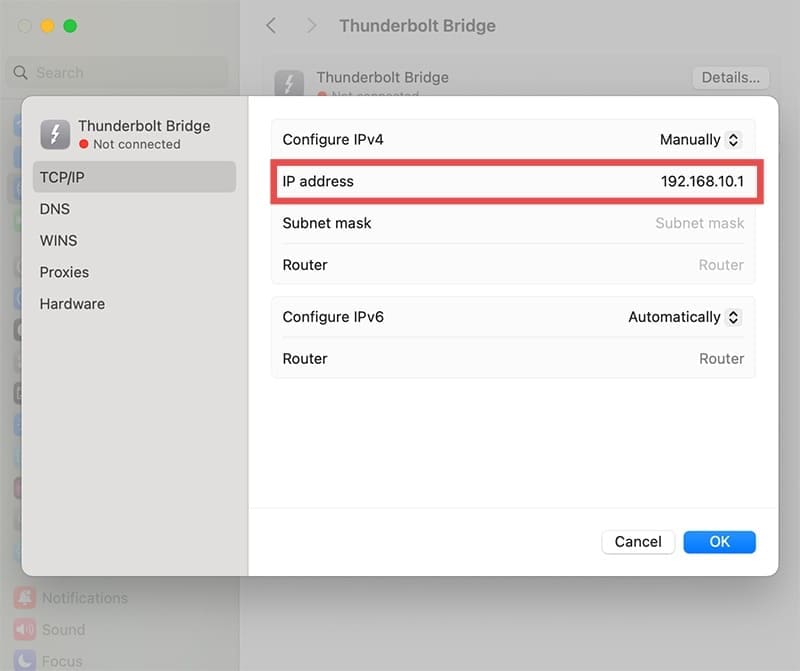
Step 4. Go to “Configure IPv4” and change the option from “Using DHCP” to “Manually.”

How to Transfer Data From PC to Mac via Cable 13

Step 5. Enter the following IP address in the IP field: 192.168.10.1.

How to Transfer Data From PC to Mac via Cable 14

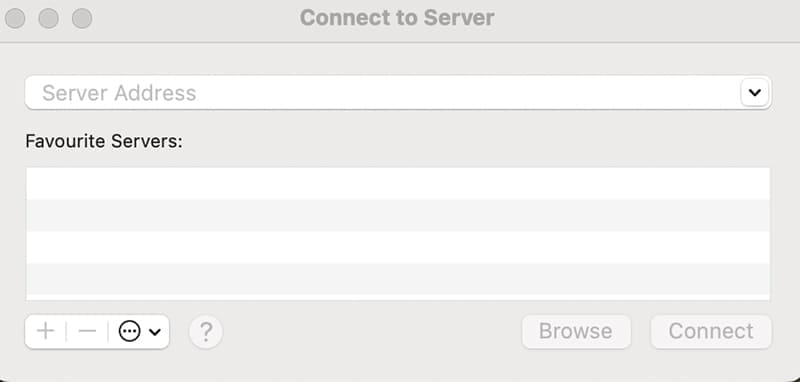
Step 6. Open Finder, hit “Command + K,” and select “Connect to Server.”

How to Transfer Data From PC to Mac via Cable 15

Step 7. Enter “smb://192.168.10.2” and hit “Connect.”

How to Transfer Data From PC to Mac via Cable 16

Step 8. You may be prompted to log in with your Windows device’s credentials. In this case, the username will be in the form of “domain + \ + username,” which you can find by going to the same Properties tab of the folder (Part 1 Step 2) and going to the “Security” tab. The user listed first after “SYSTEM” will be the username you need to enter. The password is your account password (if any).

Step 9. The folder should appear as a mountable folder in your Finder. Copy the files from it to your intended location.

Part 3: Undoing Settings Changes

When done, make sure to undo all the sharing and TCP/IP changes you’ve made to ensure the folder doesn’t get unintentionally shared later. However, you can keep the Windows folder shareable and just disable sharing via public profiles if you want to repeat the process in the near future.

Related Posts:

  • How to Buy MacBook Pro 2021 16-inch
    Best 16-inch MacBook Pro Accessories
  • 2022 Mac Mini Lifestyle
    Best Accessories for M2 Mac Mini
  • 14 Best Mac Cloud Storage for Home, Work, and School in 2023
    14 Best Mac Cloud Storage for Home, Work, and School in 2023
  • MacBook Pro 2021 iPad Mini iPhone 13 Pro AirPods 3 Beats Fit Pro iPad Pro Best Apple Products - 4
    MacBook Pro M1 Not Detecting Ethernet, How-to Fix
  • An iPhone, Mac, and MacBook on a table
    Can You Use Time Machine to Back up Your Mac to…
  • iPhone 15 Pro Max - 6
    How to Record ProRes Video to an External Drive on…
  • pexels-cottonbro-4705628
    The Best NAS Drives For Mac
  • iPhone 15 event - iPhone 15 and iPhone 15 Plus FineWoven Accessories
    Best Lightning to USB-C Adapters for iPhone 15
  • M1 MacBook Pro vs M2 MacBook Pro - M2
    M1 MacBook Pro vs M2 MacBook Pro: Should You Upgrade?
Louis Roundtree
Louis Roundtree

As an avid gamer, I’ve run into my fair share of error codes and weird faults that have forced me to find fixes to problems I never anticipated. That gave me a passion for sharing those fixes with others so we can all game without feeling like our hardware is rebelling against us.

Reader Interactions

Write a Comment Cancel reply

Primary Sidebar

Recent Posts

  • How to Disable Predictive Text in iOS 26
  • How to Stop Sharing Analytics in iOS 26
  • How to Manage Your iPhone Call Log
  • Are Apple’s Safety Precautions Enough for AirTags?
  • How to Hide Username and Photo on the Mac Lock Screen
  • Microsoft Resume vs. Apple Handoff – Which Wins for Cross-Device Work?

Connect with us

Footer

ABOUT

  • About Us
  • Contact us
  • Advertise
  • Privacy
  • Terms of Use

GUIDES

  • iOS & iPadOS
  • Apple ID
  • iCloud
  • App Store
  • iTunes
  • FaceTime
  • iMessage
  • Siri
  • Books and iBooks
  • Game Center
  • AirPlay

CONNECT

  • Facebook
  • Twitter
  • FeedBurner
  • YouTube

© Copyright 2010-2024 Guiding Tech Media · All Rights Reserved

This site and its content are in no way affiliated or endorsed by Apple, Inc. · Reproduction without explicit permission is prohibited

Last Updated on November 26, 2025 by Louis Roundtree