One of the best things about Apple’s decision to move to USB-C / Thunderbolt for connectivity is that it has made it possible to use your monitor as a USB-C hub. By doing so, you can plug in your different accessories directly into the monitor, freeing up desk space while still being able to use all of your necessary peripherals.
There are even some USB-C monitors that include a built-in Ethernet port, along with USB-A and audio. However, for one reason or another, it seems that the M1 MacBook Pro models are not exactly playing well together with these monitors when the Ethernet is connected. Luckily, there are a few different steps that you can take before needing to reach out to the maker of your monitor or Apple.
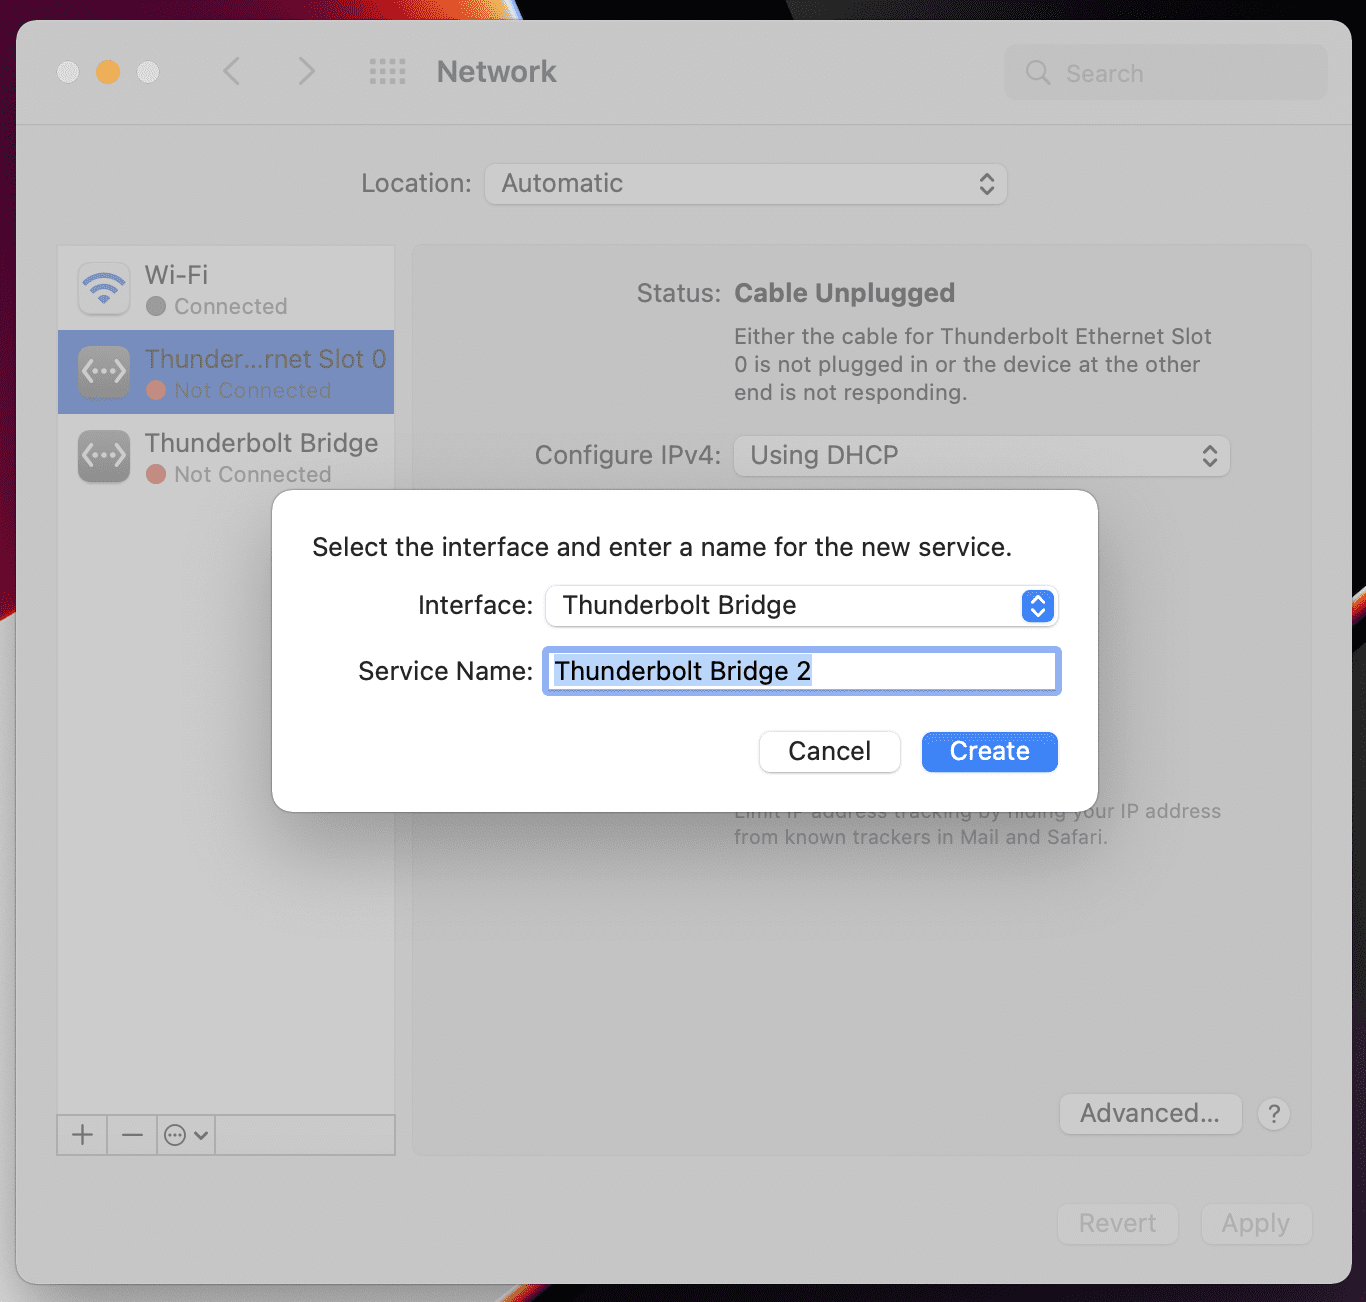
Manually Remove and Add The Ethernet Connection
The simplest way to try and remedy your MacBook Pro M1 not detecting Ethernet is to remove the connection, and then manually add the Ethernet connection using System Preferences. This isn’t the same as just plugging and unplugging the Ethernet jack from the monitor or your Mac. Here’s how you can do so from your MacBook Pro:
Open the System Preferences app on your Mac.
Click Network at the bottom of the page.
Select the non-working network connection in the sidebar.
Click the – button at the bottom of the sidebar to remove it.
Restart your Mac.
Open System Preferences and navigate back to the Network section.
At the bottom of the sidebar, click the + button.
Follow the on-screen steps to re-add the ethernet connection.
After the on-screen steps have been completed, you could try restarting your MacBook Pro just to ensure that the settings “stick”. You’ll want to do so in order to make sure that you won’t run into issues again after either restarting your Mac, or unplugging it from your monitor later on.
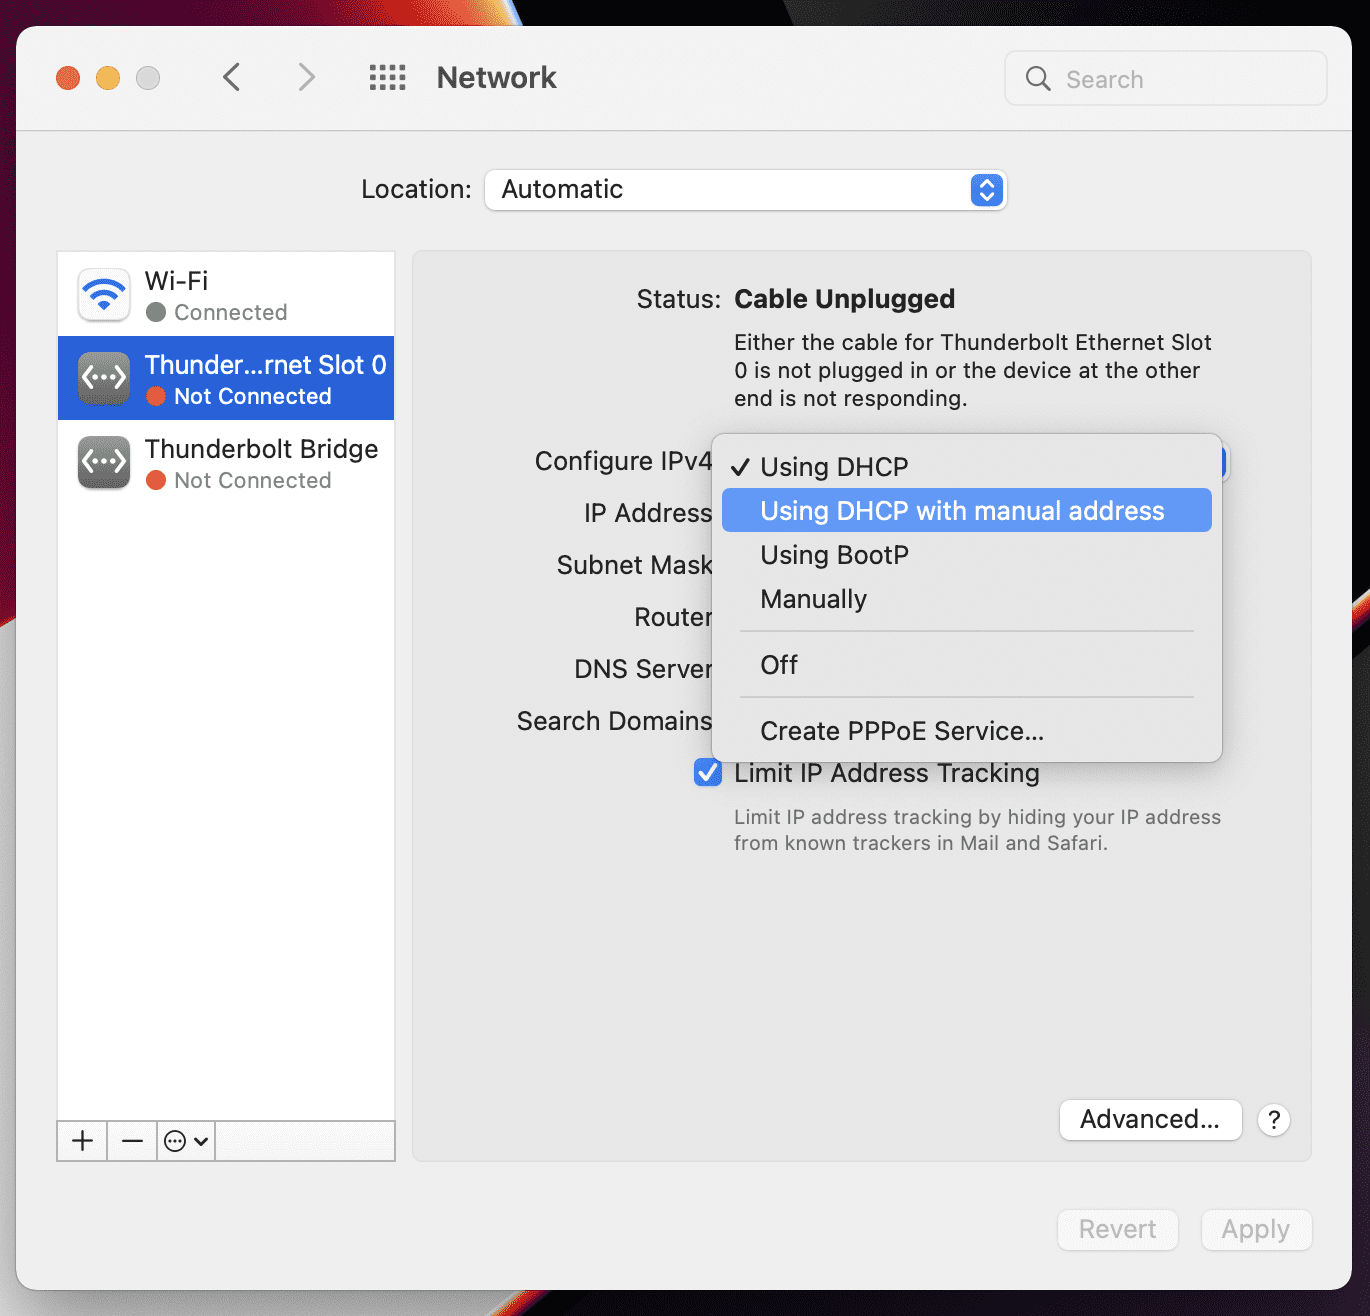
Configure IPv4
Another method, albeit slightly more complicated, is to configure the IPv4 of your Ethernet connection. By default, Ethernet connections on the Mac make use of DHCP with automatic IP address populating. However, some users have found that by switching to using DHCP with a manual IP address has fixed the issue.
Open the System Preferences app on your Mac.
Click Network at the bottom of the page.
Select the non-working network connection in the sidebar.
Click the drop-down box next to Configure IPv4:.
Select Using DHCP with manual address.
Enter the correct IP address.
Once the correct IP address has been entered, your MacBook Pro M1 should be connected to the internet. After ensuring that the connection is stable, you can follow the steps above to switch back to the standard “Using DHCP” selection in the drop-down menu.
Switch To A Different Hub
In some instances, the monitor that you are using may not be able to provide enough power to handle all of your accessories and peripherals that are plugged in. And in others, you might find yourself using a different USB-C hub entirely, especially if you need things like an SD card reader. If you fall in this camp, we would recommend considering using a different hub, one of which will provide enough power to handle everything that you need. Here are a few options to consider:
CalDigit TS3 – Includes 2x Thunderbolt 3 40Gb/s, DisplayPort 1.2, 5x USB-A & 1 USB-C 3.1 Gen 1 (5Gb/s), 1x USB-C 3.1 Gen2 (10Gb/s data only), Gigabit Ethernet, UHS-II SD Card Slot (SD 4.0), Optical Audio (S/PDIF), 3.5mm Stereo Audio In & Out. Vertical or horizontal orientation. Sturdy full aluminum construction with integrated heat sink without a fan.
Razer Thunderbolt 4 Dock for Mac – The Bandwidth and Versatility You Desire: Maximize the capabilities of your Mac with 4x Thunderbolt 4 ports, 3x USB-A 3.2 Gen 2 ports, 1x Gigabit Ethernet, 1x UHS-II SD memory card slot, and 1x 3.5 mm audio combo jack.
OWC Thunderbolt 3 Pro Dock – The OWC Thunderbolt 3 Pro Dock offers the best networking, media, and docking for pro video production and demanding data workflows. With its unique productivity configuration, you can manage multiple card uploads efficiently, access all your essential peripherals, and collaborate in a shared workflow with a 10Gb Ethernet connection.
Apple Thunderbolt to Gigabit Ethernet Adapter – The Apple Thunderbolt to Gigabit Ethernet Adapter lets you easily connect to a high-performance Gigabit Ethernet network. Supports 10/100/1000BASE-T networks.
These are just some of the options, but you’ll need to be aware of which docks you are trying to use. Not all of the docks and hubs that were compatible with pre-M1 MacBook Pro models will work with Apple’s latest computers.
Andrew Myrick is a freelance writer based on the East Coast of the US. He enjoys everything to do with technology, including tablets, smartphones, and everything in between. Perhaps his favorite past-time is having a never-ending supply of different keyboards and gaming handhelds that end up collecting more dust than the consoles that are being emulated.
None of this works. This is obviously a software problem on Apple’s part. Their product is defective. They should patch it, or give me a full refund for the computer. This is ridiculous.


None of this works. This is obviously a software problem on Apple’s part. Their product is defective. They should patch it, or give me a full refund for the computer. This is ridiculous.