One of the more quiet additions to the camera overhaul on the iPhone 11 and iPhone 11 Pro is Capture Outside the Frame. It pretty much does what it says on the tin, but it could certainly turn out to be a powerful and useful feature for both amateur and professional photographers. That is, if it works correctly.
There are actually a couple of things to note about Capture Outside the Frame, beyond general bugginess reported in the early versions of iOS 13. More than that, many users may not even know about the feature.
With all of that in mind, here’s everything you should know about Capture Outside the Frame — including what it is, how to use it, and why it may not be working for you.
Capture Outside the Frame is a new feature in iOS 13. The best way to explain it is this: it’s like cropping a photo, just in the opposite direction.
More technically speaking, the feature will actually capture image data outside of the standard viewfinder — or what you see on your iPhone’s screen when you’re taking an image or a video.
That will allow you to change the crop of an image, like adding in more of the shot, even after you take the image.
There’s also a new “Auto-Apply Adjustments” setting that will do this automatically. Basically, it’ll detect if something is accidentally cropped out of a picture (like someone’s face or body). It’ll then automatically add in more of the frame to ensure that no one or nothing is getting in adherently cropped.
All in all, it’s a nifty feature that’s sure to save plenty of photos.
How to use Capture Outside the Frame
In theory, Capture Outside the Frame shouldn’t take any explicit user input to work. As we’ll see later, there are plenty of cases when it won’t work. But it’s made to work in the background. Your iPhone should automatically cpature additional image data and let you add that data back in via the Crop tool.
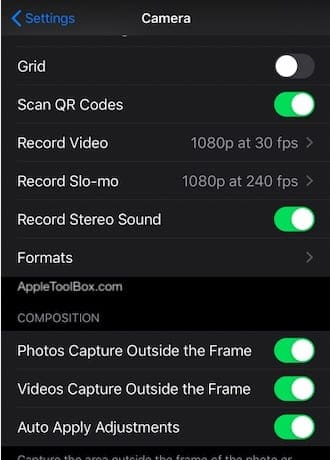
Enable the option under ‘Composition’
That being said, you may need to enable Capture Outside the Frame. You can do so by heading to Settings —> Camera and scrolling down until you see the Composition subheading.
Here, you’ll find three toggles.
Photos Capture Outside the Frame: Captures additional image data for pictures. This is off by default.
Video Capture Outside the Frame: Captures additional image for in videos. Unlike for photos, this is enabled by default.
Auto-Apply Adjustments: This will allow iOS to automatically detect when a subject in a picture is being cut off and de-crop them. At least, in theory. When this does happen, you should see a small blue Auto badge appear in the top-right corner.
If you’d like to capture data outside of your camera’s viewfinder, we recommend enabling all three. There is a caveat here, but we’ll cover that in a bit.
Manually cropping images and auto-apply adjustments
Now, if you want to manually de-crop images and add more data back into a photo, you do it through the Edit menu.
Just head to your Photos app, select an image or video, and thenselectEdit in the top-right corner.
From here, select the Crop icon. If everything worked out correctly, you should see more of the image appear outside of the default crop area.
Note that you may need to tap on the three-dot settings menu in the top-right corner and tap on Use Content Outside the Frame.
Also keep in mind that if you don’t use the additional image data taken by your iPhone 11 model, iOS will automatically delete it after 30 days. So there’s an incentive to crop or reverse crop your photos sooner than later.
As far as the automatic Auto-Apply Adjustments feature, that should also work in the background. But it just isn’t clear when it’s supposed to kick in.
Technically, iOS should detect when an object, person or some other subject is getting cut off in a photo and correct that. It should work on anything from a person’s face to a water bottle. When it comes to whether or not it’s applying adjustments in certain situations, your own mileage may vary.
Capture outside Frame feature not working? Check these tips
So that’s how Capture Outside the Frame works. By now, you may have noticed that it should work “in theory.” That’s because there are some caveats to the feature that Apple hasn’t really explained in-depth.
To put it another way, Capture Outside the Frame may not work correctly on your iPhone. And even if it does, it apparently conflicts with other iPhone 11 camera features.
It won’t work with Night Mode
First off, Capture Outside the Frame seems to only work when you’re shooting in well-lit environments. It’s not clear why this is.
According to some user reports, iOS won’t save additional image data if the Night Mode icon appears. Even if you disable Night Mode, Capture Outside the Frame won’t work properly.
So if you’re running into problems getting the feature to work, try shooting during the daytime or in areas with better light.
At the very least, make sure the Night Mode indicator isn’t appearing. Once it does, you won’t be able to capture anything outside the frame — even if you manually disable it.
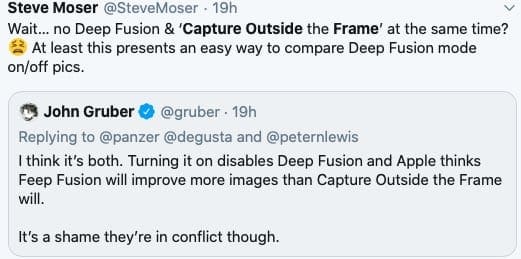
It won’t work with Deep Fusion
If you’re running a beta version of iOS 13.2, you may run into another reason why Capture Outside the Frame isn’t working. In a nutshell, it’s not compatible with Apple’s Deep Fusion system.
As a refresher, Deep Fusion is Apple’s machine-learning based system that carries out pixel-by-pixel optimization of photos. It’ll make your image’s texture, detail and noise a lot better.
But, again, it won’t work with Capture Outside the Frame. More than that, Deep Fusion only works on the iPhone 11’s telephoto and regular lenses. Capture Outside the Frame, on the other hand, typically uses the ultra-wide lens to get additional content.
According to Daring Fireball, this is probably the reason why Capture Outside the Frame is disabled by default for photos. Apple believes that Deep Fusion may enhance your images a lot more than the other feature can.
It appears to be finicky
Here’s a scenario. You’ve enabled all of the appropriate toggles and you aren’t shooting in low light. Capture Outside the Frame should work then, right?
It appears that this isn’t the case. For whatever reason, Capture Outside the Frame is still seemingly pretty buggy. To be clear, the feature was buggy during the iOS 13 beta testing cycle. And even though we’re now on iOS 13.1.2, it appears that Apple hasn’t ironed out those kinks quite yet.
We do recommend that you toggle the ‘Capture Outside Frame’ settings a few times to ON/OFF via Settings > Camera and see if it works for you. Sometimes force quitting the Camera app and then re-launching it can help with the issue.
Capture Outside the Frame just may not work for you every time you try to use it. Some users have had success in attempting to “force” iOS to auto-apply adjustments. But the setting may not kick in organically every time you take a photo. (We haven’t seen as many reports about videos running into the same problem.)
You only have a couple of options here. You can just keep trying and see if you can get it to work. Or you can simply wait until Apple tightens up the feature in a future point update to iOS 13.
Mike is a freelance journalist from San Diego, California.
While he primarily covers Apple and consumer technology, he has past experience writing about public safety, local government, and education for a variety of publications.
He’s worn quite a few hats in the journalism field, including writer, editor, and news designer.
I have an iPhone 11 Pro with the latest software (13.5.1) the “capture outside” feature doesn’t work if “grid” is turned on. I found out the very hard way. Go to camera settings, make sure “grid” is off and “capture outside” is on. Then take a picture, go to crop, press 3 dots at top right it will give you the option to use more outside the frame. It doesn’t work if you are actually in the middle of a phone call. It took me months to figure this out. Too bad coz it’s the same type of photos I take which need the grid, that I also need the more capture space. Good luck!


I have an iPhone 11 Pro with the latest software (13.5.1) the “capture outside” feature doesn’t work if “grid” is turned on. I found out the very hard way. Go to camera settings, make sure “grid” is off and “capture outside” is on. Then take a picture, go to crop, press 3 dots at top right it will give you the option to use more outside the frame. It doesn’t work if you are actually in the middle of a phone call. It took me months to figure this out. Too bad coz it’s the same type of photos I take which need the grid, that I also need the more capture space. Good luck!