Everything is online these days, which means we do a lot more downloading than we used to. That’s all well and good until your download stops and iTunes says, “The network connection was reset.”
This error message affects a lot of users, repeatedly interrupting their downloads. Movies, music, and even software updates become impossible to download when this error keeps popping up. Your download progress slows down or resets every time!
We put together this post to show you how to fix it.
It means your Internet connection failed during the download. Your computer lost connection with Apple’s server — for whatever reason — and couldn’t keep downloading content because of it.
“Download failed because your network connection was reset.”
A range of different problems can cause this error to appear. It could be Apple’s servers are down, or there could be an issue with your router. Maybe the software on your computer has become corrupt or the network settings are wrong.
Error code 3253 refers to a network connection error in iTunes. You probably saw this error code in the download window when whatever you were downloading stopped:
“6.6MB of 6.6MB – stopped (err = -3253)”
This is a common error code to get when your iTunes download fails. Image from Apple Discussions.
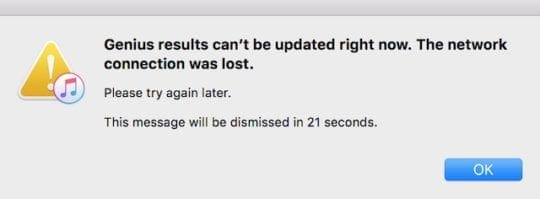
What if iTunes Genius results can’t update because of a network connection?
Some users get a similar iTunes error message: their Genius results can’t be updated because the network connection was lost. This recent issue often comes up when your sync an iCloud music library to Windows.
“Genius results can’t be updated right now. The network connection was lost.”
There’s a different solution when Genius Results can’t be updated.
Although the error message appears similar, the solution is different. Delete the iTunes Library Genius file to fix Genius results that fail to update.
How do I delete the iTunes Library Genius on a Mac?
Click the desktop to highlight Finder.
From the menu bar, select Go > Home.
Go to Music > iTunes.
Find the iTunes Library Genius.itdb file and move it to the Trash.
iTunes recreates the file when you restart it.
How do I delete the iTunes Library Genius on a Windows PC?
Open Windows Explorer on your computer.
Open iTunes from the Program Files on your hard drive.
Find the iTunes Library Genius file and delete it.
iTunes recreates the file when you restart it.
What do I do when iTunes says, “The network connection was reset?”
Follow these troubleshooting steps to fix your iTunes network problems. There are a few different steps but you shouldn’t need to follow them all — stop as soon as iTunes can download stuff again.
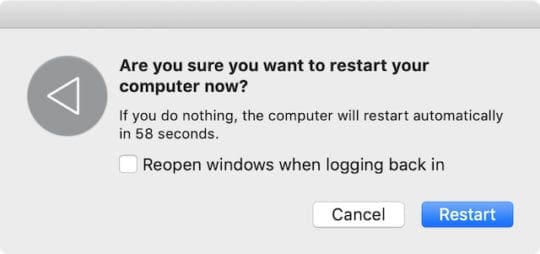
Have you turned it off and on again? This trick really does work a lot of the time!
This should always be the first thing you try when you get a problem with any of your gadgets. Close all the apps and restart the machine. Then try to download and install new software updates if there are any.
Even though you keep getting a network connection error in iTunes, you might still be able to download software updates for Windows or macOS. If there is a new one, downloading and installing it might fix your iTunes network error.
2. Turn off Simultaneous Downloads and correct the Date & Time
Turning off Simultaneous Downloads for iTunes is a quick solution that might fix your network connection.
These two suggestions, though unrelated, are both quick and easy to try. And they’ve both been effective solutions at fixing iTunes download errors.
Simultaneous Downloads put a strain on your Internet connection. If you don’t have enough bandwidth it causes connection errors in iTunes.
An incorrect Date & Time setting also causes problems. The mismatch between your computer and iTunes’ servers leads to the download network error you received.
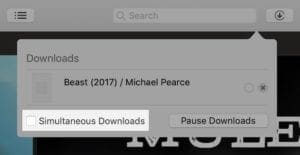
Turn off Simultaneous Downloads from the iTunes download window:
Open iTunes on your computer.
Click the circular download button in the top right (it’s only visible when a download is in progress).
Uncheck the box that says Simultaneous Downloads.
You can choose from hundreds to locations so your computer automatically updates your time zone.
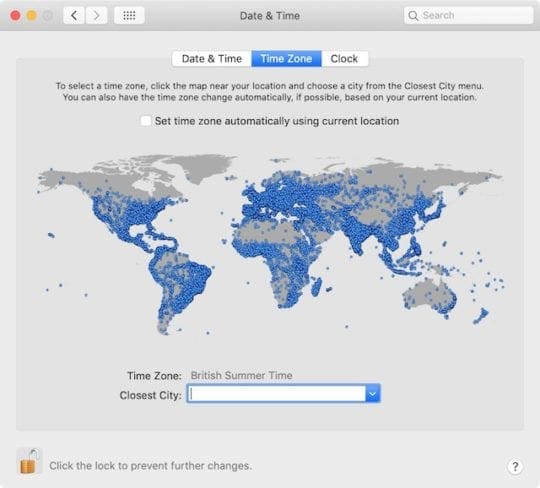
Correct the Date and Time on a Mac:
From the menu bar, go to Apple > System Preferences… > Date & Time.
Click the lock in the bottom left and enter your administrator password.
Choose your time zone or manually set the correct Date & Time.
Correct the Date and Time on a Windows PC:
Click the time in the bottom right of the screen.
From the window that appears, click Change date and time settings…
Choose the Change time zone… or manually Change date and time…
Click OK to confirm changes after you correct the date and time.
3. Test your Internet connection
The easiest way to test your internet connection is by streaming videos online. Image from Wikimedia.
It may seem too obvious, but maybe your Internet connection dropped out. iTunes says, “The network connection was reset,” when that happens.
Restart your router. Then test the connection by loading different webpages and streaming videos online. Try using the Internet from different devices.
Contact your Internet Service Provider if there are connection problems across other devices. Those problems could range from web pages loading slowly to a lack of connection at all.
Disable your VPN if you have one
A VPN (Virtual Private Network) offers great privacy advantages for browsing the web. But it can also cause interferences with services like the iTunes Store, leading to the network connection reset error.
Disable your VPN to see if it affects the quality of your network connection. You may find that iTunes downloads content without any issues after you disable the VPN.
If this is the case, contact your VPN developer to find a working solution.
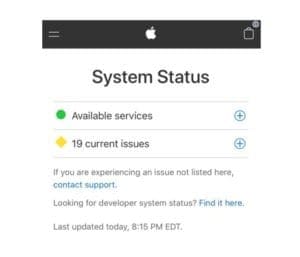
4. Check Apple’s System Status
It’s normally pretty obvious if Apple is experiencing problems when you check their website.
Of course, it’s always possible that Apple’s system is down and iTunes isn’t working for anybody right now.
All the services should have green circles next to them to say they’re working as expected. Look specifically at iTunes in the Cloud and iTunes Store. If Apple is experiencing problems, there’s nothing you can do but wait for them to fix it.
5. Sign out of iTunes, then sign in again
Apple suggests you sign out of your account on iTunes, restart the software, then sign in again. Forcing the iTunes Store to connect to your account again may resolve the network connection errors.
How do I sign out of iTunes?
Open iTunes on your computer.
From the menu bar, go to Account > Sign Out.
Restart iTunes, then go to Account > Sign In…
Update your iTunes account details
After you sign back into iTunes, go to View My Account from the menu bar and ensure your account details are up to date.
Double-check your payment details, billing address, and country or region. Inconsistencies in these details can cause problems when you buy or download content from iTunes.
Sign in to a different administrator account
Log on to a second administrator account on your computer, or create a new account if there isn’t one. Sign into your Apple ID using iTunes and attempt to download your content again.
Type the following location and click Go: /var/db/crls/
Delete the following two files:
crlcache/db
ocspcache.db
Restart your Mac.
How do I check my firewall on a Windows PC?
On your keyboard, press the Windows key or press control+escape.
Click the search button and enter: firewall.cpl
Click the file above to open Windows Firewall.
Select Allow and then click Change settings.
Add iTunes and Bonjour to the Allowed Apps list:
Add iTunes for both private and public networks.
But only add Bonjour for private networks.
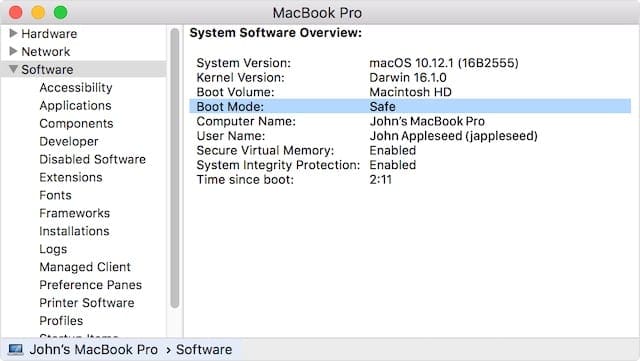
Boot into safe mode to automatically disable third-party software
You can check your Mac is in Safe Mode from the System Information window. Image from Apple Support.
Boot your computer into safe more to automatically disable third-party software. If you’re able to connect to and download from the iTunes Store in safe mode you know the problem is with your security software.
iTunes requires access to specific network ports to operate correctly. Sometimes iTunes thinks the network connection was reset because security software blocked these ports.
Changing the DNS is a successful solution for many users. There are two ways to do it: on your router or on your device.
Follow your manufacturer instructions to change the DNS on your router to affect all devices on your network. Or follow our instructions below for Mac and PC.
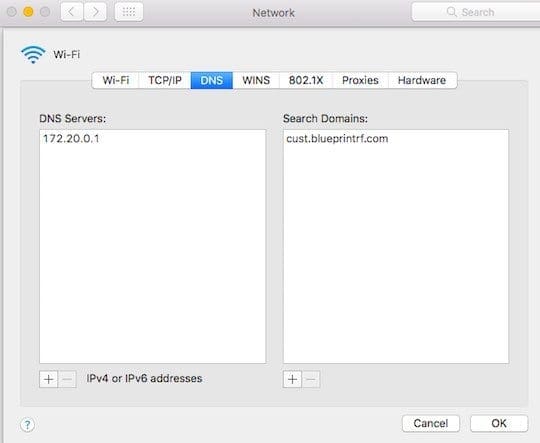
How do I change my DNS on a Mac?
From the menu bar, go to Apple > System Preferences… > Network.
On the left, select your current type of connection (Wi-Fi, Airport, etc.).
Then click Advanced… in the bottom right.
Select the DNS tab and click the + button for DNS Servers.
Enter the following DNS settings to use OpenDNS:
208.67.222.222
208.67.220.220
Or enter the following DNS settings to use Google Public DNS:
8.8.8.8
8.8.4.4
Make a note of your old DNS settings and remove them using the – button.
Click OK, then click Apply.
Your choice of DNS affects how fast and secure your internet browsing is.
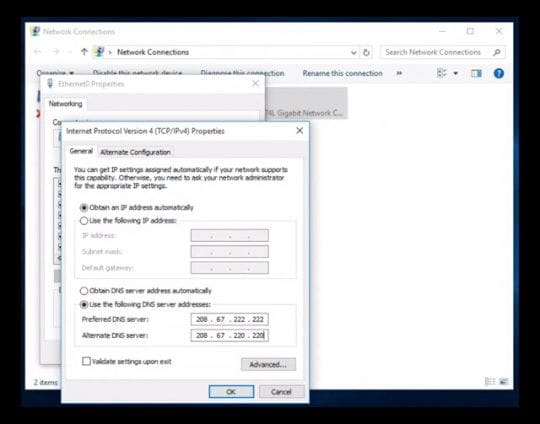
How do I change my DNS on a Windows PC?
Open Control Panel on your computer.
Go to Network and Internet > Network and Sharing Center.
On the left, choose Change adapter settings.
Right-click Connected to Internet, then go to Properties > Internet Protocol Version 4 (TCP/IPv4).
Click Properties > Use following DNS server addresses.
Enter the following DNS settings to use OpenDNS:
208.67.222.222
208.67.220.220
Or enter the following DNS settings to use Google Public DNS:
8.8.8.8
8.8.4.4
Click OK.
A different DNS on your PC could fix your iTunes network connection problems.
8. Remove and reinstall iTunes
It’s possible iTunes has become corrupt and you need to reinstall it. This happens occasionally with any software. It could be the reason iTunes thinks that “The download failed because the network connection was reset.”
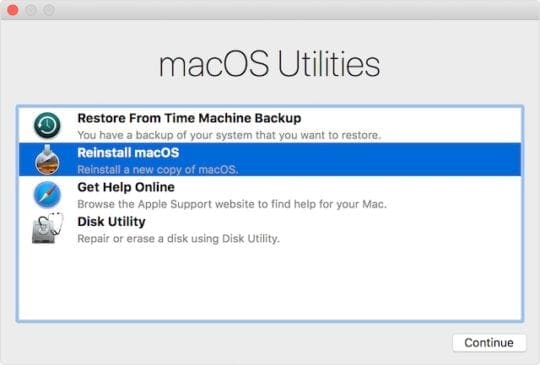
Apple programmed iTunes into the operating software on a Mac, so you can’t uninstall it. You can, however, reinstall the entire macOS to resolve software problems.
After removing iTunes, download it again from Apple’s website.
We hope you never see that pesky “Network connection was reset” error message on iTunes again. Let us know which step worked for you in the comments so we can continue to keep this post up-to-date and helpful.
Dan writes tutorials and troubleshooting guides to help people make the most of their technology. Before becoming a writer, he earned a BSc in Sound Technology, supervised repairs at an Apple Store, and even taught English in China.
I had this problem. Also affected Microsoft Store. I had to uninstall and re-install anti-virus/firewall. Disabling them was not enough. Hope this helps somebody.
Markus – you are brilliant!! This network issue just suddenly started for me last week. I tried just about everything above with no success. I stumbled across your comment here and noticed i had both ipv4 and ipv6 enabled. I disabled ipv6 with one click and BING!! suddenly i had lightning fast downloads again.
They should add this to the steps above and save people a lot of frustration!
Does anyone know why ipv6 would cause this to happen to iTunes? It’s suppose to be an improvement on ipv 4. Very strange.
I was having the same issues and was so frustrated with iTunes. I tried everything on this site and the Apple support sites and it did not work. I saw this comment about the IPv6, and I turned it off and it solved my problems. Everything downloaded and very quickly. I am using the latest version of iTunes for Windows too.
I have an iPad air 2 which has the error: locked sim, iPad is disabled connect to iTunes.
I connected the iPad to a pc, I booted to recovery mode on the iPad and opened iTunes.
I then tried updating the iPad software and in the middle of downloading it gave the error There was a problem downloading the software for the iPad “iPad”.The network connection was reset. Make sure your network settings are correct and your network connection is active, or try again later.
I then tried all the above procedures to fix the problem i.e uninstalling and reinstalling the latest version of iTunes, disabling the firewall and antivirus on my pc, using a public DNS, changing my DNS settings.
Updating my pc, booting into safe mode, Disabling VPN, turning of simultaneous downloads, correcting the date and time, updating my account details and changing the DNS that my computer uses but the problem has still persisted.
I didn’t have this problem until purchasing a new computer. Now only certain podcasts have this problem. Most of my podcasts update and download. I tried the suggestions and it doesn’t work. I am using itunes 12.3 because when I use the new version, it doesn’t recognize my ipod. This is ridiculous.
Hey, I’m a windows user and I encountered this problem when trying to download the latest 12.1.3 IoS update for my iPad.
The above solution worked perfectly! I was initially only able to get 400 Mb downloaded out of the total 2.7 Gb update size no matter how many times I tried. After manually setting the DNS addresses the download was able to complete.
If using Windows, try these steps for Control Panel:
Open Control Panel
Click on Network and Internet.
Select Network and Sharing Center
In the left pane, choose Change adapter settings
Right-click what shows as connected to the internet
Select Properties
Select Internet Protocol Version 4 (TCP/IPv4) from the list
Click the Properties button
Choose Use the following DNS server addresses option
Type these DNS server addresses
Google Public DNS addresses: 8.8.8.8 and 8.8.4.4
OpenDNS addresses: 208.67.222.222 and 208.67.220.220
Click OK to apply these new DNS Settings
Still having the problem, changing DNS made no difference. Have emailed Itunes and got a response saying it must be my internet connection – well, everything else works just fine. I’m on a Mac and getting ‘Error 3253’ and network connection ‘reset’ messages. This is so frustrating – anyone got any idea what else I can do?
I had the same problem which (apparently) is solved simply by unchecking “allow simultaneous downloads” at the bottom of the Download page in i-Tunes. I’m using a PC with system 7.
I’m on a VMWare Windows XP virtual PC running iTunes 10. Was getting the error every time I downloaded a song. Would have to his resume 5-10 times per download to get it to complete. Updated the DNS settings and downloaded two songs without issue. We’ll see if it sticks.
Like Weebsurfer I’m also on a Rogers wireless router with Extreme High speed internet. This problem started happening for me about 3 months ago. No idea why, but if this fixes it I’m happy.
Thank you for the reminder. just recently upgraded my rogers modem to one of their new router / modem pieces of …. and had to reset a lot of network settings. forgot about this. duh. it appears to have cleared up some issues. Not sure what spoonlamp means about “Amazon here I come” though. I actually think Amazon’s Cloud may be the downfall of civilization that the Mian’s were predicting. 😉
Find “My Network Places” in your start menu or on your desktop. Right-click it and select “properties.” On the properties tab that pops up, scroll down the list of protocols to the TCP/IP protocol. Highlight it and select the “properties” button below it. From there you can DE-select auto-DNS and instead enter those two DNS addresses mentioned in the article and on previous posts.
I just followed George’s instructions for this problem, and I still get the error. The address above, the 208.67.222.222 and 208.67.220.220 have a different number of digits than the spaces provided in my internet protocal window. I am allowed three digits for the 67 part. When I only had two digits, I just used them. Wonder if that’s the problem.
I used the tip that George initially posted and it worked! When I typed in the two addresses numbers, “208.67.222.222 and 208.67.220.220,” I first entered one and then hit add and then typed in the other and hit add.
Enter your router via a browser. Find where you can change DNS settings. Type in OpenDNS addresses, 208.67.222.222 and 208.67.220.220, in Primary DNS and Secondary DNS fields.
That answer was for Mac users, typical of answers that are not complete, it didn’t say so. For Windows users, go to your network control panel and change the DNS settings there. I use a Mac so can’t give you more details. If it works for you, please post the complete steps.
What is the “Apple menu”? Is it under iTunes 10? Am using window 7 and iTunes 10. I don’t see the damn thing the article calls “system preferences” and so can’t do the suggested changes. Am I looking at a different thing?
@Terry Freedman-While having the update program for the DNS service for remote (server/file sharing) access is needed, it’s not for this issue. Switching from your ISP’s DNS server to the OpenDNS servers can make a big difference for many users’ browsing and e-mail responsiveness.
Simply changing to OpenDNS servers is not enough. Users should also register with OpenDNS on its website and download the free update program so that their connection stays current if their IP address changes.
 Use these quick tips if you know what you’re doing or follow the full guide below:
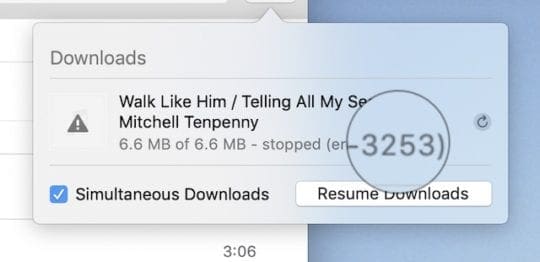


I had this problem. Also affected Microsoft Store. I had to uninstall and re-install anti-virus/firewall. Disabling them was not enough. Hope this helps somebody.
For me (on a Windows 10 PC) turning off IPv6 was the key to get this working.
Markus – you are brilliant!! This network issue just suddenly started for me last week. I tried just about everything above with no success. I stumbled across your comment here and noticed i had both ipv4 and ipv6 enabled. I disabled ipv6 with one click and BING!! suddenly i had lightning fast downloads again.
They should add this to the steps above and save people a lot of frustration!
Does anyone know why ipv6 would cause this to happen to iTunes? It’s suppose to be an improvement on ipv 4. Very strange.
I was having the same issues and was so frustrated with iTunes. I tried everything on this site and the Apple support sites and it did not work. I saw this comment about the IPv6, and I turned it off and it solved my problems. Everything downloaded and very quickly. I am using the latest version of iTunes for Windows too.
Worst software ever. More crap from Apple.
I have an iPad air 2 which has the error: locked sim, iPad is disabled connect to iTunes.
I connected the iPad to a pc, I booted to recovery mode on the iPad and opened iTunes.
I then tried updating the iPad software and in the middle of downloading it gave the error There was a problem downloading the software for the iPad “iPad”.The network connection was reset. Make sure your network settings are correct and your network connection is active, or try again later.
I then tried all the above procedures to fix the problem i.e uninstalling and reinstalling the latest version of iTunes, disabling the firewall and antivirus on my pc, using a public DNS, changing my DNS settings.
Updating my pc, booting into safe mode, Disabling VPN, turning of simultaneous downloads, correcting the date and time, updating my account details and changing the DNS that my computer uses but the problem has still persisted.
Please help me out.
I didn’t have this problem until purchasing a new computer. Now only certain podcasts have this problem. Most of my podcasts update and download. I tried the suggestions and it doesn’t work. I am using itunes 12.3 because when I use the new version, it doesn’t recognize my ipod. This is ridiculous.
Hey, I’m a windows user and I encountered this problem when trying to download the latest 12.1.3 IoS update for my iPad.
The above solution worked perfectly! I was initially only able to get 400 Mb downloaded out of the total 2.7 Gb update size no matter how many times I tried. After manually setting the DNS addresses the download was able to complete.
Thanks!
I don’t have System Preferences and it’s not under Preferences either, I’ll keep looking.
Hi RL,
If using Windows, try these steps for Control Panel:
Open Control Panel
Click on Network and Internet.
Select Network and Sharing Center
In the left pane, choose Change adapter settings
Right-click what shows as connected to the internet
Select Properties
Select Internet Protocol Version 4 (TCP/IPv4) from the list
Click the Properties button
Choose Use the following DNS server addresses option
Type these DNS server addresses
Google Public DNS addresses: 8.8.8.8 and 8.8.4.4
OpenDNS addresses: 208.67.222.222 and 208.67.220.220
Click OK to apply these new DNS Settings
Still having the problem, changing DNS made no difference. Have emailed Itunes and got a response saying it must be my internet connection – well, everything else works just fine. I’m on a Mac and getting ‘Error 3253’ and network connection ‘reset’ messages. This is so frustrating – anyone got any idea what else I can do?
Guy did you ever end up getting it fixed? I’ve done all of the above suggested, i still cant get it to work…
Ive set the DNS numbers as above, registered at open DNS the lot. I have windows 8 and I still get the same nessage
I have folloewd all of those instructions, I have windows 8, it seems even worse. it wont even let me buy anything now.
Unchecking the “allow simultaneous downloads” also worked for me.
I had the same problem which (apparently) is solved simply by unchecking “allow simultaneous downloads” at the bottom of the Download page in i-Tunes. I’m using a PC with system 7.
@Yvon: Thank you! That worked just fine for me.
I’m on a VMWare Windows XP virtual PC running iTunes 10. Was getting the error every time I downloaded a song. Would have to his resume 5-10 times per download to get it to complete. Updated the DNS settings and downloaded two songs without issue. We’ll see if it sticks.
Like Weebsurfer I’m also on a Rogers wireless router with Extreme High speed internet. This problem started happening for me about 3 months ago. No idea why, but if this fixes it I’m happy.
Yep, that fixed it. As soon as I added those DNS entries, the error went away.
Thank you for the reminder. just recently upgraded my rogers modem to one of their new router / modem pieces of …. and had to reset a lot of network settings. forgot about this. duh. it appears to have cleared up some issues. Not sure what spoonlamp means about “Amazon here I come” though. I actually think Amazon’s Cloud may be the downfall of civilization that the Mian’s were predicting. 😉
What a joke. A World-wide front end like the apple store and they expect people to go through this nonsense to make it work? Amazon here I come…
Bye
Here, here!
For PC users:
Find “My Network Places” in your start menu or on your desktop. Right-click it and select “properties.” On the properties tab that pops up, scroll down the list of protocols to the TCP/IP protocol. Highlight it and select the “properties” button below it. From there you can DE-select auto-DNS and instead enter those two DNS addresses mentioned in the article and on previous posts.
I just followed George’s instructions for this problem, and I still get the error. The address above, the 208.67.222.222 and 208.67.220.220 have a different number of digits than the spaces provided in my internet protocal window. I am allowed three digits for the 67 part. When I only had two digits, I just used them. Wonder if that’s the problem.
hi Laura
no – you can enter 2 digits just fine even though you can fit 3
I used the tip that George initially posted and it worked! When I typed in the two addresses numbers, “208.67.222.222 and 208.67.220.220,” I first entered one and then hit add and then typed in the other and hit add.
Thanks for the solution.
…and for Jerry’s sake, I’m on a Mac. 😉
Enter your router via a browser. Find where you can change DNS settings. Type in OpenDNS addresses, 208.67.222.222 and 208.67.220.220, in Primary DNS and Secondary DNS fields.
Thank you perfect solution
That answer was for Mac users, typical of answers that are not complete, it didn’t say so. For Windows users, go to your network control panel and change the DNS settings there. I use a Mac so can’t give you more details. If it works for you, please post the complete steps.
What is the “Apple menu”? Is it under iTunes 10? Am using window 7 and iTunes 10. I don’t see the damn thing the article calls “system preferences” and so can’t do the suggested changes. Am I looking at a different thing?
I already had these DNS settings and still have the problem.
@Terry Freedman-While having the update program for the DNS service for remote (server/file sharing) access is needed, it’s not for this issue. Switching from your ISP’s DNS server to the OpenDNS servers can make a big difference for many users’ browsing and e-mail responsiveness.
Simply changing to OpenDNS servers is not enough. Users should also register with OpenDNS on its website and download the free update program so that their connection stays current if their IP address changes.