Want your images to come to life and pop with a brief bit of motion? Look no further than Apple’s Live Photo feature, available on all recent model iPhones, iPads, iPods, and even Macs!
Live Photos aren’t videos, and they not exactly photos either. They are moments moving briefly in time. Quick snapshots into the world slightly before and slightly after you capture an image.
They are the frown before the smile. The thought before the action. The moment before and after a pose.
And the best news, Live Photos is on by default for any iPhone 6S or later. So it’s easy to take live photos of all your favorite experiences, places, and people!
Live Photos on iPhone is a Camera feature that Apple makes available on the Camera App for most iPhone and iPads models. You can take Live Photos on iPhone 6s or later, iPad (5th generation) or later, iPad Air (3rd generation+), iPad mini (5th generation+), and iPad Pro models from 2016 and later.
Live Photo essentially captures 1.5 seconds of video and audio both before and after you press the shutter button to take a photo. You can add these Live Photos to your lock screen and make them special or even use them as wallpapers on your iPhone.
In this first section of the detailed guide, we answer some of the basic questions surrounding the use of Live Photos on iPhone and other Apple devices.
Taking a live photo is very similar to taking a normal photo on your iPhone
Verify that Live Photo feature is ON via Settings > Camera
Open the camera app
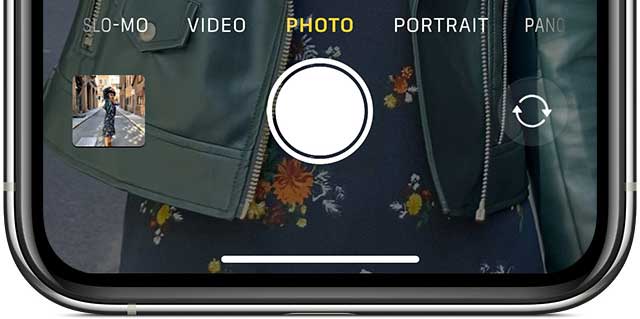
Set your type to Photo mode
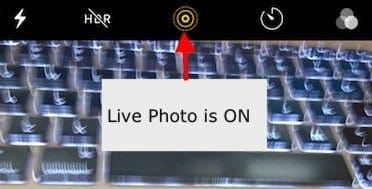
When the Live Photos feature is on, the Live Photos icon (looks like a target with concentric circles on the top middle of the camera app) shows in yellow
All you have to do next is point and shoot!
Hold your iPhone still
Tap the shutter button (large white button at the center bottom of the image)
Remember, the Live Photo feature is switched ON by default on your camera app.
Why don’t I see Live Photos feature on my iPhone?
Most of the new iPhone models now support the Live Photos feature. However, the iPhone 4, the iPhone 5 variants (5S, 5C, and 5) and the iPhone 6 do not support Live Photos. The feature is also available many iPad including iPad Pro, iPad mini, and iPad Air.
If you are looking for Live Photos and cannot find the option in your camera app, the chances are that it is not supported on your iDevice.
Can I increase the length of time that a Live Photo captures?
Unfortunately, there is no setting on your iPhone that can help you in increasing the time length of an associated live Photo.
You are restricted to the 1.5 seconds before the click and 1.5 seconds after the shutter click for a total length of 3 seconds.
Can I take a Live Photo using Portrait mode or Square and Pano modes?
Sorry but at this time, Live Photo mode is only available when using Photo mode. This mode is the default mode when you open your Camera app.
How do I disable Live Photos on my iPhone for just one photo (temporarily)?
Disabling Live photos temporarily is done via the camera app
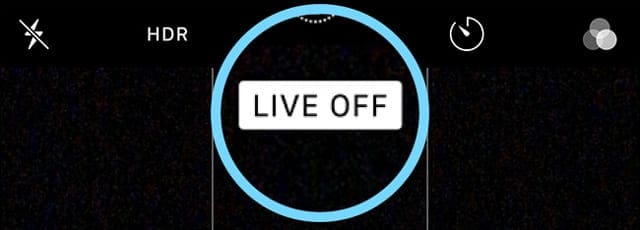
Tap on the Live Photos icon (looks like a target) at the top of your screen to it toggle the Live Photo icon from yellow to a circle with a line through it
Looks for a temporary notice that reads “LIVE OFF”
This message confirms that you are now taking pictures in the still image mode
How do I disable Live Photos on my iPhone for all photos (permanently)?
While many users like Live Photos, others would rather shoot still photos.
To prevent your Camera app from taking any Live Photos, follow these steps:
Open the Camera app and tap the Live Photo icon and disable it
Look for the slash through the Live Photos icon and the notice Live Off to confirm Live Photos is indeed off
Go to Settings > Camera > Preserve Settings > Live Photos
Toggle the Live Photo setting ON
How do I view a Live Photo?
Open the Photos app
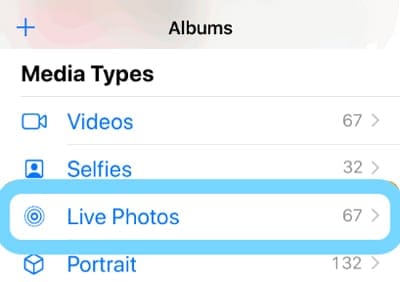
Go to the Albums tab at the bottom
Scroll down to Media Types
Select Live Photos
Press and hold on the screen to see the live photo in action!
Like your regular still photos, your live photos are saved in the Photos App and show up in My Albums.The only difference is that you will see the “LIVE” icon on the top left corner of the photo indicating that it is a Live Photo.
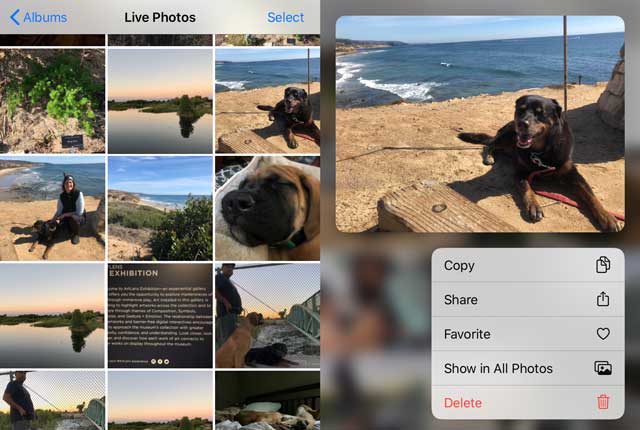
Peek at a Live Photo using Quick Actions
Open the Photos app
Go to the Live Photos Gallery or any album with Live Photos
Press and hold on the photo to open the quick action menu and to preview the live photo (it plays once end to end)
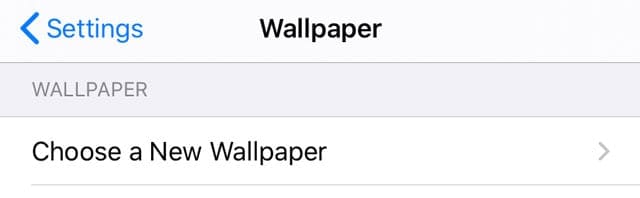
How do I make a Live Photo my lock screen’s wallpaper?
Yes, you can also set a Live Photos as your lock screen wallpaper on your iPhone, iPad, or iPod.
Go to Settings > Wallpaper > Choose a New Wallpaper
Choose an image from Live Photos
Live Photo wallpapers work on iPhone 6s or later with the exception of the iPhone XR or the iPhone SE–these models do not support Live Wallpaper
Working with Live Photos on your iPhone
Now that the basics around using Live Photos are out of the way, let’s explore some of the advanced features available to you in the following sections.
Apple has added a lot of new and interesting edit functions over the last few iOS (and iPadOS) releases when it comes to Live photos. There are the familiar auto-enhance features available that help you improve the saturation and contrast of the images. You can also use the remove red-eye tool and crop functions.
How do I edit the Live Photos on my iPhone?
Open the Photos app
Choose a Live Photo to edit
Tap Edit
Use the on-screen tools to edit the photos. Make changes to things such as light and color, cropping, add image effects and make other adjustments
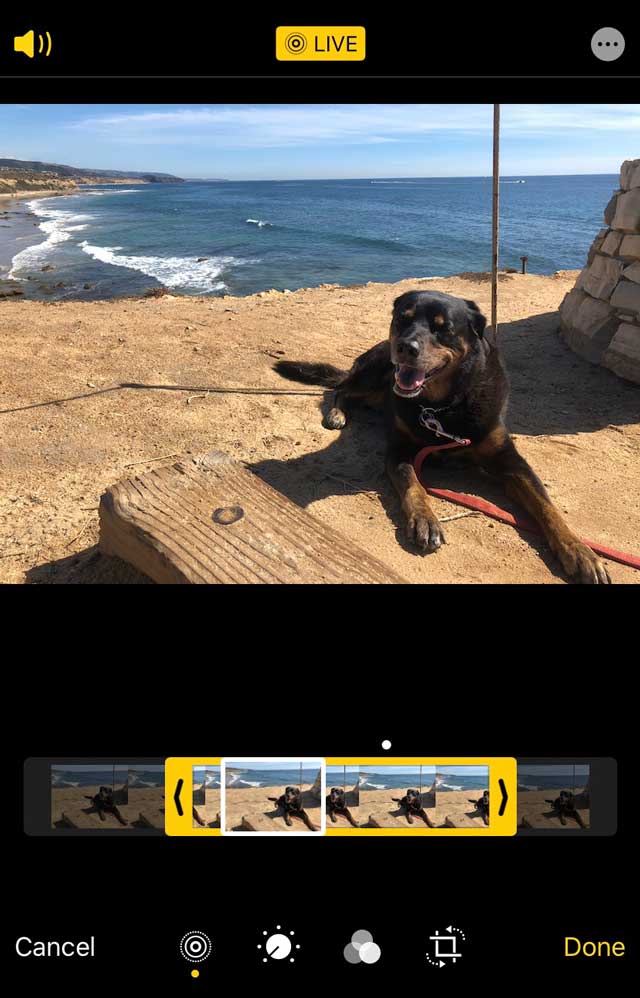
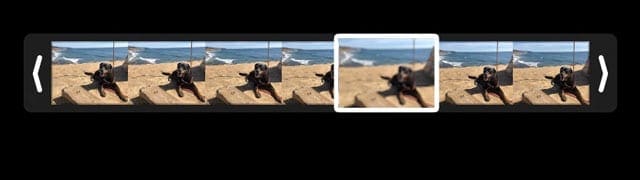
To trim its length, tap the Live Photo icon
Adjust the ends of the on-screen filmstrip slider
When finished with all your editing, tap Done
If you use iCloud Photos, any edits you make to your Live Photos update on all your devices
For folks that also have a Mac or MacBook running macOS High Sierra and above, you can easily edit the Live Photos using the Photos app in High Sierra+. The Mac version of the Photos app has some excellent editing capabilities!
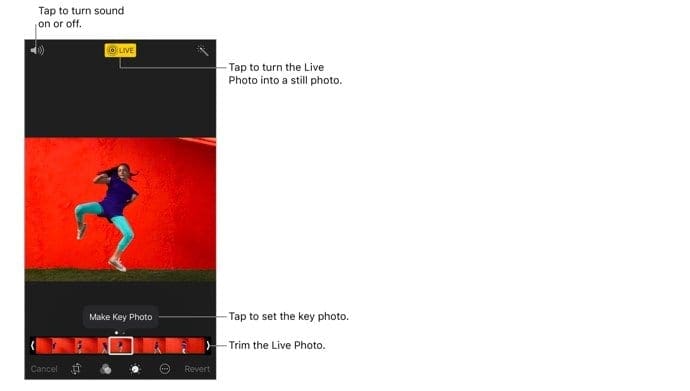
How do I mute Live Photo sound?
When editing Live Photos, you can also mute the sound associated with the Live photo.
Open a Live Photo in the Photos app
Choose Edit on the Live Photo
Tap the Live Photo icon
Tap on the speaker icon on the top left corner of your screen to mute the Live Photo
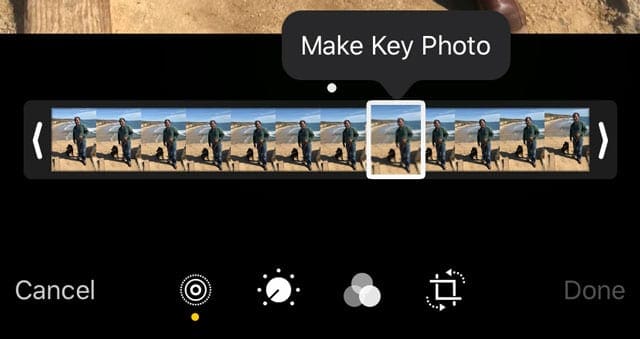
How do I change the featured photo from a Live Photo?
Open a Live Photo in the Photos app
Tap Edit
Tap the Live Photos icon
Move the white box within the filmstrip slider so your preferred featured look is in the box
Release your finger and tap Make Key Photo
Tap Done
You can also toggle the Live Photo effect between off and on. When you’re editing a Live Photo, tap the LIVE button at the top of the screen to turn Live Photo off or back on.
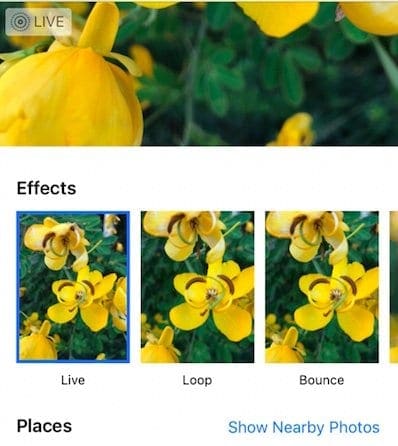
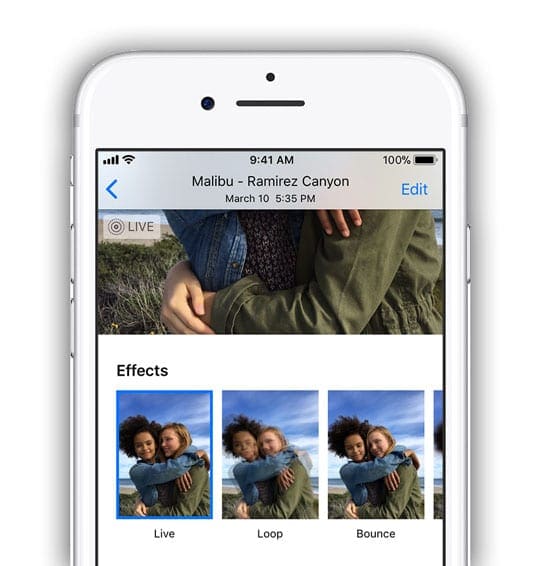
How can I add motion effects to Live Photos?
Starting with iOS11, Apple introduced some cool motion effects that you can use with Live Photos. Swipe up on a Live Photo and tap an effect.
Live Photos Effects
Loop repeats the action in a continuous looping video
Bounce rewinds the action backward and forward
Long Exposure simulates a DSLR-like long exposure effect by blurring motion
When you use the Loop or bounce effects on your Live Photo, you can share these photos as MP4 Files with your friends who are on Android or non-Apple devices.
To add motion effects to your live photos
Go to your Live Photos Album in the Photos app and choose a picture
Tap on it so that it shows up on the full screen
DO NOT TAP EDIT
Now swipe up from the bottom of the photo until you see the Effects Menu
If you go too far down to swipe, it might bring up the control center depending on your iPhone’s model
You want to swipe from the bottom of the photo on your iPhone screen
Now choose an effect that you want to add to the live photo
In iOS 11+ and iPadOS, choose from Live, Loop, Bounce and Long Exposure
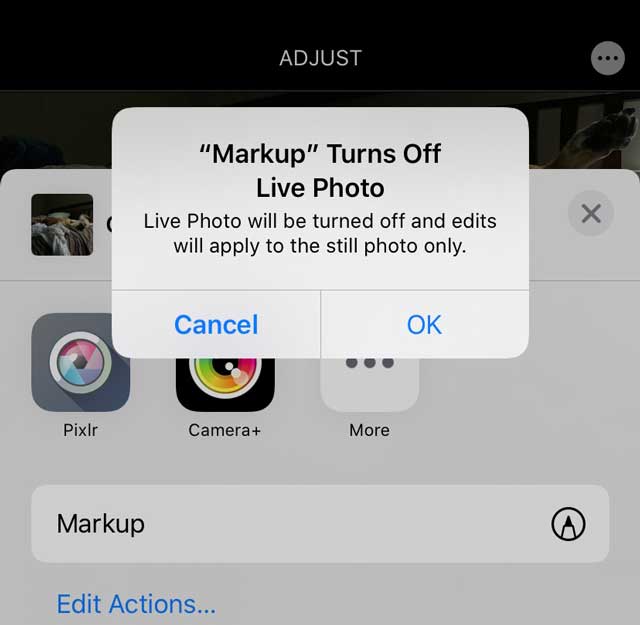
Can I mark up a Live Photo on my iPhone?
While you can choose the option to markup Live Photos, it doesn’t actually work with Live Photos. When you choose Markup, a warning message lets you know that markup turns off the Live Photo features.
Once you mark up a Live Photo, it turns it into a still image automatically.
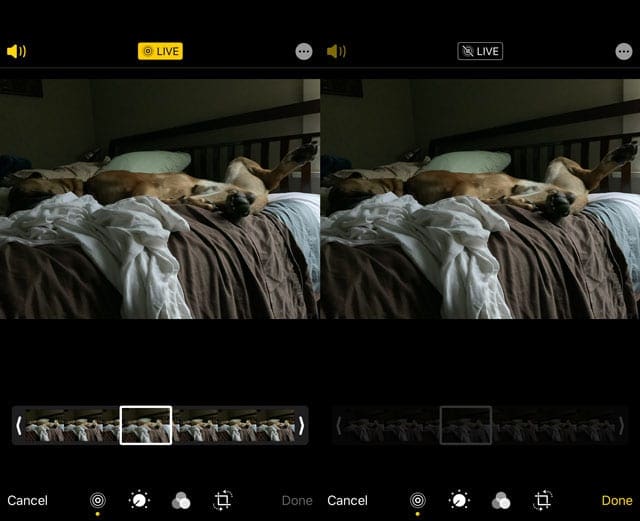
How do I convert a Live Photo into a still image?
Locate the Live Photo in the Photos app that you want to convert.
The easiest way to locate your Live Photos is to tap the ‘Albums’ tab and select the Live Photos folder
Open the Live Photo by tapping on it. You will see the familiar LIVE icon on the top left of the image verifying that you are on a Live Photo
Tap Edit
Tap the Live Photos icon
Tap the LIVE banner once and wait for it the icon to change to a slash through it indicating that the live photo is now a still image
When you change a Live Photo to a still photo, the filmstrip key frame slider grays out and is no longer active
Tap on Done and the image is saved as a still
You can change it back to a Live Photo later by tapping the Live Photo banner again
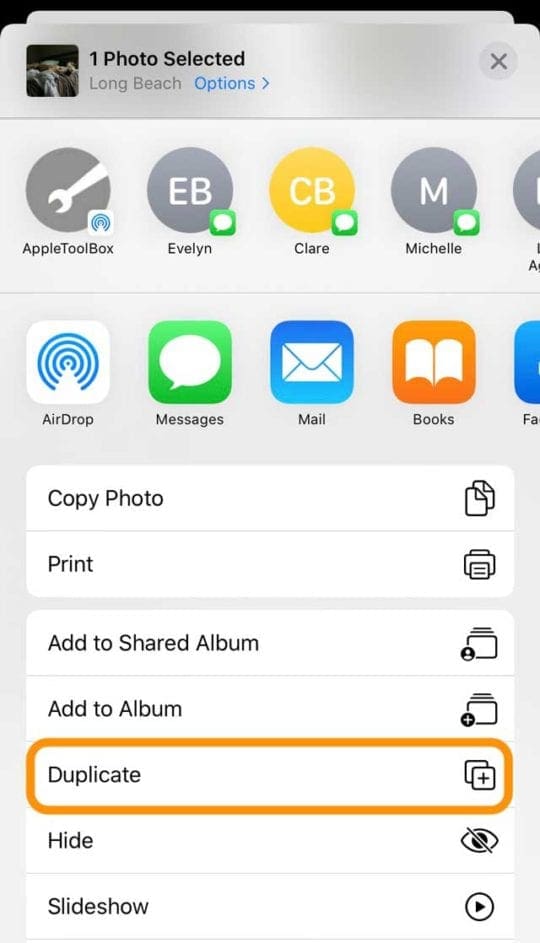
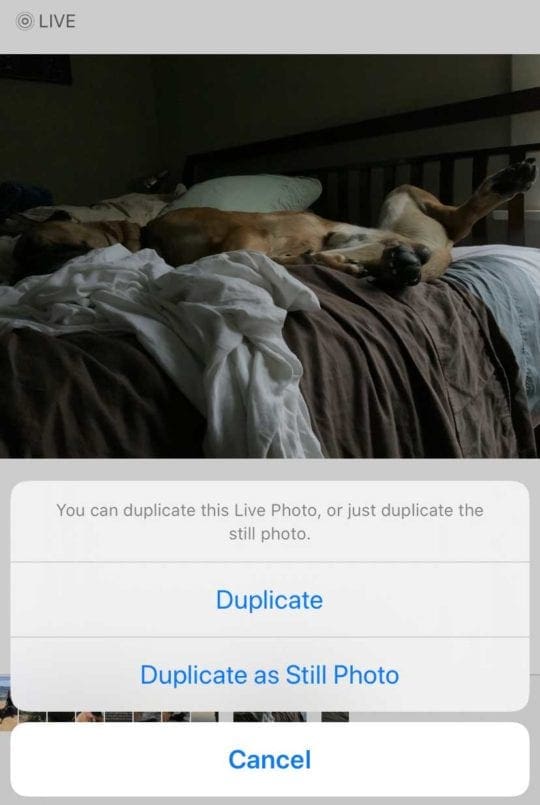
Your iPhone also allows you the ability to preserve the original Live photo but create a duplicate still image from it. That way, you have the best of both worlds!
To duplicate a live photo as a still
Click on the share icon when you are on the picture
From the share sheet’s action list, choose duplicate
You see two choices: Duplicate and Duplicate as Still photo
Duplicate creates a copy of your live photo
Duplicate as Still photo creates a still image version of your live photo
How can I take a Live Photo from FaceTime?
If you’re in a FaceTime call with someone else running iOS 11+, iPadOS, or High Sierra+, tap the circular photo button to snap a Live Photo.
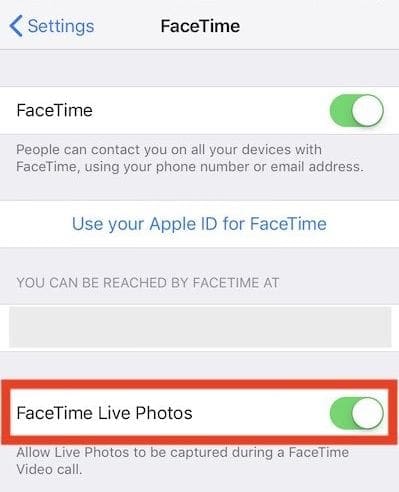
You’ll be alerted if the person on the other end of the call takes a Live Photo, and you can stop people from doing it by turning Live Photos off in the FaceTime settings.
You will find this setting in Settings > FaceTime > FaceTime Live Photos.
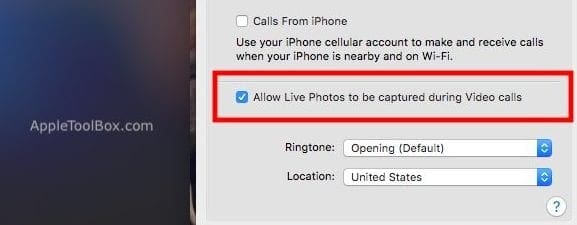
On your Mac, if you are running macOS High Sierra+, you will find this in FaceTime > Preferences > Settings at the bottom of the screen.
Noticed that iOS 12 dropped FaceTime Live Photos? For whatever reason, iOS 12 -12.1 does not support FaceTime Live Photos. It returned in the iOS 12.1.1 update. So if you don’t see FaceTime Live Photos, update your iOS or iPadOS.
Sharing Live Photos with others
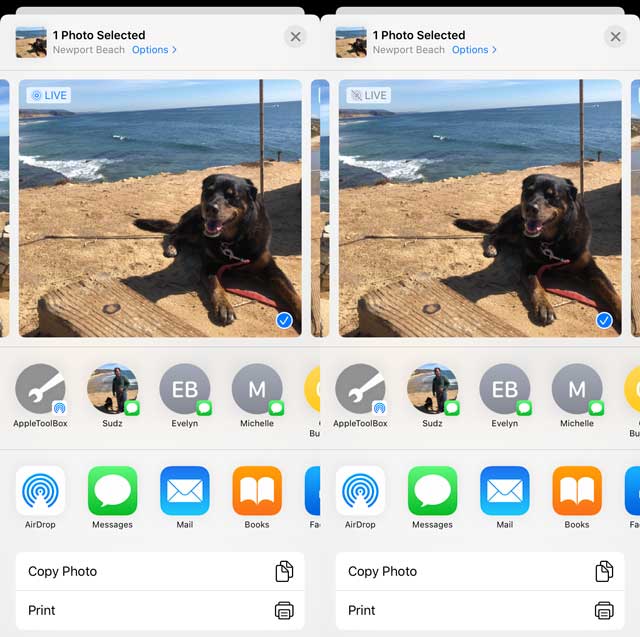
Open the Live Photo that you want to share and tap the Share button
From the Share Sheet, choose where you want to share your photo (Messages, AirDrop, Mail, and so forth)
If you want to share the Live Photo as a still image, tap Live banner in the top corner of the picture to disable it
Tap the Live banner to change it to a still photo for sharing
When you share via the Mail app, the Live Photo is automatically sent as a still image
When you receive a Live Photo via the Messages app, just tap on the photo to open it, then press and hold it to see the action
Live Photos and social media
Facebook supports Live Photos for your News Feed and Page posts. At this time, Live Photos show up as still images when you use them in your Facebook Stories.
Instagram supports Live Photos for Instagram Stories but NOT normal Instagram posts.
How to share Live Photos on social media
Open the Live Photo and tap the Share Button
Tap the Facebook icon in the share sheets second row. If you don’t see it, tap the More button and look under Suggestions
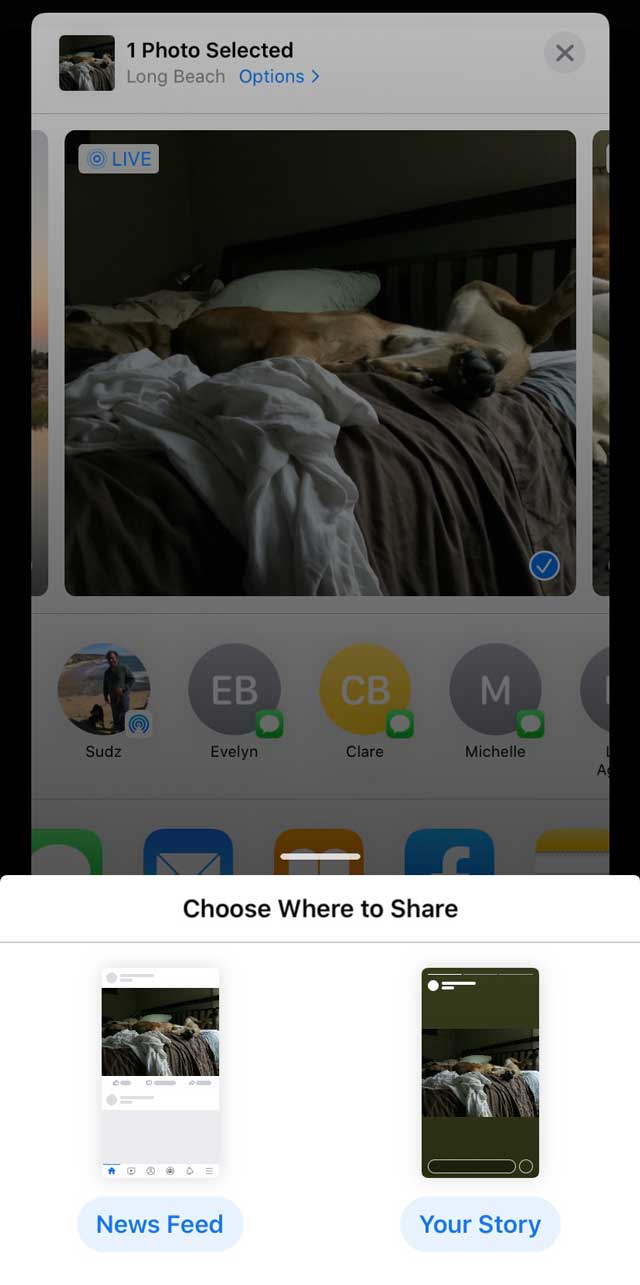
Choose how you want to share the live photo–either News Feed or Your Story
If you plan on sharing a Live photo to Facebook, tap on the “Photo” button at the top of the News Feed
From there, select the Live Photo you want to upload and tap on the “Live” icon at the bottom right
Tapping on the “Live’ icon is crucial otherwise it simply uploads a still photo when you post on Facebook
Sharing Live Photos to your Instagram account has been made easy with the IG Stories feature
There is a small caveat. You can only share photos that you have taken in the last 24 hours
To share your live photos, you must convert your Live Photos to Boomerangs for Instagram Stories
Here is a support guide from Instagram that walks you through those steps.
Google Live Photo features that are handy on your iPhone
Since Google now lets users save Live Photos as. MOV videos, which can be posted to social media and emailed or texted to friends, we figure it will be a good idea to explore the Google Possibilities that one can use on their iPhone. This is important as many users save their iPhone photos to Google photos as well. Last year Google made it easier for users to automatically backup their iPhone Live Photos into Google Photos.
Uploading a Live Photo from your Apple device to Google photos is straightforward
Once you log in using your Google credentials using photos.google.com, you can click on the Upload button if you are using your Macbook.
Browse to your photos library > Live Photos and select the photo that you want. Click on it, and it is automatically uploaded.
Note that in the Google world, Live Photos are known as “Motion Photos”
If you are using the Google Photos App on your iPhone, tap on Photos at the bottom, and then tap on the search bar at the top
Scroll down to locate “Motion Photos”
All your Live photos from your iPhone will be accessible in this folder
Tap on the photo and the animation will start playing automatically
You should see the familiar “Motion On” circle at the top right corner on your screen
Click on the ‘…’ at the top right corner and you will find the option to save the live photo as a video if you like
The save to video option is also available from the share options at the bottom of the picture
When you share the photo, its original format is maintained.
So for example, if you captured the photo using HEIC format on your iPhone, it will be sent in the same format when you use the mail app to share the photo from Google photos.
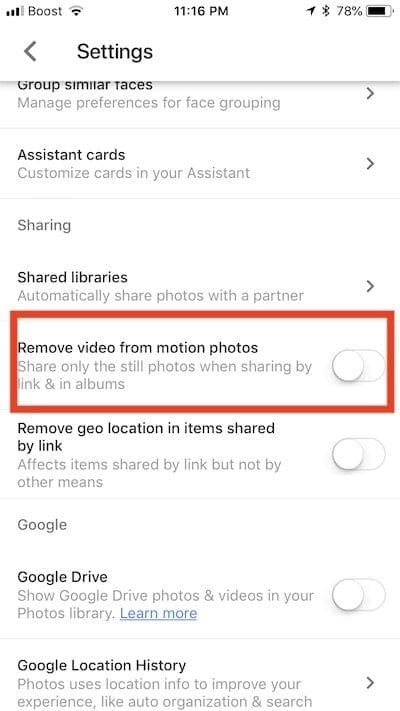
If you are sharing a live photo via a shared album or a link in Google Photos, make sure to check an important setting.
In Google photo Settings, look for “Remove video from motion photos.” Make sure that this is not enabled if you like to see the animation.
How to convert Live Photos into GIFs
You can choose to use Google’s “Motion Stills” App to convert your Live Photos into smooth GIFs and movie files
This app was made available in 2016 in the Apple app store
We have found the Motion Stills as the best course of sharing live photos as GIF’s with others or social media
Other-Apps to convert Live Photos
Other Apps that you can use to convert Live Photos into GIFs are LivePix and Lively
Momento App is another cool one that integrates very well with iMessage.
IntoLive App is another popular app that is used by many to convert GIFs etc. into Live Photos.
We have seen many users showcase these animated photos on their Apple Watch face.
We, however, liked the ease and features made available by the free Google Motion Stills App. A Live Photo of your dog on your Apple Watch could be a cool thing to try out!
Bonus Tip: 3D touching on a live photo while sending it via WhatsApp will send it as a GIF
Drop us a line!
We hope that you found this iPhone Live Photos user guide helpful. Please let us know in the comments below if you have any questions or additional tips that you would like to share with the readers.
Obsessed with tech since the early arrival of A/UX on Apple, Sudz (SK) is responsible for the original editorial direction of AppleToolBox. He is based out of Los Angeles, CA.
Sudz specializes in covering all things macOS, having reviewed dozens of OS X and macOS developments over the years.
In a former life, Sudz worked helping Fortune 100 companies with their technology and business transformation aspirations.
I have asked so many times why my idiot iPhone13 won’t allow my Live Photos or apples either animate as wallpaper on locked down? NO ANSWER, If I get another answer, go to wallpaper select….I may sue Apple for all the ways iPhones get worse, worse horrible. If I breathe on it it jumps to some other place. Apple endlessly sends UNWANTED ADS TO COVER page I am focused on.
Your u
I upload all my photos to dropbox as for backup and to be able to save some space on my iphone 12.
When I download the pics from dropbox to my iphone, the live function seems to be gone, even if I haven’t done any editing of these photos on my computer. Do I have to keep photos permanently on my apple devices to keep the live funtion alive, or is there a way to restore the live function after saving the pictures back on my apple devices?
I am not sure, but as far as I remember I think the live function was kept as long as I did not edit these pictures on my computer before? I hope there is a way to safely backup these pictures whitout losing the live funtion, and to restore the ones already uploaded! (I don’t use iCloud backup as I take far too many pictures and need to save them in a cobtrolled catalogue system to keep some control and overview of them all).
I have a question about the date of the photos I download from my iPhone 11 to the MacBook. I use AirDrop, and all the photos I receive on my Mac are dated with the time of the download. Is there a control on the iPhone that allows the photos to keep their original date and time (when they were created) at the time of the transfer?
I have a question: my daughter sends me a “live“ photo on my Messages(I have 6Splus). I receive it as just a regular photo, not “live“. Nothing shows up in the upper corner of the photo either.
I used to be able to receive “live” photos on my messages. I don’t know what happened. I cannot find an answer in your Apple toolbox. Thank you.
yes, it should work. First, confirm you both use the same iOS version–if not update so both iPhones run the same iOS. To check, go to Settings > General > About.
Ask your daughter to check the following:
Open the Settings app.
Tap Camera > Preserve Settings.
Make sure that the switch next to Live Photos is turned OFF
Go to Settings > Messages
Toggle off Low Quality Image Mode
Restart the iPhone
Then, ask your daughter to try to send a live photo again using the Photos app (not Messages app)
Choose a live photo (verify it has the Live icon) and tap the Share button
Check again that the Live in the upper-left corner is active (if inactive, it will show Live’s target icon as crossed out)
Choose the Messages app
Enter your contact to send it
Send the photos
Check if that worked now. Also, it’s a good idea to do this process on your iPhone as well, so you are sending your daughter a live photo.
Open the Live Photo and tap Edit
Tap the Live Photo icon that looks like concentric circles
To trim a Live Photo, drag either end of the frame viewer to choose the frames the Live Photo plays
I have the iPhone 11 Pro Max (or Max Pro, LOL). I have been attempting to upload a live photo to Facebook but it comes across as a still. My camera roll is live and the photo word there. When I upload it the live icon is not present in my FB app, meaning I cannot turn live on or off on the photo on the lower right…the icon is just not there at all. Any help with that?? Have you heard of this issue?
There are sporadic reports from users of Live Photos not working on Facebook.
First, make sure you’re following the supported guidelines:
Facebook supports Live Photos for News Feed and Page posts and the Instagram app supports Live Photos for Instagram Stories.
Live Photos show up as still images if you use them in Facebook Stories or normal Instagram posts.
Facebook’s recommended step is to delete the Facebook app from your device and reinstall it (the latest version) via the App Store.
If you still experience this issue after reinstalling FB, use the “Report a Problem” link in your account to let Facebook know more about what’s going on with your Live Photos not posting.
Live Photos has been available for a while and is available on iPhone 6s or later, iPad (5th generation) or later, iPad Air (3rd generation), iPad mini (5th generation), iPad Pro (all models), and iPod touch (7th generation).
to take a Live Photo
Open the Camera app
Set to photo mode and tap the upper button for Live Photos. When it’s on, you see the Live Photo button at the top of your Camera
Hold your device still
Tap the shutter button
I have tried to post a live picture to fb but it shows up as a still photo.
I have followed instructions I have selected a Live Photo and hit on the live icon but mine is at the top of my picture says live with a line through it I hit on it and it turns yellow and takes the line off I post it but it’s a still picture not a live one.
Please note that although you can share Live Photos on Facebook, only iOS devices using iOS 9 or later see the animated version. For everyone else, it’s a still image.
Here’s how to Share a Live Photo On Facebook:
Open the Facebook app on your iPhone
Select a Live Photo (look for the LIVE icon on it)
Tap Done
Scroll down on the photo and check for that Live icon. Tap it to turn on the Live feature and then tap POST
If you don’t tap the Live icon, the picture posts a still image
When you view the photos in Facebook, press and hold to view the Live part (i.e.moving image)
I am having the same problem. I am updated to the latest 12.1 on my iPhone 8 and I have posted Live Photo’s before on Facebook, but now it’s not woking. The live icon on/off option is also on the top left not the bottom. Help!!!!
Live Photos no longer work for me on Facebook, either. If I go back and look at Live Photos posted a year or so ago, they work, but ones posted in the month do not work, even though the icon is there.
I also now have the same issue. Used to work; no longer works.
Stormsays
My phone managed to take and post a very embarrassing live video on FB when I was not using the camera at all! Seems a cat walking on the phone is all it takes. This is possibly the worst feature ever. Can we kill it?


I have asked so many times why my idiot iPhone13 won’t allow my Live Photos or apples either animate as wallpaper on locked down? NO ANSWER, If I get another answer, go to wallpaper select….I may sue Apple for all the ways iPhones get worse, worse horrible. If I breathe on it it jumps to some other place. Apple endlessly sends UNWANTED ADS TO COVER page I am focused on.
Your u
I upload all my photos to dropbox as for backup and to be able to save some space on my iphone 12.
When I download the pics from dropbox to my iphone, the live function seems to be gone, even if I haven’t done any editing of these photos on my computer. Do I have to keep photos permanently on my apple devices to keep the live funtion alive, or is there a way to restore the live function after saving the pictures back on my apple devices?
I am not sure, but as far as I remember I think the live function was kept as long as I did not edit these pictures on my computer before? I hope there is a way to safely backup these pictures whitout losing the live funtion, and to restore the ones already uploaded! (I don’t use iCloud backup as I take far too many pictures and need to save them in a cobtrolled catalogue system to keep some control and overview of them all).
I have a question about the date of the photos I download from my iPhone 11 to the MacBook. I use AirDrop, and all the photos I receive on my Mac are dated with the time of the download. Is there a control on the iPhone that allows the photos to keep their original date and time (when they were created) at the time of the transfer?
I have a question: my daughter sends me a “live“ photo on my Messages(I have 6Splus). I receive it as just a regular photo, not “live“. Nothing shows up in the upper corner of the photo either.
I used to be able to receive “live” photos on my messages. I don’t know what happened. I cannot find an answer in your Apple toolbox. Thank you.
Hi Connie,
yes, it should work. First, confirm you both use the same iOS version–if not update so both iPhones run the same iOS. To check, go to Settings > General > About.
Ask your daughter to check the following:
Open the Settings app.
Tap Camera > Preserve Settings.
Make sure that the switch next to Live Photos is turned OFF
Go to Settings > Messages
Toggle off Low Quality Image Mode
Restart the iPhone
Then, ask your daughter to try to send a live photo again using the Photos app (not Messages app)
Choose a live photo (verify it has the Live icon) and tap the Share button
Check again that the Live in the upper-left corner is active (if inactive, it will show Live’s target icon as crossed out)
Choose the Messages app
Enter your contact to send it
Send the photos
Check if that worked now. Also, it’s a good idea to do this process on your iPhone as well, so you are sending your daughter a live photo.
Can I edit a live photo? I have several live photos that I love on my phone.
The problem is I don’t always hold the camera on the subject long enough and have this trailing off to the floor wave on several of my live photos.
How can I edit the live photo go get rid of the last frame that trails off?
Hi Betty,
Yes, you can edit a Live Photo!
Open the Live Photo and tap Edit
Tap the Live Photo icon that looks like concentric circles
To trim a Live Photo, drag either end of the frame viewer to choose the frames the Live Photo plays
I have the iPhone 11 Pro Max (or Max Pro, LOL). I have been attempting to upload a live photo to Facebook but it comes across as a still. My camera roll is live and the photo word there. When I upload it the live icon is not present in my FB app, meaning I cannot turn live on or off on the photo on the lower right…the icon is just not there at all. Any help with that?? Have you heard of this issue?
Hi Lita,
There are sporadic reports from users of Live Photos not working on Facebook.
First, make sure you’re following the supported guidelines:
Facebook supports Live Photos for News Feed and Page posts and the Instagram app supports Live Photos for Instagram Stories.
Live Photos show up as still images if you use them in Facebook Stories or normal Instagram posts.
Facebook’s recommended step is to delete the Facebook app from your device and reinstall it (the latest version) via the App Store.
If you still experience this issue after reinstalling FB, use the “Report a Problem” link in your account to let Facebook know more about what’s going on with your Live Photos not posting.
I do not have an option to save as a live video on the photo function. Is this only available in iOS 13.3?
Hi Julia,
Live Photos has been available for a while and is available on iPhone 6s or later, iPad (5th generation) or later, iPad Air (3rd generation), iPad mini (5th generation), iPad Pro (all models), and iPod touch (7th generation).
to take a Live Photo
Open the Camera app
Set to photo mode and tap the upper button for Live Photos. When it’s on, you see the Live Photo button at the top of your Camera
Hold your device still
Tap the shutter button
For those of us who don’t share your excitement, how can the Live “feature” be removed?
The disabling procedure is neither permanent nor reliable.
Tonight my phone turned it back on by itself.
I checked, and my settings are still those that “permanently” disable it. Had to reset them 2-3 times to get it to stop.
Hi Storm,
There are currently only two ways to disable this feature:
1. Open Settings > Camera and tap on Preserve Settings and then switch Live Photo to the Off position
2. Open the Camera app and disable Live Photos by tapping the yellow circular icon turning it white with a diagonal line crossing it out
It sounds like you already tried these ways. At this time, there isn’t any other universal off toggle.
Sam
I have tried to post a live picture to fb but it shows up as a still photo.
I have followed instructions I have selected a Live Photo and hit on the live icon but mine is at the top of my picture says live with a line through it I hit on it and it turns yellow and takes the line off I post it but it’s a still picture not a live one.
I have a iPhone 7 can you help?
Hi Sharon,
Please note that although you can share Live Photos on Facebook, only iOS devices using iOS 9 or later see the animated version. For everyone else, it’s a still image.
Here’s how to Share a Live Photo On Facebook:
Open the Facebook app on your iPhone
Select a Live Photo (look for the LIVE icon on it)
Tap Done
Scroll down on the photo and check for that Live icon. Tap it to turn on the Live feature and then tap POST
If you don’t tap the Live icon, the picture posts a still image
When you view the photos in Facebook, press and hold to view the Live part (i.e.moving image)
Sam
I am having the same problem. I am updated to the latest 12.1 on my iPhone 8 and I have posted Live Photo’s before on Facebook, but now it’s not woking. The live icon on/off option is also on the top left not the bottom. Help!!!!
Live Photos no longer work for me on Facebook, either. If I go back and look at Live Photos posted a year or so ago, they work, but ones posted in the month do not work, even though the icon is there.
I also now have the same issue. Used to work; no longer works.
My phone managed to take and post a very embarrassing live video on FB when I was not using the camera at all! Seems a cat walking on the phone is all it takes. This is possibly the worst feature ever. Can we kill it?