Trust me, your Mac is sure to let you know when the startup disk is almost full. If you ignore the persistent warning messages, you’re still going to notice the drop in speed. As the startup disk fills up, your Mac runs out of the precious free space it needs to keep working, and its performance suffers as a result.
Sometimes it gets so bad you can’t delete files anymore, making it difficult to fix the problem. Other times it gets even worse and your Mac might not even turn on.
Whatever issues you’re facing, we can show you how to fix it.
It’s tough to know where to start when you can’t even delete files anymore, but we’ve got you covered with these quick tips, explained in detail below:
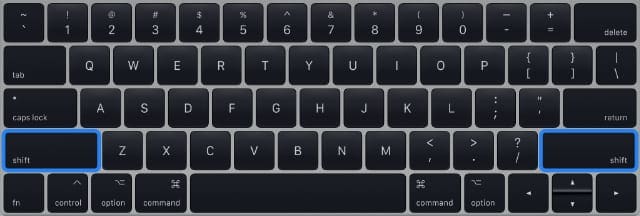
Boot into Safe Mode by holding the shift key during startup.
Bypass the Trash when you delete files with option+command+delete.
Open Disk Utility and run First Aid on your startup disk.
Hold T to boot into Target Disk and access your data from a second Mac.
If you have a recent backup, erase your startup disk and reinstall macOS.
For those who don’t know, your startup disk is the hard drive in your computer that stores the operating software. Normally there’s only one drive in a computer, so it holds all your documents and data as well — which is probably how it got filled up.
If you have multiple drives connected to your Mac — or if you split your drive into multiple partitions, as recommended for running beta software — only one of them is your startup disk.
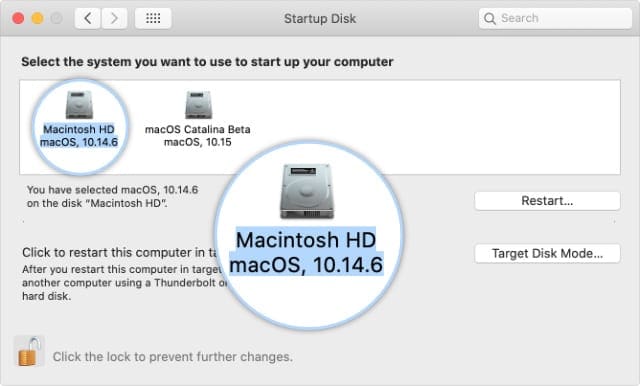
Your startup disk is the drive your Mac boots up from by default. You can choose which drive to use as your startup disk from the System Preferences.
If you have multiple disks or partitions, choose your startup disk from System Preferences.
Why do I need free space on my Mac’s startup disk?
As your Mac runs software and completes different processes, it needs extra space to work in. This space is used to copy files, unpack folders, and perform other instantaneous tasks behind the scenes.
Without enough space on the startup disk, your Mac is unable to do complete these tasks and ceases to function properly. When this happens, you normally end up with a beach ball cursor, slow load times, and an unresponsive machine.
How much free space do I need on my startup disk?
As a general rule of thumb, you should keep at least 10 GB free on your Mac’s startup disk. For the best performance, you should aim to keep about 10–15% of your startup disk free.
Try to keep plenty of free space on your startup disk.
That said, it’s hard to give precise numbers without knowing the size of your startup disk, how much RAM your Mac has, and what processes you usually use your computer for.
If your Mac starts to slow down, take a look at your storage and consider creating more free space.
How do I find out how much free space I have on my startup disk?
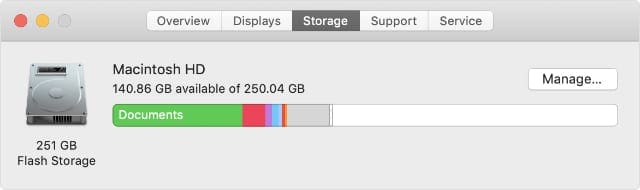
The simplest — although not always the most accurate — way to look at the storage usage on your Mac is from the About This Mac window. In the menu bar, go to > About This Mac, then click on the Storage tab.
OmniDiskSweeper offers a more detailed view of your storage.
This window shows a graph of the storage use on your Mac’s disks, separating your storage into different categories. Make sure you leave this window open for at least two minutes, as it often takes a moment to update to the latest storage reading. But even then, it’s known to be vague and inaccurate.
Instead, if you have space to download it, you might want to scan your Mac’s startup disk using the third-party app OmniDiskSweeper. This free app quickly scans your disks and shows you exactly where your storage is going.
How to delete files on your Mac when the startup disk is full
As counterintuitive as it sounds, your Mac still needs free space to work even when it’s deleting files. And that isn’t just when you move stuff to the Trash. If your Mac’s startup disk is too full, you can’t even empty the Trash.
When you can’t delete anything, it seems impossible to create more free space on your overflowing startup disk. But there are still a few things you can do.
These tips also work if your Mac won’t turn on because the startup disk is full.
More importantly, Safe Mode automatically clears certain sets of cached data on your Mac. That means it creates a small amount of extra free space on your startup disk, just by booting up.
Hopefully it’s enough free space to let you empty the Trash again!
How do I boot my Mac into Safe Mode?
Shut down your Mac by going to > Shut Down. If your Mac is frozen, press and hold the power button until the screen goes black.
Wait 30 seconds for your Mac to fully shut down.
Briefly press the power button, then immediately press and hold shift.
Use either shift key to boot into Safe Mode.
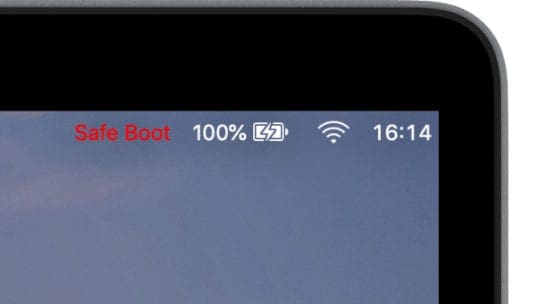
Keep holding shift until a login screen appears, it should say ‘Safe Boot’ in the top-right of the screen.
It only says ‘Safe Boot’ in the menu bar from the login screen.
Step 2. Bypass the Trash when you delete files
When you delete a file or folder on your Mac, it doesn’t actually get deleted straight away. Instead, macOS moves that item to your Trash for safekeeping, in case you deleted it by mistake. You don’t get any more free space on your startup disk until you empty the Trash.
But the act of moving an item to the Trash actually requires more free space on your startup disk than immediately erasing it would need. Fortunately, there are a couple of ways you can bypass the Trash to immediately delete files or folders on your Mac. Try each of them below.
Of course, with these methods there are no do-overs. When you hit delete, that item vanishes forever and you can’t get it back again. So make sure you don’t delete the wrong files or folders by mistake!
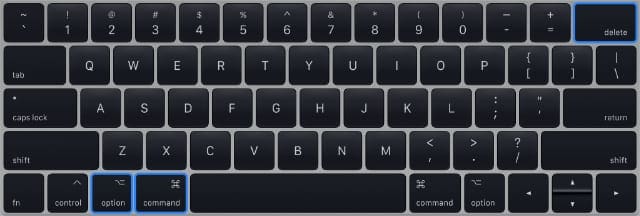
How do I bypass the Trash using a keyboard shortcut?
Carefully select the file or folder you want to delete.
Press the following key command: option+command+delete.
In the pop-up window, confirm you want to delete the item.
You can’t undo it when you use this shortcut to delete something.
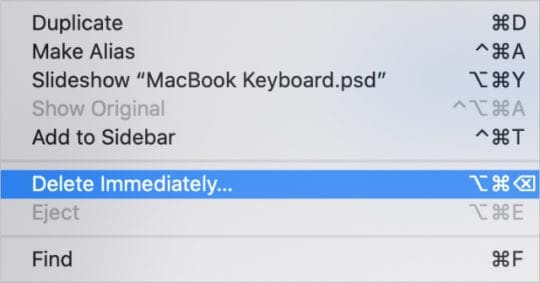
How do I bypass the Trash using the File menu in Finder?
Open a Finder window and select the file or folder you want to delete.
Hold option and go to File > Delete Immediately.
In the pop-up window, confirm you want to delete the item.
Lots of File menu options change when you hold different keys.
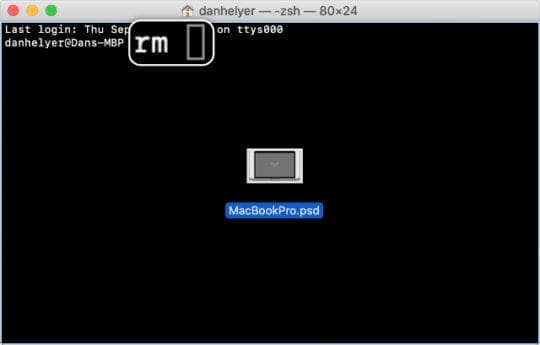
How do I bypass the Trash using Terminal commands?
Open Terminal from the Utilities folder in your Applications.
Type rm into Terminal, including the whitespace at the end.
Drag the file you want to delete into the Terminal window. This command only works on individual files, not folders.
Hit enter to immediately and permanently delete the file.
Dropping a file into Terminal after the remove command enters the file path so you can delete it.
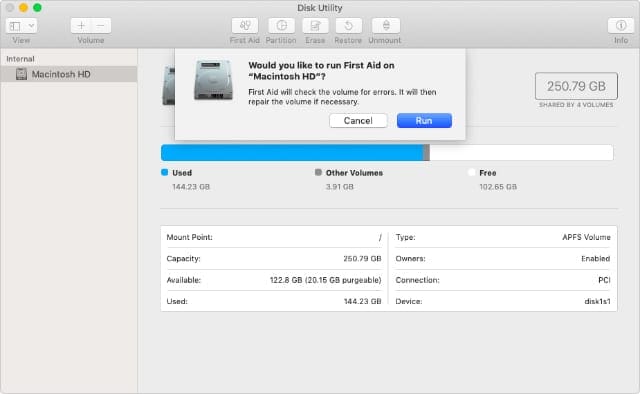
Step 3. Repair your startup disk using Disk Utility
It’s possible there are corruptions on your startup disk stopping you from deleting files, regardless of it being full. Although booting into Safe Mode attempts to repair these corruptions, you can perform a more detailed scan using Disk Utility.
We suggest you use Target Disk Mode to do the following two things:
Try to clear more space on your startup disk.
Make a copy of important items you haven’t backed up.
If you can’t clear any more space on your startup disk using Target Disk Mode, your last option is to erase the startup disk entirely. So you really want to make sure you’ve got a copy of those irreplaceable documents first.
To use Target Disk Mode, you need to connect your Mac to a second Mac using one of the following ports:
How do I use Target Disk Mode to access my startup disk?
Shut down your Mac by going to > Shut Down. If your Mac is frozen, press and hold the power button until the screen goes black.
Connect your Mac to a second Mac using the Thunderbolt 2, Thunderbolt 3, USB-C, or Firewire ports.
Briefly press the power button on your Mac, then immediately press and hold the T key.
Your Mac should display a large Thunderbolt, USB, or Firewire symbol on the screen.
On the second Mac, open a Finder window and access the data on your Mac. It should appear as an external hard drive.
Your Mac should show a connection icon on the screen when it’s in Target Disk Mode. Image from 9to5Mac.
Step 5. Erase your startup disk and reinstall macOS
If you still can’t delete anything on your Mac because the startup disk is too full, your last option is to erase it entirely and reinstall macOS. Of course, this means you lose any data that isn’t already backed up.
How do I erase my startup disk and reinstall macOS?
Shut down your Mac by going to > Shut Down. If your Mac is frozen, press and hold the power button until the screen goes black.
Briefly press the power button on your Mac, then immediately press and hold command+R.
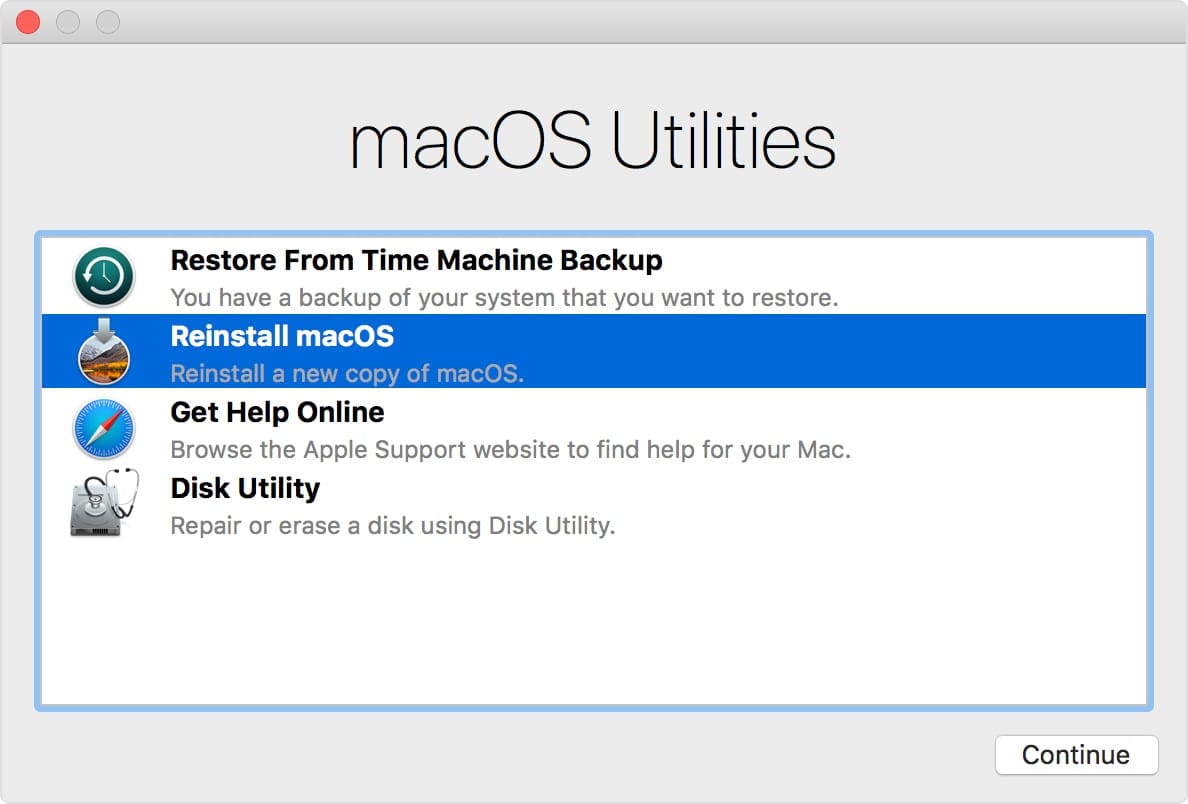
Keep holding the keys until you see a macOS Utilities window appear.
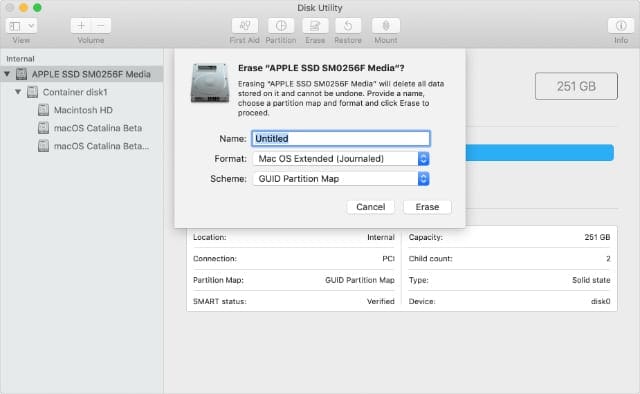
Open Disk Utility, then select your Mac’s startup disk and click Erase.
Choose a new name and format for your disk. We suggest using the default format, which is Mac OS Extended (Journaled).
Click Erase, wait for the process to complete, then press command+Q to close Disk Utility.
From the macOS Utilities window, select ‘Reinstall macOS’ and follow the onscreen prompts to complete installation.
After the installation is complete, you should set up your Mac as new then manually import a smaller amount of content from your backups.
Open Disk Utility and then Reinstall macOS from the Recovery Mode Utilities window.
How to create space on your Mac when the startup disk is full
Hopefully, by now, you can delete files on your startup disk again. So now you probably want to know which ones you should delete first to create more space.
If you haven’t done so already, empty the Trash on your Mac. Otherwise, everything you deleted up to now is still taking up space on your startup disk.
If you can, empty the Trash to free up space on your Mac.
To empty the Trash, control-click the Trash icon in the Dock and select ‘Empty Trash.’
You should also empty app-specific Trash from different applications. You can normally do this by opening the app and finding the deleted files section. The following apps may still have some deleted files:
Mail
Photos
iMovie.
Tip 2. Delete any files you don’t want
Get an overview of your storage use from the About This Mac sidebar.
Track down the largest files or folders on your Mac and delete the ones you don’t want anymore. A good place to start is the About This Mac window, which gives you an overview of your largest documents.
From the menu bar, go to > About This Mac > Storage. Click ‘Manage’ and select ‘Documents’ in the sidebar. This shows a list of documents you might want to delete, sorted from the largest to the smallest.
You might also want to use OmniDiskSweeper to find out where your storage is being used. Although you should be very cautious about deleting anything from the System or Library folders, since doing so can cause problems with your Mac’s operating software.
Consider deleting each of the following things to free up more space:
photos and videos in your library
iPadOS and iOS backups in iTunes or Finder
apps downloaded from the web or the Mac App Store
files saved to your Desktop, Downloads, or Documents folders.
Don’t forget to empty the Trash when you’re finished!
Tip 3. Move other files off your startup disk
Any files or folders you don’t want to delete can still be moved off your startup disk by putting them on an external hard drive or uploading them to cloud storage. This is particularly useful for items you don’t need to use very often.
Archive some of your documents by saving them to an external hard drive. Then free up space on your startup disk by deleting them from your Mac. We recommend you make semi-regular backups of your external drives.
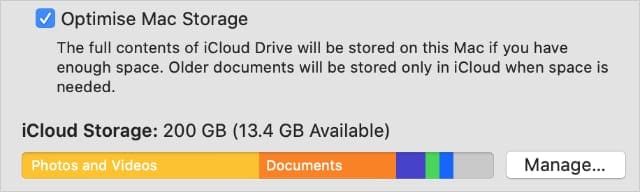
Turn on Optimize Storage from the Apple ID page in System Preferences.
Tip 4. Use Time Machine to back up your Mac
In between Time Machine backups, your Mac stores ‘Local Snapshots’ of your documents to offload to your Time Machine drive the next time you backup. macOS saves these snapshots to your System files, sometimes taking up quite a bit of storage.
Temporarily turn off automatic backups to clear your local snapshots.
Although Apple designed macOS to delete the snapshots when your startup disk gets full, it doesn’t always happen. But you can remove them by making a new backup or turning off automatic backups from the Time Machine settings.
Connect your backup drive and wait for a new backup to finish. Or go to > System Preferences > Time Machine and turn off ‘Back Up Automatically.’
Tip 5. Update macOS to the latest release
Finally, you should update your Mac to the latest version of macOS. These updates are often designed to make better use your of storage. But as well as that, your Mac might have already downloaded the update anyway.
If you have automatic updates turned on for macOS, your Mac downloads updates as soon as they become available. But it may not have installed those updates yet if there hasn’t been a good opportunity to do so. When that happens, the update still takes up a lot of your storage.
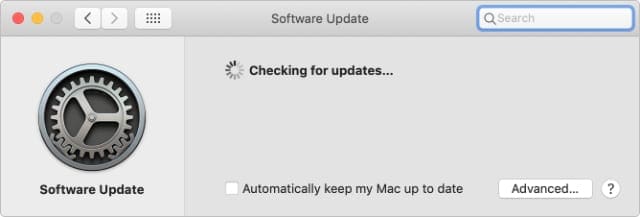
Go to > System Preferences > Software Update and make sure you’re running the latest version of macOS. Be sure to wait for the update to finish installing before checking your storage use again.
Uncheck the box if you don’t want to automatically download future updates.
You should be able to delete files from your Mac’s startup disk by now, no matter how full it was. If you’ve got any additional space-saving tips, we’d love to see them in the comments!
Dan writes tutorials and troubleshooting guides to help people make the most of their technology. Before becoming a writer, he earned a BSc in Sound Technology, supervised repairs at an Apple Store, and even taught English in China.
Recently, I constantly got “Startup Disk is full” even when I removed some large files. After I checked all my photos, music and movies, I started to suspect Microsoft Outlook, for I had problems with it in the beginning. I tried to find Outlook file directory of Outlook and could not find the directory nor my personal mail file (pst files). So I played around and went to Tools\Run Schedule\Empty Deleted Items Folder, and tried to permanently delete all deleted messages. I was a little concerned when it took about 10 minutes to complete, and has obviously cleaned up multiple folders.
When it’s done, I have emptied trash can and shutdown my MacBook Air (Yosemite). When restarted, I was so pleased I got 28GB of my 128GB system Disk storage back.


Cannot thank you enough! This was so so helpful! I went through so many other videos, tutorials and forums and they didn’t help. Thank youu!!
Hey check out TarDisk. It doubled my MacBooks internal hard drive.
Do you use Microsoft Outlook on your MacBook Air?
Recently, I constantly got “Startup Disk is full” even when I removed some large files. After I checked all my photos, music and movies, I started to suspect Microsoft Outlook, for I had problems with it in the beginning. I tried to find Outlook file directory of Outlook and could not find the directory nor my personal mail file (pst files). So I played around and went to Tools\Run Schedule\Empty Deleted Items Folder, and tried to permanently delete all deleted messages. I was a little concerned when it took about 10 minutes to complete, and has obviously cleaned up multiple folders.
When it’s done, I have emptied trash can and shutdown my MacBook Air (Yosemite). When restarted, I was so pleased I got 28GB of my 128GB system Disk storage back.
How to delete some files if my startup disc is full
How to delete some files if my startup disc is full