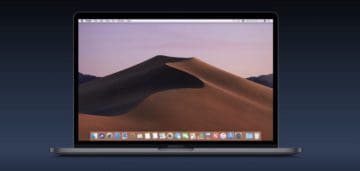
macOS Mojave will officially be the last version of Apple’s Mac operating system to support 32-bit apps. But what if you absolutely need to use a 32-bit app going forward? While it isn’t exactly the easiest solution, you can always use a virtualization program to create a virtual machine running Mojave.
This is, truthfully, a bit of a tedious and tech-y task. Partly, that’s because setting up a Mac virtual machine is a bit more difficult than virtualizing Windows or Linux. But as of the writing of this article, it can be done and could be a working solution for running 32-bit apps in macOS Catalina and beyond.
Virtualization, in a nutshell, is a way to run any operating system on your current computer without needing to install them individually or create a dual-boot situation.
Instead, a virtualization program like VirtualBox, Parallels Desktop, VMware Fusion, or similar apps lets you create virtual machines — essentially self-contained computers that operate independently of your host operating system.
In the context of 32-bit apps, this means that you can still run them in an instance of macOS Mojave even after you’ve upgraded your Mac to Catalina.
There are also plenty of other uses for virtual machines, but we’ll get to those later.
The first required steps
For illustration purposes, we use Oracle VM’s VirtualBox app but the steps are similar for other virtualization programs.
The only things you need for this to work is a copy of Oracle VM’s VirtualBox app, which you can download here, and an ISO image of the macOS version that you’d like to install.
Unfortunately, an ISO image of macOS is pretty hard to come by. While there are plenty of websites out there that have their own ISO images, they all come with a certain level of risk.
Creating an ISO Installation Media
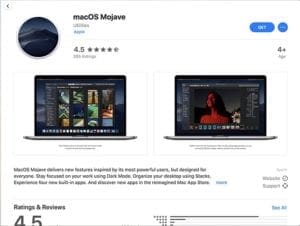
You can grab a copy of the macOS Mojave installer from the Mac App Store.
Because of the risk of random ISO images, we actually recommend creating your own using the official macOS Mojave installer.
Note: Apple doesn’t typically offer past macOS version installers through the App Store indefinitely. We recommend trying this before you update to macOS Catalina.
Open the Mac App Store and search for macOS Mojave.
Once the command finishes running, check your destination folder to see if you have an .iso image. This is what you’ll use to install macOS Mojave in VirtualBox.
If the iso file name includes the .cdr at the end, rename the file to remove that .cdr so the final filename is Mojave.iso
How to use VirtualBox to run macOS Mojave
Creating a VirtualBox macOS machine is a bit tedious, but it’s worth the hassle.
Before you start, make sure to download VirtualBox and install it on your Mac.
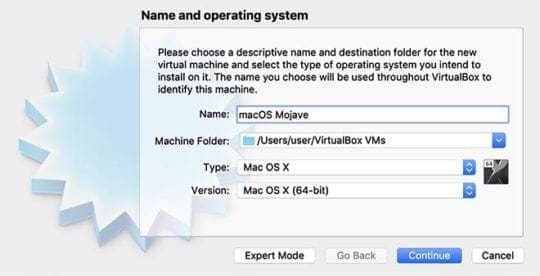
Open VirtualBox.
Click on the New button.
Select Mac OS X for the operating system and Mac OS X (64-bit) for the version.
Continue through the process of setting up the memory size and the h. We recommend setting a size of at least 32GB.
Once you get to the step asking about a hard drive, choose to Create a Virtual Hard Disk Now.
Choose VDI for the hard disk type. Click next.
Now, navigate to Settings > Storage.
In the SATA controller section, click on Add Optical Disk and select the .iso file you created earlier.
Under the Display tab, set the video memory to at least 128MB (or its maximum value).
Quit the Settings.
Now, you’ll want to boot the virtual machine. Just select it from your list and click on Start. After a while, it’ll ask you the installation language and where you want to install macOS.
From here, select Utilities in the top menu bar and open Disk Utility. Select VBOX HARDDISK Media and erase the storage by clicking on the Erase icon at the top.
Enter the desired name and quit Disk Utility when it’s finished. Now, you should see a new storage media. Choose that for the installation of macOS Mojave.
Make sure to go back to Settings > Storage and eject the .iso image.
Then, just boot up the machine again to see if the installation proceeds normally. If all went well, you should see the standard Mac setup menu.
We recommend skipping logging in with your Apple ID during setup and trying to log in later in the App Store.
When you get it all set up
Once you get the macOS Mojave machine all set up, you should be able to use it normally.
Just note that Apple’s software isn’t always the best for virtualization. Because of that, some of the system features — like audio or video acceleration — may not work properly. Other apps, like iMessage or Apple Maps, may also fail to load.
In other words, it may not be the best option as a daily driver machine. But you should be able to install and use 32-bit apps on the virtual machine, even after you’ve updated your shot Mac to Catalina.
Other uses for a virtual machine
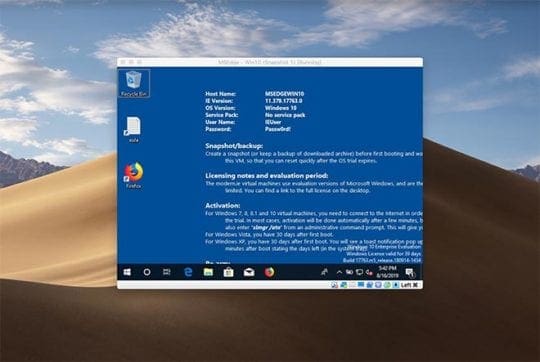
Need to run something that only works on Windows? You can download a test version of the OS for VirtualBox.
While VirtualBox and virtual machines are great for running 32-bit apps on macOS Catalina, there are plenty of other uses for them.
You can, for example, run a virtual version of Windows on your Mac. There are also plenty of Linux distributions available for VirtualBox, if you’d like to use them.
Virtual machines are also great for security. If there’s a sketchy file that you’re curious about, you can save a snapshot of your virtual machine and open the file within that machine.
If the file ends up being nefarious, you can always revert to that earlier snapshot or delete the virtual machine entirely. It won’t end up threatening your host computer.
(Thanks to AppleToolBox reader Will Goad for the suggestion!)
Mike is a freelance journalist from San Diego, California.
While he primarily covers Apple and consumer technology, he has past experience writing about public safety, local government, and education for a variety of publications.
He’s worn quite a few hats in the journalism field, including writer, editor, and news designer.
Hello
If I am installing 32-bit Mojave into a Virtual Box on Catalina why do these in instructions indicate to select 64-bit in the Version dropdown? Does the Version refer to the fact that Catalina is 64-bit? I’m confused 🙂
First, the “Show package Contents” cannot be used with packages and/or was removed years ago. And second there is no installESD.dmg file in my package. Any ideas? Thanks! – Jack
The solution of virtualizing a machine is not valid for many situations of the times where you require low-level access such as GPU Access (make use of accelerated Opengl and you need Opengl 3.3 / 4.1 and good fps for gaming)
And for the preservation of software it should be able to run natively without layers involved..
Does this work on a new machine that came with Catalina installed?
It seems some of this depends on Mojave (or earlier) being the original system on the machine and that the Mojave installer would be prevented from running on my machine.
The version that’s supposed to automatically run from the App store told me that my system was “too new” when I tried to create a bootable Mojave installer volume.
I’m hoping that the virtual-machine approach is possible.
Loren
I have same issue that number of others have. After setting up Mojave.iso as the optical disc, it never seems to install and get to the ‘disk utility’ screen to install it. Just stays at the prompt. Any workarounds or corrections yet?
This was going so well until I also got stuck on some kind of shell screen when starting the virtual box. The iso mounting instructions weren’t 100% clear but I think I got it right. Any idea how to move past this? I see others in the comments ran into the same problem.
Thanks for the article.
I have already updated to Catalina. When using terminal I was unsure whether to use the new shel zsh or try using bash. When trying to convert the cdr file to an iso file I keep getting a message ‘hdiutil: convert failed – Resource temporarily unavailable’
I am using the bash shell (does this make any difference). Any ideas?
Hi Michael
Greetings from New Zealand.
I have updated to Catalina too early and I would like to go back to Mojave until Catalina is “perfect”.
I have all business files in Dropbox plus all passwords and other important files in iCloud.
For me is a factory reset of my MacBook Pro the easiest way to go back to Mojave.
Is it possible ?
Looking forward to your reply.
Thank you
Kind regards
Dietmar
Yes, this is possible especially with a backup of your files. It’s even easier if you backup via Time Machine or something like Carbon Copy Cloner and have a backup made before you updated to macOS Catalina.
Step 1 Backup
Backup your files and your Mac with Time Machine. This process erases your Mac so backup anything you want to carry over.
Step 2 Create bootable installer
You’ll need to create a bootable installer for macOS Mojave. Follow the steps in this Apple whitepaper on how to do that.
To download macOS Mojave, visit this page and scroll to the section Download macOS Mojave
Step 3 Erase
Boot in your Mac’s Recovery Mode (Command+R) and run Disk Utility to erase your Mac’s startup disk–make sure you format in the SAME type (i.e. APFS, HFS+)
Step 4 Reinstall macOS Mojave–choose one method
Method A
Reinstall macOS Mojave from that USB bootable drive you created in step 2 by restarting your Mac and hold down the Option key. Select the USB drive and install macOS Mojave from that.
Method B
If your Mac came with macOS Mojave, restart your Mac while holding down Shift-Option-Command-R
Step 5 Reconnect to backup
Connect to time machine backup made before updating to macOS Catalina.
Restart in Recovery Mode (Command+R) and choose Restore from Time Machine Backup–make sure you choose a backup made with macOS Mojave and NOT Catalina.
I find this process quite challenging…and I tend to know computers pretty good.
So if I have a hard time, I imagine a lot of others do too!
In reviewing some support documents and forums for VirtualBox users (https://forums.virtualbox.org), I came across this handy guide that uses macOS High Sierra–but seems to work/help for folks wanting macOS Mojave too.
“Now, you’ll want to boot the virtual machine. Just select it from your list and click on Start. After a while, it’ll ask you the installation language and where you want to install macOS.”
I’m pretty sure I did everything above that correctly. But when I start the virtual machine, all I get is what looks like a shell environment (a black background with fixed font, saying:
UEFI Interactive Shell v2.1
EDK II
UEFI v2.40 (EDK II, 0x00010000)
Mapping table
[then three lines describing BLK0, BLK1, BLK2]
Press ESC in 1 seconds to skip startup.nsh or any other key to continue
Shell>
I get no prompt for installation language, etc.
I also don’t know where to look for Utilities in the top menu bar to open Disk Utility. I presume that if I could figure out how to move beyond the black UEFI shell, I might see what menu you are talking about.
Hello.
Exactly the same here.
I did take into account the parameters proposed by Gregor (tobiwashere.de) but got the same result.
One thing, I am trying to install a Mojave client on a Mojave server with VirtulaBox 6. Just before migrating to Catalina.
Hopefully someone can help us one day.
Best.
Follow up.
I decided to create the Mojave.iso following Lizzy B’s process here below (I had to go admin because of the sudo command).
It produced a different file (slightly different size) than the one described in the article.
Virtualbox went much further (however displaying some error messages) and then was blocked at this step :
Load_init_program: attempting to load /shin/launchd.
(I am creating a Mojave client on a Mojave server. Note also that I am running as a standard user not an admin one but I don’t see why this would be an issue.)
Cheers.
(Sorry for previous double posting)
Ditto here. I’m running Catalina and try to install Mojave and run it via VirtualBox. can’t get further than the UEFI screen that stops at the shell prompt…Please update on this.
Could you please somehow link the script for us to use? I am someone who was stuck at the shell screen and just saying “use a script instead to automatically create ISO images…” is not actually helpful.
I am quite surprised that following these instructions seems easy but isn’t working.
John, your directions are so vague. “All you need is the full macOS installer”…from what source? Once we get it, how do we use it? “Use a script”…from where? What script? How?
Like you said Mike, this is not for the faint-hearted. It took me a while to get this working…so I want to share my experience to help others (I hope!)
1) Download macOS Mojave if it’s not already on your computer (check first in your application folder–if you can’t find it in the App Store, go to Apple’s support page for macOS Mojave–there’s a link there)
2) If you need to download it, it may take a while so be prepared for waiting. Once downloaded, Quit the installer
3) Find it in your Applications folder as Install macOS Mojave.app
4) Create a temporary disk image from the install file & make a bootable installer using Terminal:
step 6 the dash is a wrong dash characteer.
Then I was still blocked by UEFI shell at VM startup, but I did the following to boot Mojave instalelr :
1) type exit
2) in the interactive console “BIOS like” choose to boot from VBOX CD device instead of EFI.
Then that VM would boot and stop up to “End Randomseed”
3) as I had High sierra choosen in the VM basic settings, I switched it to Mac OS X (64-bit)
then the installer booted fine
Make sure you aren’t choosing SSD for your virtual hard disk–choosing results in converting the filesystem to APFS, which VirtualBox doesn’t yet support.
Dale, I got round this by shutting down the VM, removing the CD, and restarting. This took me back to the UEFI shell again – I then followed the instructions here https://forums.virtualbox.org/viewtopic.php?t=85631 to boot from file, which then put me back into the second section of the OSX install.
Thank you for the article but I’m stuck right after finding the InstallESD.dmg. I mounted it thinking Disk Utility would allow me to choose that disk to convert. However, when I select it with Disk utility the “choose” button is grey.
Please help
Thank you
Yes, you want to create an iso file. We do not recommend deleting the .cdr file, since you may be able to re-create it in the future. Instead, archive it and store it somewhere so if you need it again, it’s there.
Thanks for the reply, but that wasn’t what i was asking.
My question is about the output file i get : filename.ISO.CDR
Why do i still get a .cdr after the .iso ? Should i keep it or remove the .cdr on the converted file ?


Hello
If I am installing 32-bit Mojave into a Virtual Box on Catalina why do these in instructions indicate to select 64-bit in the Version dropdown? Does the Version refer to the fact that Catalina is 64-bit? I’m confused 🙂
First, the “Show package Contents” cannot be used with packages and/or was removed years ago. And second there is no installESD.dmg file in my package. Any ideas? Thanks! – Jack
The solution of virtualizing a machine is not valid for many situations of the times where you require low-level access such as GPU Access (make use of accelerated Opengl and you need Opengl 3.3 / 4.1 and good fps for gaming)
And for the preservation of software it should be able to run natively without layers involved..
Does this work on a new machine that came with Catalina installed?
It seems some of this depends on Mojave (or earlier) being the original system on the machine and that the Mojave installer would be prevented from running on my machine.
The version that’s supposed to automatically run from the App store told me that my system was “too new” when I tried to create a bootable Mojave installer volume.
I’m hoping that the virtual-machine approach is possible.
Loren
Here’s the Mojave link via the Mac App Store: https://apps.apple.com/us/app/macos-mojave/id1398502828?mt=12
I have same issue that number of others have. After setting up Mojave.iso as the optical disc, it never seems to install and get to the ‘disk utility’ screen to install it. Just stays at the prompt. Any workarounds or corrections yet?
This was going so well until I also got stuck on some kind of shell screen when starting the virtual box. The iso mounting instructions weren’t 100% clear but I think I got it right. Any idea how to move past this? I see others in the comments ran into the same problem.
Thanks for the article.
I have already updated to Catalina. When using terminal I was unsure whether to use the new shel zsh or try using bash. When trying to convert the cdr file to an iso file I keep getting a message ‘hdiutil: convert failed – Resource temporarily unavailable’
I am using the bash shell (does this make any difference). Any ideas?
Hi Michael
Greetings from New Zealand.
I have updated to Catalina too early and I would like to go back to Mojave until Catalina is “perfect”.
I have all business files in Dropbox plus all passwords and other important files in iCloud.
For me is a factory reset of my MacBook Pro the easiest way to go back to Mojave.
Is it possible ?
Looking forward to your reply.
Thank you
Kind regards
Dietmar
Hi Dietmar,
Yes, this is possible especially with a backup of your files. It’s even easier if you backup via Time Machine or something like Carbon Copy Cloner and have a backup made before you updated to macOS Catalina.
Step 1 Backup
Backup your files and your Mac with Time Machine. This process erases your Mac so backup anything you want to carry over.
Step 2 Create bootable installer
You’ll need to create a bootable installer for macOS Mojave. Follow the steps in this Apple whitepaper on how to do that.
To download macOS Mojave, visit this page and scroll to the section Download macOS Mojave
Step 3 Erase
Boot in your Mac’s Recovery Mode (Command+R) and run Disk Utility to erase your Mac’s startup disk–make sure you format in the SAME type (i.e. APFS, HFS+)
Step 4 Reinstall macOS Mojave–choose one method
Method A
Reinstall macOS Mojave from that USB bootable drive you created in step 2 by restarting your Mac and hold down the Option key. Select the USB drive and install macOS Mojave from that.
Method B
If your Mac came with macOS Mojave, restart your Mac while holding down Shift-Option-Command-R
Step 5 Reconnect to backup
Connect to time machine backup made before updating to macOS Catalina.
Restart in Recovery Mode (Command+R) and choose Restore from Time Machine Backup–make sure you choose a backup made with macOS Mojave and NOT Catalina.
That should do the trick!
I find this process quite challenging…and I tend to know computers pretty good.
So if I have a hard time, I imagine a lot of others do too!
In reviewing some support documents and forums for VirtualBox users (https://forums.virtualbox.org), I came across this handy guide that uses macOS High Sierra–but seems to work/help for folks wanting macOS Mojave too.
See this guy’s guide (he’s German but it’s in English): https://tobiwashere.de/2017/10/virtualbox-how-to-create-a-macos-high-sierra-vm-to-run-on-a-mac-host-system/
Thanks for the article!
I got as far as:
“Now, you’ll want to boot the virtual machine. Just select it from your list and click on Start. After a while, it’ll ask you the installation language and where you want to install macOS.”
I’m pretty sure I did everything above that correctly. But when I start the virtual machine, all I get is what looks like a shell environment (a black background with fixed font, saying:
UEFI Interactive Shell v2.1
EDK II
UEFI v2.40 (EDK II, 0x00010000)
Mapping table
[then three lines describing BLK0, BLK1, BLK2]
Press ESC in 1 seconds to skip startup.nsh or any other key to continue
Shell>
I get no prompt for installation language, etc.
I also don’t know where to look for Utilities in the top menu bar to open Disk Utility. I presume that if I could figure out how to move beyond the black UEFI shell, I might see what menu you are talking about.
Can you help me make progress? Thanks!
Same problem :/
Everything went swimmingly until trying to run the machine.
Hello.
Exactly the same here.
I did take into account the parameters proposed by Gregor (tobiwashere.de) but got the same result.
One thing, I am trying to install a Mojave client on a Mojave server with VirtulaBox 6. Just before migrating to Catalina.
Hopefully someone can help us one day.
Best.
Follow up.
I decided to create the Mojave.iso following Lizzy B’s process here below (I had to go admin because of the sudo command).
It produced a different file (slightly different size) than the one described in the article.
Virtualbox went much further (however displaying some error messages) and then was blocked at this step :
Load_init_program: attempting to load /shin/launchd.
(I am creating a Mojave client on a Mojave server. Note also that I am running as a standard user not an admin one but I don’t see why this would be an issue.)
Cheers.
(Sorry for previous double posting)
Ditto here. I’m running Catalina and try to install Mojave and run it via VirtualBox. can’t get further than the UEFI screen that stops at the shell prompt…Please update on this.
There is a better way to install macOS Mojave on Virtualbox.
All you need is the full macOS installer.
Use a script instead to automatically create ISO images and Virtual hard disk.
Could you please somehow link the script for us to use? I am someone who was stuck at the shell screen and just saying “use a script instead to automatically create ISO images…” is not actually helpful.
I am quite surprised that following these instructions seems easy but isn’t working.
John, your directions are so vague. “All you need is the full macOS installer”…from what source? Once we get it, how do we use it? “Use a script”…from where? What script? How?
What about drivers? I’d give Apple a big finger icon!
Like you said Mike, this is not for the faint-hearted. It took me a while to get this working…so I want to share my experience to help others (I hope!)
1) Download macOS Mojave if it’s not already on your computer (check first in your application folder–if you can’t find it in the App Store, go to Apple’s support page for macOS Mojave–there’s a link there)
2) If you need to download it, it may take a while so be prepared for waiting. Once downloaded, Quit the installer
3) Find it in your Applications folder as Install macOS Mojave.app
4) Create a temporary disk image from the install file & make a bootable installer using Terminal:
hdiutil create -o /tmp/Mojave.cdr -size 7000m -layout SPUD -fs HFS+J
5) Attach that file, with Terminal command
hdiutil attach /tmp/Mojave.cdr.dmg -noverify -mountpoint /Volumes/install_build
6) Build it, with command
sudo /Applications/Install\ macOS\ Mojave.app/Contents/Resources/createinstallmedia –volume /Volumes/install_build
7) Move it to your mac’s Desktop
mv /tmp/Mojave.cdr.dmg ~/Desktop/InstallSystem.dmg
8) Unmount the file
hdiutil detach /Volumes/Install\ macOS\ Mojave
9) Convert it to ISO
hdiutil convert ~/Desktop/InstallSystem.dmg -format UDTO -o ~/Desktop/Mojave.iso
10) Rename it to remove the CDR reference
mv ~/Desktop/Mojave.iso.cdr ~/Desktop/Mojave.iso
11) Exit terminal via terminal command: exit
12) Mount Mojave in VirtualBox as instructed
at step 6 I get “You must specify a volume path.”
The command that runs createinstallmedia is missing an extra dash; use ‘–volume’ instead of ‘-volume’
At step 8 I get “hdiutil: couldn’t unmount “disk8″ – Resource busy”. Avoid jargon please I have no experience working in Terminal
step 6 the dash is a wrong dash characteer.
Then I was still blocked by UEFI shell at VM startup, but I did the following to boot Mojave instalelr :
1) type exit
2) in the interactive console “BIOS like” choose to boot from VBOX CD device instead of EFI.
Then that VM would boot and stop up to “End Randomseed”
3) as I had High sierra choosen in the VM basic settings, I switched it to Mac OS X (64-bit)
then the installer booted fine
Hi! Thanks for the guide!
I’m hoping you can help me with a problem I’m running into.
Everything is fine up and through creating the drive to install onto in Disk Utility.
Then I choose that drive and begin the Mojave install and everything goes fine until right toward the end.
The installation stops and I’m taken back to the installation screen.
If I choose reinstall, the whole process starts over. Any ideas what’s going wrong? Thanks!
Hi Dale,
Make sure you aren’t choosing SSD for your virtual hard disk–choosing results in converting the filesystem to APFS, which VirtualBox doesn’t yet support.
Dale, I got round this by shutting down the VM, removing the CD, and restarting. This took me back to the UEFI shell again – I then followed the instructions here https://forums.virtualbox.org/viewtopic.php?t=85631 to boot from file, which then put me back into the second section of the OSX install.
I got as far as starting the VM of Mojave and get a shell window–not the desktop as I would have expected. Not sure where to go from here.
Same here, I get an “UEFU Interactive Shell v2.1” And can enter commands at Shell>_
where to go from here?
That’s what I get, too. I’m stuck at that point.
What am I missing?
you need to select high Sierra 32bit, not just 32bit. this will take you through the setup and onto the Mac OS installation
Unfortunately there is no option for Sierra 32 Bit
Thank you for the article but I’m stuck right after finding the InstallESD.dmg. I mounted it thinking Disk Utility would allow me to choose that disk to convert. However, when I select it with Disk utility the “choose” button is grey.
Please help
Thank you
Once you find the InstallESD.dmg file, copy it to your Documents or Downloads directory and try that copy in DiskUtility. Should work.
When i convert the cdr file, the output i get is a .iso.cdr file. Is it normal ?
Should i just delete the .cdr ?
Hi Benf,
Yes, you want to create an iso file. We do not recommend deleting the .cdr file, since you may be able to re-create it in the future. Instead, archive it and store it somewhere so if you need it again, it’s there.
Liz
Hi Elizabeth,
Thanks for the reply, but that wasn’t what i was asking.
My question is about the output file i get : filename.ISO.CDR
Why do i still get a .cdr after the .iso ? Should i keep it or remove the .cdr on the converted file ?
Thanks
HI Benf,
Yes, remove the .cdr–you want the file named Mojave.iso.
You say “open the Terminal app and type in the following command.” but there is no following command…
Hi Joe,
Wow, what an oversight! Sorry about that. We’ve updated the article with that missing info.
Here’s the command: hdiutil convert ~/NameOfFolder/NameOfFile.cdr -format UDTO -o ~/NameOfFolder/NameOfFile.iso