Updating macOS can be a real chore sometimes, especially if you get stuck in an update loop because there isn’t enough free space. Some users started the update but found themselves stuck in this “boot loop” after it failed, returning to the update installer page every time their Mac booted up again.
If there isn’t enough free space on your Mac, usually you get an alert before you start the update. But if your update failed during installation, or if that alert failed to read your storage properly, you might find yourself with problems.
In this post, we’ve explained a few different ways to break out of the macOS update loop and make sure you have enough free space on your Mac.
It’s not immediately obvious why your Mac needs free space to update itself anyway. Especially after you already made enough space to download the update. But in fact, the macOS update installer needs extra room to work in.
Without that space, the macOS update installer can’t complete all of its tasks, and the update fails.
How much free storage do I need to update macOS?
Try to always keep at least 10% of your hard drive empty.
Apple lists storage space recommendations for macOS updates on its website. Click here to take a look at that page, typically Apple suggests you need around 20 GB of free space.
We advise you to give your Mac 1.5x Apple’s recommended storage requirement for an update. This should avoid the risk of getting stuck in a macOS update loop.
Regardless of whether you’re updating your Mac, try to keep at least 10% of your hard drive empty. This is common advice to help your computer run smoothly.
How do I create more free space from a macOS update loop?
But if you can’t log in to your Mac — which is probably the case if you’re reading this post — follow the troubleshooting steps below to break out of the macOS update loop or free up space from within the macOS installer.
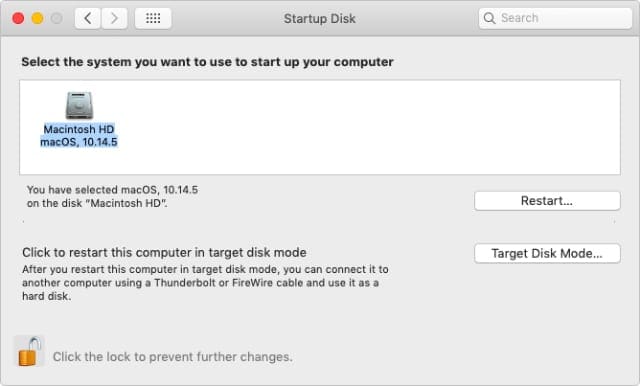
Step 1. Change your startup disk
Move your mouse to the top-left corner of the screen, you should see a menu bar appear. Go to > Startup Disk… and select your Mac’s hard drive, which is usually called ‘Macintosh HD.’
Use Startup Disk to avoid looping around the macOS update installer.
What if I can’t see a menu bar?
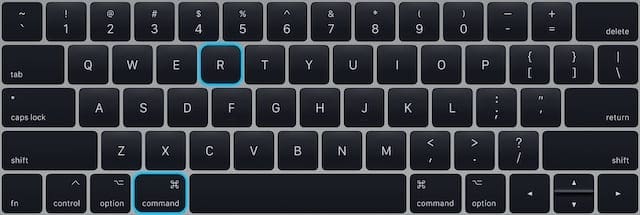
If there’s no menu bar or no option to choose your startup disk, reboot your Mac into Recovery Mode. Do this by holding the command+R keys while powering your Mac on.
Hold these keys while your Mac powers up to boot into Recovery Mode.
From Recovery Mode you should be able to follow the instructions above to choose your startup disk.
What if I can’t choose my startup disk?
If the Startup Disk window doesn’t show your Mac’s hard drive, follow the instructions below to repair your drive using Disk Utility. Then try choosingyour startup disk again.
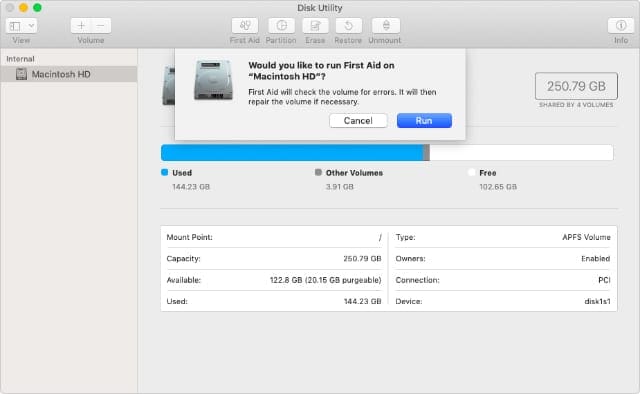
Step 2. Repair your hard drive using Disk Utility
Small problems with your drive might be the reason your macOS update failed, they might also be the reason you can’t select your Mac’s hard drive as the startup disk. Fortunately, they’re easy to repair using Disk Utility.
In Disk Utility, select your Mac’s hard drive from the sidebar, it’s usually called ‘Macintosh HD.’ Make sure you select the parent level drive, which may have a different name. Now click the First Aid button and Run first aid on the drive.
The length of time it takes to run First Aid on your Mac depends partly on the size of your hard drive.
Step 3. Erase your hard drive, if you have a backup
If you have a recent backup of your Mac — or if you don’t mind losing all the content and data on it — the next step is to erase your hard drive completely. If you don’t want to erase your Mac, click here to skip to the final step instead.
After erasing your Mac, you should definitely have enough free space to update macOS, at which point you can restore your backup.
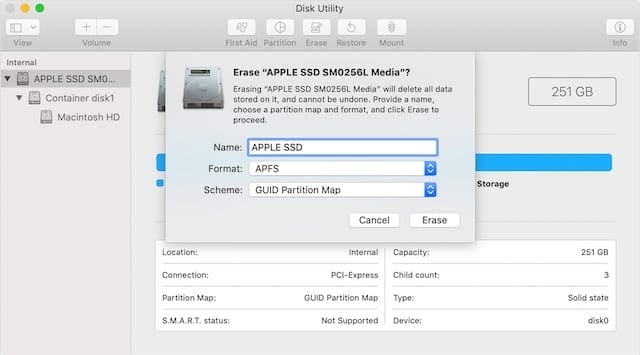
How do I erase the hard drive on my Mac?
Erasing your hard drive permanently deletes all your content — films, photos, documents, etc. — do not do it unless you have a backup.
Boot your Mac into Recovery Mode by holding the command+R keys while it powers on.
From the menu bar, go to Utilities > Disk Utility.
Select your Mac’s hard drive from the sidebar.
Click the Erase button and confirm you want to erase your Mac.
Choose a name, format, and scheme for your erased hard drive — we suggest you keep the defaults.
How do I update macOS after erasing my hard drive?
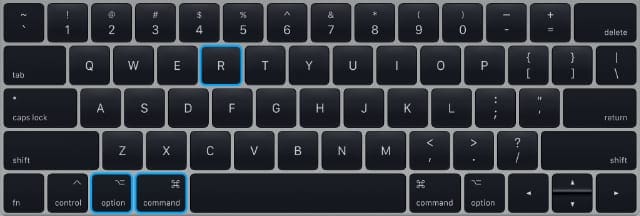
Boot your Mac into an alternate version of Recovery Mode by holding OPTION+command+R while it powers on.
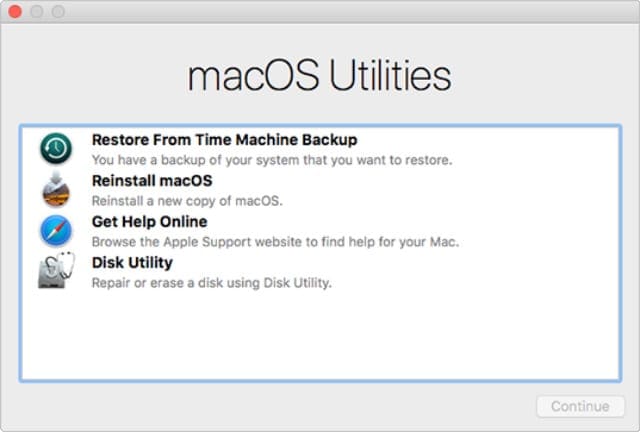
Click ‘Reinstall macOS’ to update your Mac to the latest version of macOS compatible with your machine.
You also need to hold the Option key this time, to install the latest version of macOS.
How do I recover my Time Machine backup?
After completing the macOS update, boot your Mac into Recovery Mode a final time by holding the command+R keys while it powers on.
Click ‘Restore from Time Machine Backup.’
Connect your external backup drive and select the most recent backup.
Follow the on-screen prompts to restore your Time Machine backup from Recovery Mode.
Step 4. Create enough free space for the macOS update using Terminal
If you don’t have a backup and you can’t change your startup disk, your last option is to remove data from your Mac using Terminal. This requires you to enter terminal commands to navigate your hard drive and choose which files to remove. We’ve explained exactly what to do below.
Make sure you enter each command exactly as it’s written below, including punctuation and whitespaces.
How do I open Terminal from the macOS update installer?
Boot your Mac into Recovery Mode by holding the command+R keys while it powers on.
From the menu bar, go to Utilities > Terminal.
How do I navigate using Terminal?
You only need to know the following three commands to navigate using Terminal:
Print Working Directory (pwd)
List (ls)
and Change Directory (cd).
Print Working Directory (pwd): Displays your current position in the hard drive, shown as a file path.
You can see I used the pwd command to find out I’m in the Test Folder in my Documents.
List (ls): Displays a list of all the files and folders in your current position.
I used the ls command to find out there are two sub-folders and one file in my location.
Change Directory (cd): Allows you to move to a different position in the hard drive, by typing the file path you want to go to.
When typing a file path, insert a backslash (\) before a space. You can also use a period (.) as a shortcut for typing your current location. And finally, after you start typing, you can use Tab to cycle through autocomplete options.
I used the cd command to move into Sub-Folder 1, then I checked my location again with pwd.
How do I remove files using Terminal?
When you locate a file you want to delete, there is only one command you need to use to delete it:
Remove (rm).
Remove (rm): Use this command, followed by a filename in your current location to immediately and permanently delete it. Be careful to type the filename correctly, including its file type, to ensure you don’t delete the wrong file.
I used ls to see the files in my location, then I used rm to remove Large File.doc. Finally, I confirmed it was deleted by using ls again.
How do I find large files using Terminal?
If you’re struggling to find large files you can delete to make enough free space for the macOS update, use the command below to see a list of every file on your Mac larger than 500 MB:
find / -size +500000 -print
You can then use the commands above to navigate to and remove those files.
Tips for creating more free space on your Mac
When you’re able to log into your Mac again, use these tips to create enough free space for future macOS updates and keep your storage use to a minimum.
1. Use iCloud Drive to optimize storage
iCloud presents the simplest way to free up space on your Mac. If you subscribe to extra iCloud storage, use iCloud Drive to upload your documents to the cloud.
Then go to your iCloud preferences and turn on Optimize Storage for iCloud Drive. This automatically removes old files from your hard drive — keeping them on iCloud Drive — to create free space on your Mac.
Check the box to get more free space on your Mac.
2. Move data to an external hard drive
If you have a lot of files or folders you don’t need all the time — like work archives, or movie collections — move all that data off your Mac and onto an external hard drive.
You can do this using drag and drop in Finder, then be sure to delete those files from your Mac when they’re safely stored to an external drive.
3. Don’t forget to empty the Trash
Empty the Trash regularly to free up space on your Mac.
After you delete files, don’t forget to empty the Trash. Otherwise they still take up space on your hard drive. To do this, control-click on the Trash can in the dock and select ‘Empty Trash.’
Let us know your own space-saving tips in the comments below. And be sure to tell us if you’re still stuck in a boot loop trying to update macOS, we’ll do whatever we can to help you out.
Dan writes tutorials and troubleshooting guides to help people make the most of their technology. Before becoming a writer, he earned a BSc in Sound Technology, supervised repairs at an Apple Store, and even taught English in China.
I find it almost comical, how ignorant Mac is to the fact that their updates require more free space than even Fucxing come factory on some of these $2-3,000 lap tops.. which might I add, upgrading the memory or ram is NON- Optional! Am I living in the twighlight zone? This is a Mac I bought at best buy in 2020… for almost $3,000, and it’s garbage because I can’t download more than 2 adobe apps and use them without getting storage full prompts. but my current problem is that I CANT UPDATE THE OS because there IS NOT ENOUGH SPACE! Then forums say delete apps.. Bi+€H!!!! I have none!!! Someone please give me a fu€king work around before i break this machine in half and whipe my @$$ with its insides. Thanks
Actually – if you don’t see the HD in startup disk after a failed update installation – you will need NVRAM reset 99% of the time and not the FirstAid option in DiskUtility. Resetting the NVRAM will make the internal drive the default startup disk. All the data on the drive remains intact.
I am stuck in this software update loop, like described in the passage, on my MacBook Air and it keeps saying I do not have enough storage and the screens stays black while giving a pop up offering me a restart or Startup Disk option that is greyed out and not working leaving me no options. I know nothing about computers at all and am kinda confused from the article. Is there anyway to just cancel the update somehow? I tried Command + R but nothing happens.
Every time I once again try to google this problem I’m just told to move documents to the cloud or to an external drive, but I’ve already done all of that. I only have Logic Pro X left and I don’t want to remove that. I’ve even removed all the Logic projects I’m working on and I still don’t have enough space to update the os. I have one single photo left on my computer because it’s the background on my desktop and it takes literally no space. I have about 27GB of free space. System takes up about the same amount. Idk what else to do.
I hear you. I’m in almost the same position. The only things left on my MacBook Air are the operating system it can’t update due to the lack of space… No idea how to fix it…
I’m afraid of trashing important documaent needed to run my computer and I do not want to lose my pictures. No one in my family has time to help me, I’m not iomportant
I can’t thank you enough for this post!!! You saved me!
In my case the lack of space kept the Mac on a loop so I had to enter recovery mode and use the terminal to free up space and then I rebooted and the installation finished successfully
After many fits and starts trying to downgrade from piggish Catalina to reliable Mojave, I finally got to where I could install a copy of Mojave — except, I needed more disk space.
So I bit the bullet and erased my hard drive prior to rebooting with Command-R+Option, reinstalling Mojave, and then reinstalling my other data.
Problem is, the Apple server always,only offers Catalina — the most recent OS my old MacBook Pro can handle — as my “new” OS option. How to escape this loop and get Mojave as my OS option?
Hello,
So my software update is failing due to the “connection”, before I wanted to start the update I had more than 20 gb of storage, after the update failed for about 4 times my storage is now down to 1-2 gb without me downloading anything. The thing about the update is that every time I have to restart the update, it does not continue from where the update got interrupted, but my main concern is that I believe every time the update restarts, it is taking up my storage without ever completing the update. I am afraid this will happen again if I click update for the 5th time, what must I do?
Hi,
I desperately need help. Especially as because of the virus I can’t take my laptop to a repair shop! I am no computer expert so any help would be appreciated.
Went to update my Apple laptop. All was well until it caught me in a loop. Whenever I restart it takes me right back again. I can’t log in or do anything. I’ve tried recovery mode and even clicking macintosh had OS X, 10.11.6 in startup disk but it take me straight back to the grey screen and failed installation again. Tried disk utility but first aid failed. Worried that I have now lost the files on the computer and I really need them! Any help would be appreciated.
It sounds like there are some serious issues with your Mac, and since you mention that you might have lost files, I assume you have not made a backup of your Mac recently (or at all.)
If that is the case, any further steps we can advise here place your data at risk. So if your goal is to recover your data, it’s best to contact a local repair shop–they may be available for appointments rather than open for usual business hours. Your best chance to recover your data is via a professional.
Do you have access to another Mac? If so, running in target disk mode might be your best option to see what’s going on with your MacBook’s storage.
Do you know if you enabled iCloud on that MacBook? If so, it’s possible that your MacBook is now full due to iCloud syncing your Music, Photos, and so forth. But that’s just a guess.
Thank you this post. I am stuck trying to free up space using the terminal because the ls command isn’t working :/
Any ideas?
When I open terminal I see [bash-3.2#
When i use command pwd I get: /var/root
What you are seeing is normal. Navigating Terminal is something you have to know to use.
That said, I might be able to help. Do these steps only IF you are okay with things NOT working out–this process worked for me and others but there is no guarantee! There is always a risk. I
f you don’t feel comfortable, take your Mac to the Apple Store or another Mac specialist. Or put your Mac into target disk mode and use another Mac to copy or delete some large files from it.
Another option is to use a bootable USB hard drive as your macOS start-up and delete files you want from the internal drive.
But if you want to continue, try this (at your own risk)
Try using this command instead: diskutil list
This lists all your disks–find your virtual memory disk which is identified by the letters VM next to APFS Volume. It should be in the same list as APFS Preboot, recovery, and your Macintosh HD
Take note of the disk identifier for your VM (usually something like disk1s4)
Next, type in and run this command to erase the VM: diskutil apfs deleteVolume disk1s4 (put the correct disk identifier for your VM there instead)
Once done, you should be able to remove files from your drive by using the rm- rf command for your volume (you need to know the file path after /Volumes/Macintosh\ HD/Users/…) to get rid of some large files and free up space (hopefully)
be very careful to make sure you use the correct disk identifier for that VM!!!
That VM is your Mac’s vitual memory paging partition (swap partition). Since you are in Recovery Mode, you can erase this VM.
Been going round and round for 5 days after trying to upgrade to Catalina, not being able to reboot and finally getting on the phone with Apple support only to find out afterward there wasn’t enough storage to install Catalina or Mojave.
I was finally able to restart from your suggestions and finally got to the login screen!! Off to delete everything I can.
If you Mac is taking longer than 30 minutes, try running Apple Diagnostics by pressing the D key at startup. There might be a hardware issue impacting your startup process.
Hi, I have deiting lots of files from terminal to free up space to resume installation, but the free space has not moved. The disk utility shows the same, and so does df command. Please help , completely stuck.
Hi! Thank you for this helpful article! I tried all your suggestions where possible and ended up using terminal. I am able to locate the big files with the command given, but I cannot get into the folders. The base line in terminal is -bash-3.2# and I cannot seem to move elsewhere. Any advise? Thank you!!


I find it almost comical, how ignorant Mac is to the fact that their updates require more free space than even Fucxing come factory on some of these $2-3,000 lap tops.. which might I add, upgrading the memory or ram is NON- Optional! Am I living in the twighlight zone? This is a Mac I bought at best buy in 2020… for almost $3,000, and it’s garbage because I can’t download more than 2 adobe apps and use them without getting storage full prompts. but my current problem is that I CANT UPDATE THE OS because there IS NOT ENOUGH SPACE! Then forums say delete apps.. Bi+€H!!!! I have none!!! Someone please give me a fu€king work around before i break this machine in half and whipe my @$$ with its insides. Thanks
Thank you so much for this article, it was exactly what I needed to free up space by deleting large files through Terminal. Can’t thank you enough!
Actually – if you don’t see the HD in startup disk after a failed update installation – you will need NVRAM reset 99% of the time and not the FirstAid option in DiskUtility. Resetting the NVRAM will make the internal drive the default startup disk. All the data on the drive remains intact.
I am stuck in this software update loop, like described in the passage, on my MacBook Air and it keeps saying I do not have enough storage and the screens stays black while giving a pop up offering me a restart or Startup Disk option that is greyed out and not working leaving me no options. I know nothing about computers at all and am kinda confused from the article. Is there anyway to just cancel the update somehow? I tried Command + R but nothing happens.
Every time I once again try to google this problem I’m just told to move documents to the cloud or to an external drive, but I’ve already done all of that. I only have Logic Pro X left and I don’t want to remove that. I’ve even removed all the Logic projects I’m working on and I still don’t have enough space to update the os. I have one single photo left on my computer because it’s the background on my desktop and it takes literally no space. I have about 27GB of free space. System takes up about the same amount. Idk what else to do.
I hear you. I’m in almost the same position. The only things left on my MacBook Air are the operating system it can’t update due to the lack of space… No idea how to fix it…
I’m afraid of trashing important documaent needed to run my computer and I do not want to lose my pictures. No one in my family has time to help me, I’m not iomportant
Thank you soooooo much
Hi,
I can’t use numbers or pages if I can’t update the system and I have no space. Why it doesn’t let me to use old version of numbers without update?
Thank you
I can’t thank you enough for this post!!! You saved me!
In my case the lack of space kept the Mac on a loop so I had to enter recovery mode and use the terminal to free up space and then I rebooted and the installation finished successfully
After many fits and starts trying to downgrade from piggish Catalina to reliable Mojave, I finally got to where I could install a copy of Mojave — except, I needed more disk space.
So I bit the bullet and erased my hard drive prior to rebooting with Command-R+Option, reinstalling Mojave, and then reinstalling my other data.
Problem is, the Apple server always,only offers Catalina — the most recent OS my old MacBook Pro can handle — as my “new” OS option. How to escape this loop and get Mojave as my OS option?
Hello,
So my software update is failing due to the “connection”, before I wanted to start the update I had more than 20 gb of storage, after the update failed for about 4 times my storage is now down to 1-2 gb without me downloading anything. The thing about the update is that every time I have to restart the update, it does not continue from where the update got interrupted, but my main concern is that I believe every time the update restarts, it is taking up my storage without ever completing the update. I am afraid this will happen again if I click update for the 5th time, what must I do?
Whomever wrote this,
Thank you so much. You just made my day .
Hi,
I desperately need help. Especially as because of the virus I can’t take my laptop to a repair shop! I am no computer expert so any help would be appreciated.
Went to update my Apple laptop. All was well until it caught me in a loop. Whenever I restart it takes me right back again. I can’t log in or do anything. I’ve tried recovery mode and even clicking macintosh had OS X, 10.11.6 in startup disk but it take me straight back to the grey screen and failed installation again. Tried disk utility but first aid failed. Worried that I have now lost the files on the computer and I really need them! Any help would be appreciated.
Hi A,
It sounds like there are some serious issues with your Mac, and since you mention that you might have lost files, I assume you have not made a backup of your Mac recently (or at all.)
If that is the case, any further steps we can advise here place your data at risk. So if your goal is to recover your data, it’s best to contact a local repair shop–they may be available for appointments rather than open for usual business hours. Your best chance to recover your data is via a professional.
I have a years old MacBook Pro.
Recently after updating to Catalina OS my hard drive is now full.
There is not enough space for the new update.
I have a 250GB HD but now only 26.5 MB are available.
I do not have much on this laptop and rarely use it. I can’t even open email app.
What did Catalina OS do to my laptop? How do I fix this?
Hi Mark,
Do you have access to another Mac? If so, running in target disk mode might be your best option to see what’s going on with your MacBook’s storage.
Do you know if you enabled iCloud on that MacBook? If so, it’s possible that your MacBook is now full due to iCloud syncing your Music, Photos, and so forth. But that’s just a guess.
Thank you this post. I am stuck trying to free up space using the terminal because the ls command isn’t working :/
Any ideas?
When I open terminal I see [bash-3.2#
When i use command pwd I get: /var/root
Hey Phil,
What you are seeing is normal. Navigating Terminal is something you have to know to use.
That said, I might be able to help. Do these steps only IF you are okay with things NOT working out–this process worked for me and others but there is no guarantee! There is always a risk. I
f you don’t feel comfortable, take your Mac to the Apple Store or another Mac specialist. Or put your Mac into target disk mode and use another Mac to copy or delete some large files from it.
Another option is to use a bootable USB hard drive as your macOS start-up and delete files you want from the internal drive.
But if you want to continue, try this (at your own risk)
Try using this command instead: diskutil list
This lists all your disks–find your virtual memory disk which is identified by the letters VM next to APFS Volume. It should be in the same list as APFS Preboot, recovery, and your Macintosh HD
Take note of the disk identifier for your VM (usually something like disk1s4)
Next, type in and run this command to erase the VM: diskutil apfs deleteVolume disk1s4 (put the correct disk identifier for your VM there instead)
Once done, you should be able to remove files from your drive by using the rm- rf command for your volume (you need to know the file path after /Volumes/Macintosh\ HD/Users/…) to get rid of some large files and free up space (hopefully)
be very careful to make sure you use the correct disk identifier for that VM!!!
That VM is your Mac’s vitual memory paging partition (swap partition). Since you are in Recovery Mode, you can erase this VM.
Ahhh thank you for this.
Been going round and round for 5 days after trying to upgrade to Catalina, not being able to reboot and finally getting on the phone with Apple support only to find out afterward there wasn’t enough storage to install Catalina or Mojave.
I was finally able to restart from your suggestions and finally got to the login screen!! Off to delete everything I can.
I’m trying to restart using Startup disk macintosh HD however it just keeps loading. How long should it take?
Hi Megan,
It can take a bit of time, but not hours!
If you Mac is taking longer than 30 minutes, try running Apple Diagnostics by pressing the D key at startup. There might be a hardware issue impacting your startup process.
Hi, I have deiting lots of files from terminal to free up space to resume installation, but the free space has not moved. The disk utility shows the same, and so does df command. Please help , completely stuck.
Hi Martin,
After deleting your files, restart your Mac and see if Disk Utility updates your total storage and reflects your changes.
Hi! Thank you for this helpful article! I tried all your suggestions where possible and ended up using terminal. I am able to locate the big files with the command given, but I cannot get into the folders. The base line in terminal is -bash-3.2# and I cannot seem to move elsewhere. Any advise? Thank you!!
Hi Evelien,
-bash-3.2# is the default user name you see when working with Terminal in Recovery Mode.
To see files within your folders, you need to change the directory to that specific folder.
For example, if you currently see a list of your folders use the cd ./(Folder Name) to change the directory to this folder.
Once the folder is listed as the current directory in terminal use the command ls or ls -l to see the files within that folder.
ls lists the files
ls -a includes hidden files
ls -l shows the long listing format including file size and date
To learn more about Terminal commands, take a look at this Terminal cheat sheet.
What if there is nothing popping up in the startup prompt?