The MacBook Pro is so well designed that most users go years without any problems at all. But when something does go wrong, you want to know what it is straight away. In this article, we’ve explained how to run a complete diagnostics test on your MacBook Pro hardware.
If the hardware diagnostics come back clear, the cause of your MacBook Pro problems might be software-based. That means you can fix it yourself, for free! We’ve shown you how to do that in this article as well!
Print these instruction so you can follow them without using your MacBook Pro.
If you’re reading these instructions on your MacBook Pro, we suggest you print them out or load it on a different device. Once you start the diagnostics below you won’t be able read this again until they’re finished.
Go to File > Print from the menu bar in your web browser to print this page.
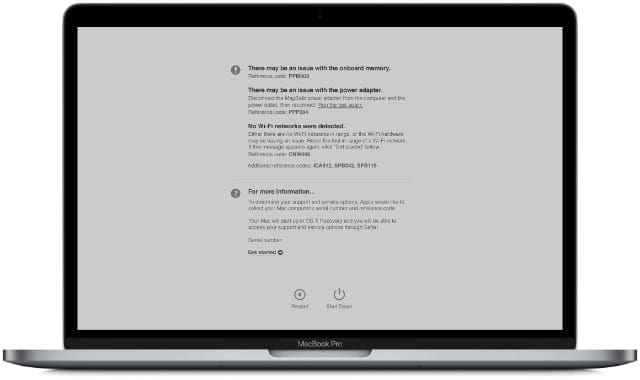
After the diagnostic checks are complete, Apple Diagnostics gives you a list of error codes — if any — and presents a link to get in touch with Apple Support.
What if my MacBook Pro is from before 2013?
You can check the year your MacBook Pro came out by going to > About This Mac. If your MacBook Pro is from before 2013, you can use Apple Hardware Test instead of Apple Diagnostics.
Apple Hardware Test was introduced with OS X Mountain Lion.
Apple Hardware Test is essentially an older version of Apple Diagnostics; it checks each internal component on your MacBook Pro looking for any issues.
If your MacBook Pro is running OS X 10.8.4 (Mountain Lion) or later, you can run Apple Hardware Test using the Apple Diagnostics instructions below.
Otherwise, you need to use the disc or USB flash drive that came with your Mac. Which you can do by holding option while your Mac boots up.
How do I prepare my MacBook Pro for Apple Diagnostics?
Apple Diagnostics only tests the internal hardware on your MacBook Pro. Disconnect all external devices from your computer except for a keyboard, mouse, display, or set of speakers. Otherwise they may interfere with the tests.
It’s advisable to connect your MacBook Pro to the power adapter, ensuring it doesn’t run out of battery throughout the diagnostics.
Finally, make sure your MacBook Pro is well-ventilated and placed on a hard, flat, and stable surface.
A spacious desk is the perfect place to run diagnostics on your MacBook Pro.
How do I run Apple Diagnostics or Apple Hardware Test?
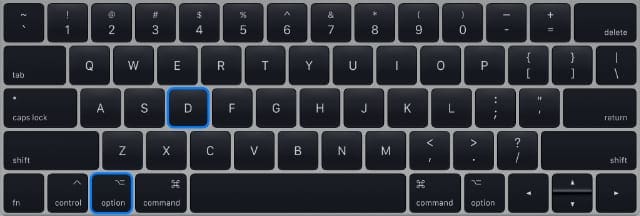
From the menu bar on your MacBook Pro, go to > Restart.
Confirm you want to restart your MacBook Pro, then press and hold the D key as soon as the screen goes black.
Keep holding D until a screen with languages appears.
Select your preferred language.
Apple Diagnostics begins automatically, but for Apple Hardware Test you need to hit the Return key to start it.
If you want to arrange a repair, click ‘Get Started’ and follow the onscreen prompts to book a Genius Bar appointment.
Otherwise, choose to ‘Shut Down’ or ‘Restart’ your MacBook Pro.
Make sure you write down the error codes you get from Apple Diagnostics.
What if the diagnostics didn’t work?
If Apple Diagnostics or Apple Hardware Test didn’t work, repeat the instructions again but hold option+D when your MacBook Pro boots up instead. This runs the tests over an Internet connection.
Hold these keys while booting up your MacBook Pro to start Apple Diagnostics from the Internet.
Step 2. Use third-party software for a full hardware check
The next step is to get a more complete picture of your MacBook Pro’s health using some third-party apps. We recommend EtreCheck and coconutBattery, both of which are free to download and install.
Neither app makes any changes to your MacBook Pro. They simply take readings on the hardware and present them in a way that’s easier to digest.
You should conduct your own research before to installing third-party apps.
What does EtreCheck do?
EtreCheck is frequently recommended on the Apple Support communities.
EtreCheck looks at your system information and — if you allow access — your system files to figure out why your computer is acting up. Based on this information, EtreCheck might diagnose a lack of RAM, an adware infestation, a failing hard disk, or several of other potential issues.
How do I install EtreCheck?
You can either download EtreCheck from the EtreCheck website or the Mac App Store. We recommend you download it from the website, since it isn’t limited by the same restrictions as the Mac App Store version.
When you first try to open EtreCheck, a pop-up warns you that it’s unrecognized software. You should be able click ‘Open’ anyway.
EtreCheck Power User is available as an in-app purchase, but you don’t need it.
How do I use EtreCheck to run diagnostics on my MacBook Pro?
Open EtreCheck.
If it’s the first time using the app, agree to the Terms & Conditions and dismiss the welcome message.
Open the drop-down menu to choose a problem on your MacBook Pro or select ‘No problem – just checking.’
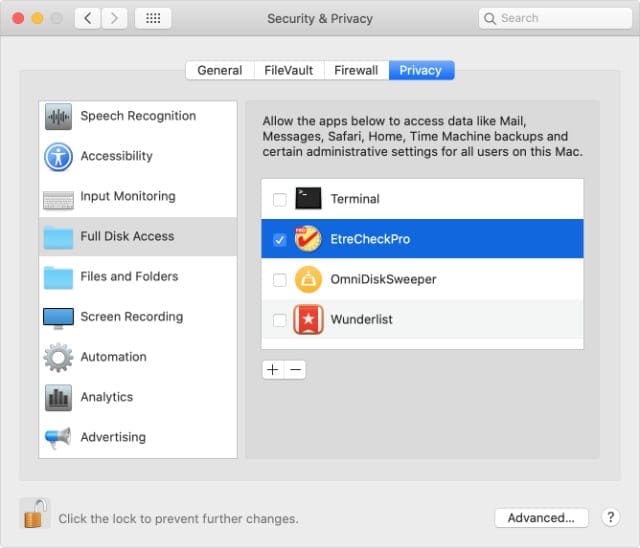
For a full scan, tick the box to ‘Allow Full Drive Access.’
You need to give EtreCheck full drive access from System Preferences.
Read the pop-up window and click ‘Allow.’
It takes you to the Full Disk Access screen in your Privacy Preferences.
Click the padlock and enter your password to unlock changes.
Check the box next to EtreCheck to allow full disk access.
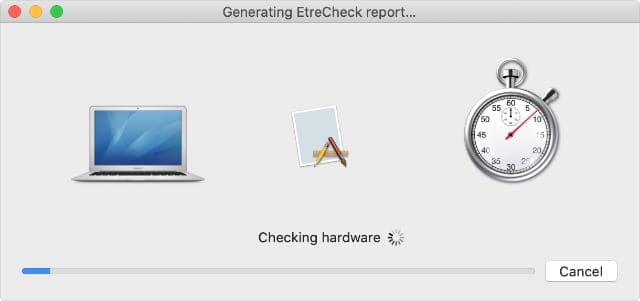
Click ‘Start EtreCheck’ and wait for the scan to complete.
Review the Major and Minor issues — if there are any — after the scan.
EtreCheck checks all the hardware on your MacBook Pro looking for faults.
What does coconutBattery do?
You can also use coconutBattery to check the battery health of your iOS devices.
This app shows you up-to-date information about the battery in your MacBook Pro, including the number of charge cycles, the current maximum capacity, and the original maximum capacity.
You can use this information to determine the health and lifespan of your MacBook Pro battery. Helping you to decide if it’s worthwhile replacing your battery or not.
How do I install coconutBattery?
You can only download coconutBattery from their website; it isn’t available on the Mac App Store. There is a ‘Plus’ version of the app available, but the free app should be all you need.
When you first try to open coconutBattery, a pop-up warns you that it’s unrecognized software. Click OK, then go to System Preferences > Privacy & Security > General. At the bottom of the window a message says coconutBattery was blocked. Click ‘Open Anyway.’
If you can’t open coconutBattery, check your Security & Privacy System Preferences.
How do I use coconutBattery to run diagnostics on my MacBook Pro?
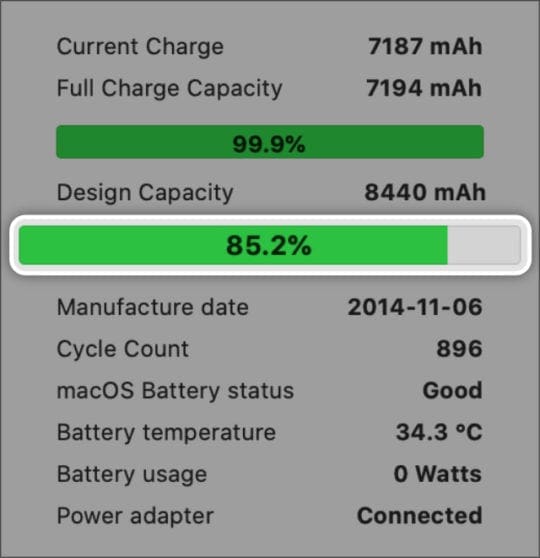
This percentage bar represents the health of your battery.
When you open coconutBattery it immediately presents you with simplified information about your MacBook Pro battery. The most important detail is the Full Charge Capacity compared to the Design Capacity, represented by the second percentage bar.
The lower your Full Charge Capacity is, in comparison to the Design Capacity, the more your MacBook Pro battery has aged. This is normal for the lithium-ion battery in your machine, but it does mean your battery can’t hold as much charge anymore.
Typically, Apple considers a battery to be heavily aged when the Full Charge Capacity drops to less than 80% of the Design Capacity. You probably want to consider a battery replacement after this point.
Step 3. Make sure your problem isn’t software-related
A lot of the time, what seems like a hardware problem with your MacBook Pro is actually the result of a software error. Surprisingly, software errors can affect everything from screen brightness, to boot-up speed, to battery life.
If none of the hardware diagnostics raised any problems with your MacBook Pro, there’s a strong chance you have a software issue.
The good thing about software-related issues is you can fix them yourself, for free! Just follow the steps below to do so.
You should be able to reset the PRAM, NVRAM, and SMC without losing any data on your Mac, although doing so does reset some of your settings.
How do I reset the PRAM and NVRAM?
From the menu bar on your MacBook Pro, go to > Restart.
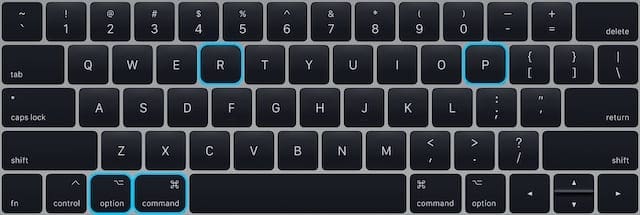
Confirm you want to restart your MacBook Pro, then press and hold the following keys as soon as the screen goes black: option+command+P+R.
Release the keys after the second time you hear a startup chime or see an Apple logo.
How do I reset the SMC?
Shut down your MacBook Pro and unplug the power cable.
If you have a removable battery: Remove the battery, then hold the power button for five seconds.
If you don’t have a removable battery: Press and hold shift+control+option on the left side, then hold the power button at the same time for ten seconds.
2. Clear more space on your hard disk
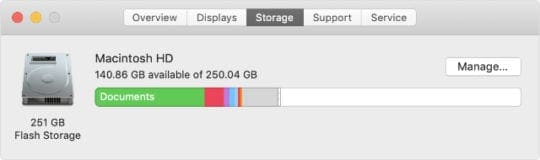
It’s advisable to keep at least 10% of your hard disk empty to keep your MacBook Pro running at optimal speeds. This is because your Mac constantly needs space to expand folders, copy files, and perform other tasks.
Try to keep plenty of free storage on your Mac. Image from Apple.
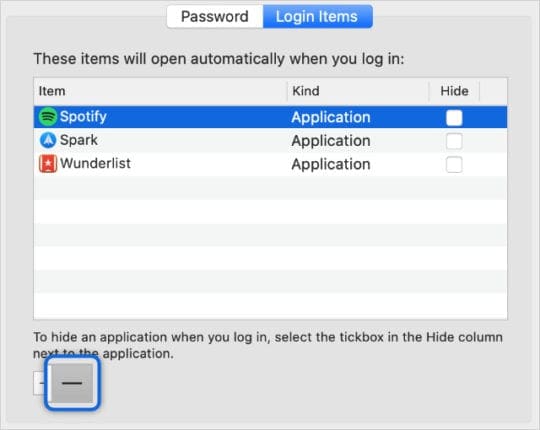
3. Reduce the number of Login Items
If multiple apps open up as soon as you log in it puts enormous strain on your MacBook Pro. This can cause your Mac to take a long time starting up and may make it perform slowly once it does so.
Go to > System Preferences > Users & Groups, then select your user account to see your Login Items. Minimize your list of Login Items by selecting apps from the list and clicking the minus (–) button.
Remove all your Login Items to speed up your MacBook Pro.
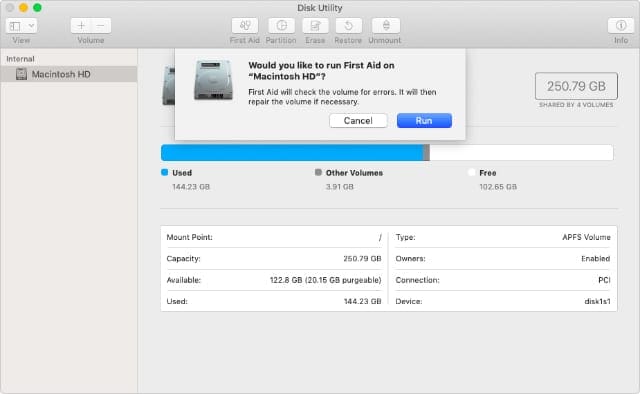
4. Repair your drive using Disk Utility
Small corruptions in your MacBook Pro hard disk can cause all manner of performance problems. Fortunately, they’re usually easy to fix thanks to Apple’s Disk Utility application.
Open Disk Utility from the Utilities folder in Applications. Select your hard disk from the sidebar — it’s usually called Macintosh HD — then click the First Aid button. When you run First Aid, it scans your hard disk for errors and repairs any it finds.
The length of time it takes to run First Aid on your Mac depends on the size of your hard drive.
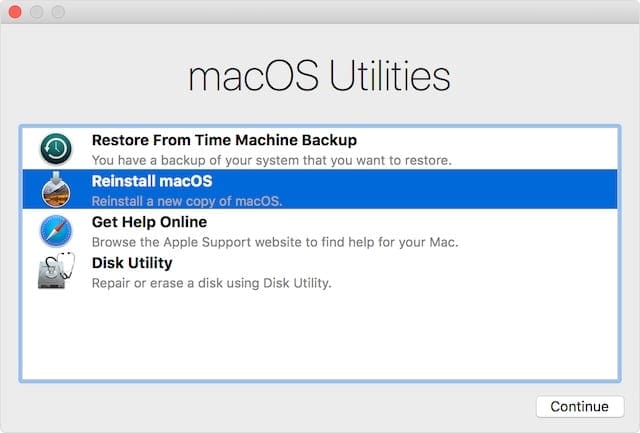
From the menu bar on your MacBook Pro, go to > Restart.
Confirm you want to restart your MacBook Pro, then press and hold command+R as soon as the screen goes black.
In the macOS Utilities window that appears, select ‘Reinstall macOS.’
Follow the onscreen prompts to complete your macOS reinstallation.
Reinstalling macOS should fix almost any problem with your operating software.
Step 4. Book a repair
At this point, it’s time to consider a professional repair. If any of the diagnostics discovered a failing component in your MacBook Pro, you should take those reports to a technician for a replacement. Otherwise, you may need to book your machine in for a triage, allowing technicians to stress your machine to find the fault.
Let us know you’re experiences in the comments below. Did Apple Diagnostics turn up any hardware faults for your MacBook Pro? Or did you find a solution from our software troubleshooting tips?
Dan writes tutorials and troubleshooting guides to help people make the most of their technology. Before becoming a writer, he earned a BSc in Sound Technology, supervised repairs at an Apple Store, and even taught English in China.

 Here’s an outline of how to run hardware diagnostics on your MacBook Pro. We’ve explained everything in full detail below:


Write a Comment