Night Shift automatically shifts the colors of your device’s display to warmer (orange) after sunset for your overall health and wellbeing. Studies show that exposure to blue light after sunset may impact circadian rhythms, making it much harder to fall asleep. To counteract this effect, Apple introduced Night Shift to its iPhone, iPad, and iPod and later its Mac.
Night Shift is available on iPhone 5s or later, iPad Pro, iPad (5th generation and later), iPad Air or later, iPad mini 2 or later, and iPod touch (6th generation and later.) For example, if you have an iPod touch 5 or an iPhone 5C then there won’t be any Night Shift option to select from.
The Night Shift mode feature uses your device’s clock and GPS for the location to determine when is the best time to have Night mode turned on.
How to Enable Night Shift Mode on your iPhone, iPad, or iPod
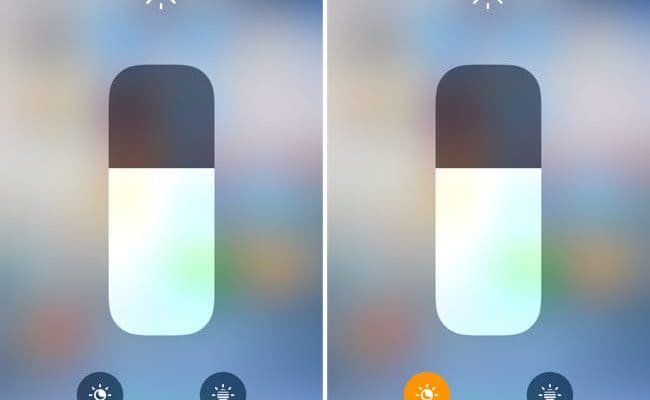
Open Control Center and long-press the Brightness control icon, then tap Night Shift to turn it on or off manually
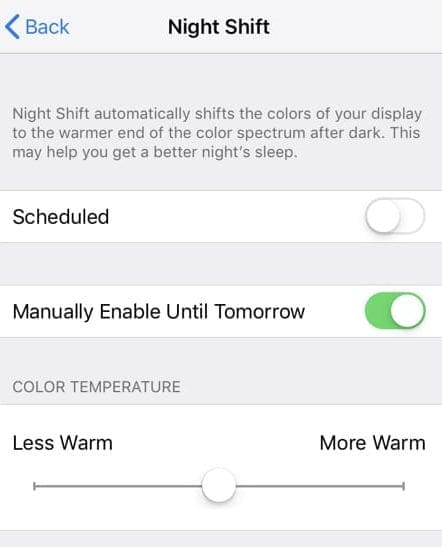
Go to Settings > Display & Brightness > Night Shift. Choose to schedule Night Shift, Manually enable it, and make adjustments to the color temperature
Enable Night Shift mode manually on iPhone
How to Schedule Night Shift Mode
As I mentioned earlier, this feature can also be turned on automatically using your device’s clock and GPS data, however, a scheduling system must be set up first.
Launch your Settings > Display & Brightness > Scheduled
Set the time you want to start (From) and end (To)
Night Shift Not Working after iOS or iPadOS Update?
If you have checked all the settings and your Night Shift mode is still not working, you are not alone. Several users have had this issue after updating their iOS or iPadOS. We suggest that you try the following fixes to help you with this issue.
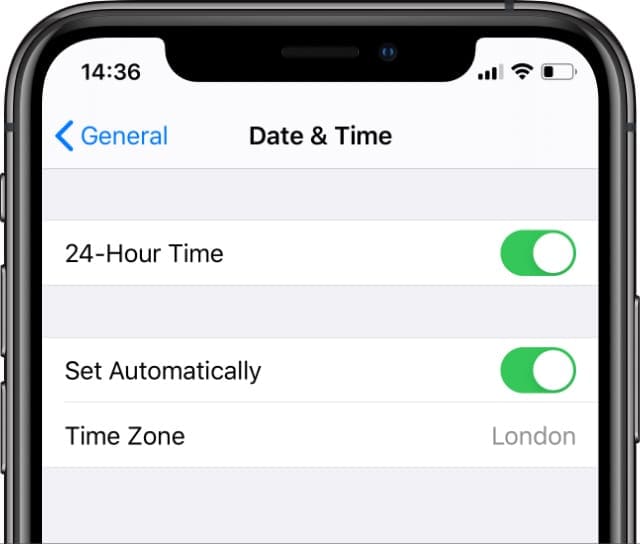
Check that your date and time settings are on Set Automatically
Go to Settings > General > Date & Time and choose Set Automatically
Turn on ‘Set Automatically’ and select your Time Zone.
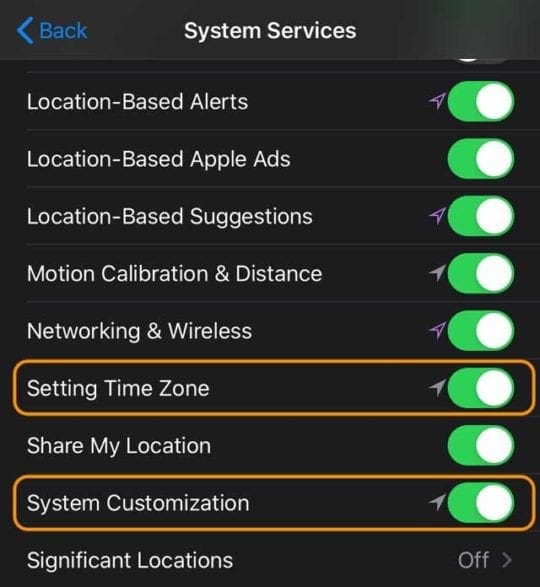
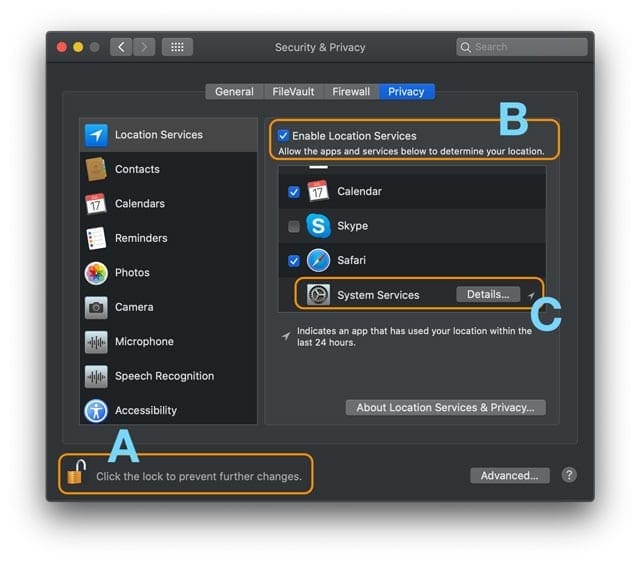
Turn on Location Services at Settings > Privacy > Location Services
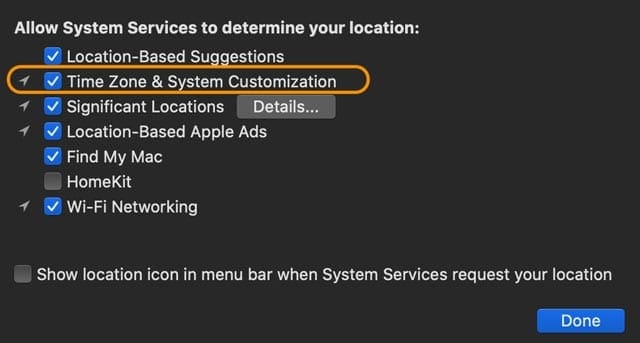
Scroll down and tap System Services
Toggle on Setting Time Zone and System Customization
Toggle the night Shift switch in your Settings to OFF and then ON a few times
Keep it at ON at the end and test to see if it does the trick
If that Settings toggle didn’t work for you, please try to restart your iDevice
We hope that these tips work for you. Please let us know in the comments below.
Night Shift not working on macOS?
When you turn it on, Night Shift uses your Mac’s clock and geolocation to determine when it’s sunset and automatically shifts the colors in your display to the warmer end of the color spectrum. After sunrise, Night Shift returns your Mac to its usual setting (less warm, more blue.)
If Night Shift isn’t working on your Mac, first check that it’s turned on
Choose Apple menu > System Preferences > Displays
Click the Night Shift
Set a Schedule or tick the box Turn On Until Sunrise to set Night Shift manually
To change the color warmth (orange), slide the Color Temperature scale right or left to your preferred setting.
Check your system requirements for Night Shift
For macOS: Night Shift requires macOS Sierra 10.12.4 and above.
For Macs
MacBook models from early 2015 or later
MB Air models from mid-2012 or later
MacBook Pro models from mid-2012 or later
Mac mini models from late 2012 or later
iMac models from late 2012 or later
Mac Pro models from late 2013 or later
For Displays
Apple LED Cinema Display
Apple Thunderbolt Display
LG UltraFine 5K Display
LG UltraFine 4K Display
Look at your Mac’s Date, Time, and Time Zone settings
If your Mac support Night Shift and you turned it on, it’s possible that your Mac’s Date&Time settings are not correct.
Open System Preferences > Date & Time
Choose to set your date and time automatically.
Tick the box for Set Date & Time automatically and verify that the information is correct, including the time zone tab
Turn on Location Services
Go to Apple menu > System Preferences >Security & Privacy
Choose the Privacy tab and tap the lock icon to unlock preferences (A)
In my opinion best solution of this problem is not to use this feature. Try any screen protector which can protect harmful blue light. This short wavelength light is known to cause eye strain and fatigue, as well as to increase the likelihood of eye diseases. I can currently using “ocushield” screen protector, which can prevent blue light.


Worked for me. Thanks.
In my opinion best solution of this problem is not to use this feature. Try any screen protector which can protect harmful blue light. This short wavelength light is known to cause eye strain and fatigue, as well as to increase the likelihood of eye diseases. I can currently using “ocushield” screen protector, which can prevent blue light.