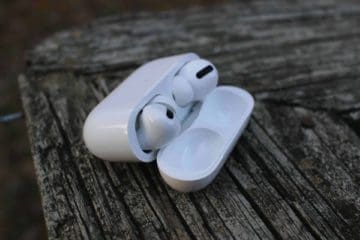
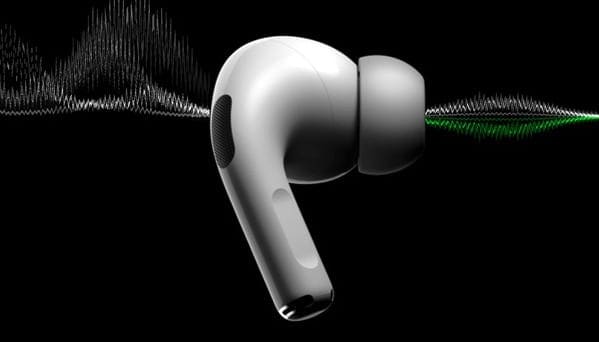
The AirPods Pro are one of Apple’s most popular products as they change the way you listen to your content even more than the original AirPods. This is the de-facto guide for everything you need to know about these awesome wireless headphones from Cupertino.
In this guide, you’ll learn about what AirPods Pro are, what the different sound modes offer, what to do if you lose them, power tips to boost productivity, how to maintain your AirPods, troubleshooting common issues, and even more.
Apple’s AirPods are some of the most popular products to become available in quite some time. These headphones offer a wireless solution to listening to your favorite content, taking phone calls, and much more.
For months, there were rumors swirling about a “Pro” model of the AirPods being released. Back in October of 2019, the rumors became a reality as the AirPods Pro were quietly announced via a press release.
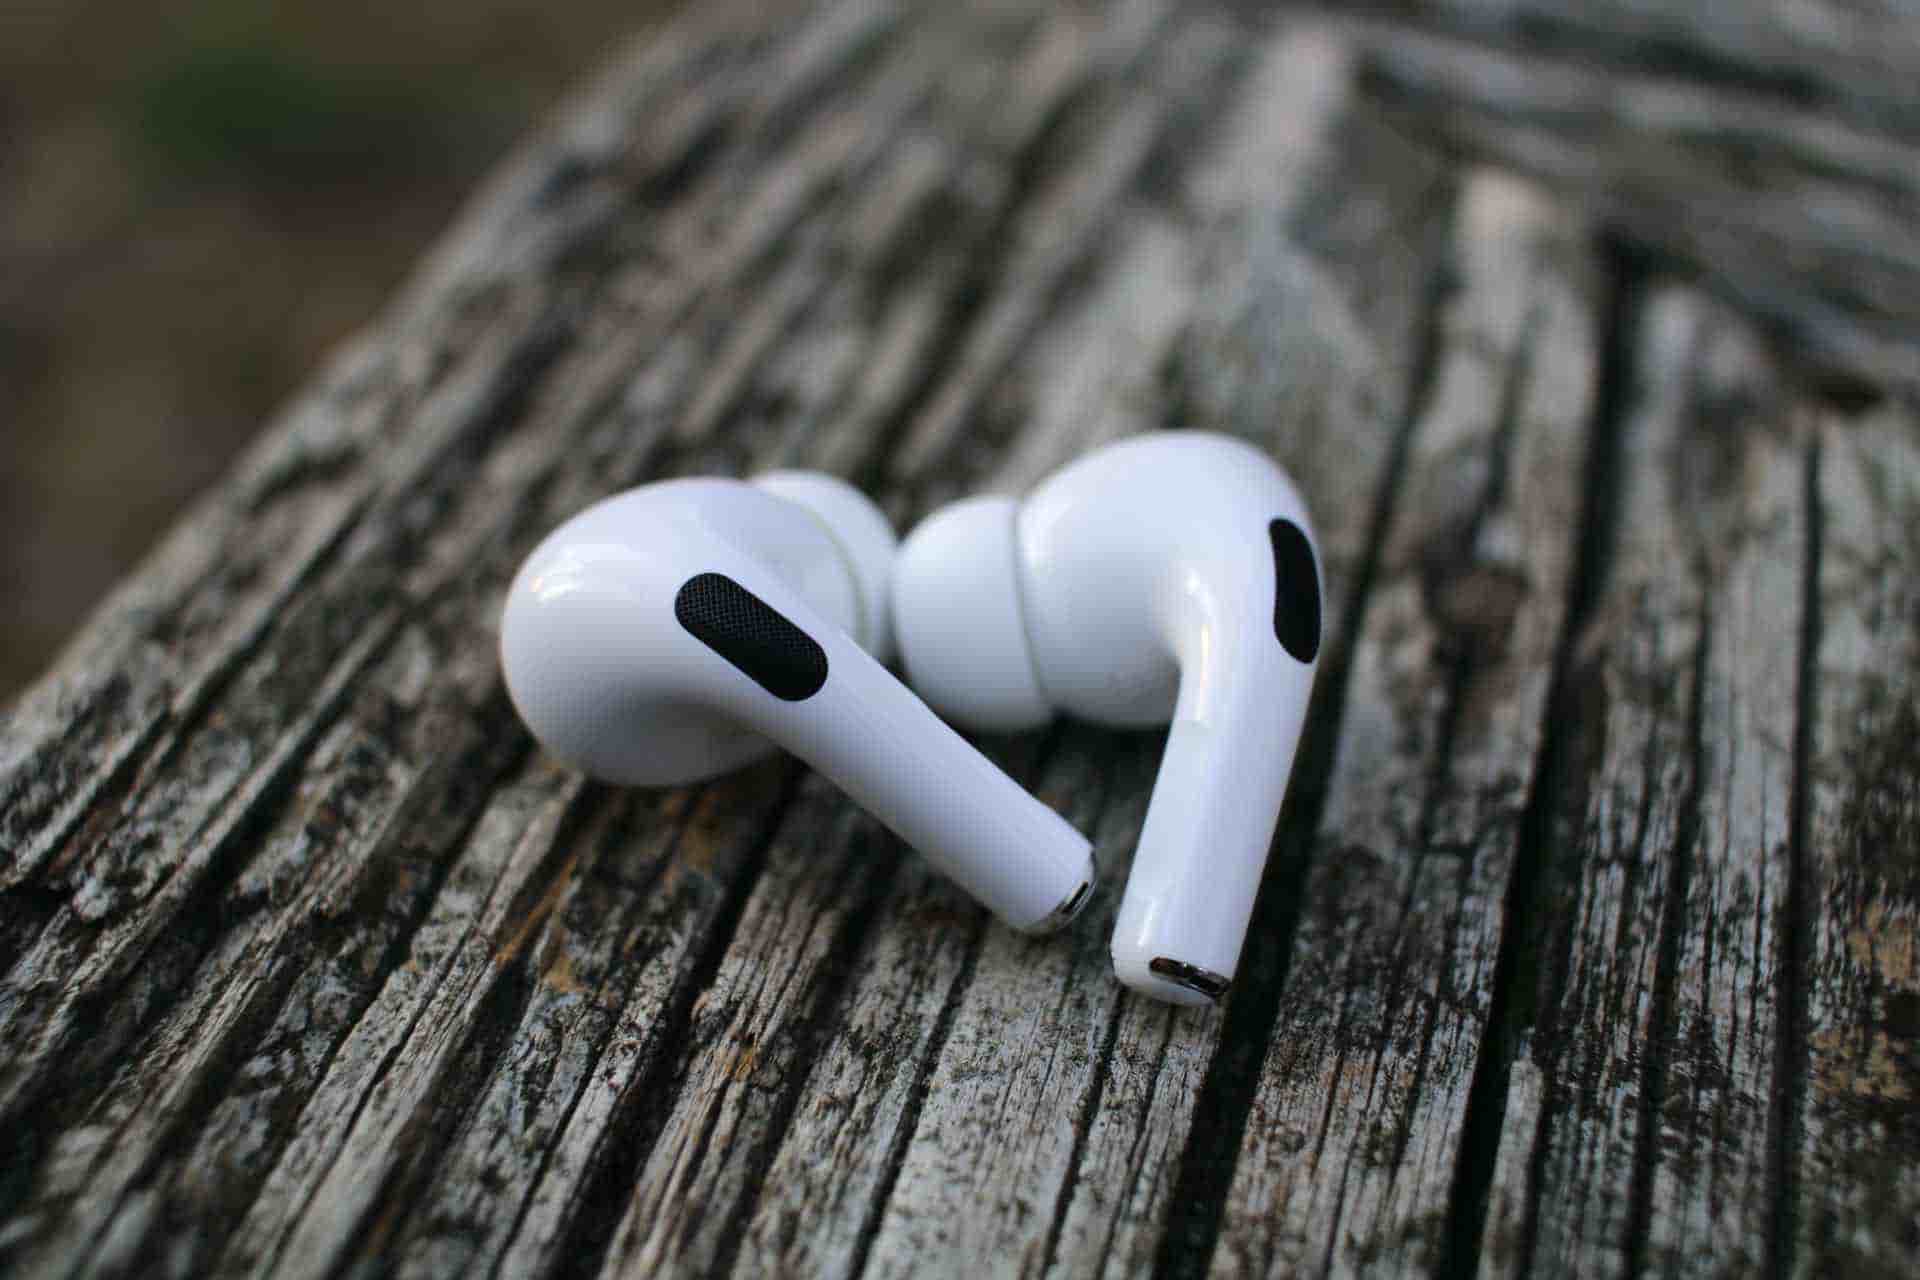
These new headphones tout similar battery life to the 2nd generation AirPods, which launched earlier in the year. But there is a new design for the Pro, as the stems have been shortened, along with a new Force Sensor for controls.
The two biggest features of the AirPods Pro are Active Noise Cancellation (ANC) and Transparency mode. ANC lets you eliminate background noise, while Transparency mode lets you hear the outside world clearly over your music.
Since the original release, Apple launched the second version — the AirPods Pro 2 — in 2022. The company is working on the third generation of these, and it’s expected that these will make their way onto the market in 2024 or 2025.
Are the AirPods Pro waterproof?
The AirPods Pro 1 and 2 are sweat and water-resistant (but not water-resistant for water sports like swimming), with an IPX4 rating (based on the IEC standard 60529).
It’s worth noting, however, that “waterproof” is very different from “water-resistant”. You shouldn’t submerge your AirPods Pro in water for extended periods of time, as this will likely still damage them. You can learn more about the AirPods Pro and their tolerance to liquid here:
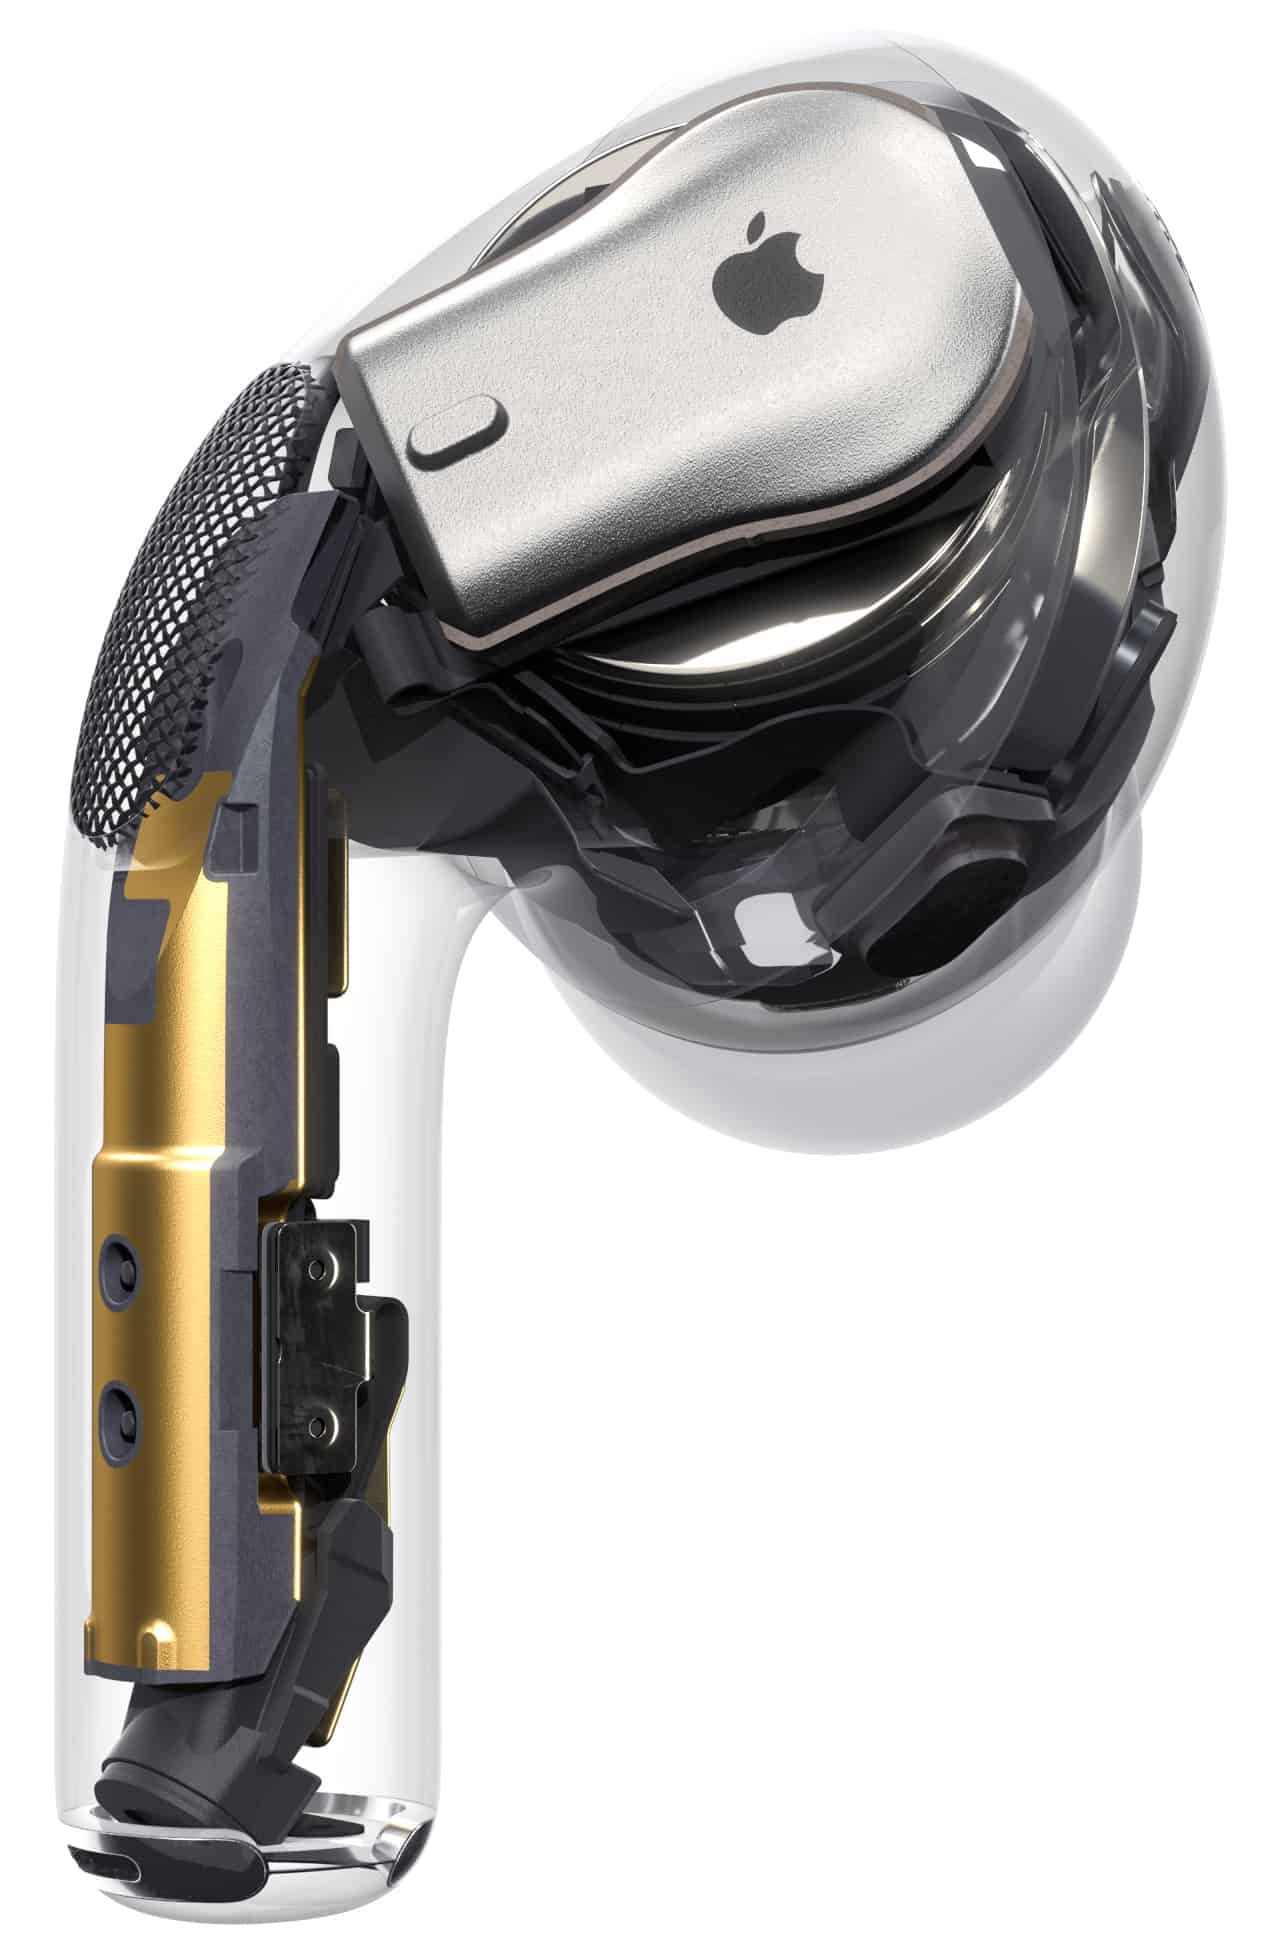
Introduced along with the 2nd-generation AirPods, the H1 chip is Apple’s own chipset for wireless earphones. With the AirPods Pro, the H1 chip works to bring “Hey Siri” to the headphones, along with better battery life, improved stability, and even more.
The H1 chip works with Active Noise Cancellation and Transparency mode to provide better performance. It also allows for wireless charging via the charging case, and even faster switching between devices.
What do you get in the AirPods Pro box?
When you first open the AirPods Pro box, you are greeted with the earbuds themselves, front and center. Then, there are a few extras that Apple includes to get you started:
AirPods Pro
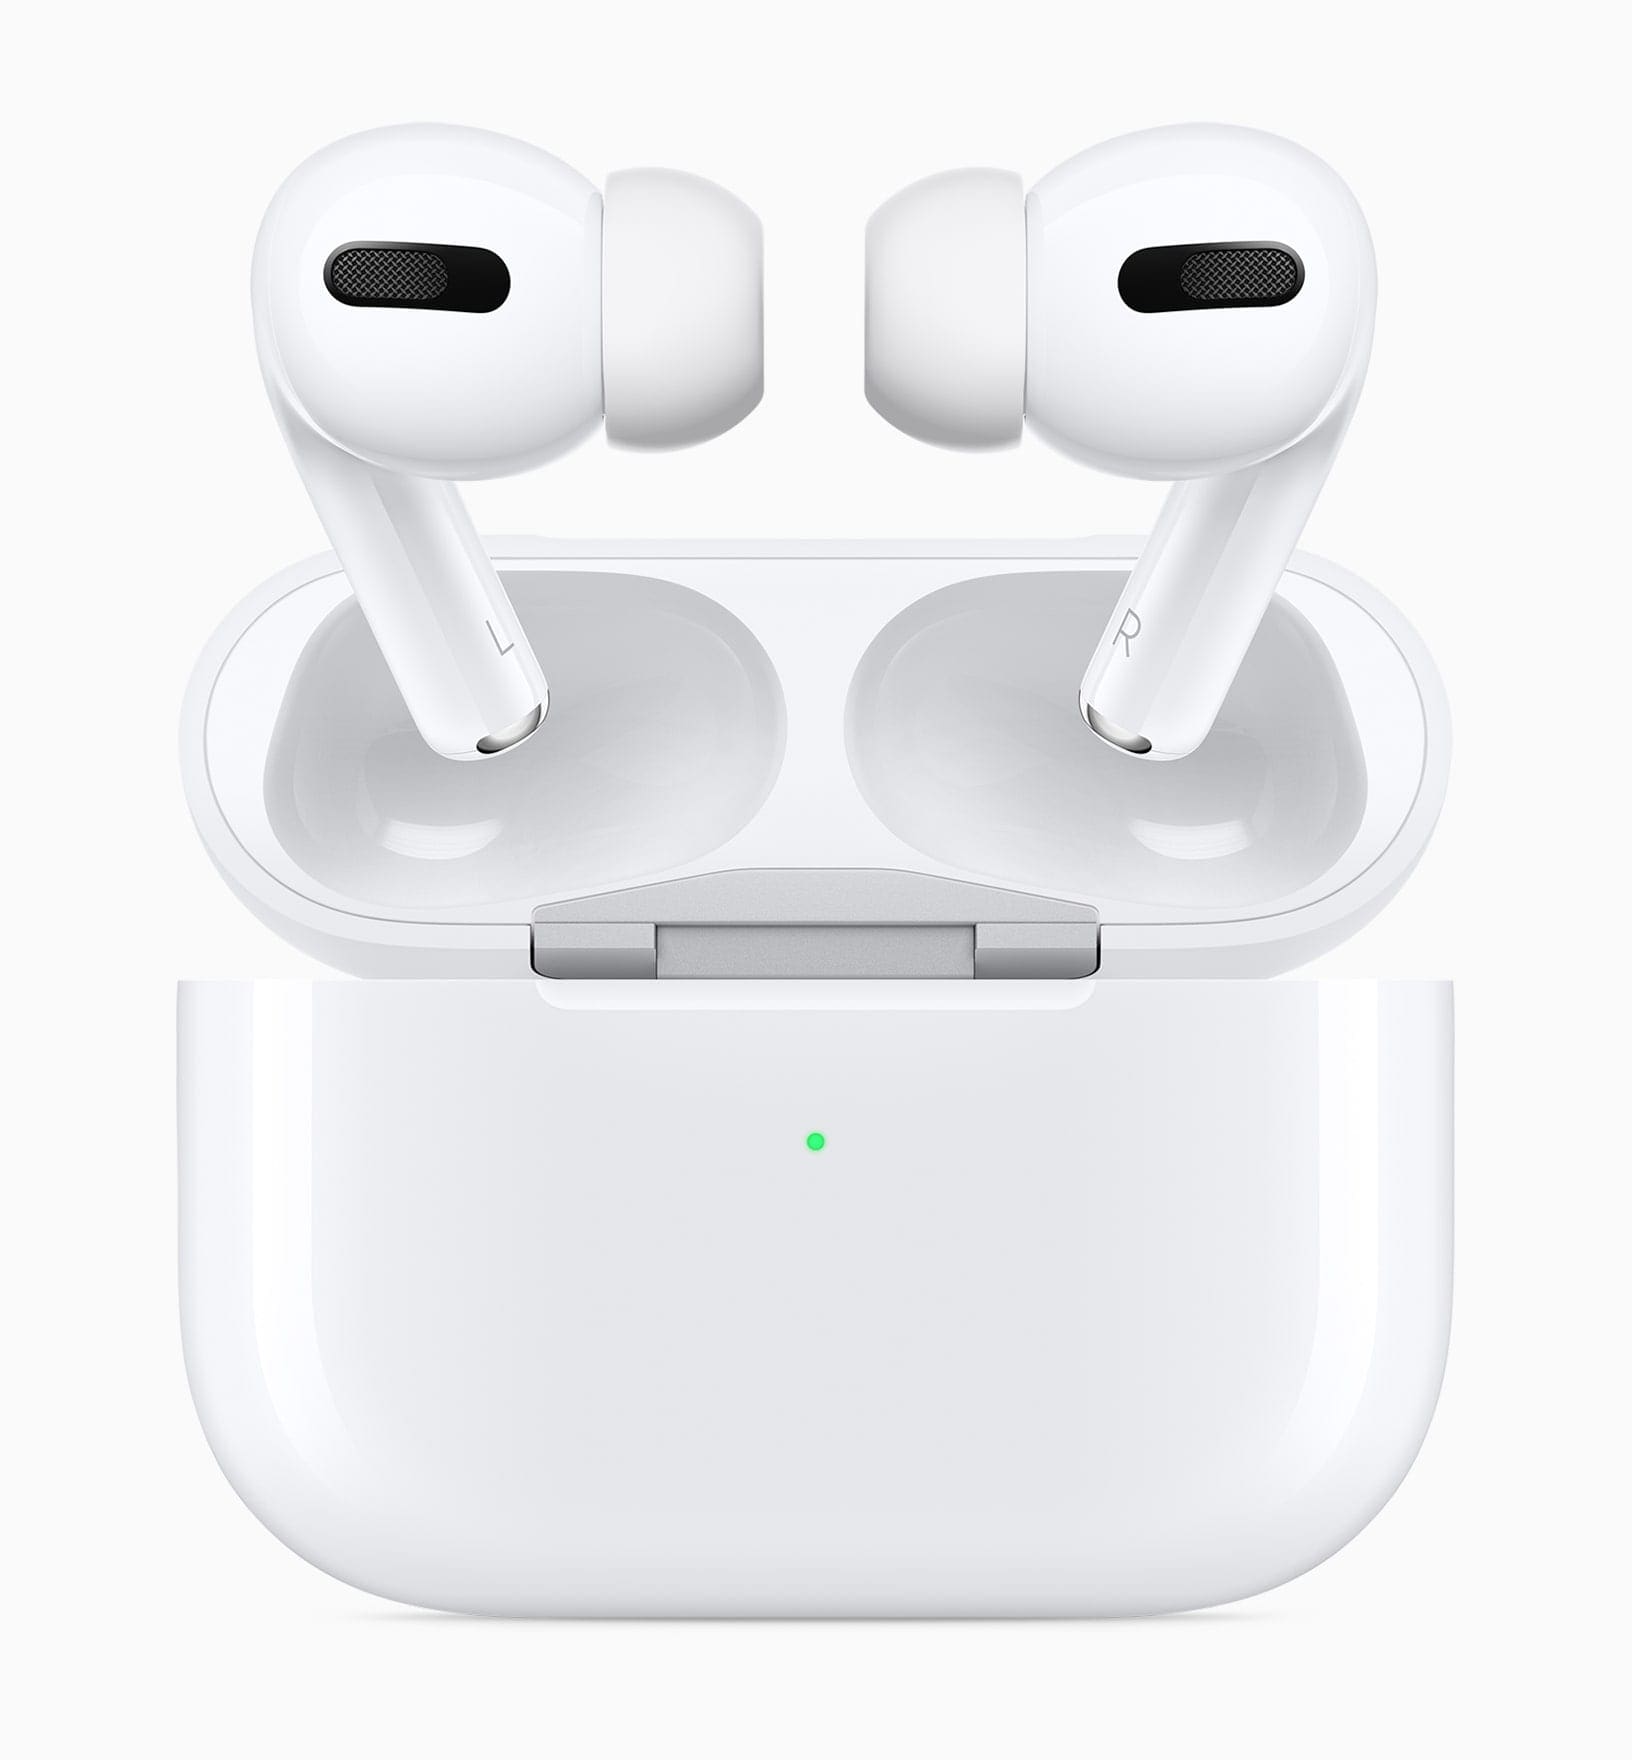
Wireless Charging Case
Lightning to USB-C Charging Cable
Silicone Ear Tips (S, M, L)
Documentation
Unfortunately, there are no Apple stickers to be found with the AirPods Pro.
If you have older Apple devices and aren’t sure if the AirPods Pro will pair with them, check out the AirPods Pro 1 tech specs from Apple for a list of compatible devices. You can do the same for the AirPods Pro 2.
How to pair to your iPhone for the first time
Instead of fiddling around with the Bluetooth menu, Apple has made pairing AirPods Pro to your iPhone an absolute breeze. Here’s what you’ll need to do:
Open the AirPods Pro case near your iPhone.
Press Connect in the on-screen pop-up.
The AirPods Pro quickly connect and start working with your iPhone. In fact, you can use any other Apple devices signed in to the same Apple ID, thanks to Automatic Device Switching.
Short on Time? Check out our AirPods Pro Tips Video
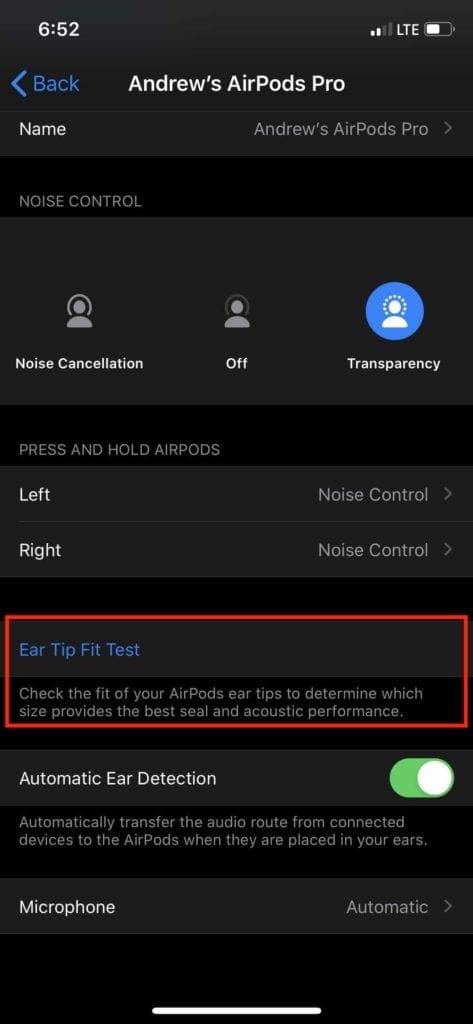
Make sure the ear tips fit right
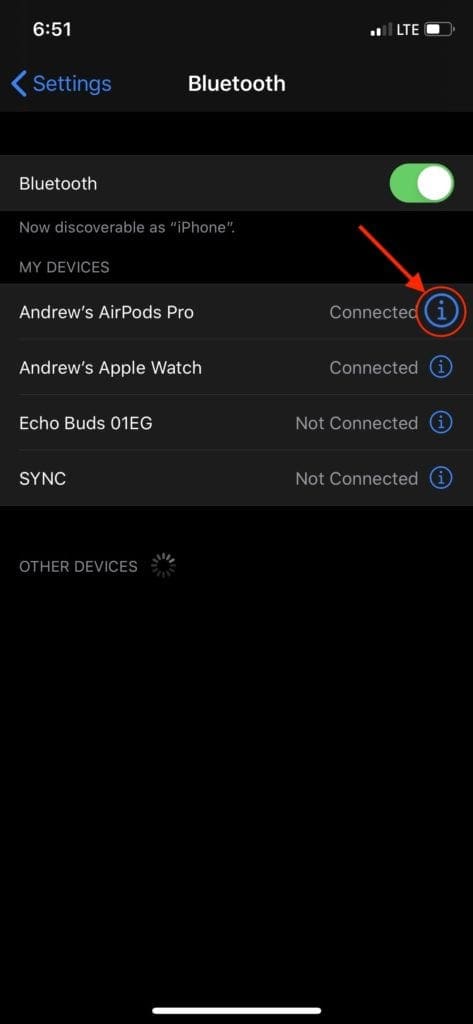
As we mentioned above, there are three different ear tips included in the box, allowing you to find the best fit for your ears. To make things even easier, Apple added an Ear Tip Fit Test to the settings.
This test uses the microphones on the AirPods Pro to make sure the earphones are creating a tight seal in your ears. You want a tight seal for the best noise cancelation and to improve the bass response in what you’re listening to.
To run the Ear Tip Fit Test:
Connect your AirPods to your iPhone.
Open the Settings app.
Tap Bluetooth.
Under My Devices, tap the i next to your AirPods Pro.
Scroll down and tap Ear Tip Fit Test.
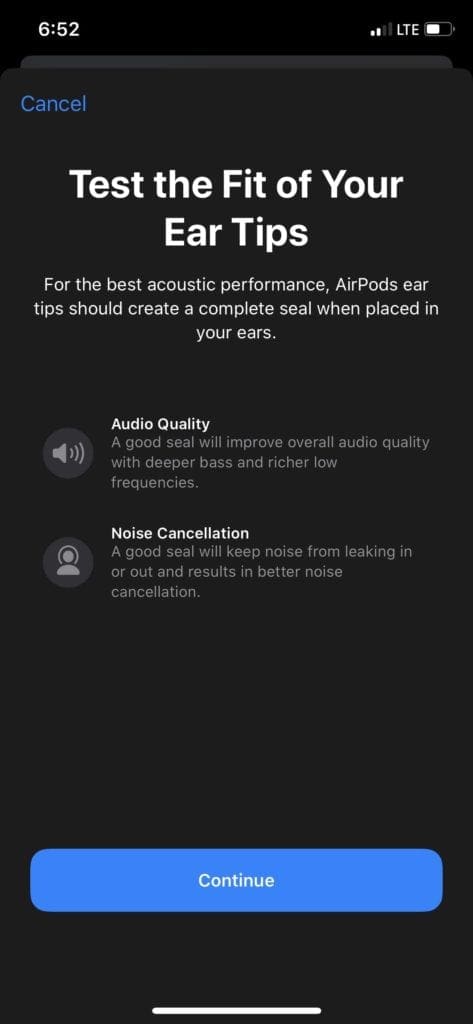
Tap Continue.
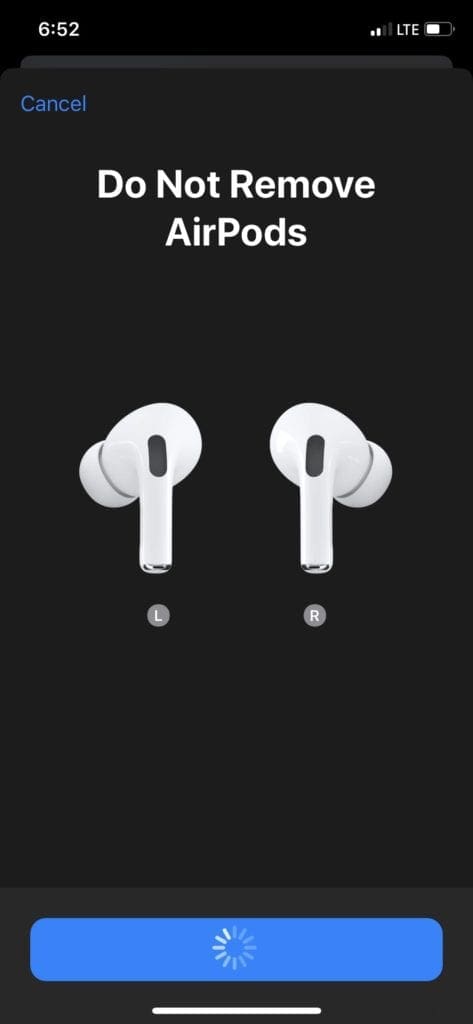
After putting both AirPods in your ears, tap the Play button at the bottom.
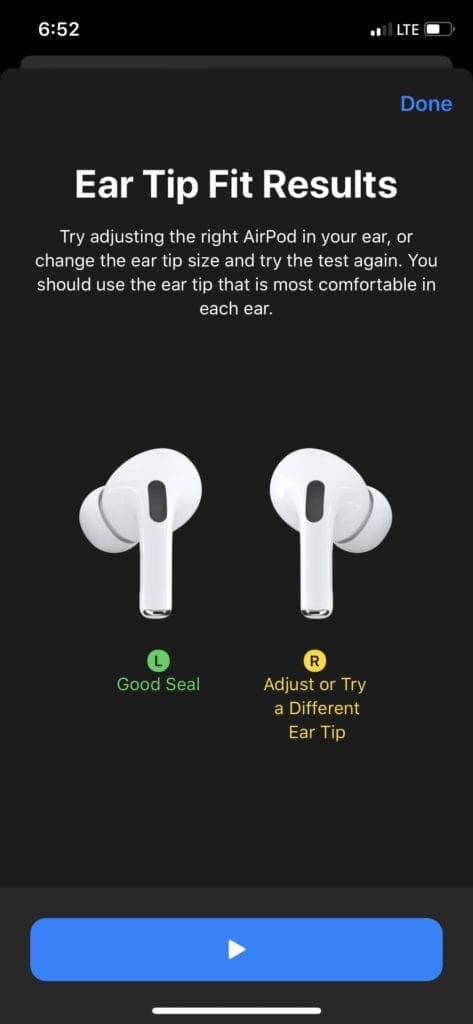
Once the test is finished, the results show whether there is a good seal or not. If you got a bad seal, try adjusting the AirPods in your ears or changing for a different size ear tip.
How do I change the ear tips on AirPods Pro?
The ear tips on your AirPods Pro snap on and off using a small plastic ring. All you need to do to remove them is to carefully pull the ear tip away from the body of the AirPod.
You do need to pull fairly hard to remove the ear tip, but be careful you don’t rip the thin silicone.
When attaching an ear tip to your AirPods Pro, make sure the oval-shaped plastic ring lines up with the AirPod grill, then push them together until you hear a click.
Can I use third-party AirPods Pro ear tips?
It’s possible to buy third-party ear tips for your AirPods Pro from trusted brands such as Comply. Many users prefer third-party memory foam ear tips over Apple’s silicone tips, so it’s worth trying out for yourself.
Although it ultimately comes down to personal preference, user reviews suggest that memory foam ear tips can provide:
A more comfortable fit
A tighter seal
Better noise cancelation
Improved audio quality
Use the AirPods Pro to control everything
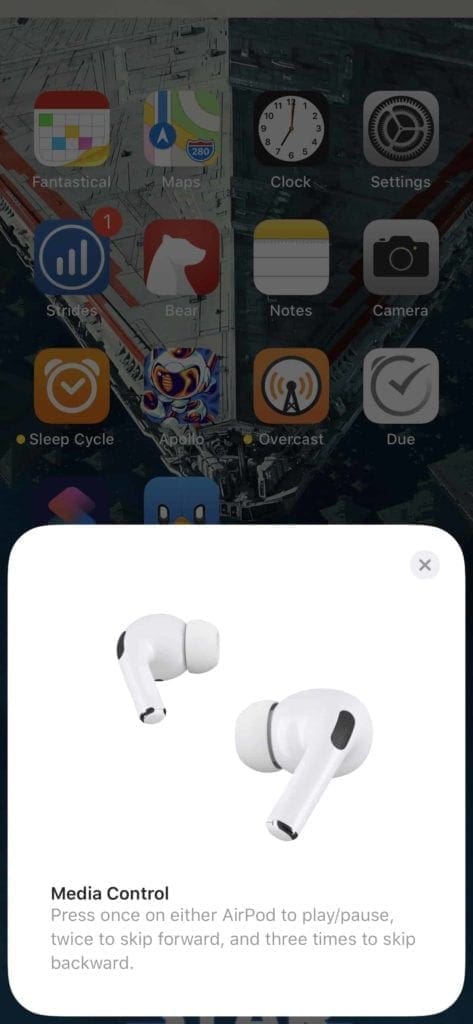
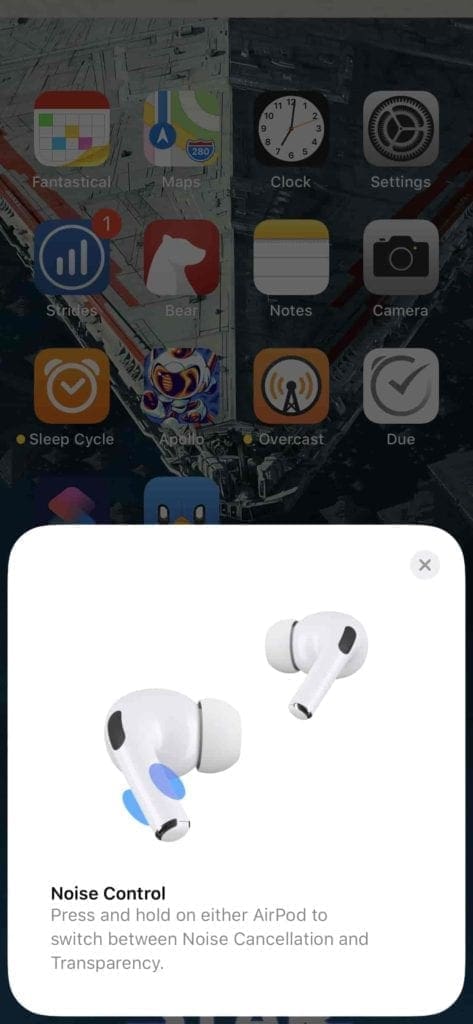
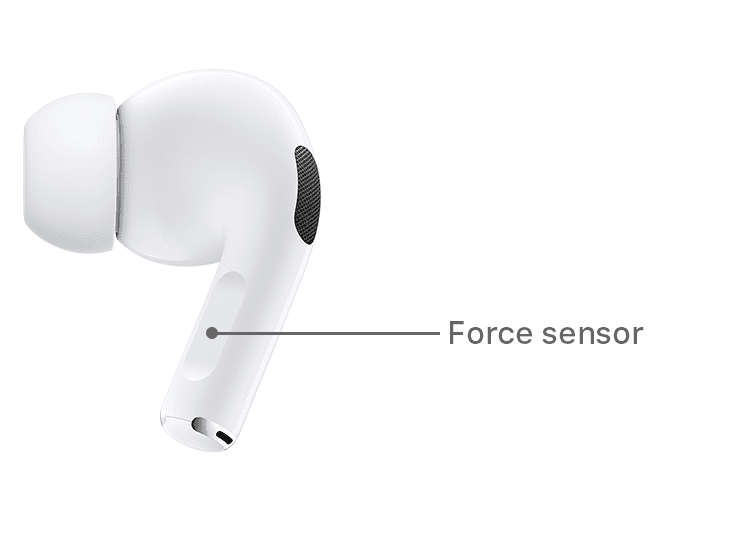
Gone are the days of having to tap your AirPods (and eardrum) every time you want to control something. With the AirPods Pro, Apple switched to a Force Sensor in order to control your content, phone calls, and the noise canceling.
What is the Force Sensor?
If you look at the 1st and 2nd generation AirPods compared to the AirPods Pro, there are a few major design differences. Perhaps the biggest is the fact that the stems are shorter on the AirPods Pro.
And that’s also where you find the Force Sensors.
Here are all the controls that you can perform with the sensor:
Squeeze once to play and pause music.
Squeeze once to answer an incoming call, then squeeze again to hang up.
Squeeze twice to skip forward on a track. Keep holding to fast forward.
Squeeze three times to skip back on a track. Keep holding to rewind.
Squeeze and hold to switch between Active Noise Cancellation and Transparency mode.
In our opinion, this is a much better way to control your media. Something never felt right about tapping your eardrum with the regular AirPods.
Adjust the Force Sensor duration
Thankfully, Apple made it possible to adjust the duration that it takes before the Force Sensor reacts. This is particularly useful for users with mobility difficulties who might struggle to squeeze the sensor for a short period.
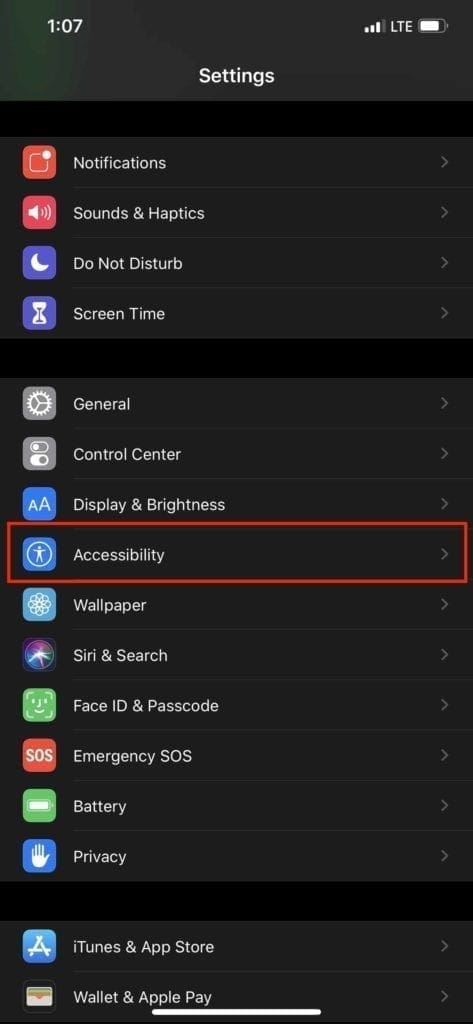
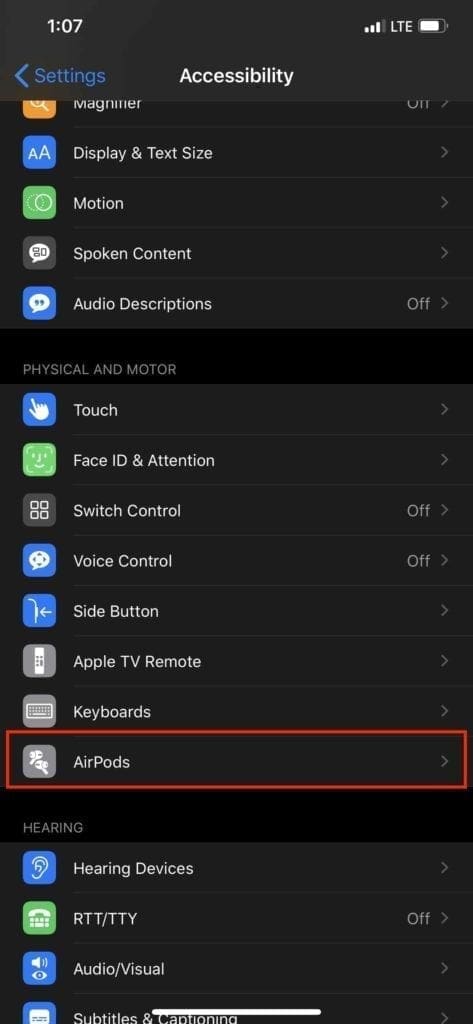
You can change this in the Accessibility settings. Here’s how:
Open the Settings app on your iPhone.
Scroll down and select Accessibility.
Scroll down and tap AirPods.
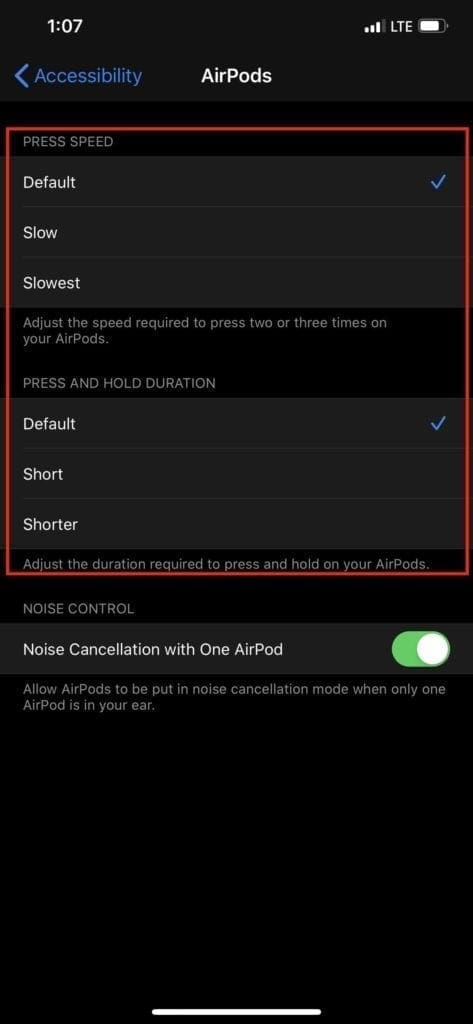
From here, you are presented with three different categories: Press Speed, Press and Hold Duration, and Noise Control. We want to focus on the first two categories.
Press Speed will adjust the speed required to press two or three times on the stem of your AirPod. The Default is already enabled, with there also being options for Slow and Slowest.
Press and Hold Duration adjusts the duration required to press and hold the stem of your AirPods to change the noise cancelation mode. Other than Default, you can adjust the settings to Short, or Shorter.
What is Active Noise Cancellation?
With the AirPods Pro, Active Noise Cancellation is a key feature, letting you block outside noise to focus on your media. Here’s Apple’s description of how it works:
An outward-facing microphone detects external sounds, which your AirPods Pro then counter with anti-noise, canceling the external sounds before you hear them. An inward-facing microphone listens inside your ear for unwanted internal sounds, which your AirPods Pro also counter with anti-noise.
All of this is done in real-time and with the help of the H1 chip. Turning AirPods Pro into the all-in-one headphones you need.
What is Transparency mode?
It can be annoying to have to take your AirPods in and out of your ears just to hear someone speaking. With Transparency mode, this is no longer an issue, as you can activate the mode and keep the AirPods in.
Essentially, this mode uses the microphones to let more sound in, so you can hear what’s going on around you. Rather than canceling it out with anti-noise.
We’ve all been there before: you’re listening to some music when someone starts a conversation with you. Instead of having to take out your AirPods, you can activate Transparency mode to hear them over your music instead.
Then you can turn ANC back on when the conversation is over.
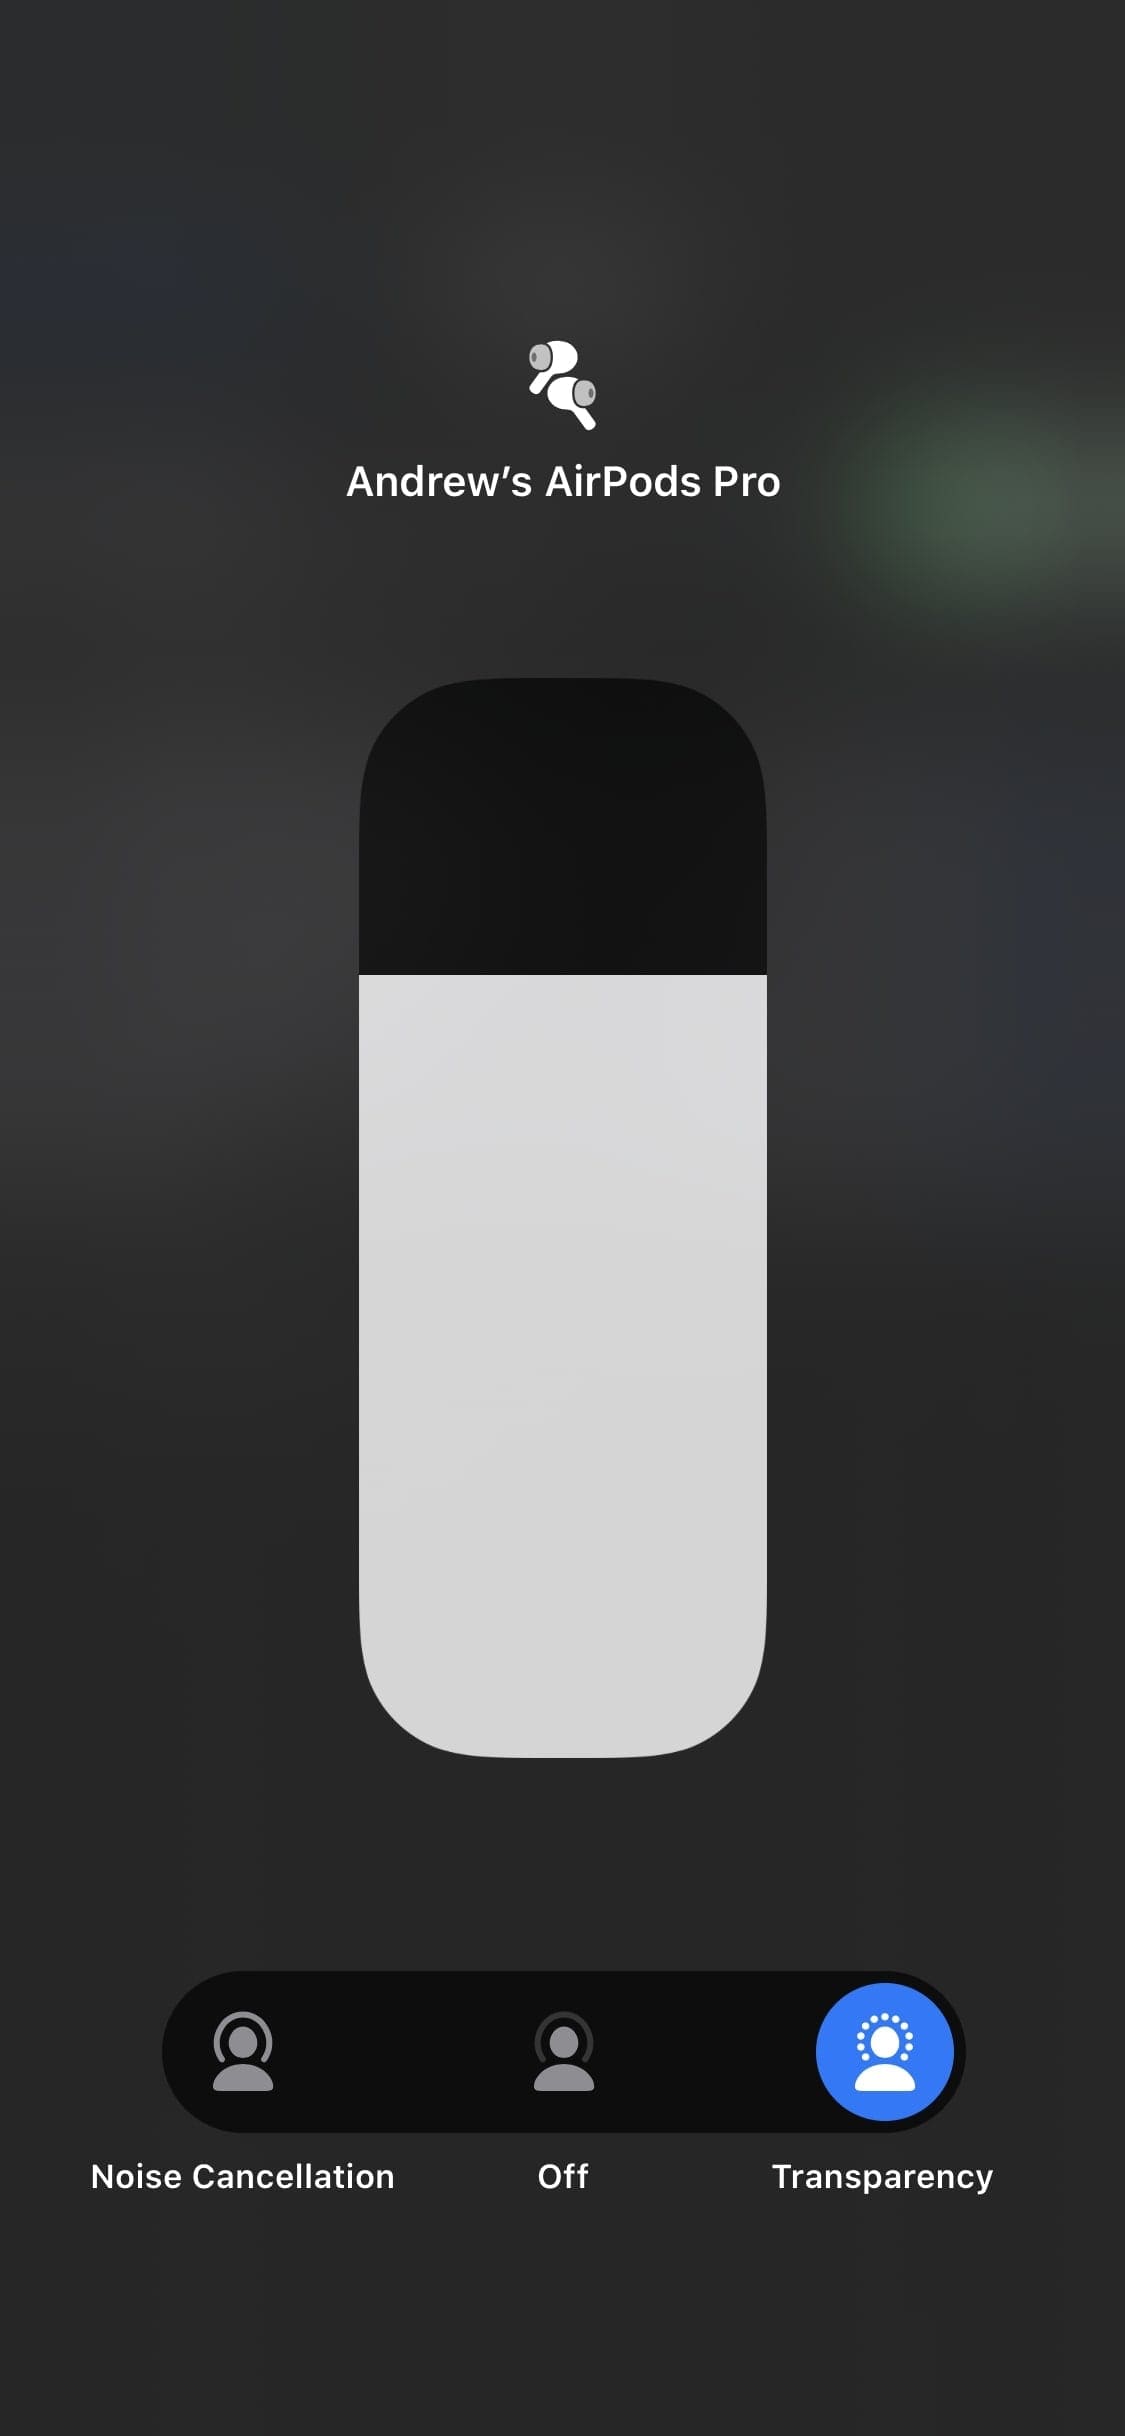
To do so:
Make sure that the AirPods are connected to your iPhone and are playing music.
Swipe down from the top right-hand corner of your iPhone to reveal Control Center.
Press and hold the Volume bar in Control Center.
Switch between Noise Cancellation, Transparency, and Off.
Alternatively, squeeze and hold the Force Sensor on the stem of your AirPods Pro.
It’s important to note that you will want to make sure that the AirPods Pro are securely fitted in your ear. If not, you may run into issues with sound getting through when ANC is enabled, and not enough sound getting in when using Transparency mode.
Enable Noise Cancellation with a single AirPod
For one reason or another, not everyone uses both AirPods at the same time. At launch, it was thought that you wouldn’t be able to use ANC with a single AirPod, but that’s not the case.
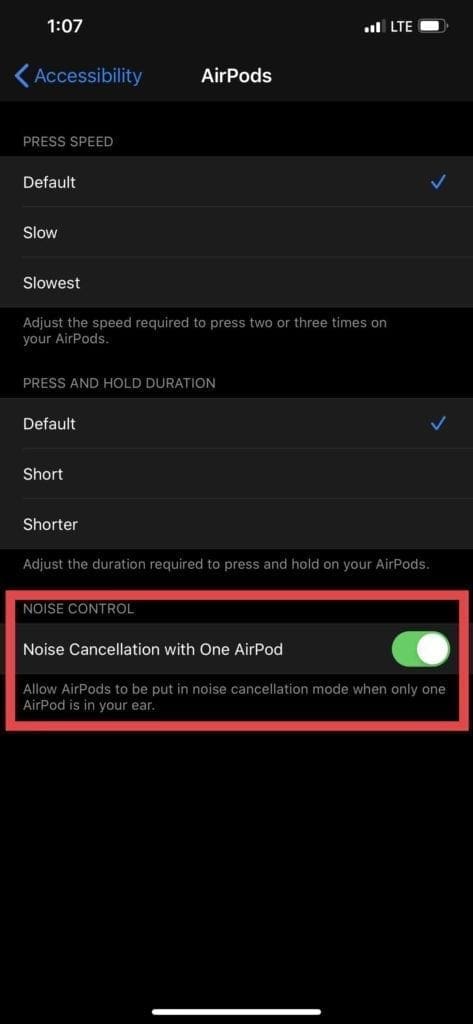
You can actually enable ANC with a single AirPod via the Accessibility settings:
Open the Settings app on your iPhone.
Scroll down and select Accessibility.
Scroll down and tap AirPods.
At the bottom, enable Noise Cancellation with One AirPod.
You may notice that the sound quality isn’t as great as when you have both AirPods in. But that’s to be expected to a certain extent when using just a single AirPod.
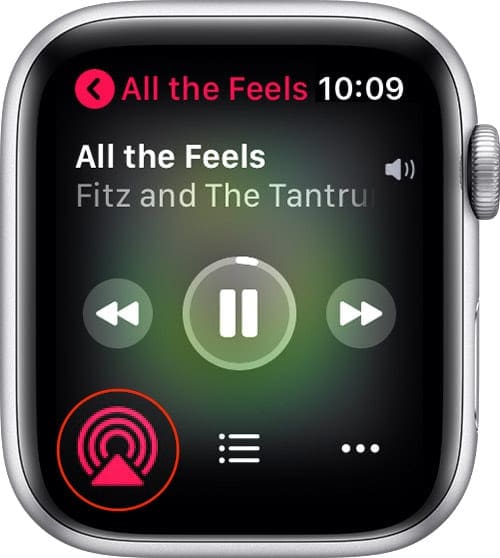
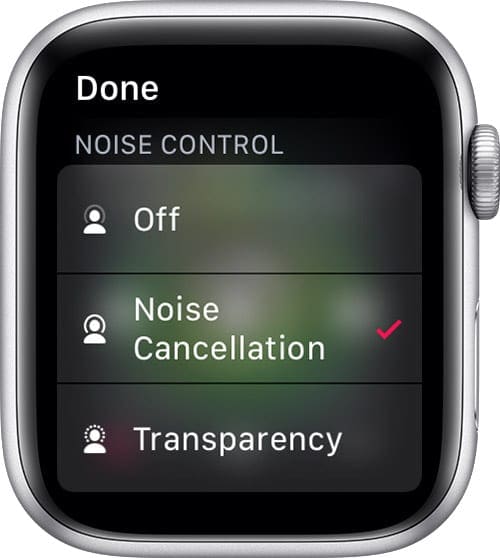
Use your Apple Watch to control Noise Cancelation mode
It would be a sin if Apple didn’t make it possible to change the Noise Cancelation mode from your Apple Watch. Luckily, we don’t have to worry about that, as you can switch modes just fine from the Watch.
Before getting started, make sure that the AirPods are connected to your iPhone and are playing music.
Wake your Apple Watch.
From the Now Playing screen, tap the Audio Sharing icon in the bottom-left corner.
Tap your AirPods Pro in the list.
Select Active Noise Cancellation or Transparency.
Obviously, you can switch back and forth from your Watch to your iPhone. This even works if you have your AirPods Pro paired to the Watch.
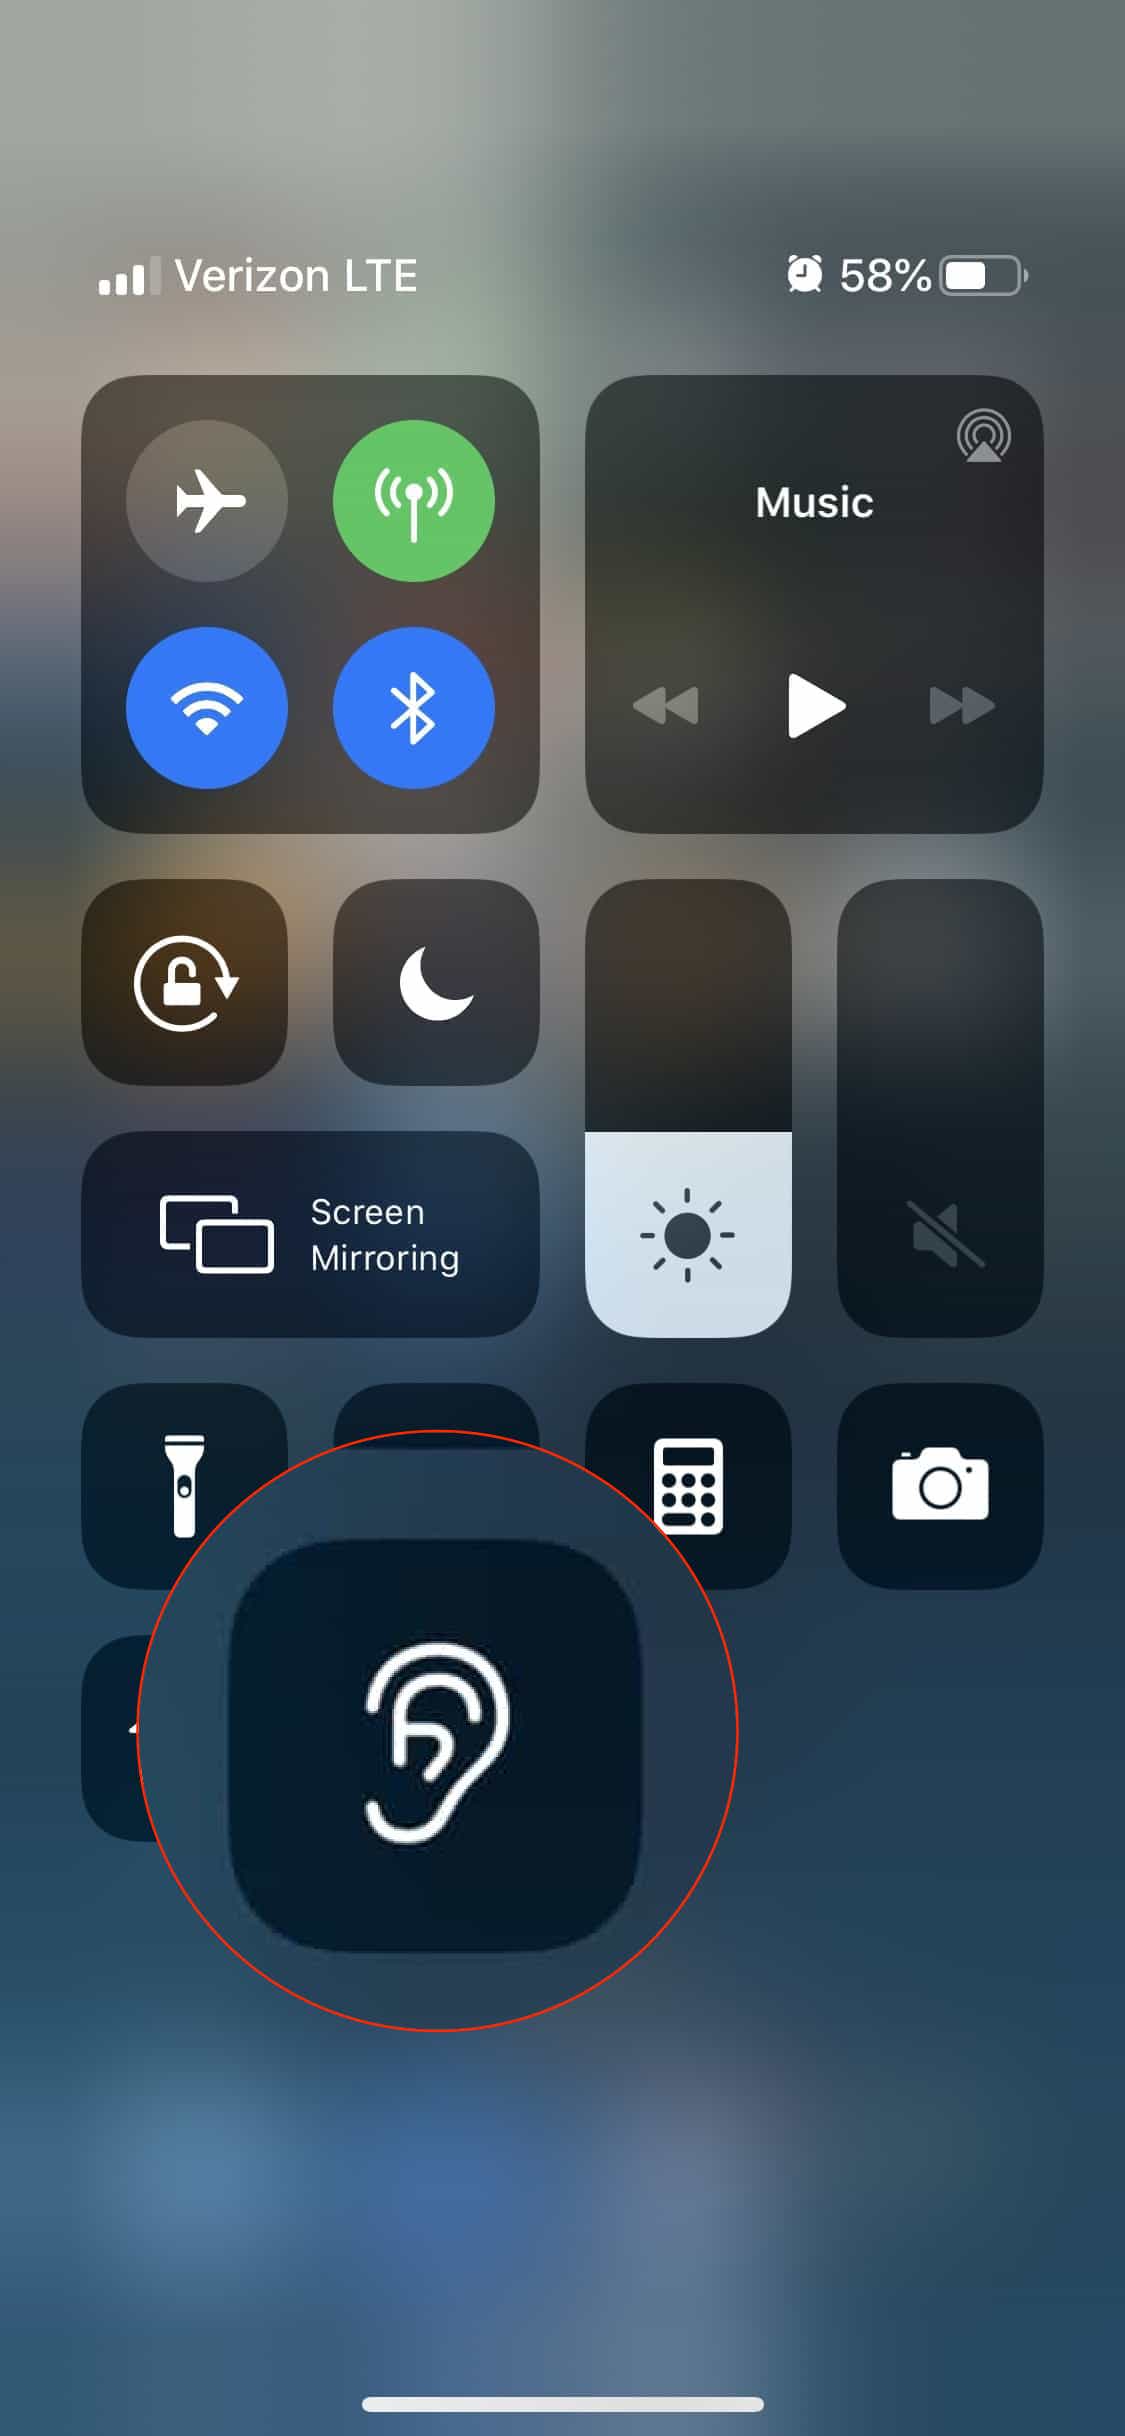
How to Set up Live Listen with the AirPods Pro
In addition to Transparency mode making it possible to hear the outside world better, there’s also Live Listen available. This allows you to use the microphone on your iPhone to amplify sounds in your AirPods, like a hearing aid.
Here’s how you can set it up:
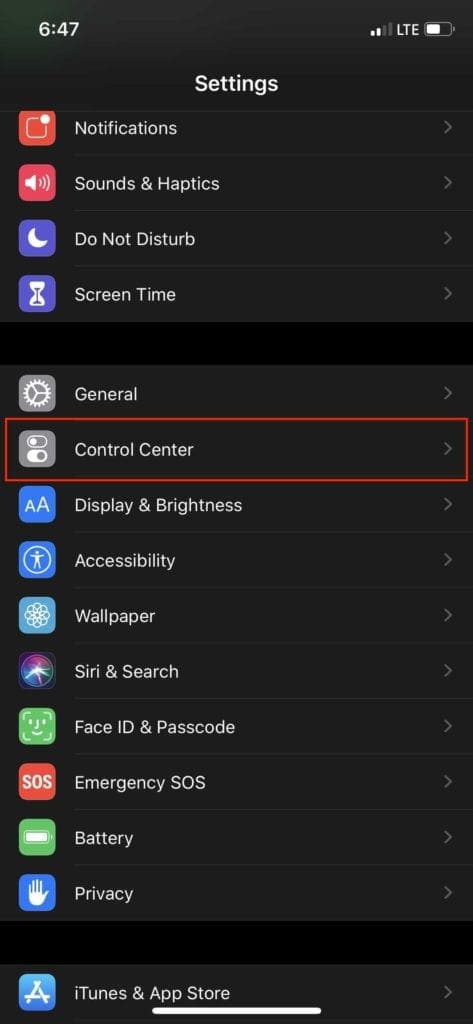
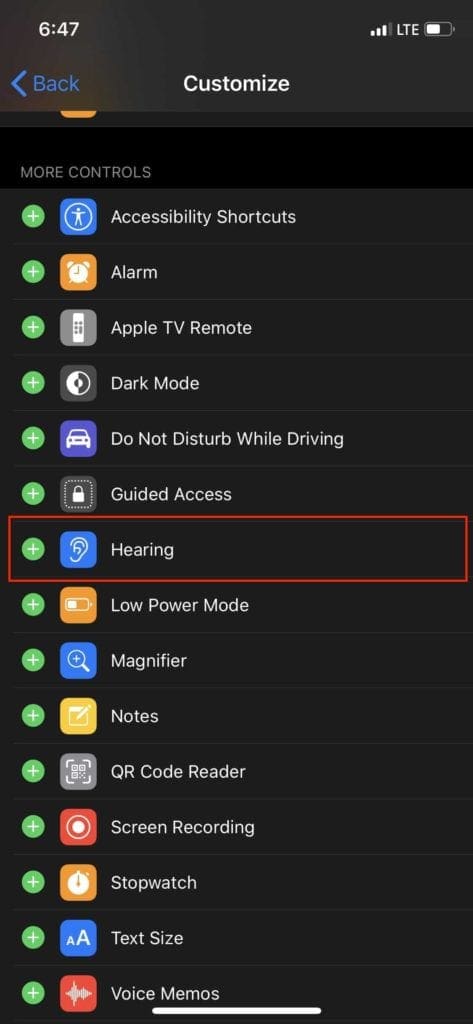
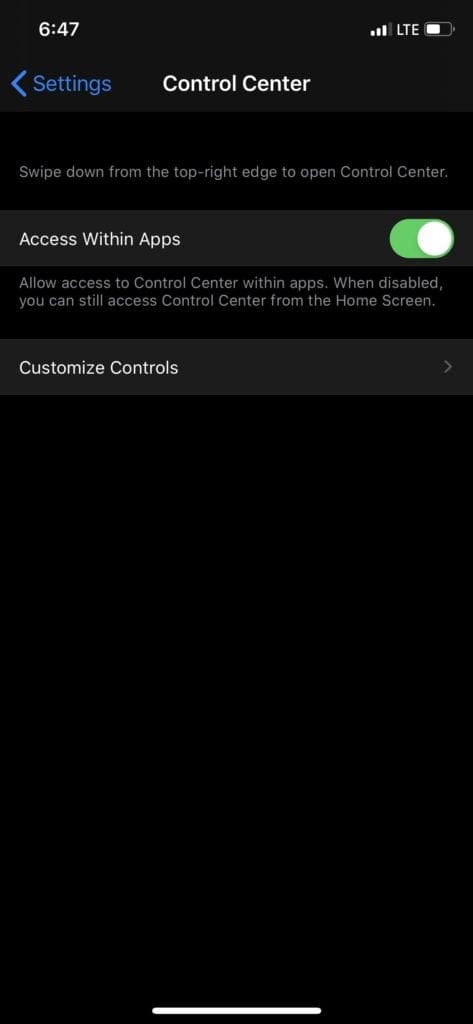
Open the Settings app on your iPhone.
Scroll down and select Control Center.
Tap Customize Controls.
Tap the Add (+) button next to Hearing.
Once you add Hearing to the Control Center, you still need to activate it whenever you want to use Live Listen. Here are the steps to do that:
Connect your AirPods Pro to your iPhone.
Swipe down from the top-right corner to reveal Control Center.
Tap the Hearing icon.
Select Live Listen.
After activating Live Listen, move your iPhone closer to the audio source to amplify it in your AirPods Pro. This should help you hear with better clarity when listening to conversations.
Use Audio Sharing with the AirPods Pro
Gone are the days of having to share your playlist with someone by stretching a headphone cable between you. With Audio Sharing, you can both listen to the same audio from one iPhone at the same time, so long as you each have your own set of AirPods or AirPods Pro.
Here’s how to use Audio Sharing:
With your AirPods connected, start playing audio on your iPhone.
Swipe down from the top-right corner of the screen to reveal the Control Center.
Tap the AirPlay icon in the audio playback section.
Bring the other pair of AirPods closer to your iPhone and flip the lid open
A prompt appears with the option to Share Audio.
After your friend has confirmed, they will be able to listen to the same music or media that you are!
Automatic Device Switching
Automatic device switching promises to let you seamlessly switch between different Apple devices without needing to pair and repair your AirPods Pro each time.
You need to update your Apple devices to at least iOS 14, iPadOS 14, or macOS Big Sur to benefit from this feature.
Once you do so, the audio in your AirPods Pro automatically switches to whatever device you used last.
For example, if you’re listening to music on your MacBook and then answer a call on your iPhone, your AirPods Pro automatically switch from the MacBook to the iPhone. If you end your call and start watching a video on your iPad, the AirPods Pro automatically switch across to your iPad instead.
How to have your AirPods Pro announce calls and texts
If you’re deep in your studies or in a long work session, you may end up missing phone calls or text messages. With AirPods Pro, Siri can announce these messages to you so you don’t need to check your iPhone.
Here’s how to make Siri announce calls on your AirPods Pro:
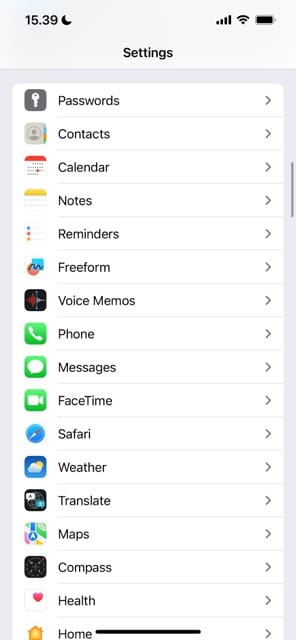
Open the Settings app.
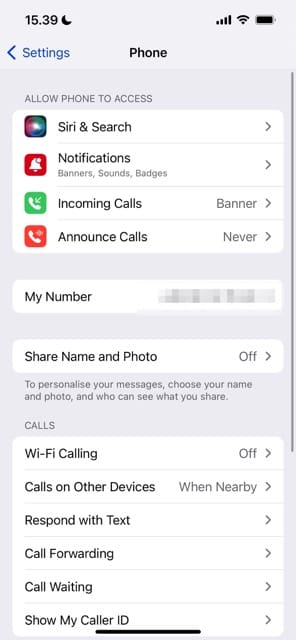
Scroll down and select Phone.
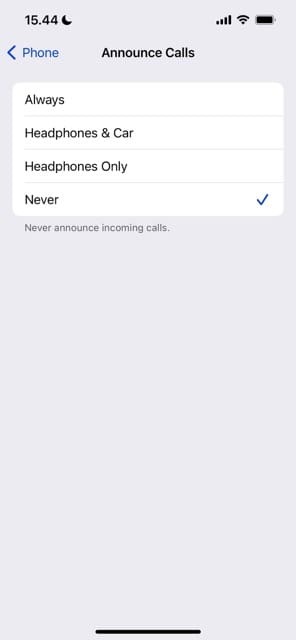
Scroll down and tap Announce Calls.
Tap Headphones & Car or Headphones Only.
The obvious benefit here is so that you can hear what messages are coming through, without actually stopping to pick up your phone.
What is the battery life on the AirPods Pro?
The AirPods Pro battery life depends on whether you use first or second-generation headphones. If you use Active Noise Cancellation, the AirPods Pro 1 should last you around four-and-a-half hours. Meanwhile, the AirPods Pro 2 will last around six hours with Noise Cancellation.
You can get up to 24 hours’ extra battery life via your AirPods case with the AirPods Pro 1. For the AirPods Pro 2, this stands at 30 hours.
How to quickly check your AirPods Pro battery life
You don’t want to run out of battery life on your AirPods Pro, especially if you have a full schedule ahead of you. There are a few ways to check the battery life on your AirPods, with the first taking advantage of the H1 chip and your iPhone.
Here’s how to check your AirPods Pro battery:
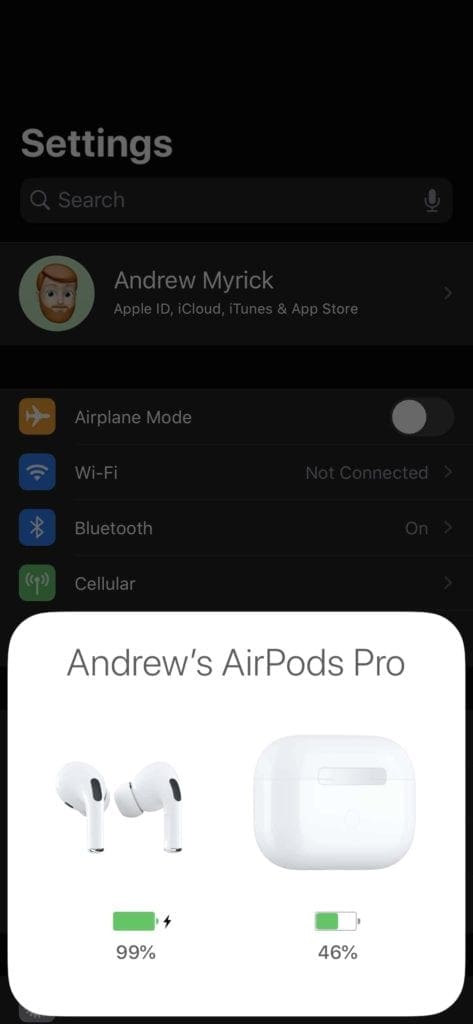
Open the lid of your AirPods case without taking them out.
Hold the case close to your iPhone and wait a few seconds.
The status of both the case and AirPods appear on your iPhone.
Just open the case
Use Siri
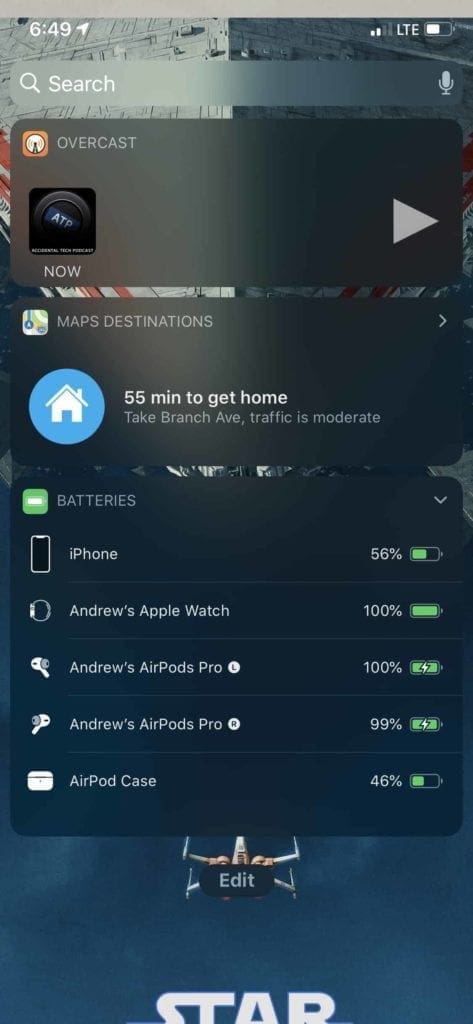
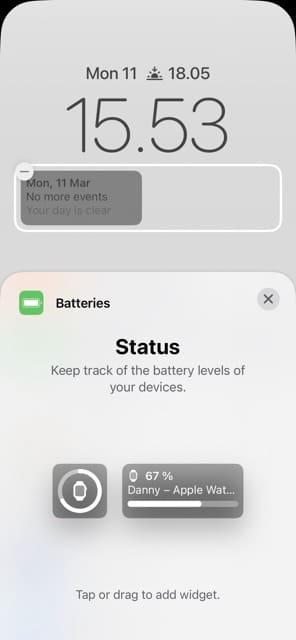
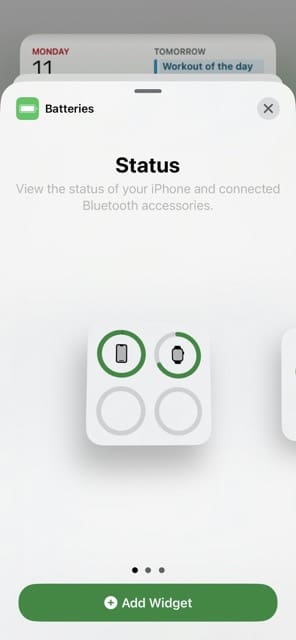
Batteries Widget
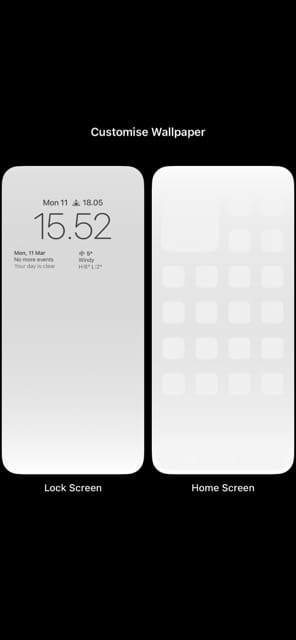
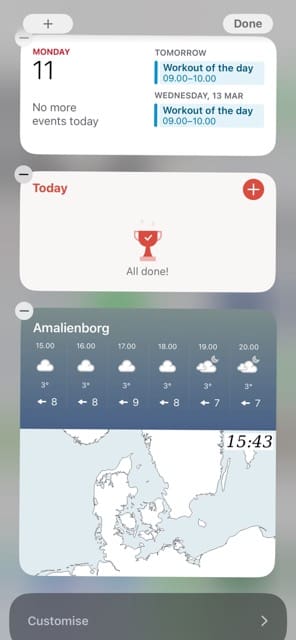
Another method for checking the battery life is to enable the Batteries widget on your iPhone or Lock Screen. Once completed, you can view the remaining battery of both the AirPods and the charging case. To enable the Batteries widget on your Lock Screen, follow these steps:
Tap and hold on to your Lock Screen until you see the Customize option.
Select Lock Screen.
Tap the section with widgets below your time.
Choose Batteries.
Drag your preferred widget into the box. Alternatively, tap on your screen to enable the feature.
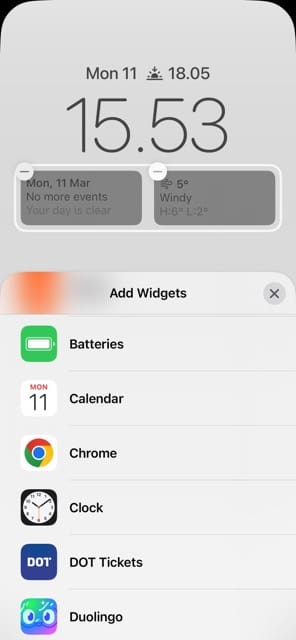
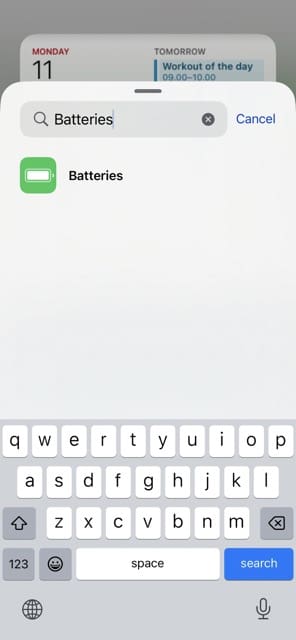
To add widgets to your iPhone but not on the Lock Screen, follow these steps instead:
Swipe left on your iPhone home screen to reveal the Widgets section.
Scroll to the bottom and select Edit.
Tap the + button.
Search for and select Batteries.
Select Add Widget when you find the one that you’re happy with.
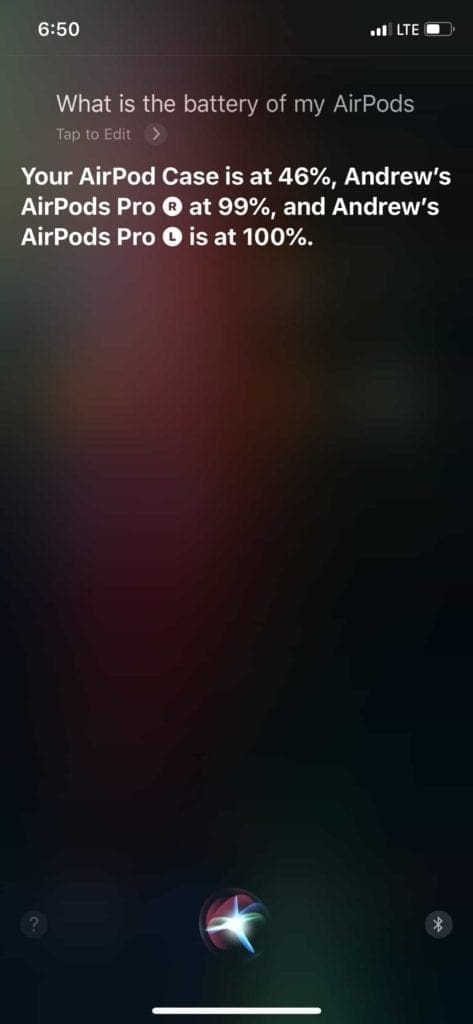
Additionally, you can just ask Siri how much battery life is left on your AirPods. Simply activate Siri and ask “What is the battery of my AirPods?” and Siri provides the remaining battery life.
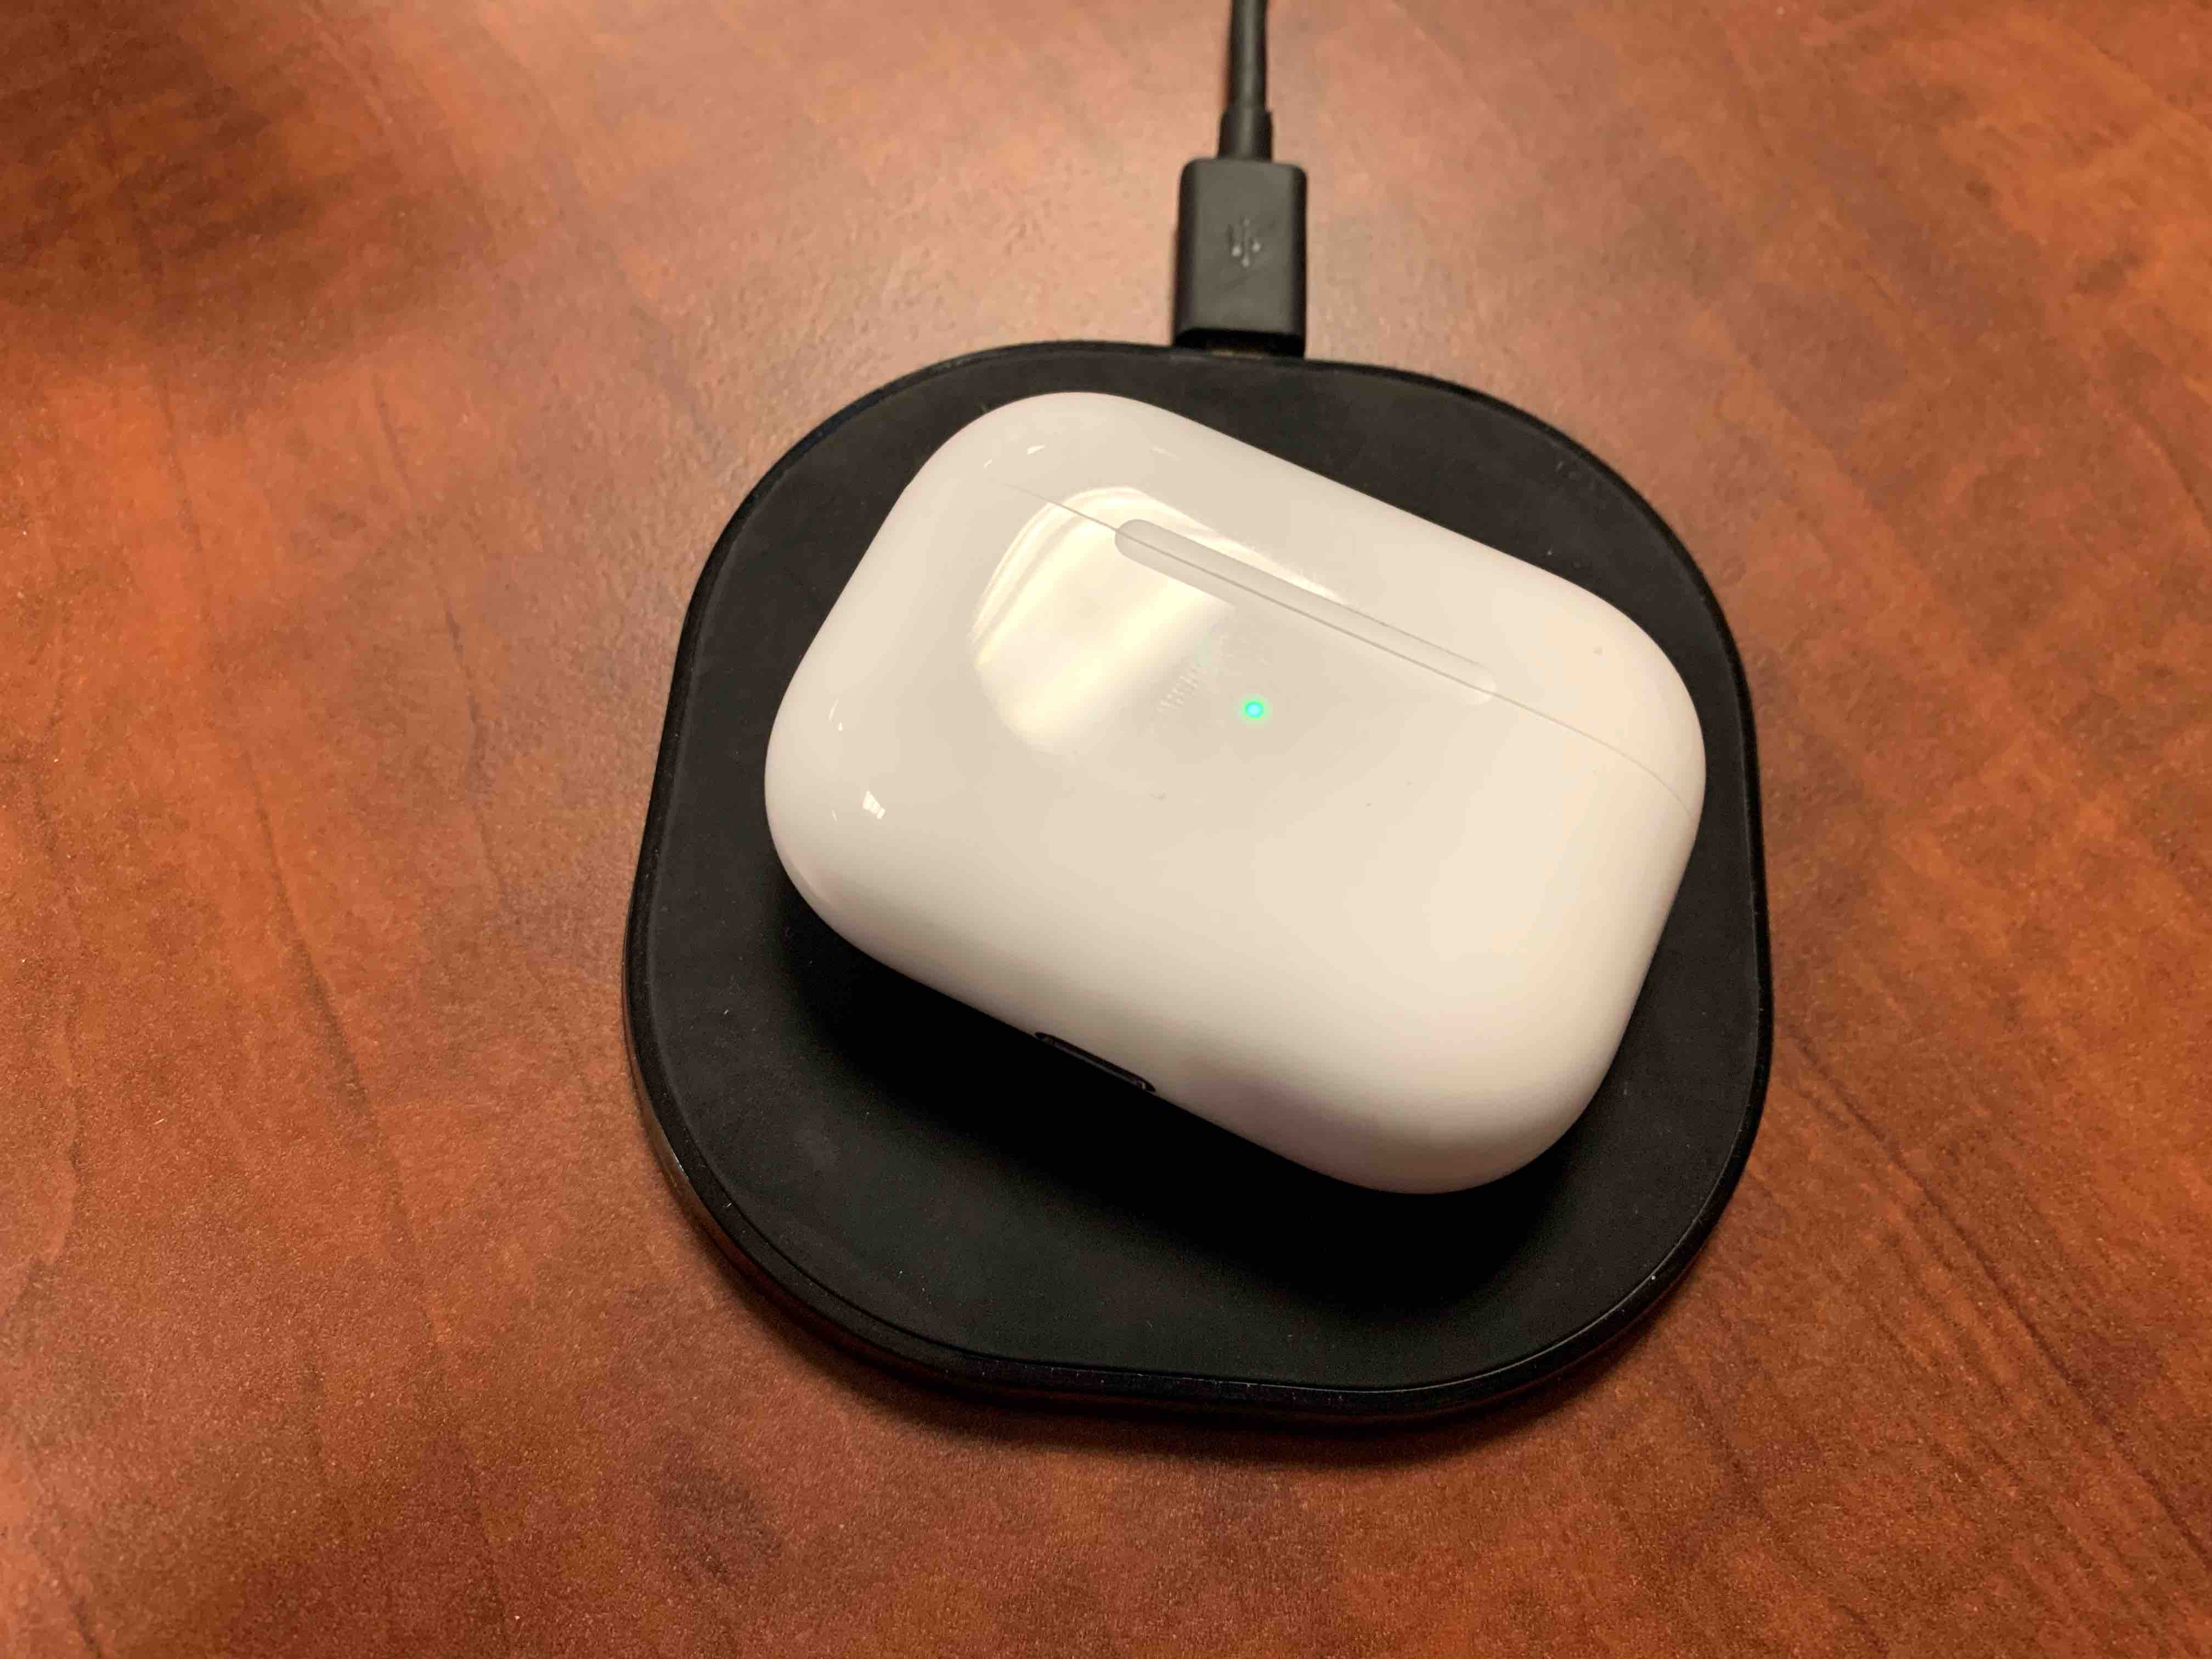
Can I wirelessly charge the AirPods Pro?
You can charge the AirPods Pro charging case wirelessly. Just tap the case while it’s charging to make the LED come on, showing whether the case is fully charged or not.
A green light means the case or AirPods are more than 75% charged. An amber light means it’s less than that, so you may want to wait.
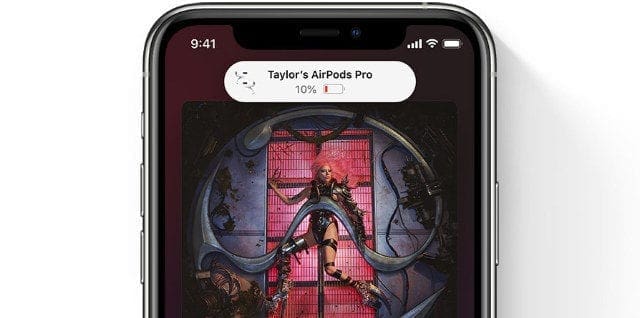
Battery Notifications
Battery notifications appear at the top of your screen to show your AirPods battery status when it gets low or when it’s fully charged. It should save you the hassle of needing to manually check your AirPods Pro battery.
Find out when your battery is low from a notification.
If you see that your AirPods battery needs charging, you can simply put them into your case.
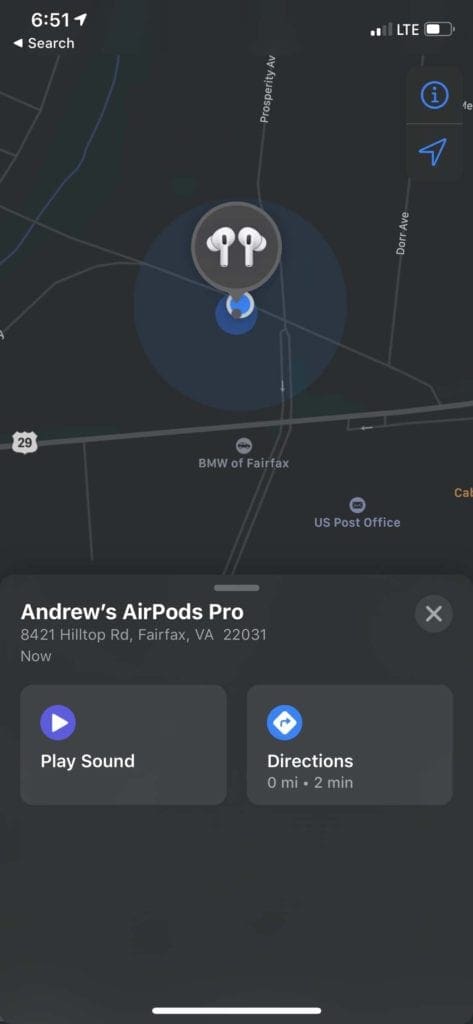
How to find your misplaced AirPods Pro
As amazing as the AirPods are, they sure can get lost pretty quickly. It doesn’t take much for you to put one in a pocket, only to have it fall out while walking around.
With the help of the new and improved Find My app, you can locate your AirPods with ease:
Open the Find My app on your iPhone.
Tap Devices at the bottom of the screen.
Scroll down and select your AirPods Pro from the list.
Tap Play Sound if your AirPods are nearby and are within earshot. If not, tap Directions and the last known location will appear on a map so you can find them easily.
Unfortunately, this won’t help if you misplaced the charging case, at which point you’ll need to get a new one from Apple.
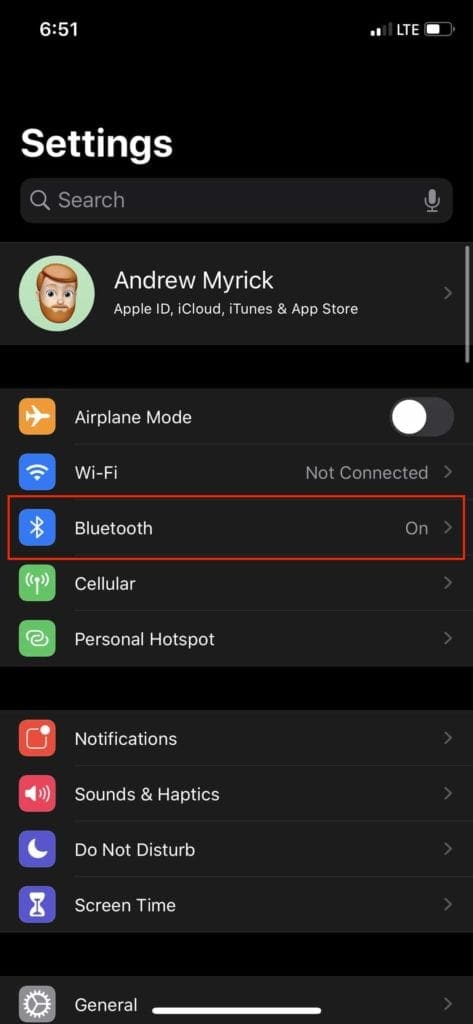
There’s an easy way for you to combat potentially losing your AirPods. One method is to rename the AirPods to something with your name and phone number.
Here’s how to rename the AirPods:
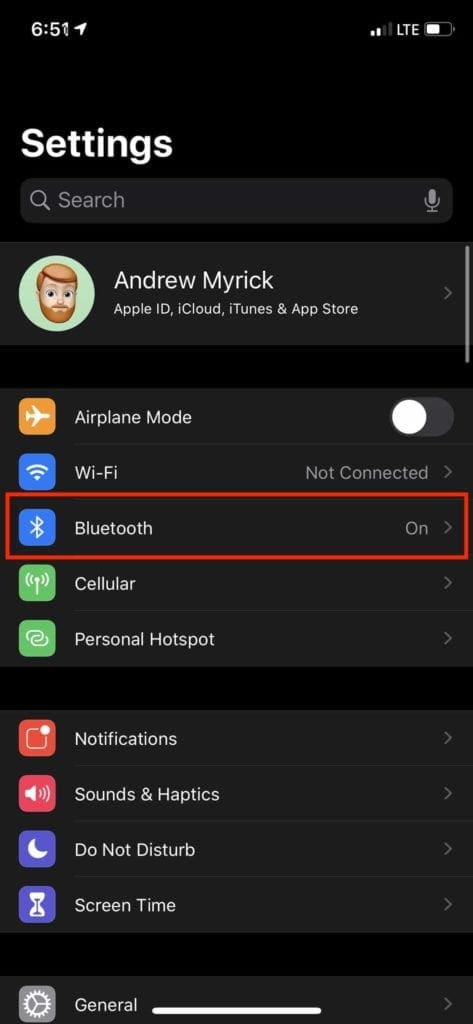
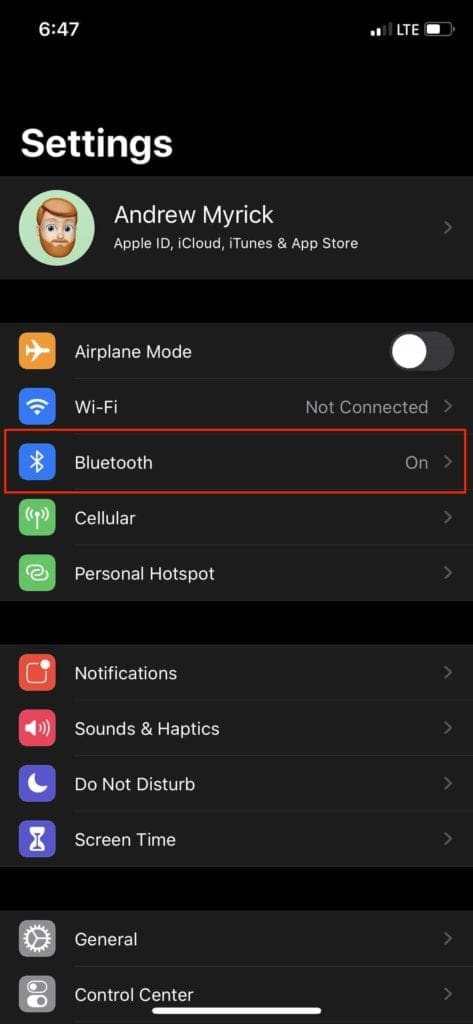
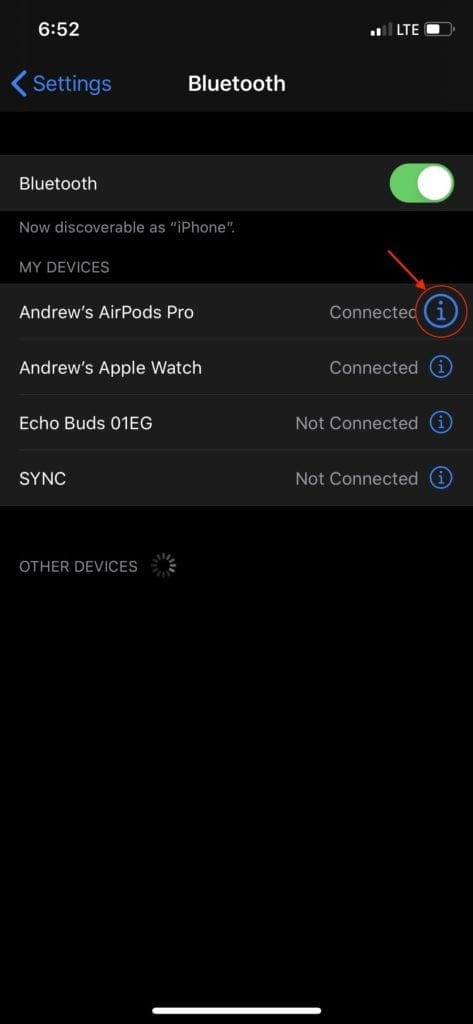
Open the Settings app.
Select Bluetooth.
Tap the i next to the name of your AirPods.
Tap on Name.
Enter the name of your choosing.
Tap in the top left-hand corner to go back.
The new name will be saved, allowing you to hope that someone will give you a ring in the event the AirPods are lost.
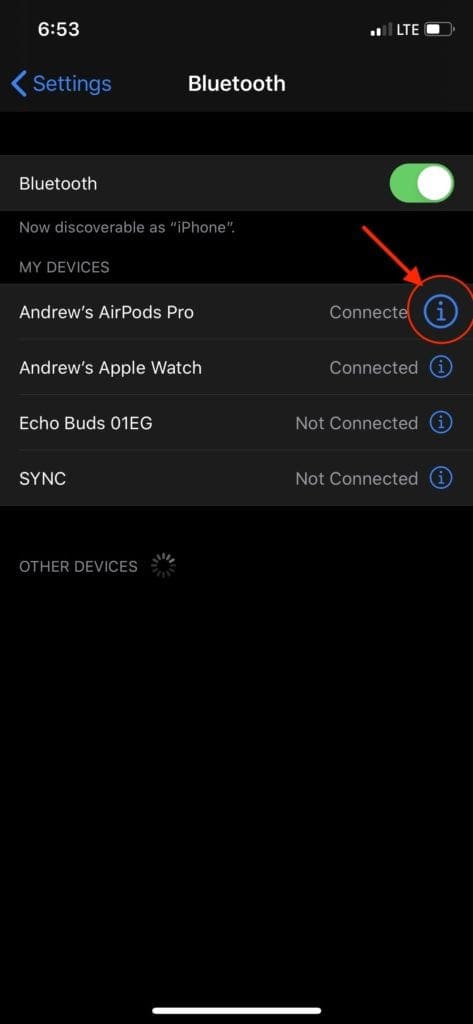
How to reset your AirPods Pro
There are times when your AirPods may not be working properly. For those times, you’ll want to reset them and get them paired to your iOS or macOS device again.
Ensure that your AirPods Pro are in the charging case.
Wait 30 seconds, and then open the lid.
Open the Settings app on your iPhone.
Select Bluetooth.
Tap the i next to your AirPods.
Tap Forget This Device and Confirm.
After the headphones have been unpaired from your iPhone, you will need to leave the lid open on the case. Then, press and hold the Setup button on the back of the case for 15 seconds, until the light on the front starts flashing. From there, you can re-pair the AirPods Pro to your iPhone.
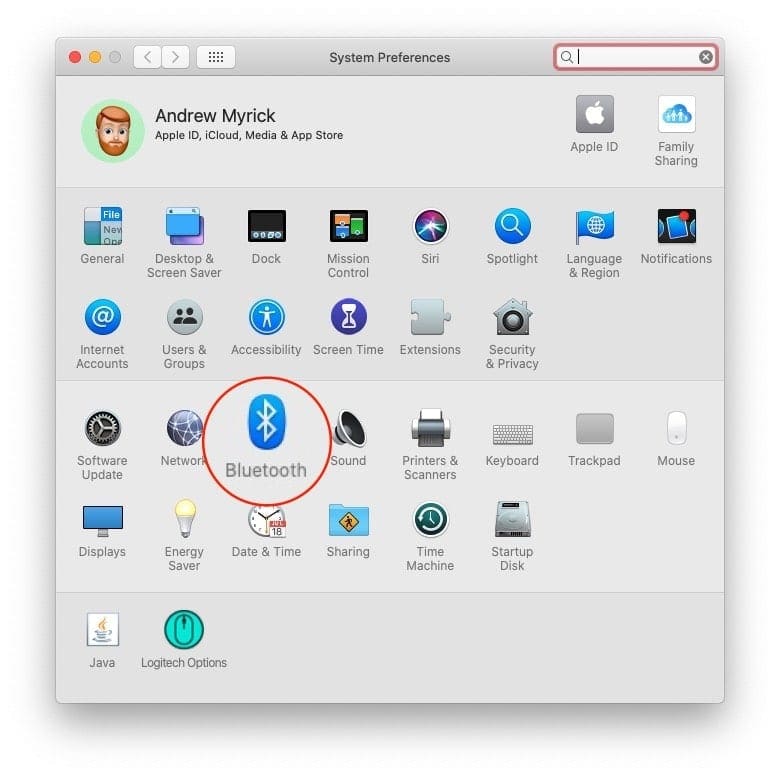
How to properly use AirPods Pro with a Mac
As one would expect, Apple makes it easy to use its new headphones with your Mac. If you don’t already have an iPhone for the initial setup, have no fear, as you can still pair them.
From your Mac, open the Control Center from the menu bar.
Select the AirPlay button next to the Volume slider.
Click the Arrow next to your AirPods Pro to reveal all the noise cancelation modes.
Alternatively, go to System Preferences > Bluetooth and click the Options button for your AirPods Pro.
The nice thing here is that you can quickly switch between modes without needing an iPhone to do so.
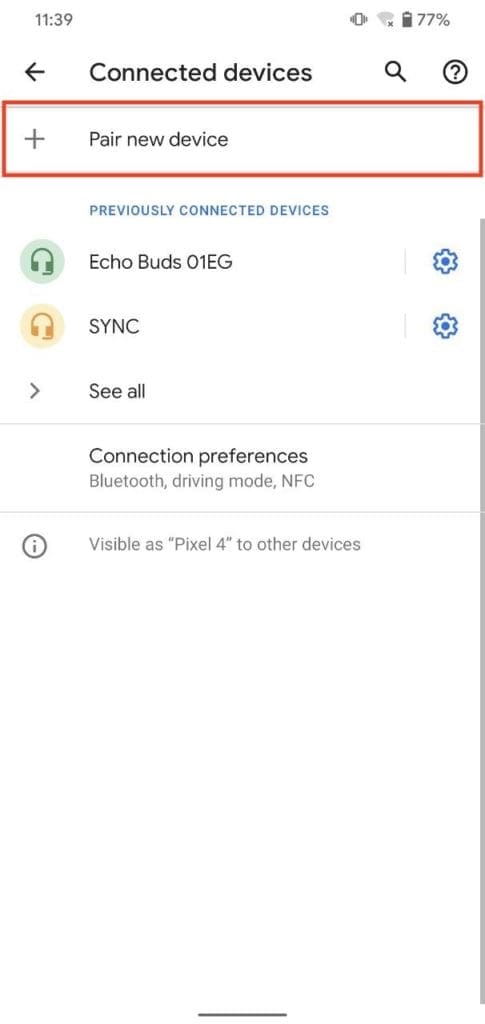
How to pair AirPods Pro with an Android device
The world of iOS isn’t for everyone, as a case can be made for some Android devices being better than even the latest iPhone. Or maybe you using enjoy both platforms but want to use the AirPods Pro with an Android phone.
Here’s how you can pair the AirPods with an Android device:
Open the lid on your AirPods Pro case.
Press and hold the Setup button on the back of the case for 15 seconds.
The light on the front of the case will start flashing.
From there, open the Settings app on your Android phone.
Tap Bluetooth under Connected Devices.
Tap Pair New Device.
Select the AirPods Pro from the Available devices list.
Now that the AirPods Pro are connected to an Android device, here’s a breakdown of what works:
Active Noise Cancellation
Transparency Mode
Controls via Force Sensors
But that’s about it, so you won’t be able to view AirPods battery level indications, nor will you be able to use Apple’s Ear Tip Fit Test or Audio Sharing. But if those other features are not important, the Pro’s will be perfect, even with an Android device.
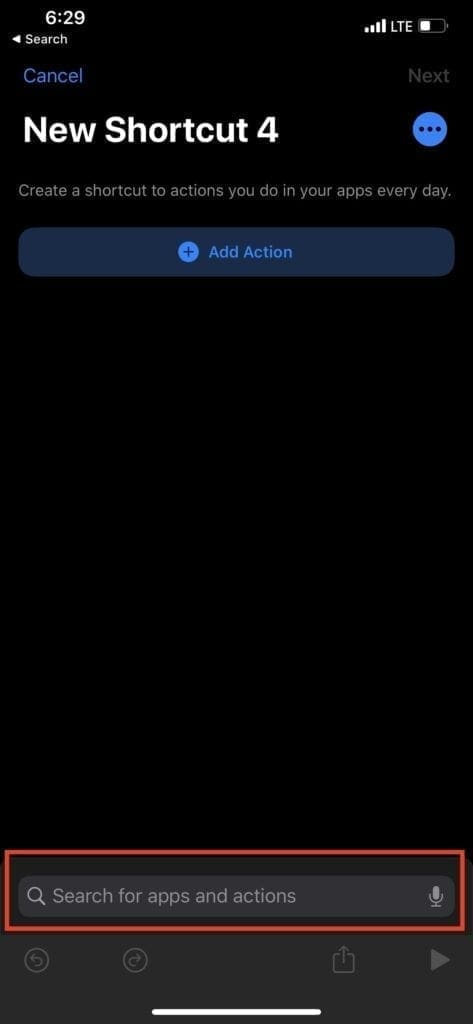
Step things up a notch with AirPods Pro and Shortcuts
With the AirPods Pro, you can actually create Shortcuts to quickly switch between ANC and Transparency modes.
How to switch Noise Control Mode with Shortcuts
If you want to dive deeper into Shortcuts, you can create a toggle for turning on ANC or Transparency mode. These are extremely simple and a perfect way to get some users acclimated to using Shortcuts in general.
Here’s how you can create the Shortcut for yourself:
Open the Shortcuts app on your iPhone.
Tap the Add (+) button in the top right-hand corner.
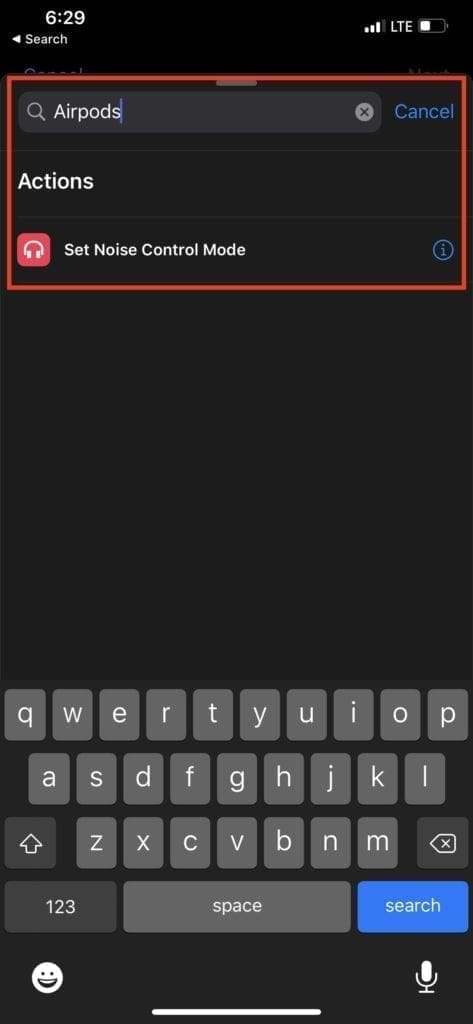
Using search, type AirPods into the search box.
Tap Set Noise Control Mode.
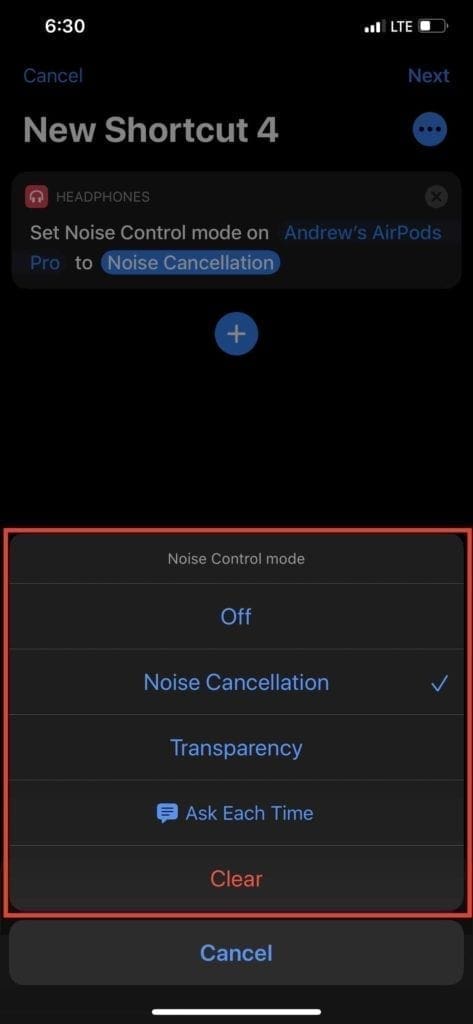
From the main panel, tap Route within the shortcut and select your AirPods Pro. Then, tap on Noise Control Mode.
From here, you can select what you want to the Shortcut to do, and here are the options:
Off
Noise Cancellation
Transparency
Ask Each Time
If you choose to activate Noise Cancellation with the first Shortcut, you can go back and create a second one to activate Transparency. The benefit of creating two separate Shortcuts is to access them quickly via the Shortcuts Widget or by long pressing on the app to activate them.
Can you get AppleCare+ at a later date?
As we mentioned above, it can be a big downer if you end up losing an AirPod or the charging case. Instead of having to shell out another $250 for a whole new package, you can take advantage of AppleCare+.
If you don’t sign up at purchase, you have 60 days after the initial purchase date to do so. Learn more here:
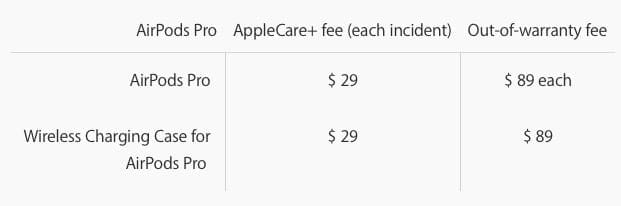
The cost for AppleCare+ on the AirPods Pro is just $29, and that grants you two years of coverage with two “accidental incidents”. For example, if you broke one AirPod Pro and did not have AppleCare, you would be charged $89. However, if you signed up for the protection plan, then you would just pay $29.
However, if you lose either the earbud or the wireless charging case, you are out of luck and will have to pay $89 for either one. That price applies regardless of whether you signed up for AppleCare+ or not. For many fixes, you’ll need to pay a $29 service fee — but this is still cheaper than getting a new pair of AirPods Pro headphones.
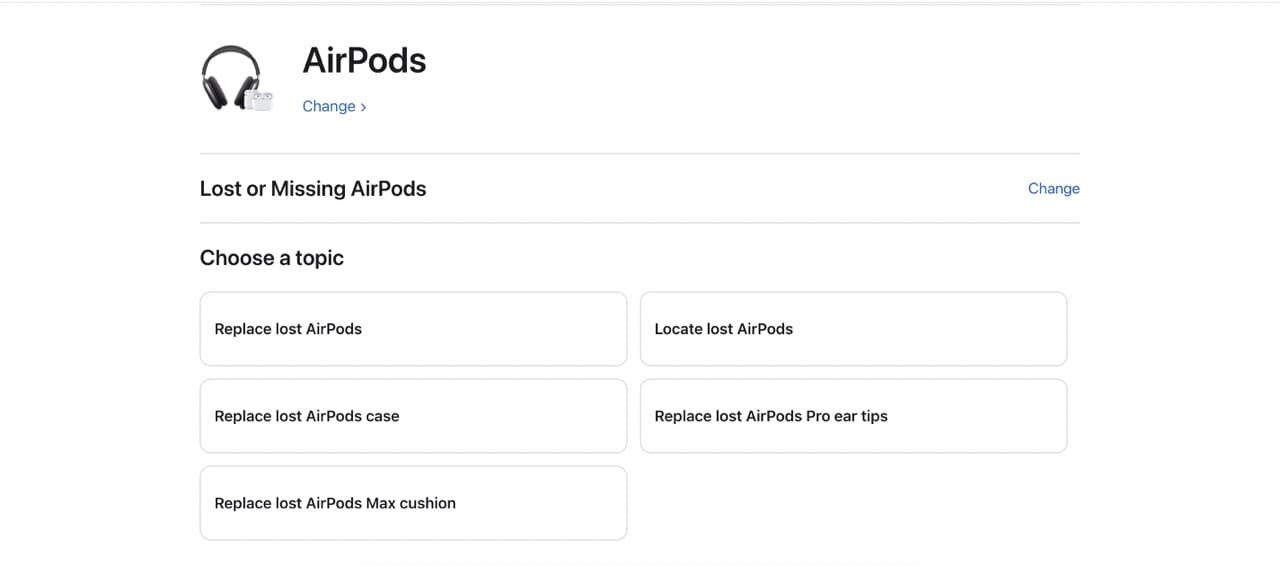
How to replace lost or broken AirPods Pro earbuds
Regardless of whether you signed up for AppleCare+ or not, you can still get a replacement AirPod or charging case. Here’s what you’ll need to do:
At the top of the page, click on Lost or Missing AirPods > Replace lost AirPods.
Follow the steps on the screen to order a replacement pair of AirPods. After you make your payment, Apple will send a confirmation email and update you with tracking information after it has shipped.
How to pair your replacement AirPods Pro
For more assistance on pairing your replacement headphones, please refer to this guide:
Unfortunately, you cannot just stockpile a bunch of ear tips for your AirPods Pro. In the event that you want or need to order replacements, you’ll have to go through Apple’s support.
At the top of the page, click on Lost or Missing AirPods > Replace lost AirPods Pro ear tips.
Follow the steps on your screen to order replacement tips.
As is the case with replacing lost earbuds, you will receive a confirmation email after paying the fee. Then, another email will arrive with updated tracking information.
AirPods Pro Maintenance and Troubleshooting
The AirPods Pro are built solid by Apple and backed by a warranty. If you have any sound-related issues with the AirPods, you should reach out to Apple and get them fixed.
Most of the maintenance you’re required to perform on these units centers around properly cleaning your AirPods. After a while, you may notice charging or sound issues — especially if you use your earbuds daily. This is primarily due to accumulated dirt and debris in the case or in the charging contacts of the AirPods themselves. The guide below will help you:
The other minor issues related to AirPods Pro pertain to the initial setup and use of the earbuds. We have prepared a complete troubleshooting guide that will answer most of your questions if you run into any issues.
Everything You Need to Know About the AirPods Pro
The AirPods Pro is a powerful set of headphones, and you can get two different versions. These devices offer excellent sound, the ability to cancel out noise, and several other advantages. You can easily pair these with your iPhone for simple listening while on the go.
Hopefully, you now have all the information you need to maximize your listening experience and troubleshoot some of the most common problems. We’d love to hear your thoughts on the AirPods Pro, so feel free to reach out to us in the comments. Please also share your experiences if you’re having any problems with your device; we’d love to help you out if possible.
Andrew Myrick is a freelance writer based on the East Coast of the US. He enjoys everything to do with technology, including tablets, smartphones, and everything in between. Perhaps his favorite past-time is having a never-ending supply of different keyboards and gaming handhelds that end up collecting more dust than the consoles that are being emulated.
I actively use multiple Apple devices at the very same time. My iPhone, an iPad and maybe 2 MacBook Pros and frequently my Apple TV also. they are all on and I am up and actively using them. Do you know they will all try to connect willy nilly to just about any device that is up and running? I have turned off Bluetooth on every device to stop this. So now the only place I ever use them is with my Apple TV and I frequently have to manually connect them. Than I also manually disconnect them when finished as they will seek out other Apple devices. The original ones will sort of stay in my ears, the Pro fall out all the time. I much prefer the original ones with the cord you plugged into your iPhone or iPad. They stayed put inside the ears. And frankly, the sound is fantastic with them.
Okay guys anyone ever get a pair that had one ear work but not the other?
My brand new ones the right one will turn on but the left doesn’t let anysound out.
I have scanned the manual (online. The very light colored, very small type in the manual that comes with the product is unreadable and worthless) and it looks like once I get them set up these are going to be awesome. The only question I can not find addressed in the manual is how do I use the charger cord. The case is at 13% charge and I’m not sure how I recharge it. The cord has an Apple plug on one end (for the case?) but not the standard usb plug on the other end. What do I plug this in to?
Thanks for your help,
Penny
Thanks so much! The information in the article is easy to track and apply. Could you add information about connecting AirPods Pro to Samsung Smart TV (e.g., is there an easy way to reconnect after AirPods Pro has been connected back to iPhone and iPad) and to Windows-based laptops?
Superb article! Now I know I need an Apple Watch (as well as my iPhone & iPad) as my Valentine’s Day present Lots of superb tips that you don’t pick up on in the official Apple instructions; thank you
Thanks for the article – very helpful. Is there a way to turn off the “out of power” sound on the AirPod Pros? I use the ANC to help go to sleep and that sound wakes me back up!
Hey Roy, that’s a good point, but unfortunately it doesn’t look like there is a way to turn off that sound. It might be worth sending some feedback to Apple to ask them to include it in a future update? You can do so at feedback.apple.com
How can I turn off the AirPods after each phone conversation. The previous AirPods just require two taps but with the Pro version, pressing the sensor didn’t seem to work.


")


I actively use multiple Apple devices at the very same time. My iPhone, an iPad and maybe 2 MacBook Pros and frequently my Apple TV also. they are all on and I am up and actively using them. Do you know they will all try to connect willy nilly to just about any device that is up and running? I have turned off Bluetooth on every device to stop this. So now the only place I ever use them is with my Apple TV and I frequently have to manually connect them. Than I also manually disconnect them when finished as they will seek out other Apple devices. The original ones will sort of stay in my ears, the Pro fall out all the time. I much prefer the original ones with the cord you plugged into your iPhone or iPad. They stayed put inside the ears. And frankly, the sound is fantastic with them.
Okay guys anyone ever get a pair that had one ear work but not the other?
My brand new ones the right one will turn on but the left doesn’t let anysound out.
I have scanned the manual (online. The very light colored, very small type in the manual that comes with the product is unreadable and worthless) and it looks like once I get them set up these are going to be awesome. The only question I can not find addressed in the manual is how do I use the charger cord. The case is at 13% charge and I’m not sure how I recharge it. The cord has an Apple plug on one end (for the case?) but not the standard usb plug on the other end. What do I plug this in to?
Thanks for your help,
Penny
Thanks so much! The information in the article is easy to track and apply. Could you add information about connecting AirPods Pro to Samsung Smart TV (e.g., is there an easy way to reconnect after AirPods Pro has been connected back to iPhone and iPad) and to Windows-based laptops?
Superb article! Now I know I need an Apple Watch (as well as my iPhone & iPad) as my Valentine’s Day present Lots of superb tips that you don’t pick up on in the official Apple instructions; thank you
Is there a pdf available with this information? Sometime I may need access offline. Thank you.
Many thanks for the very comprehensive, well organized and detailed guide. The table of contents and links are particularly useful. Great work.
Very useful guide. Thanks.
Apple pro ear pods are the best of the bestt, this is my 5th set of buds l finally bought the best!
Thanks for the article – very helpful. Is there a way to turn off the “out of power” sound on the AirPod Pros? I use the ANC to help go to sleep and that sound wakes me back up!
Hey Roy, that’s a good point, but unfortunately it doesn’t look like there is a way to turn off that sound. It might be worth sending some feedback to Apple to ask them to include it in a future update? You can do so at feedback.apple.com
Found a pair of AirPod pros at a local parking lot, is there a way I can track the owner to return?
Great article, way more comprehensive than the Apple manual!!
Thanks for taking the time to write this out. Great article that answered all my questions!
Hi, This is Enrique From Spain …. Great article!
I just want to say is thanks, all the information I need and very easy to understand.
How can I turn off the AirPods after each phone conversation. The previous AirPods just require two taps but with the Pro version, pressing the sensor didn’t seem to work.
Hi Aza,
You are correct, you press the force sensor on your AirPod Pro to finish a call. Try pressing and holding for 1 second and see if that works
Andrew,Great article!!,clear,concise, with perfect visuals.