This is how the problem (error 52) starts. You connect your iPhone or another iDevice to your Windows machine like any other day. You fire up iTunes. Or vise-verse. But today for whatever reason isn’t like any other day–it’s this day. And you need to restore your iDevice. So you do what you’ve always done in situations like this, you click the Restore option in your iTunes. But then something really goes wrong, and you see the error “this iPhone could not be restored.An unknown error occurred (52).” And all you think is “what the heck did I do? And how do I get my iPhone back?”
Error 52 is most commonly seen while restoring your iPhone, iPod Touch and iPad on a Windows computer. The main reason behind this error 52 is a problem with the USB driver on your computer. According to the description of the error 52, it is due to the problem with the verification of digital drivers that are required to restore iPhone, iPod Touch and iPad.
Third party antivirus or security programs installed on your computer cause this issue, as well as software and hardware glitches. Moreover, malware or a virus on your computer can also cause this problem. So, there is no exact rhyme or reason way for this error. But certain troubleshooting tips help to eradicate this error while restoring your iPhone, iPod Touch or iPad.
Troubleshooting Error 52:
First of all, make sure it isn’t your USB cable that’s the problem. So try a different Apple USB cable if you have one on hand or ask a family member or friend to use theirs temporarily.
Unplug all OTHER USB accessories from your computer except for your iDevice. Try each USB port to see if one works.
Restart Everything, including your computer AND your iDevice.
Press and hold the Sleep/Wake button until the red slider appears.
Drag the slider to turn your device completely off.
After the iDevice turns off, press and hold the Sleep/Wake button again until you see the Apple logo.
Disconnect your iPhone from the computer and close the iTunes. Connect your device again and launch iTunes. This is the easiest solution that has worked for some users.
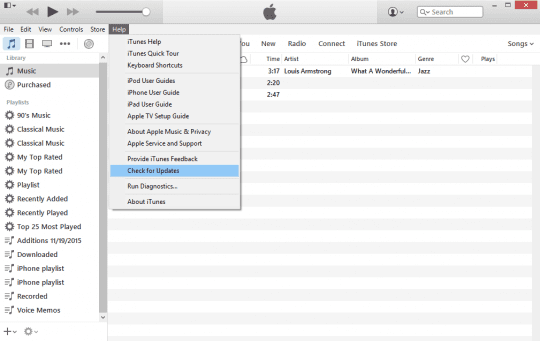
Next, make sure that you are using the latest version of iTunes on your Windows computer. If you don’t know about the version or recent updates, open iTunes on your PC and click on Now, select Check for Updates. Follow the on-screen instructions to update your iTunes to the latest version.
If iTunes is correctly installed and working, check for any new Updates for Windows. There are different methods to check the Updates on various versions of Windows such as Windows 7, 8 and Windows 10.
One of our readers had terrible trouble with error 52 until he discovered his own solution. He removed the iDevice’s SIM card and THEN did a hard reset. And (his words “BAM worked like a charm…put the SIM card back in and NO ERROR 52!”
Turn OFF your iDevice before removing the SIM card
To Remove SIM Card
Pop open your Device’s SIM tray, insert a paper clip or an SIM-eject tool into the hole beside the tray
To Hard Reset
On an iPhone 7 or iPhone 7 Plus: Press and hold both the Sleep/Wake and Volume Down buttons for at least ten seconds, until you see the Apple logo
On an iPhone 6s and earlier, iPad, or iPod touch: Press and hold both the Sleep/Wake and Home buttons for at least ten seconds, until you see the Apple logo
Let’s Take Some Action Here to Solve Error 52!
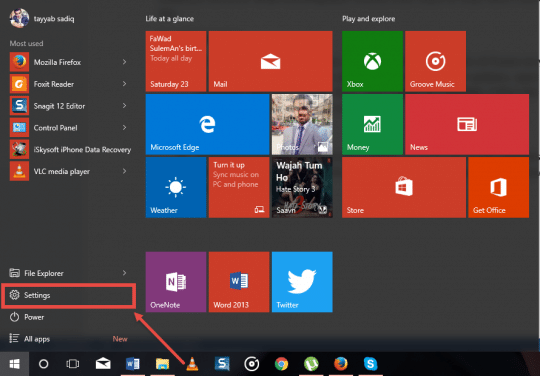
Step 1: Click on the Start Menu and hit the Settings.
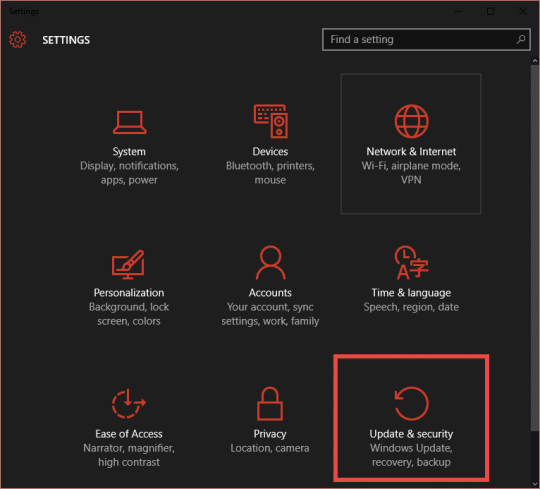
And Step 2: On the next screen, click on Update and Security
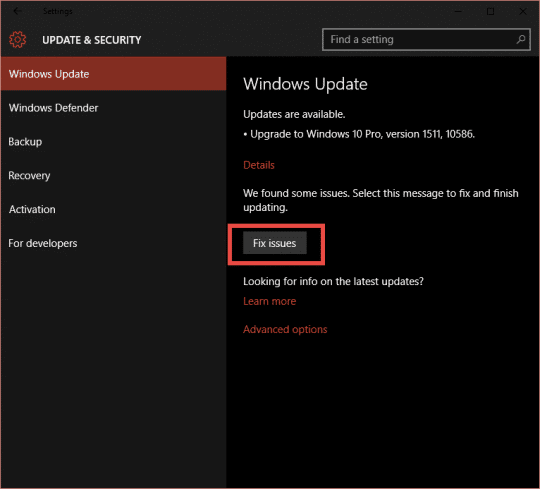
Step 3: The very first option is the Windows Update, it will automatically start checking the updates for Windows on your computer. If you have any updates, click on the Fix Issue.
And finally, Step 4: It will automatically download the updates on your computer and will install them in a few minutes. Sit tight and let windows do this task for you.
Update Your USB Drivers
Another potential cause is your USB drivers, so make sure you have updated the driver for your computer. This method differs depending on the manufacturer of your computer. For example: If you bought your computer from Dell, go to their help website and enter the details for your PC. And then download the USB drivers and install them on your computer.
Turn Off Forced Driver Signing
Usually, Windows automatically signs the drive enforcement, so, by turning OFF this forced driver signing process, you resolve this issue, here’s how you do that.
Step 1: Logout from Windows and Shut it down.
Once the computer is properly shut down, start it up. Or use the Restart option from the Logout panel. When the computer is restarting, hit the F8 key on the very first screen.
Step 2: On the next screen, go to the Windows Advanced Options list.
Now, use the arrow key on your keyboard or cursor of your mouse to select the Disable forced driver signing enforcement. That’s it! Hit the backspace on your computer and restart it. This action resolves the issue for you.
Still Nothing?
If none of those mentioned above methods have worked for you, reinstall the windows on your computer, and use the Recovery Disc or Thumb Drive that comes with the laptop.
However, if you don’t want to reinstall the Windows, use a friend’s computer to restore your iPhone, iPod Touch or iPad.
If you have another solution for this problem, please share it with us! And let us know the steps and method that worked for you.
With iPhone plugged into USB – go to Control Panel – System – Device Manager – Expand ‘Mobile Devices’ and uninstall your ‘Apple iPhone.’ Staying in the Device Panel expand the USB Controllers and uninstall the ‘Apple Mobile Device USB Driver’ and then close the device manager window. Now unplug any Apple USB device. Open Control Panel>Programs & Features and UNINSTALL “Apple Mobile Device Support.” Restart Computer. Next, Open Windows Explorer and navigate to C:/Program Data/Apple/Installer Cache/. Now ‘sort by date’ in that directory and open a folder that’s an earlier/previous version and double click the installer that resides in that folder (AppleMobileDeviceSupport64.msi) and allows it to run. Restart your computer. Then finally, plug in your iPhone and allow your PC to redetect the device. Open iTunes and hopefully, you’re back in business.
iTunes error 52 is a kind of error among various iTunes or iPhone errors. I also encountered this problem before and tried the methods mentioned in this article. And they indeed are proven to be effective. To help more people who are bothered by this trouble, the fixes above are strongly recommended, and if you wanna try professional iOS system recovery tools, TunesKit, wondershare are referred. Or you can directly send the device to the Apple store for help.
I opened the full motherboard and just left it connected only USB charger connected nothing else not even the camera. If still not working, remove the ic chip and then re-solder it back to the phone and it worked
My solution was to disconnect all the connection…. restore again (IPhone give me a sign of life! ) and try restart my iPhone by connecting one by one each component and restore between each step…. the iPhone crash again when I connect the power connection so …. I think I need to change it, when I remove it and restore again no error code :0
Hi!
I’ve got this 52 error issue….
Do you havé any solution for a MacBook user!
I try a several Time but Nothing… i Still have thaïs issue!!!!
I’ ve try with a brand New MacBook but it doesn’t working !
And Apple told me the error 52 don’t exist :/
The 52 error is the most common error while using iTunes. First, a window will appear on the screen displaying iTunes error code 52. If you are found iTunes error 52 then your active program crashes out and you need to restart it that indicates that you caught up with iTunes error 52. Keep a record of the error so that you can troubleshoot them easily. If you want to solve your problem very fast then contact iDoctor iPhone repair center.
This is a particularly difficult problem to solve. A reader had some luck with the following–see if it works for you. We’ve also added it to the reader tips section.
With iPhone plugged into USB – go to Control Panel – System – Device Manager – Expand ‘Mobile Devices’ and uninstall your ‘Apple iPhone.’ Staying in the Device Panel expand the USB Controllers and uninstall the ‘Apple Mobile Device USB Driver’ and then close the device manager window. Now unplug any Apple USB device. Open Control Panel>Programs & Features and UNINSTALL “Apple Mobile Device Support.” Restart Computer. Next, Open Windows Explorer and navigate to C:/Program Data/Apple/Installer Cache/. Now ‘sort by date’ in that directory and open a folder that’s an earlier/previous version and double click the installer that resides in that folder (AppleMobileDeviceSupport64.msi) and allows it to run. Restart your computer. Then finally, plug in your iPhone and allow your PC to redetect the device. Open iTunes and hopefully, you’re back in business.
Hope this helps. We are still looking into fixes for this issue–so far Apple is silent on it, unfortunately!
Removing the SIM worked for me, after many, many attempts at other solutions, none of which worked. I followed the instructions here and it now works, albeit restored to factory settings and no content retained.
i also have error 52. I’ve done all those suggested things. i tried two other computers and came up with other error codes. very frustrating. ill try the other computers again and take note of the error codes. A may just take it into Apple.


iTunes error 52 is a kind of error among various iTunes or iPhone errors. I also encountered this problem before and tried the methods mentioned in this article. And they indeed are proven to be effective. To help more people who are bothered by this trouble, the fixes above are strongly recommended, and if you wanna try professional iOS system recovery tools, TunesKit, wondershare are referred. Or you can directly send the device to the Apple store for help.
I opened the full motherboard and just left it connected only USB charger connected nothing else not even the camera. If still not working, remove the ic chip and then re-solder it back to the phone and it worked
My solution was to disconnect all the connection…. restore again (IPhone give me a sign of life! ) and try restart my iPhone by connecting one by one each component and restore between each step…. the iPhone crash again when I connect the power connection so …. I think I need to change it, when I remove it and restore again no error code :0
FAB, Thank you for sharing the tip. We really appreciate your input and are glad that it worked for you.
Hi!
I’ve got this 52 error issue….
Do you havé any solution for a MacBook user!
I try a several Time but Nothing… i Still have thaïs issue!!!!
I’ ve try with a brand New MacBook but it doesn’t working !
And Apple told me the error 52 don’t exist :/
The 52 error is the most common error while using iTunes. First, a window will appear on the screen displaying iTunes error code 52. If you are found iTunes error 52 then your active program crashes out and you need to restart it that indicates that you caught up with iTunes error 52. Keep a record of the error so that you can troubleshoot them easily. If you want to solve your problem very fast then contact iDoctor iPhone repair center.
DID NOT WORK! THERE IS NO WAY TO FIX ERROR 52 I’VE SPENT A WEEK TROUBLE SHOOTING EVERY POSSIBLE WAY!
Hi John,
This is a particularly difficult problem to solve. A reader had some luck with the following–see if it works for you. We’ve also added it to the reader tips section.
With iPhone plugged into USB – go to Control Panel – System – Device Manager – Expand ‘Mobile Devices’ and uninstall your ‘Apple iPhone.’ Staying in the Device Panel expand the USB Controllers and uninstall the ‘Apple Mobile Device USB Driver’ and then close the device manager window. Now unplug any Apple USB device. Open Control Panel>Programs & Features and UNINSTALL “Apple Mobile Device Support.” Restart Computer. Next, Open Windows Explorer and navigate to C:/Program Data/Apple/Installer Cache/. Now ‘sort by date’ in that directory and open a folder that’s an earlier/previous version and double click the installer that resides in that folder (AppleMobileDeviceSupport64.msi) and allows it to run. Restart your computer. Then finally, plug in your iPhone and allow your PC to redetect the device. Open iTunes and hopefully, you’re back in business.
Hope this helps. We are still looking into fixes for this issue–so far Apple is silent on it, unfortunately!
Cheers,
SK
Removing the SIM worked for me,
Removing the SIM worked for me, after many, many attempts at other solutions, none of which worked. I followed the instructions here and it now works, albeit restored to factory settings and no content retained.
i also have error 52. I’ve done all those suggested things. i tried two other computers and came up with other error codes. very frustrating. ill try the other computers again and take note of the error codes. A may just take it into Apple.