The iPhone is an amazing piece of technology, but it’s not without its issues and quirks. One problem that has caused endless hours of frustration over the years is when you connect to a Wi-Fi network, but there’s no actual internet connection.
Apple has attempted to release “point updates” to solve these issues, but it continues to rear its ugly head over and over again. Users on the latest version of iOS 13 and those on the iOS 14 beta have found the problem to show itself. There are a few steps to take in an effort to get things working again.
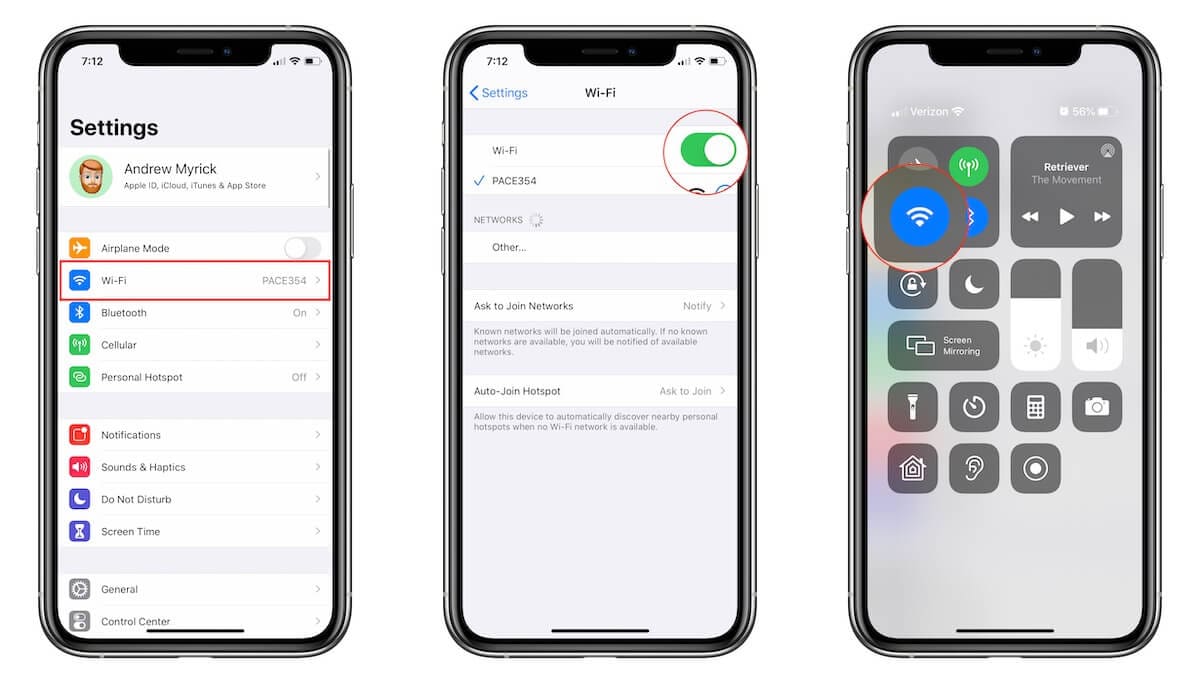
As you’ve probably tried a few times already, you can toggle your Wi-Fi on and off. The quick and easy way is to open Control Center and tap the Wi-Fi icon, then wait a few seconds and tap it again to re-enable Wi-Fi. However, you may want to actually go into the Settings app to turn this off if you are having issues.
Open the Settings app on your iPhone or iPad.
Tap Wi-Fi in the app.
Tap the switch next to Wi-Fi to turn it off.
Wait 10 seconds.
Tap the switch next to Wi-Fi to turn it on.
The important part here is to wait before turning it back on. You don’t want to “jump the gun” and turn the Wi-Fi back on before it’s actually been turned off in the system.
Double-check the network
Sometimes, you may think that you are connected to your home network, or maybe a friend, but you’re not connected to either. This can happen if you sign in to one of those “free” Wi-Fi networks offered by a local restaurant or cable provider. Head into the Settings app and double-check the name of the network that you’re connected to.
Disable Wi-Fi Assist
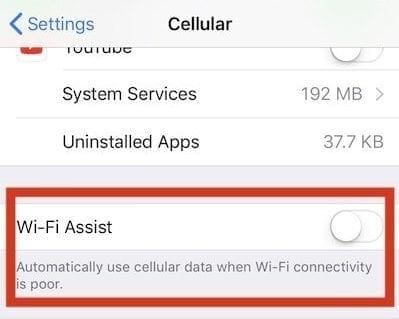
With the release of iOS 9, Apple introduced Wi-Fi Assist, which will supplement a poor Wi-Fi connection with your cellular network. By default, this is enabled and it could be the cause for why your Wi-Fi connection is poor if the “handoff” between Wi-Fi and Cellular networks was not done correctly.
Open the Settings app on your iPhone.
Tap Cellular.
Scroll all the way to the bottom.
Tap the toggle next to Wi-Fi Assist to disable.
If the issues are solved, then you can leave this disabled. But you may want to remember these steps for later if you want to re-enable it.
Check your Router
There are times where the problem isn’t your iPhone, but instead, it’s the router for the network you’re trying to connect to. Problems commonly arise when software updates are trying to be installed and end up getting “stuck”. So you’ll want to power cycle your router and then reconnect your iPhone. You can also connect another device to the router in an effort to try and determine if it’s your router or the iPhone causing issues.
Forget your Wi-Fi
You’ve gone through all of these steps and your Wi-Fi is still acting up. The next move is to forget the network completely on your iPhone and then reconnect it. Here’s how you can that:
Open the Settings app on your iPhone or iPad.
Tap Wi-Fi in the app.
Tap the “i” icon next to the connected Wi-Fi network.
Select Forget This Network.
Tap Forget to confirm.
If you want to take an extra step before reconnecting to the network, go ahead and reboot your iPhone. This will knock out any cobwebs and ensure that it has actually been “forgotten” before you attempt to reconnect.
Open the Settings app on your iPhone or iPad.
Tap Wi-Fi.
Find your preferred Wi-Fi network and select it.
Enter your Wi-Fi password to connect.
Toggle Location Services
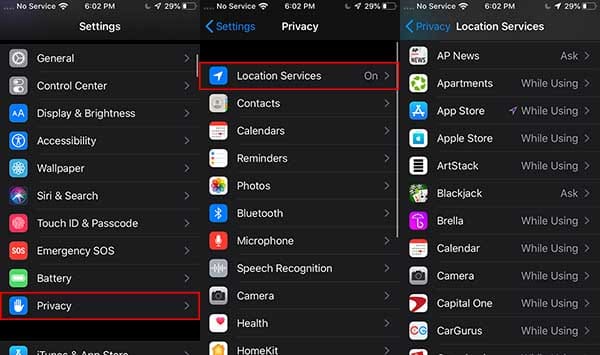
Just about every app that you have installed on your iOS devices uses Location Services for one reason or another. There are some apps that require the use of Location Services in order to function properly, while others may be used maliciously. Your Wi-Fi network settings also have access to these services, and that could cause some issues.
Open the Settings app on your iPhone or iPad.
Scroll down and select Privacy.
Select Location Services at the top of the page.
Scroll down and select System Services.
Locate Wi-Fi Networking and toggle this to the Off position.
Before re-enabling this, make sure that you can connect to your Wi-Fi network. If so, then you can keep this off until prompted by your iPhone to re-enable it. At that time, or anytime beforehand, you can decide whether to toggle Location Services back on, or leave them off.
Are you using a VPN?
Using a VPN can be extremely useful, especially if you are trying to keep your online information protected. However, VPNs can act up from time-to-time and can cause your internet connection to not work properly.
How to check for a VPN
In the event that you are not sure if there’s a VPN enabled or installed on your iPhone, here’s how you can check.
Open the Settings app.
Tap General.
Scroll down and select VPN.
If there’s a VPN listed, tap the option and turn it off, then try to connect to your Wi-Fi network again.
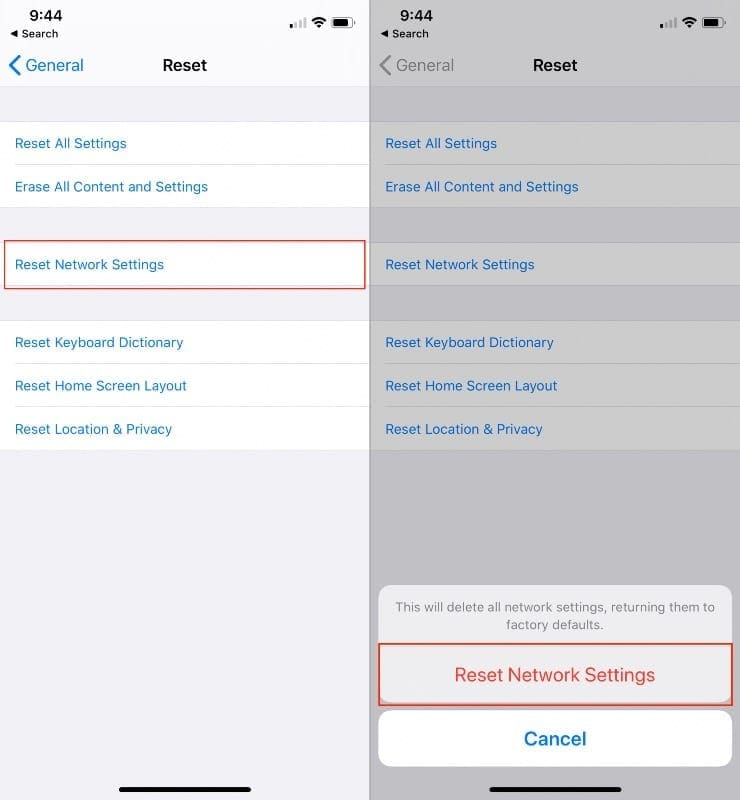
Reset Network Settings
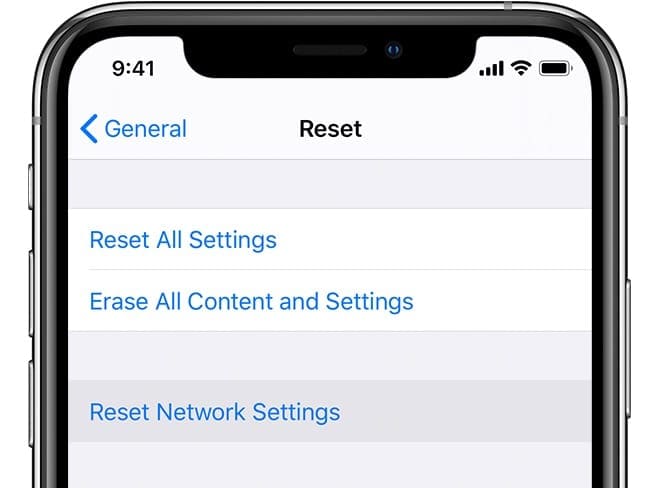
Surprisingly, Apple has made it possible for users to completely reset the network settings on their iPhones. This process will reset any Wi-Fi network connections, remove passwords, along with removing any user-set cellular or VPN/APN settings that were created.
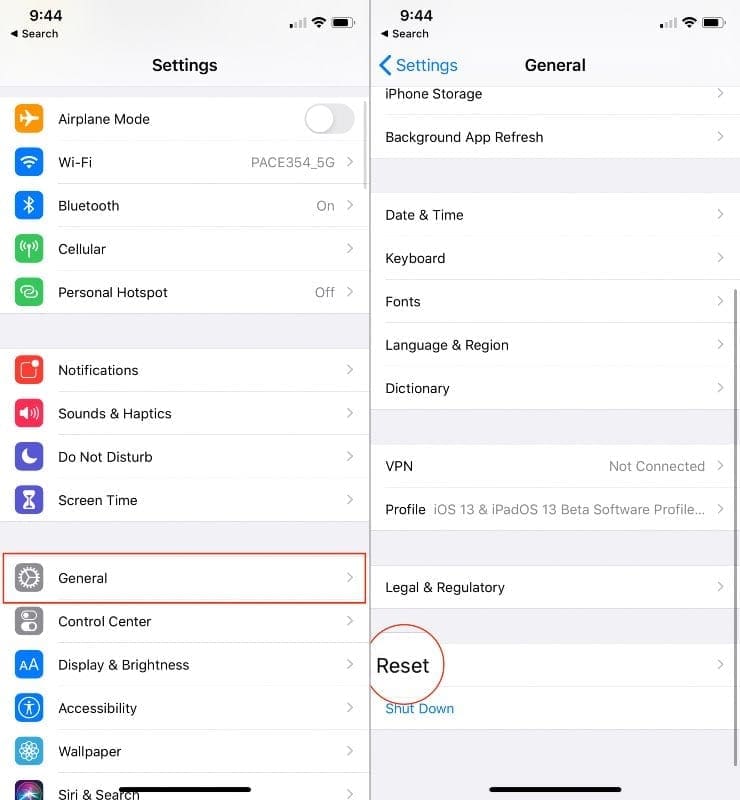
Open the Settings app.
Tap General.
Scroll down and tap Reset.
Select Reset Network Settings.
Confirm.
After this has been done, you’ll want to reboot your iPhone. This ensures that the process has been completed successfully, and will install any necessary carrier updates in the process.
Are you on the latest version of iOS?
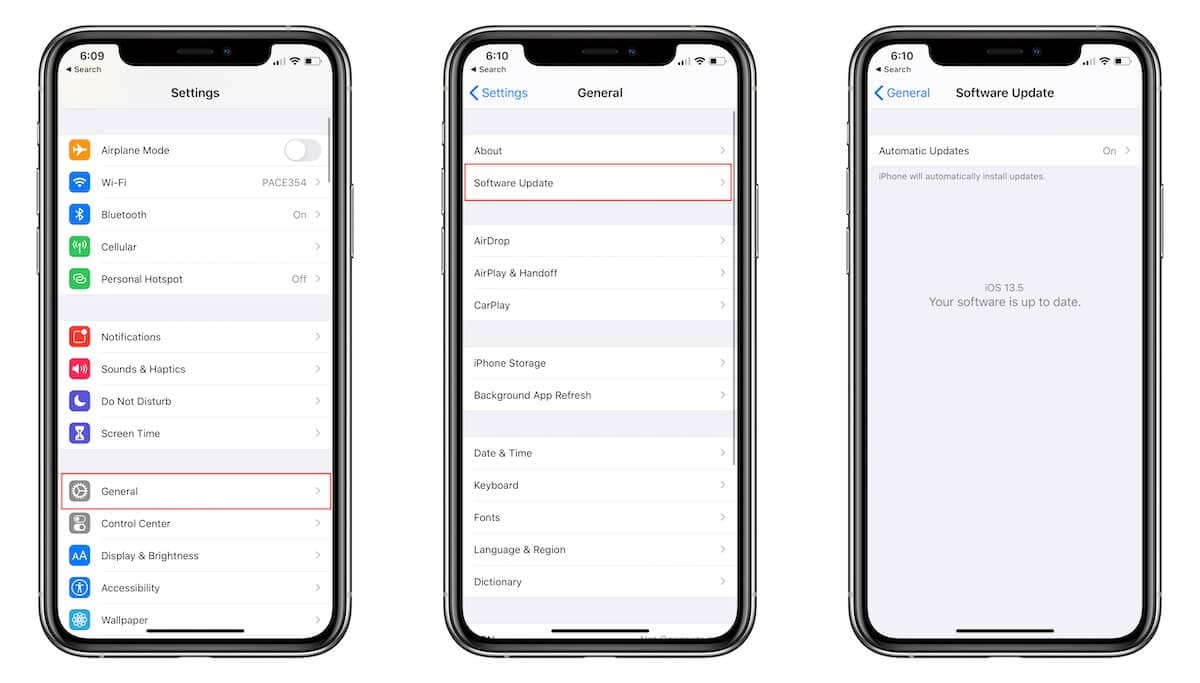
When it comes to diving into more troubleshooting, one step is to double-check and make sure that your software is up to date. This is especially true as of late, as Apple has been releasing some “point” updates at a more frequent pace. Here’s how to check your software:
Open the Settings app.
Tap General.
Select Software Update.
If an update is available, download it and then once prompted, install the update. Another reason for this is if you happen to be on the iOS beta cycle, as releases are coming even more frequently than the stable releases. So it’s important to make sure that your iPhone is up to date, as there could be some bugs wreaking havoc.
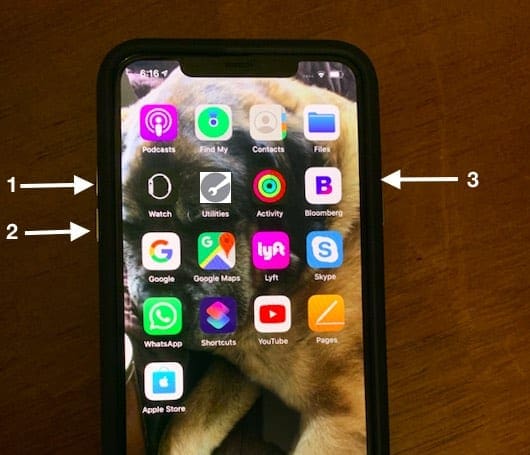
Reboot your iPhone
Three easy steps to force restart your iPhone 11 Pro
There’s an old adage in the tech community to just “turn it off and turn it on again”. That adage still applies in 2020, as these devices are nothing more than computers in your pocket, and a good ole’ reboot can help fix your issues.
Quickly press and release the Volume Up button.
Quickly press and release the Volume Down button.
Press and hold the Side button until the Apple logo appears.
Release the Side button.
After your iPhone is finished booting, head into the Settings app and check to see if the Wi-Fi network was reconnected to. Then, open your browser of choice and see if the problems have been solved.
Backup and restore your iPhone
So you’ve exhausted all of the other options and are just at your wit’s end. The next step you’ll want to try before resorting to something more extreme is to wipe your iPhone completely clean and start anew.
Backup first
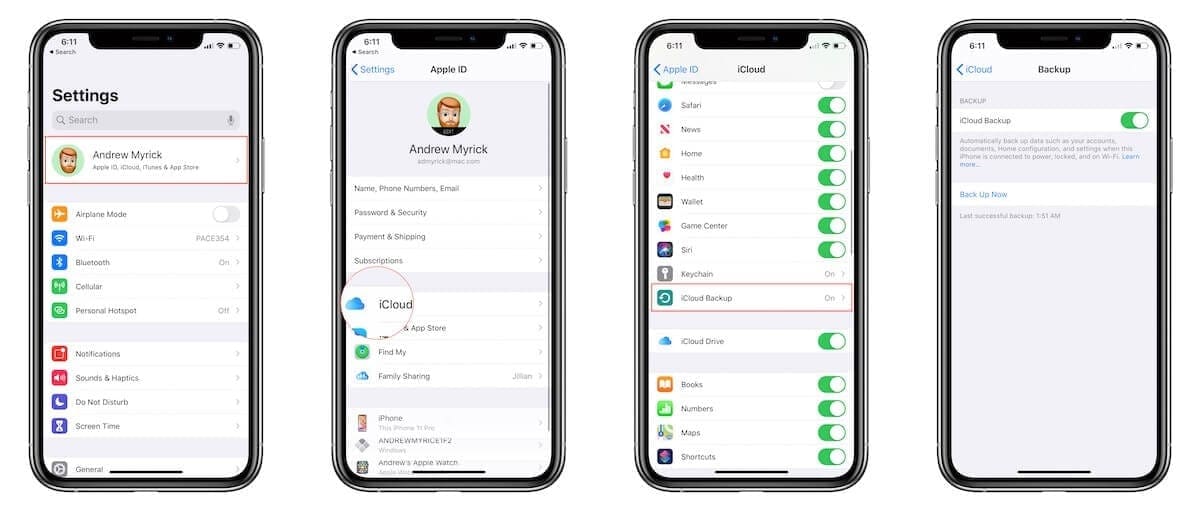
Before just wiping everything, make sure that you have an iCloud backup saved, so that you can restore pertinent pieces of information. Here’s how to backup your iPhone to iCloud:
Open the Settings app on your iPhone.
Tap your name at the top of the page.
Select iCloud.
Scroll down under Apps using iCloud, and select iCloud Backup.
Tap Back Up Now.
The backup process could take some time if you are connected to your cellular network. However, it’s still important to back everything up before you perform a Factory Reset, so patience is key here.
Now Restore
After the backup has been completed, you can rest easy and proceed with the Factory Reset of your iPhone.
Open the Settings app on your iPhone.
Tap General.
Scroll down and select Reset.
Tap Erase All Content and Settings.
Enter your passcode or Apple ID password, when prompted.
Wait.
After your iPhone has wiped itself clean, you will need to go through the setup process again. If you want, you will have the option to restore the recently-created iCloud backup.
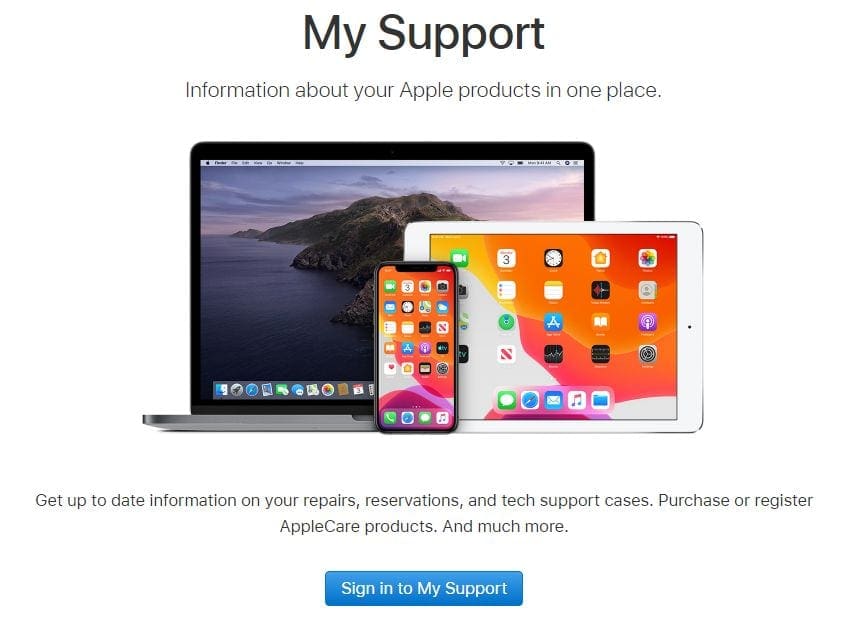
Reach out to Apple
Sometimes, you can exhaust all of the potential workarounds or fixes and your iPhone just continues to have issues. This likely has something to do with the hardware itself, and can’t be solved just by restarting or resetting your iPhone.
In the event that you have exhausted all other avenues, you will need to reach out to Apple’s Support Team. Chances are they will confirm whether you have performed a series of steps to try and get your iPhone back in working order. Be sure to share all of the steps that you took if asked, as it will help the Support Team to determine what route to take.
Andrew Myrick is a freelance writer based on the East Coast of the US. He enjoys everything to do with technology, including tablets, smartphones, and everything in between. Perhaps his favorite past-time is having a never-ending supply of different keyboards and gaming handhelds that end up collecting more dust than the consoles that are being emulated.
and was so clearly organized and well written with simple and demystified steps that i was able to follow the troubleshooting process without crying — appreciate your patience and clarity and expertise greatly — MAD SKILLS!!
I updated to IOS15 last night and this morning I had lost my internet connections over data and over my WiFi. My WiFi works but no internet connection. I have done all of the resets,soft and hard stops, clean ups and wipes but still no connection. How do I fix this HUGE IOS 15 bug on my IPhone XS?
Great article, thanks!
Another thing to check:
Some VPN apps can prevent the iPhone accessing the internet after detecting one or more issues.
Uninstalling and reinstalling the VPN app can clear this protective denial of service mechanism. There may well be other ways to kick it back into life, but this (brutal) reset technique worked for me recently.
One word of warning about doing a full backup and erase of an iPhone. If the phone still does not connect to wifi after this reset process, it will not be able to upload the backed up apps – except maybe a few via the mobile network. You will then be in a worse situation than you were in the first place.


this worked! YAY!!
and was so clearly organized and well written with simple and demystified steps that i was able to follow the troubleshooting process without crying — appreciate your patience and clarity and expertise greatly — MAD SKILLS!!
many thx & kindest regards
ldb
I can’t get YouTube to work even though I’m on Wi-Fi.
I have iphone 7, uptodate with ver 15.5 op sys.
Iphone would not connect to internet through wifi. Didn’t matter which wifi i was connected to.
So far, turning off vpn seems to be the answer. Not sure if vpn supplier or apple software are cause of issue.
Thanks for your help.
This helped so much. I tried every method and was starting to get really nervous. This helped me out so much. I beg iphone fix this bug.
Deleting the VPN app immediately fixed the problem that had been with me since updating to IOS 15.4.1 thank you!!
I updated to IOS15 last night and this morning I had lost my internet connections over data and over my WiFi. My WiFi works but no internet connection. I have done all of the resets,soft and hard stops, clean ups and wipes but still no connection. How do I fix this HUGE IOS 15 bug on my IPhone XS?
VPN was the problem – got rid of it and all OK
Mannnnnnnn. My phone was acting crazy all day. you help me out and i really appreciate you and your article. THANKKKKKK YOUUUUUUU.
None of these are fixes. They temporarily cure the symptoms but do not fix the underlying problem. Why waste people’s time writing garbage like this?
Great article, thanks!
Another thing to check:
Some VPN apps can prevent the iPhone accessing the internet after detecting one or more issues.
Uninstalling and reinstalling the VPN app can clear this protective denial of service mechanism. There may well be other ways to kick it back into life, but this (brutal) reset technique worked for me recently.
One word of warning about doing a full backup and erase of an iPhone. If the phone still does not connect to wifi after this reset process, it will not be able to upload the backed up apps – except maybe a few via the mobile network. You will then be in a worse situation than you were in the first place.
Worked by disabling the wi-fi assist. Thanks so much!
After hours of frustration, I discovered my VPN app was the culprit. I deleted the app and the phone connected to the internet perfectly.
Router reboot worked, thanks!
this was so helpful thankyou!!!!!
Try to turn off private address inside connected wifi details. It helps me with my iPhone 14.1