As our smartphones and internet continues to get faster in most areas, so does the size of files that we interact with. It’s why some websites take forever to load, as the days of basic ads in the sidebar are long gone. Instead, we have videos, GIFs, and other pictures that are displayed whenever a website is loaded.
The same sentiment spreads to pictures and screenshots that you take on your iPhone or iPad. Using the PNG format is extremely common for devices, as it retains the most amount of data. Unfortunately, this also means that you can end up having a lot of space taken up on your phone just from screenshots.
How To Convert PNG to JPG on iPhone and iPad Instantly
There are ways to work around this, as you’ll want to convert PNG to JPG on iPhone and iPad. JPG files aren’t as detailed as PNG images, especially once you start making edits. However, the file sizes are usually much smaller than PNG files. If you need to convert PNG to JPG on iPhone, there’s a really easy way to do so with your screenshots.
Take a screenshot on your iPhone or iPad.
Tap the screenshot preview in the bottom right corner.
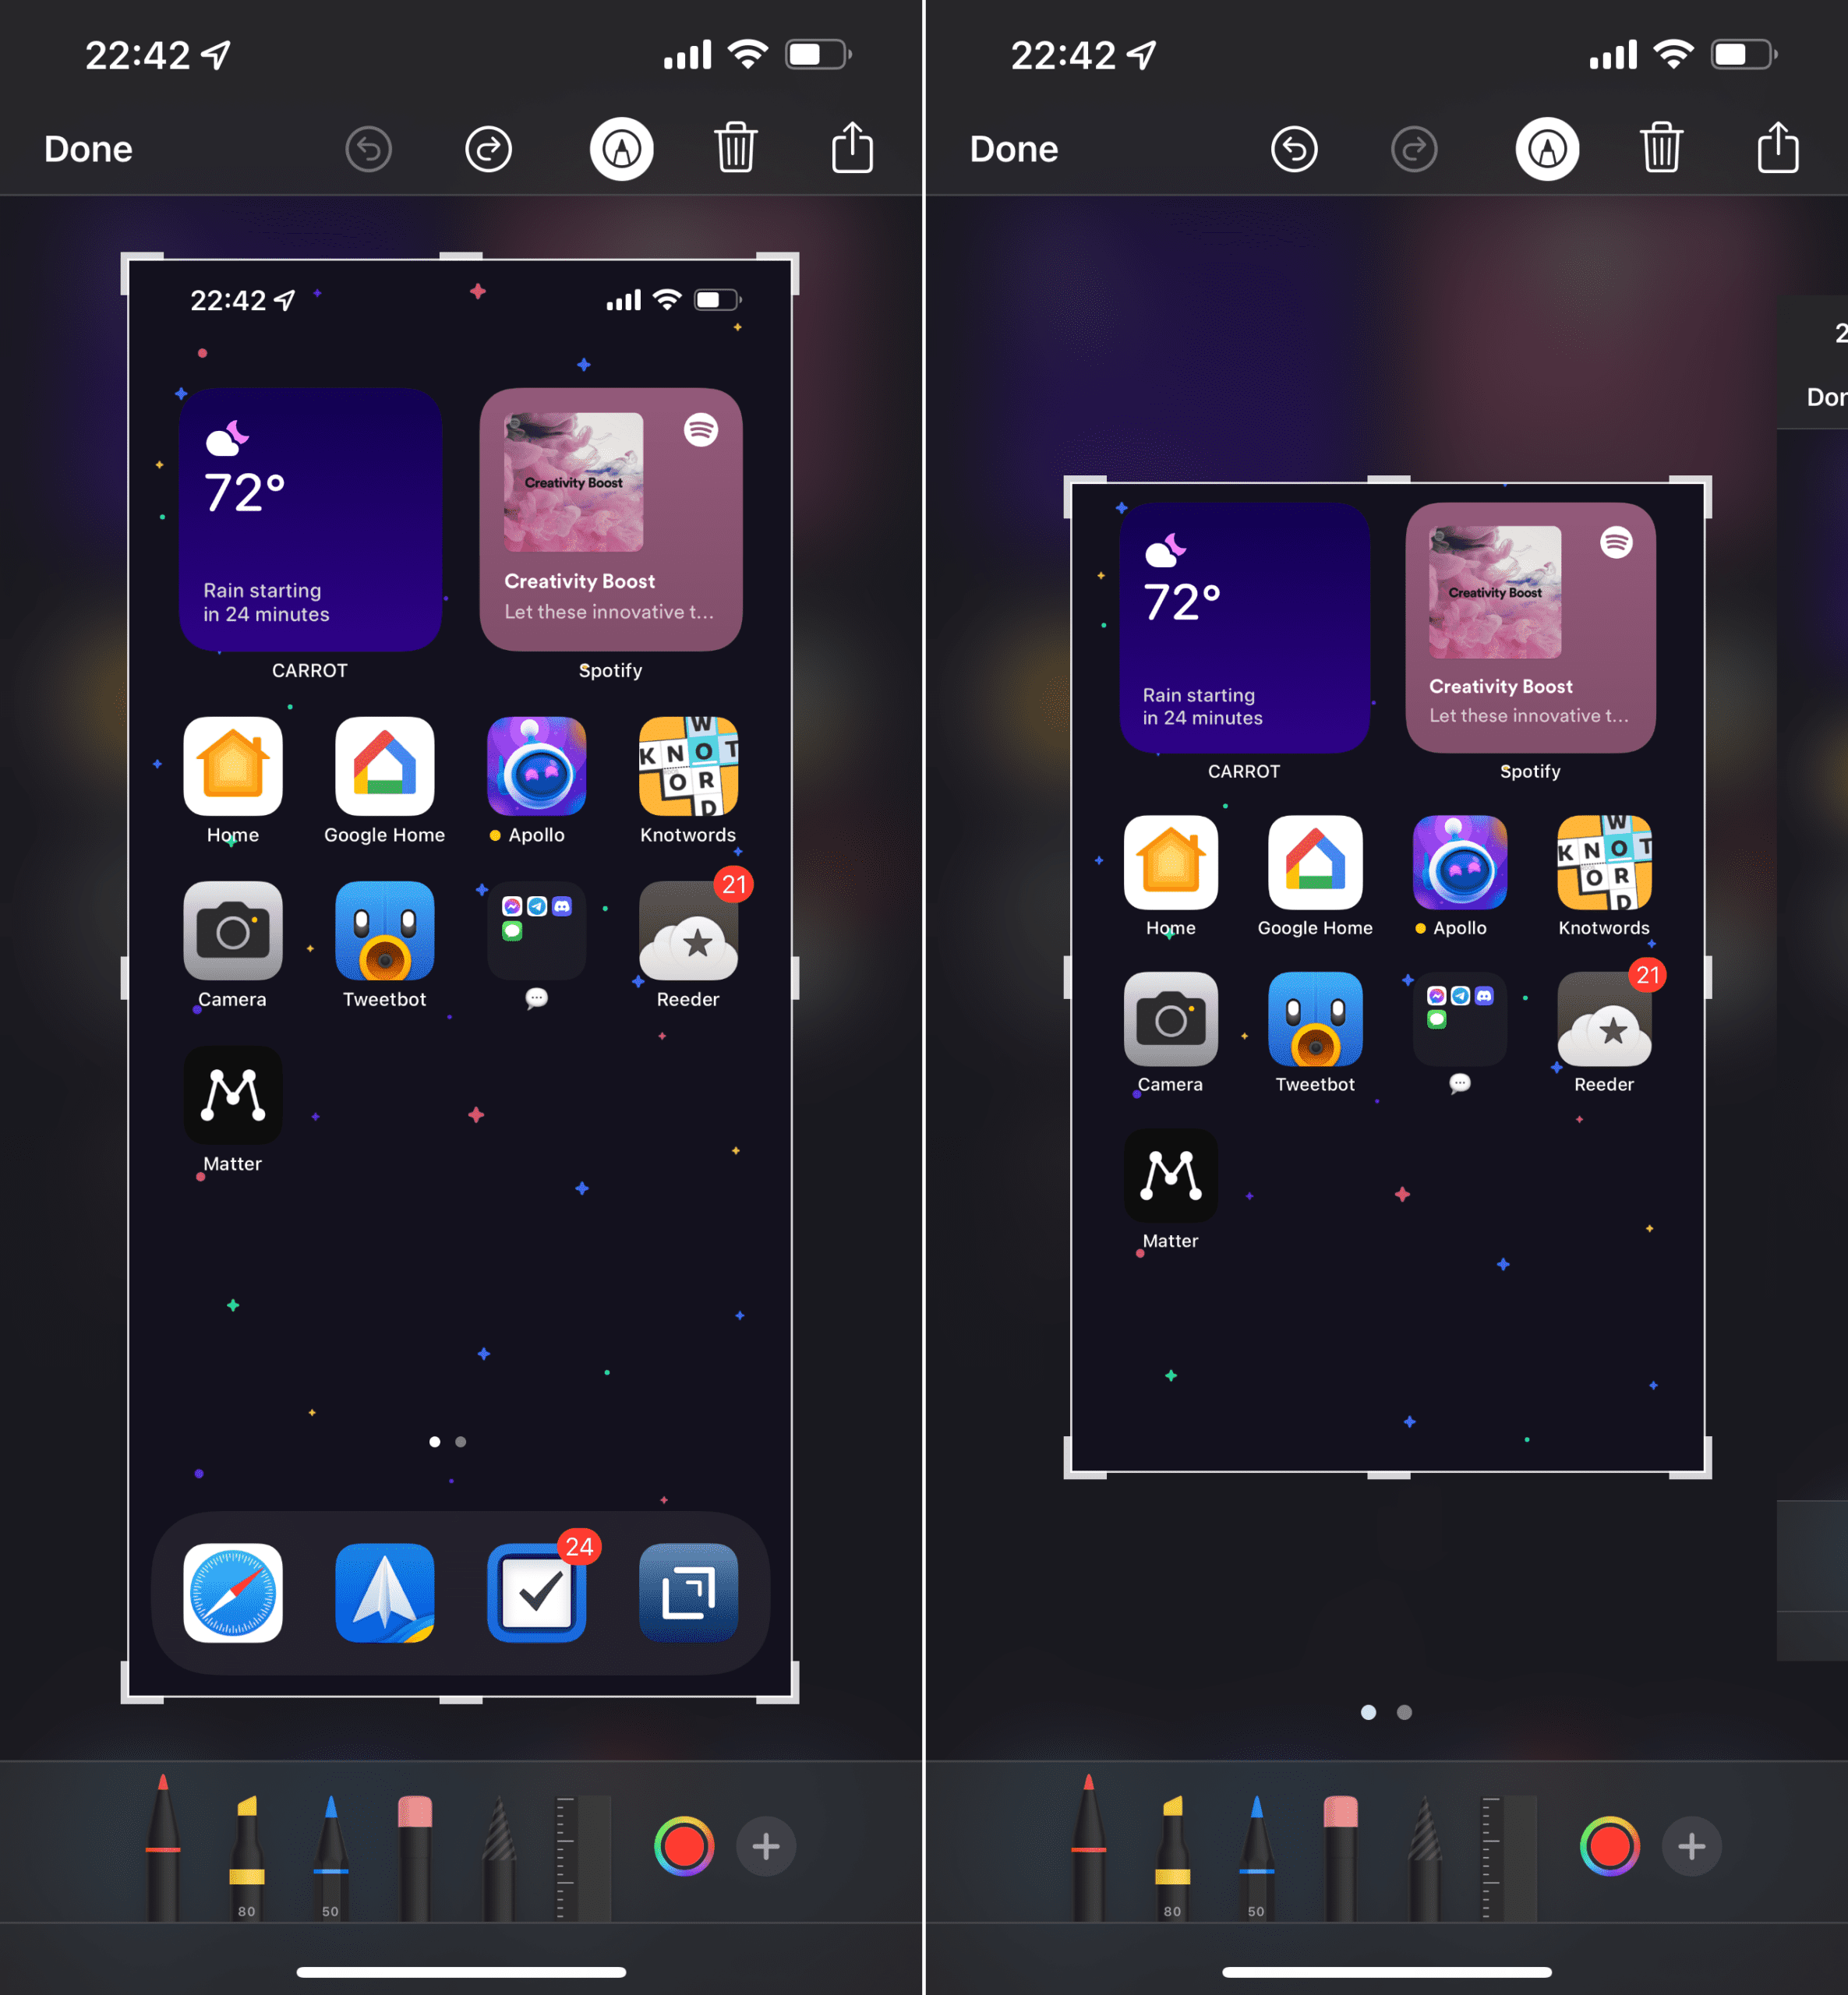
Drag the handle on any of the four corners or sides to crop the image.
Tap Done in the top right corner.
For one reason or another, as soon as you crop a screenshot on your iPhone or iPad, it’s instantly converted to JPG from PNG. But if you need to keep the full screenshot, there’s another method for those who need to convert PNG to JPG on iPhone and iPad.
How To Convert PNG to JPG on iPhone and iPad Using AirDrop
AirDrop is one of the best reasons to entrench yourself in the Apple ecosystem. Being able to instantly send files in between your devices is extremely convenient. It’s much faster than waiting for uploads to cloud storage services, and AirDrop is even faster than manually connecting your devices with a cable. Much like cropping a screenshot, you can instantly convert PNG to JPG on iPhone using AirDrop.
Take a screenshot on your iPhone or iPad.
Tap the screenshot preview in the bottom right corner.
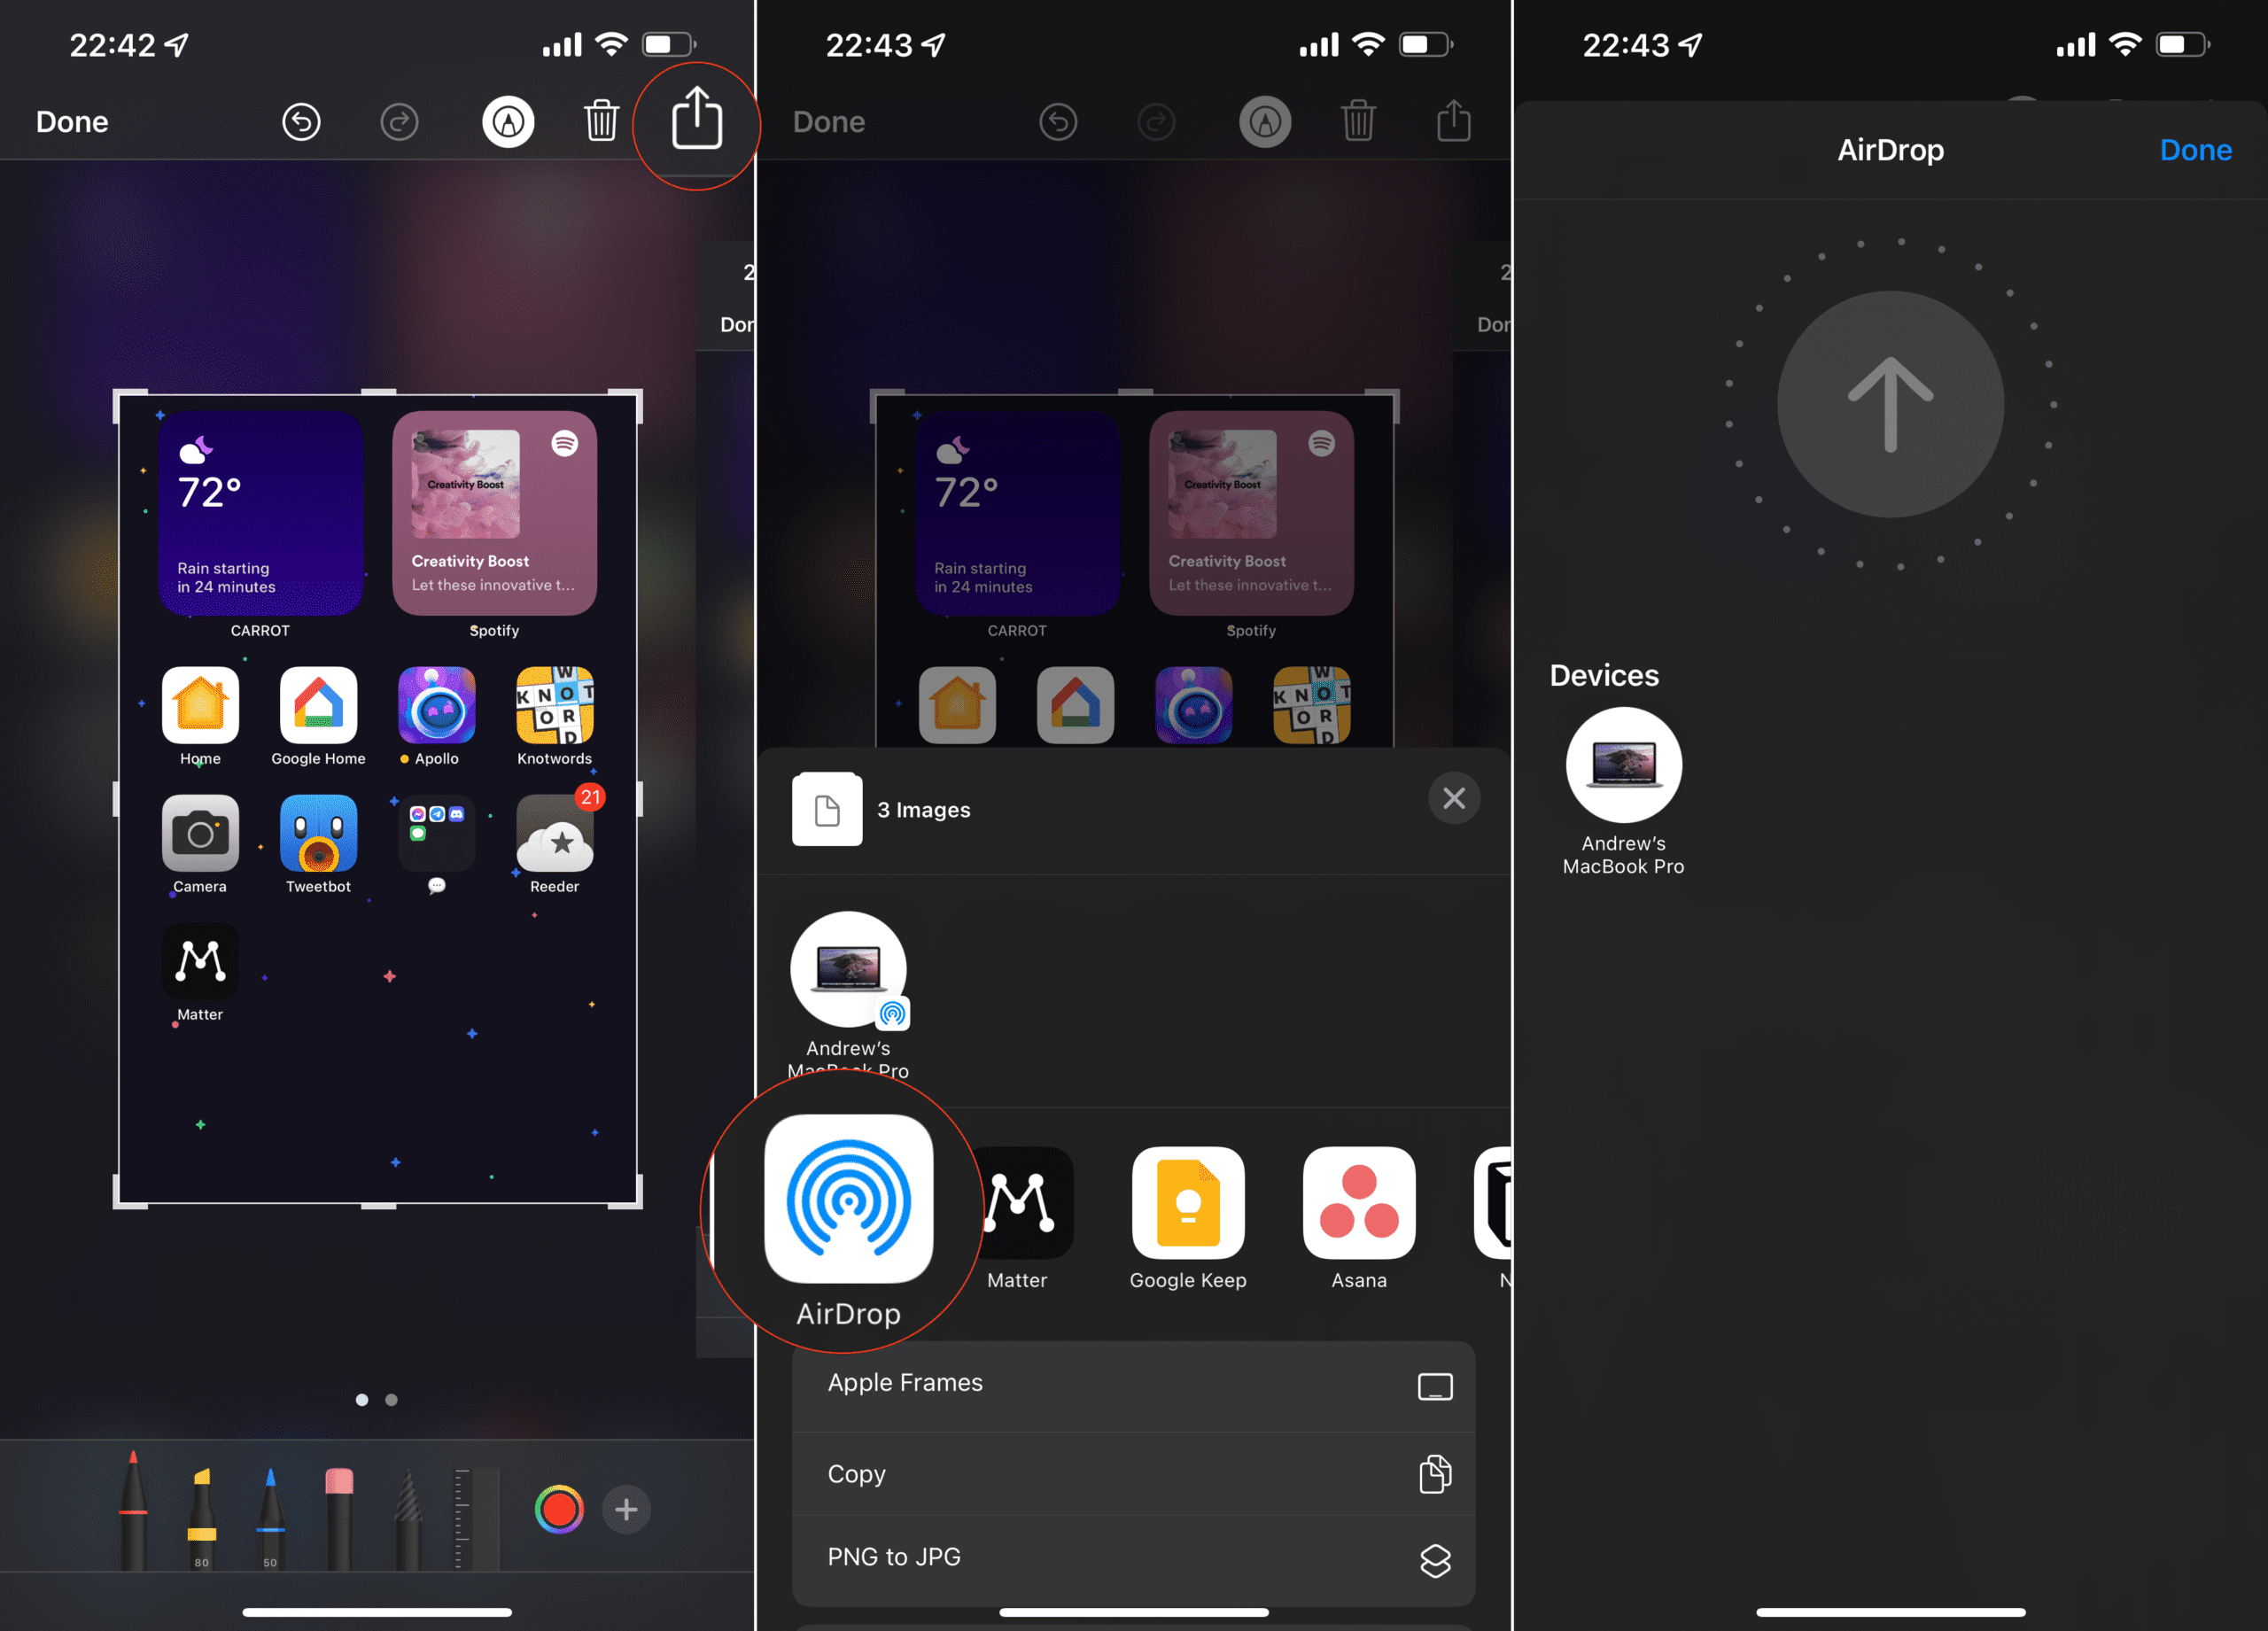
In the top right corner, tap the Share button.
Select AirDrop from the list of options.
This can usually be found in the second row of the Share Sheet.
Select the device that you want to AirDrop the screenshot to.
Wait for the transfer to complete.
Using AirDrop usually only takes a few moments, even when sending several images at the same time. Once the transfer is complete, you can open them on your secondary device and enjoy the smaller file sizes.
How To Convert PNG to JPG on iPhone and iPad With Shortcuts
Arguably one of the greatest additions to iOS, iPadOS, and now the Mac over the past few years has been the Shortcuts app. This adds a level of automation that we never thought would be possible on our mobile devices. And Apple is committed to Shortcuts to the point that the app will eventually replace AppleScript on the Mac.
With Shortcuts, there’s not much that you can’t accomplish, provided you know what you’re trying to do. This includes being able to convert PNG to JPG with just a few taps, after creating the Shortcut.
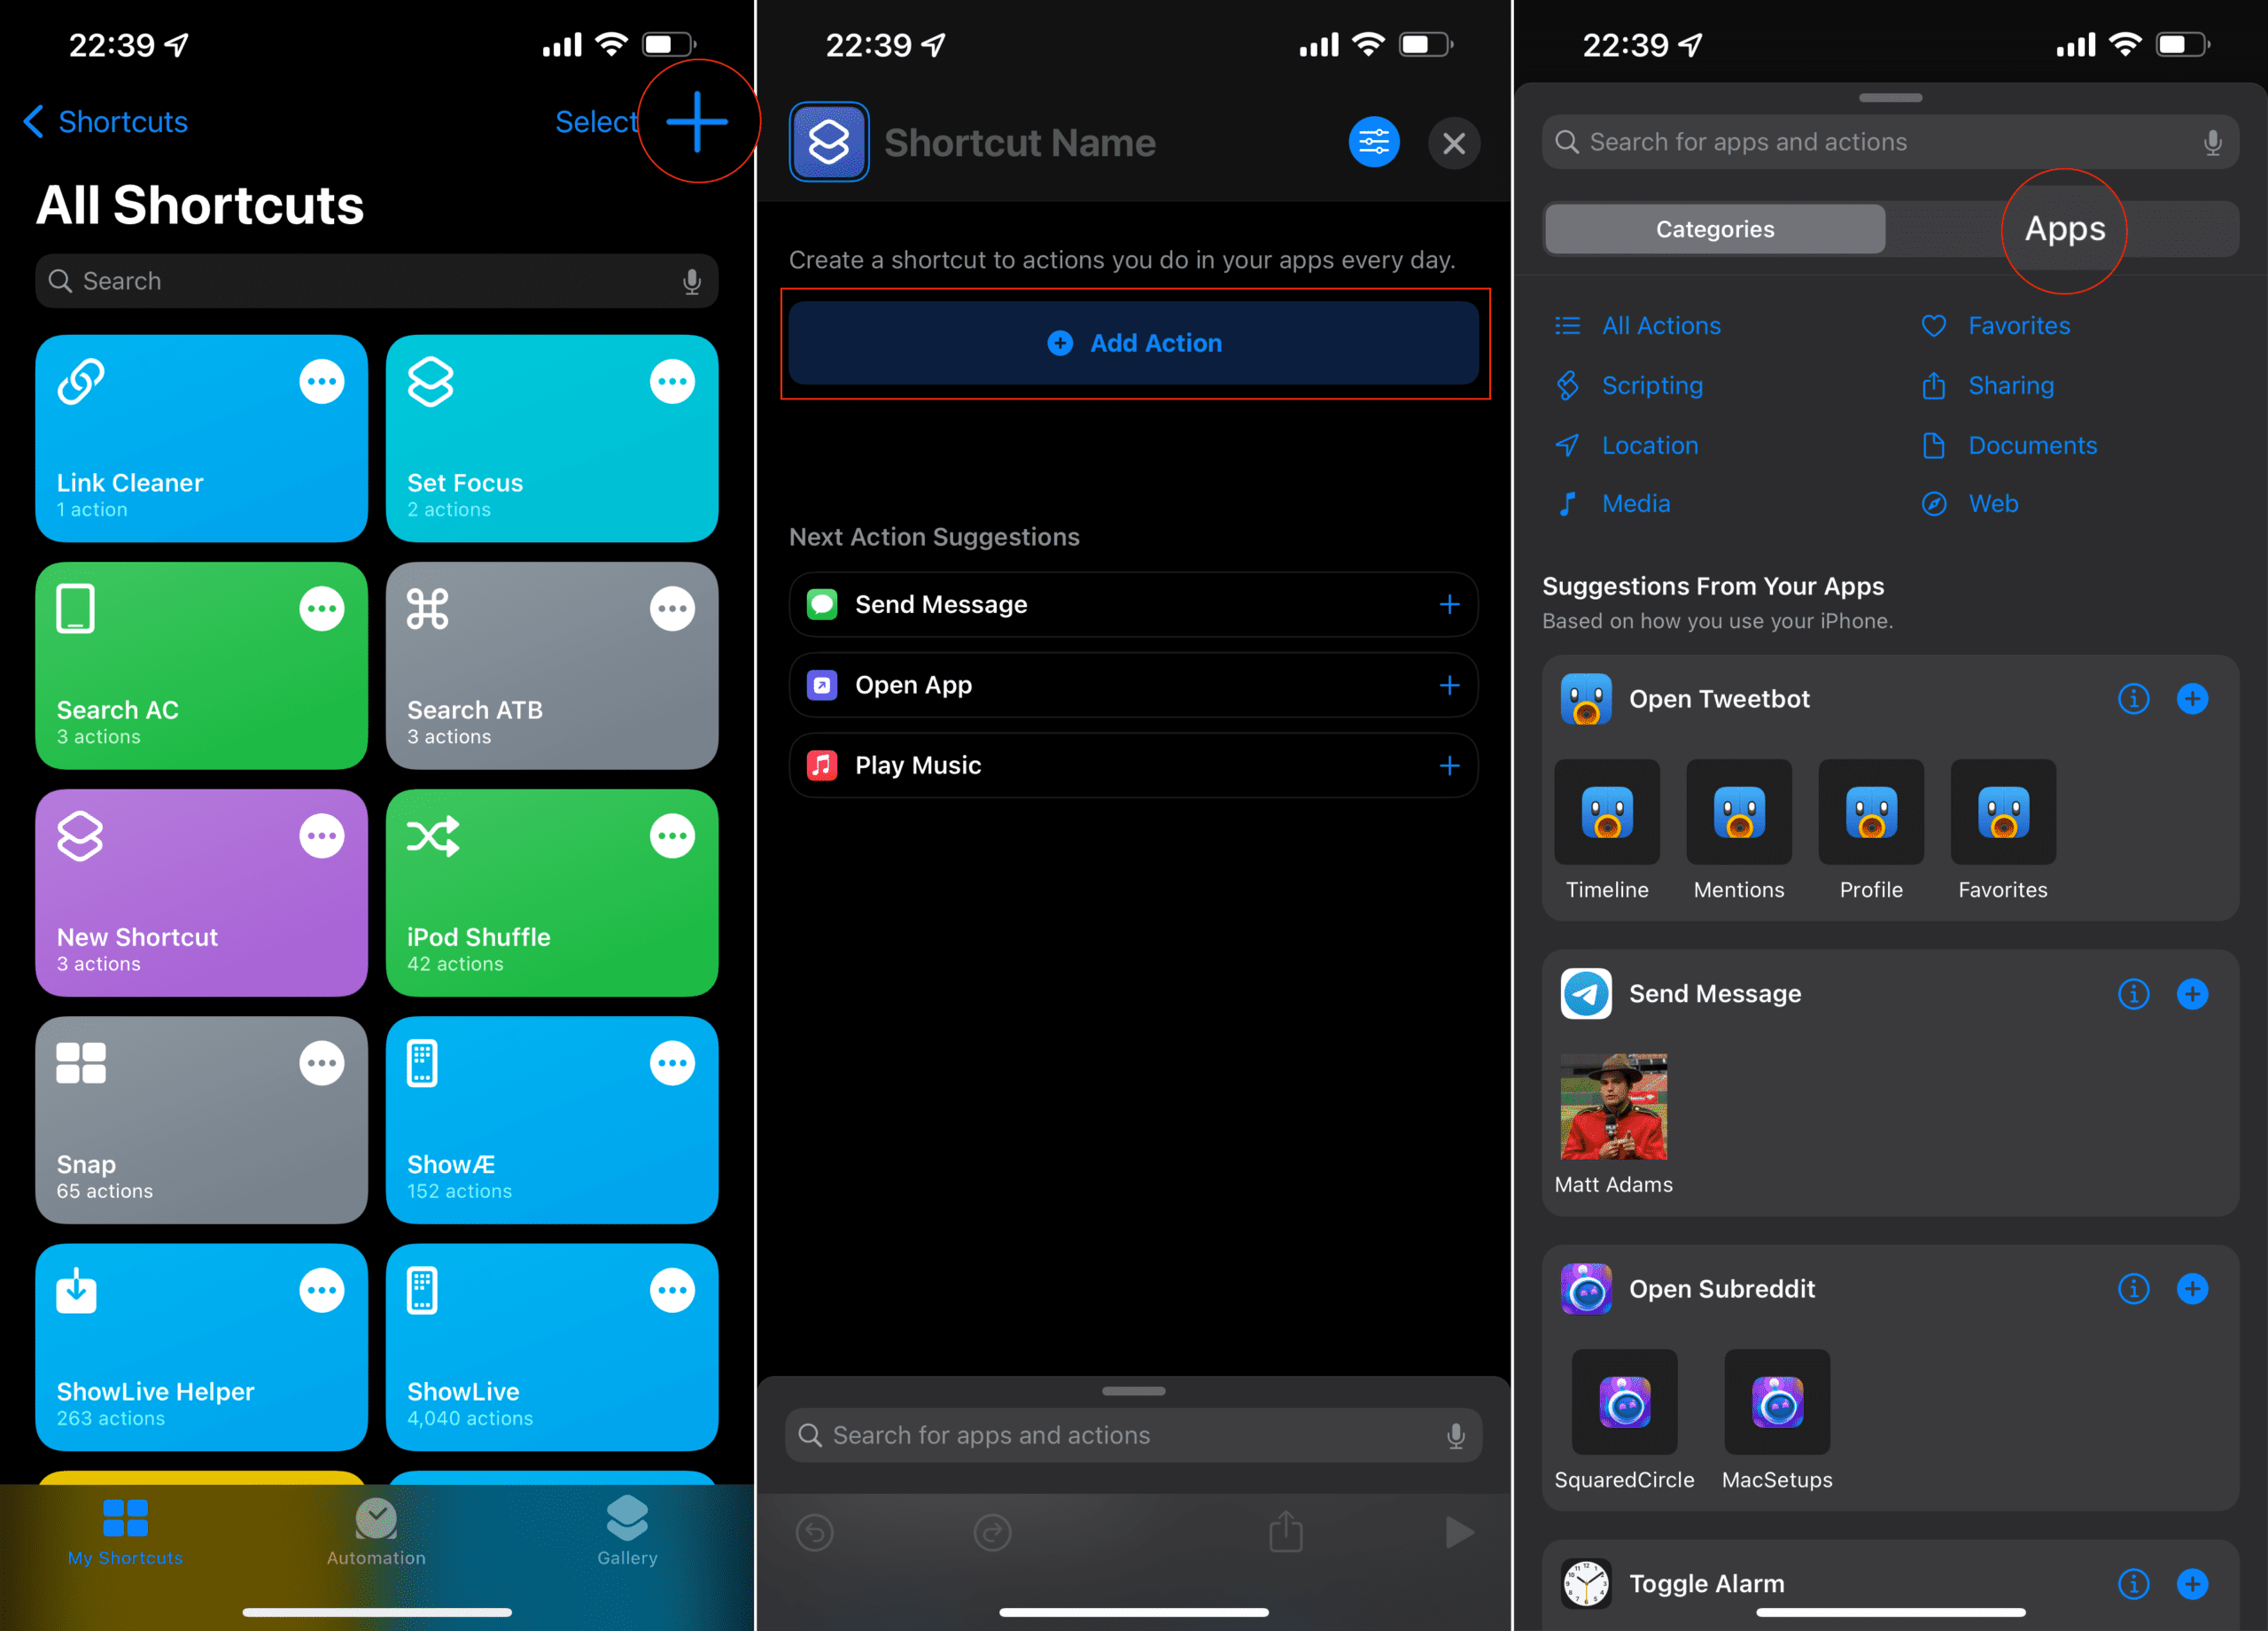
Open the Shortcuts app on your iPhone or iPad.
Tap the + button in the top right corner.
From the New Shortcut page, tap the Add Action button.
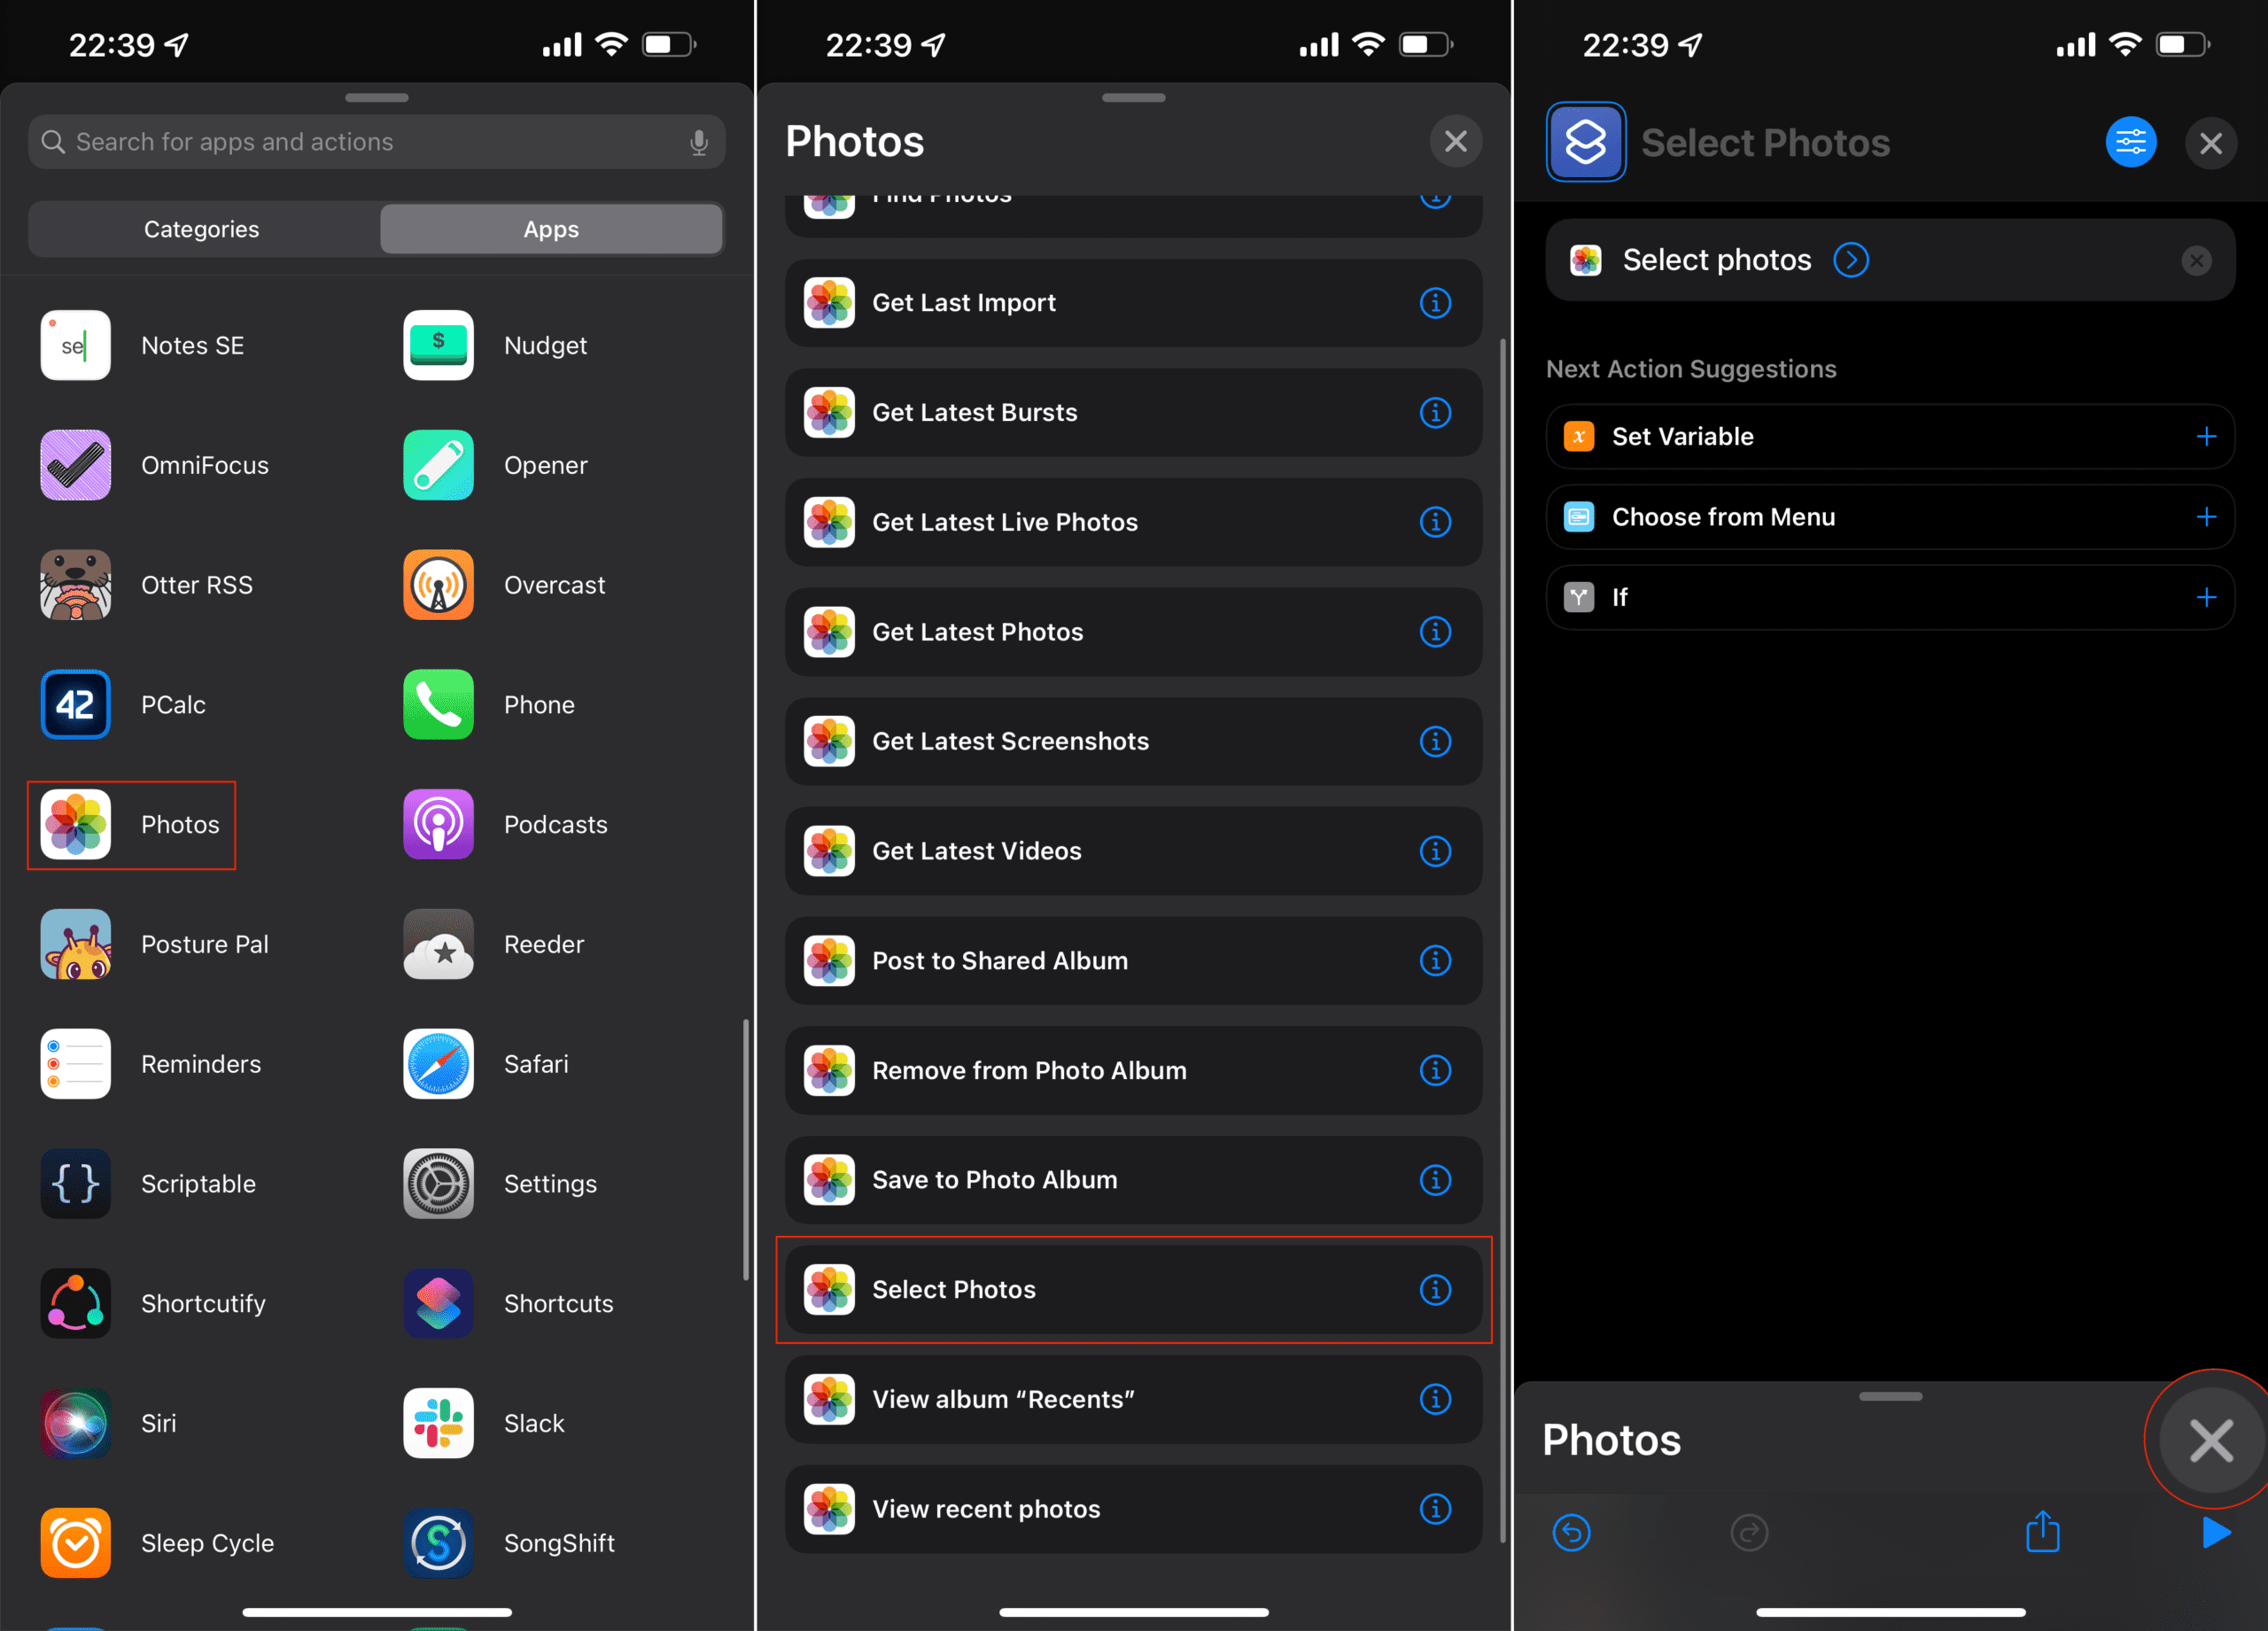
Select the Apps icon.
Scroll down and tap Photos.
From the list of options, tap Select Photos.
Under the newly-added action, tap the down arrow next to Show More.
Tap the toggle next to Select Multiple.
Tap the + button beneath the Select Photos Action.
When the list of Photos actions appears, tap the X in the top right corner.
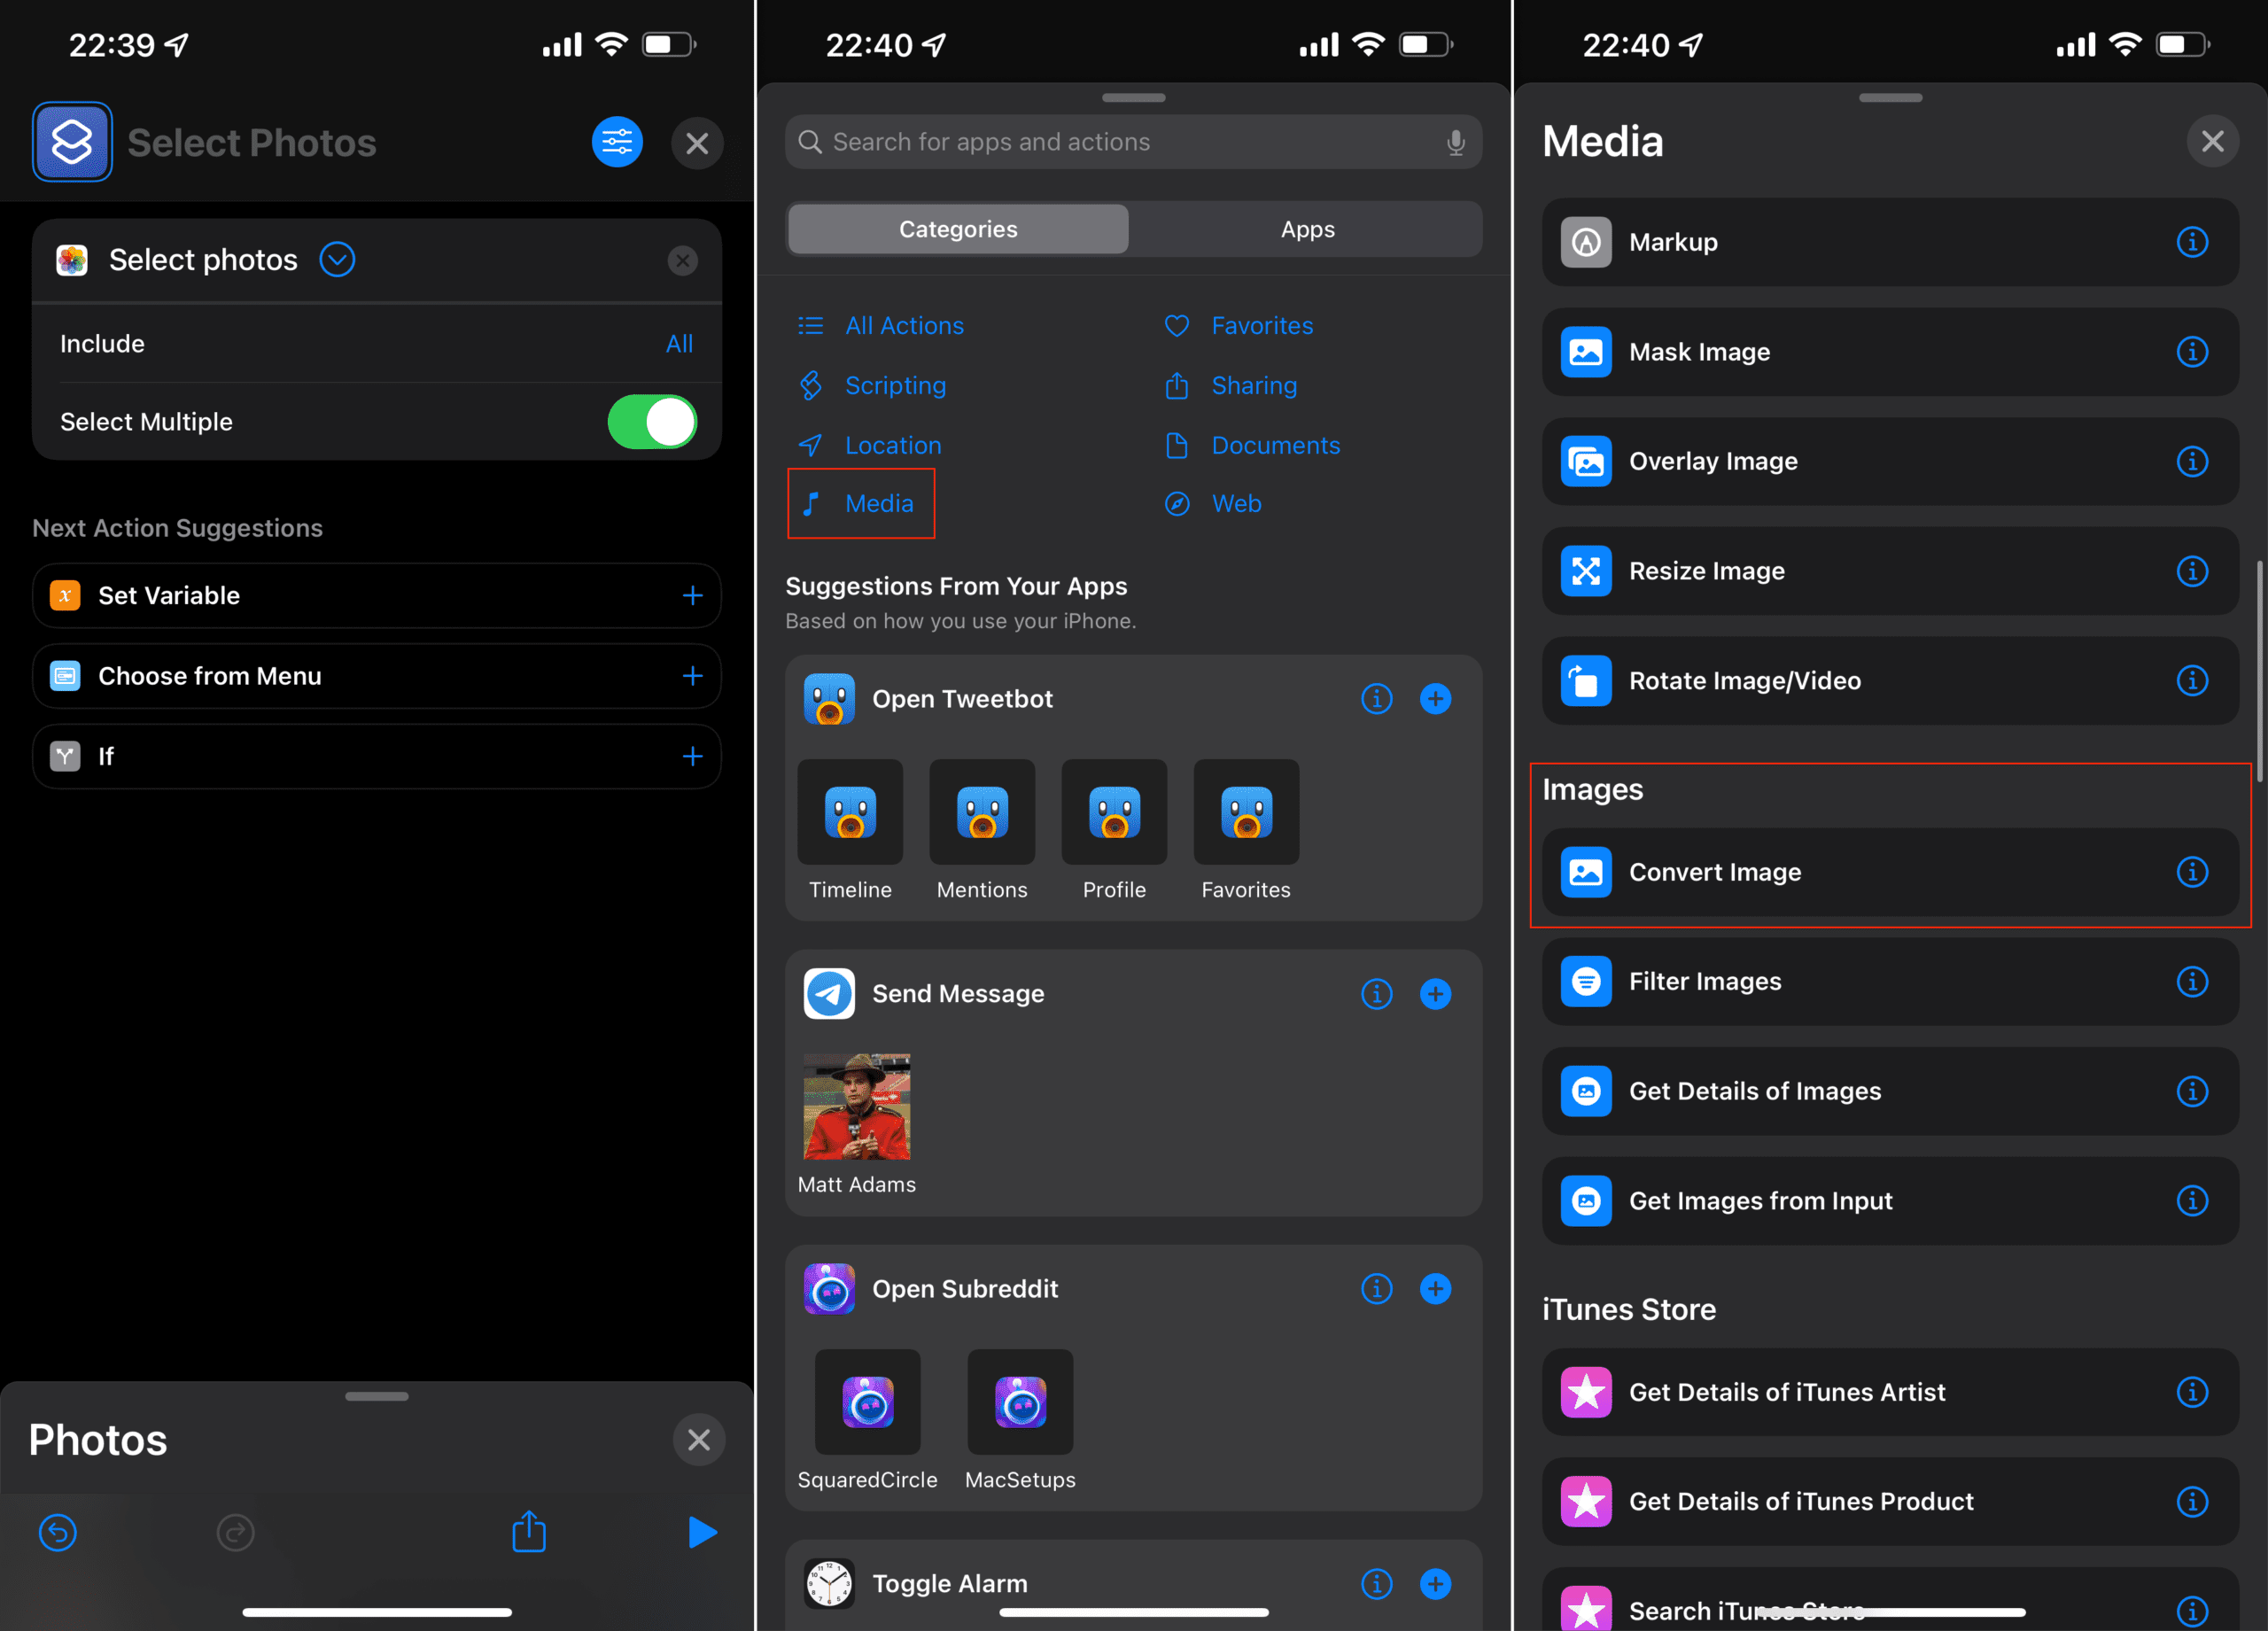
From the list of suggestions, tap Media.
Scroll down until you see the Images section, and tap Convert Image.
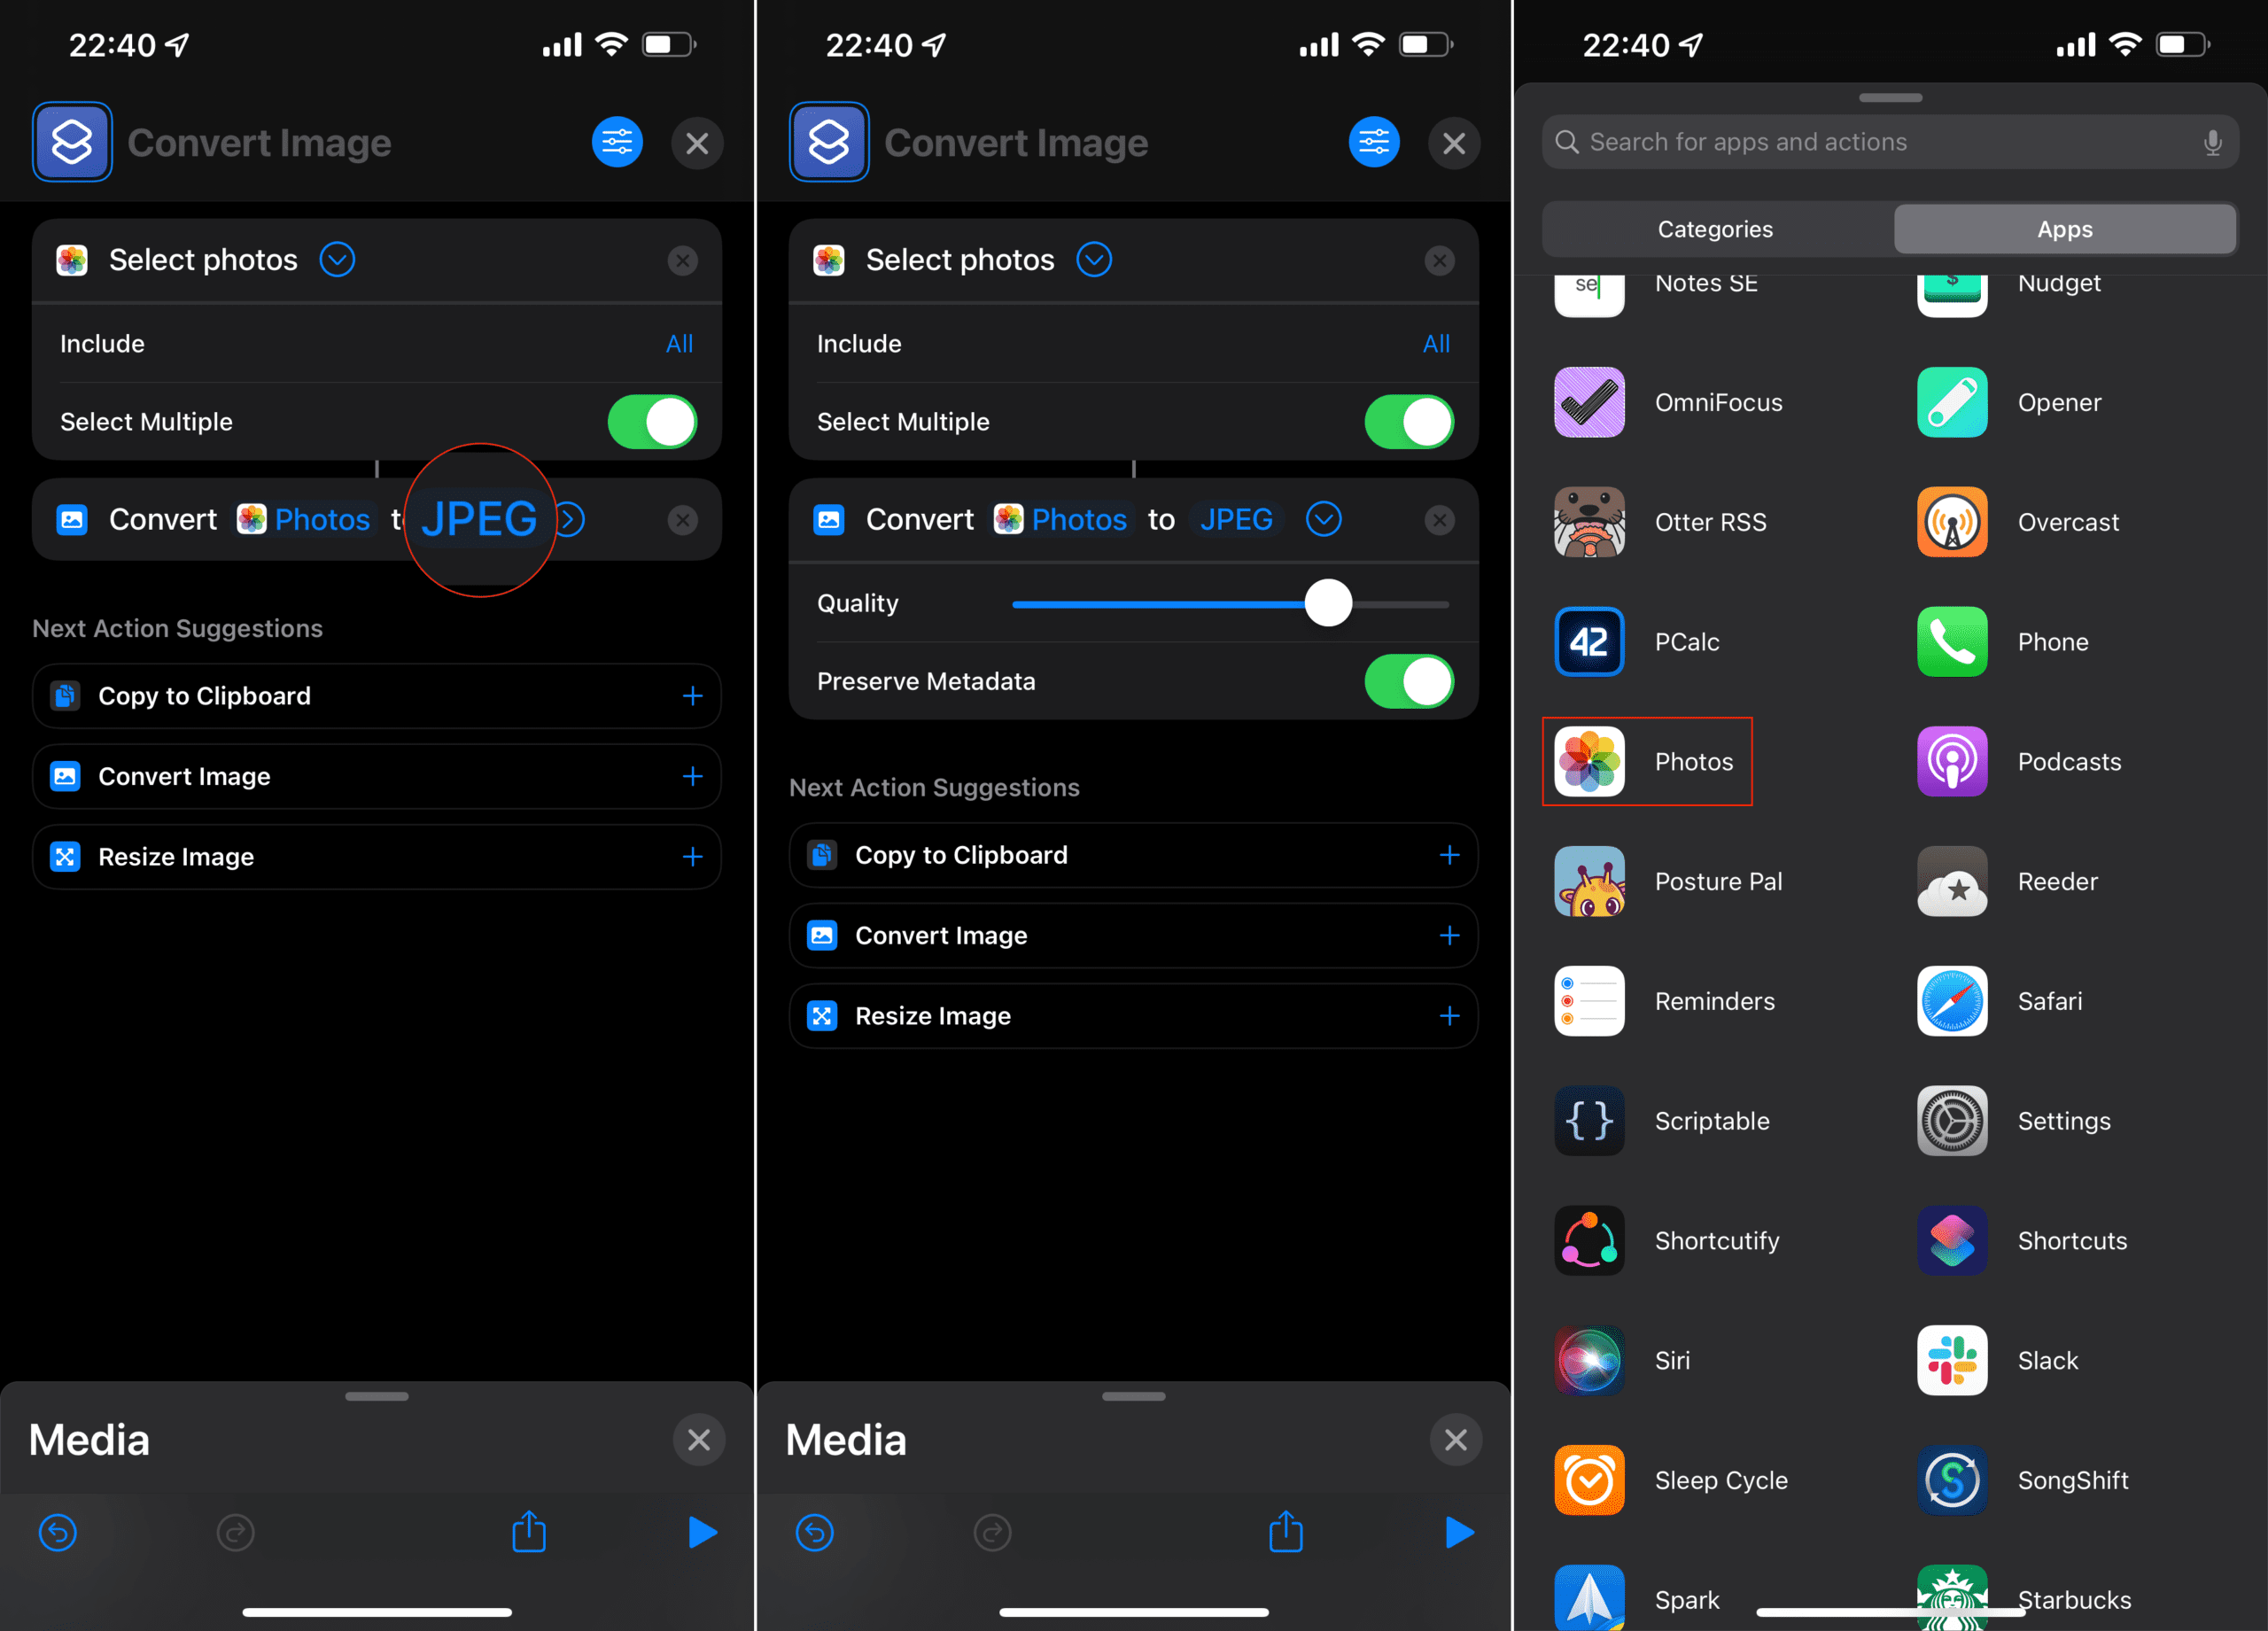
By default, this conversion action defaults to JPEG. If not, tap the file format and select JPEG from the list of options.
Tap the + button beneath the Media Action.
When the list of Media actions appears, tap the X in the top right corner.
Tap the Apps icon again.
Scroll down and select Photos from the list of apps.
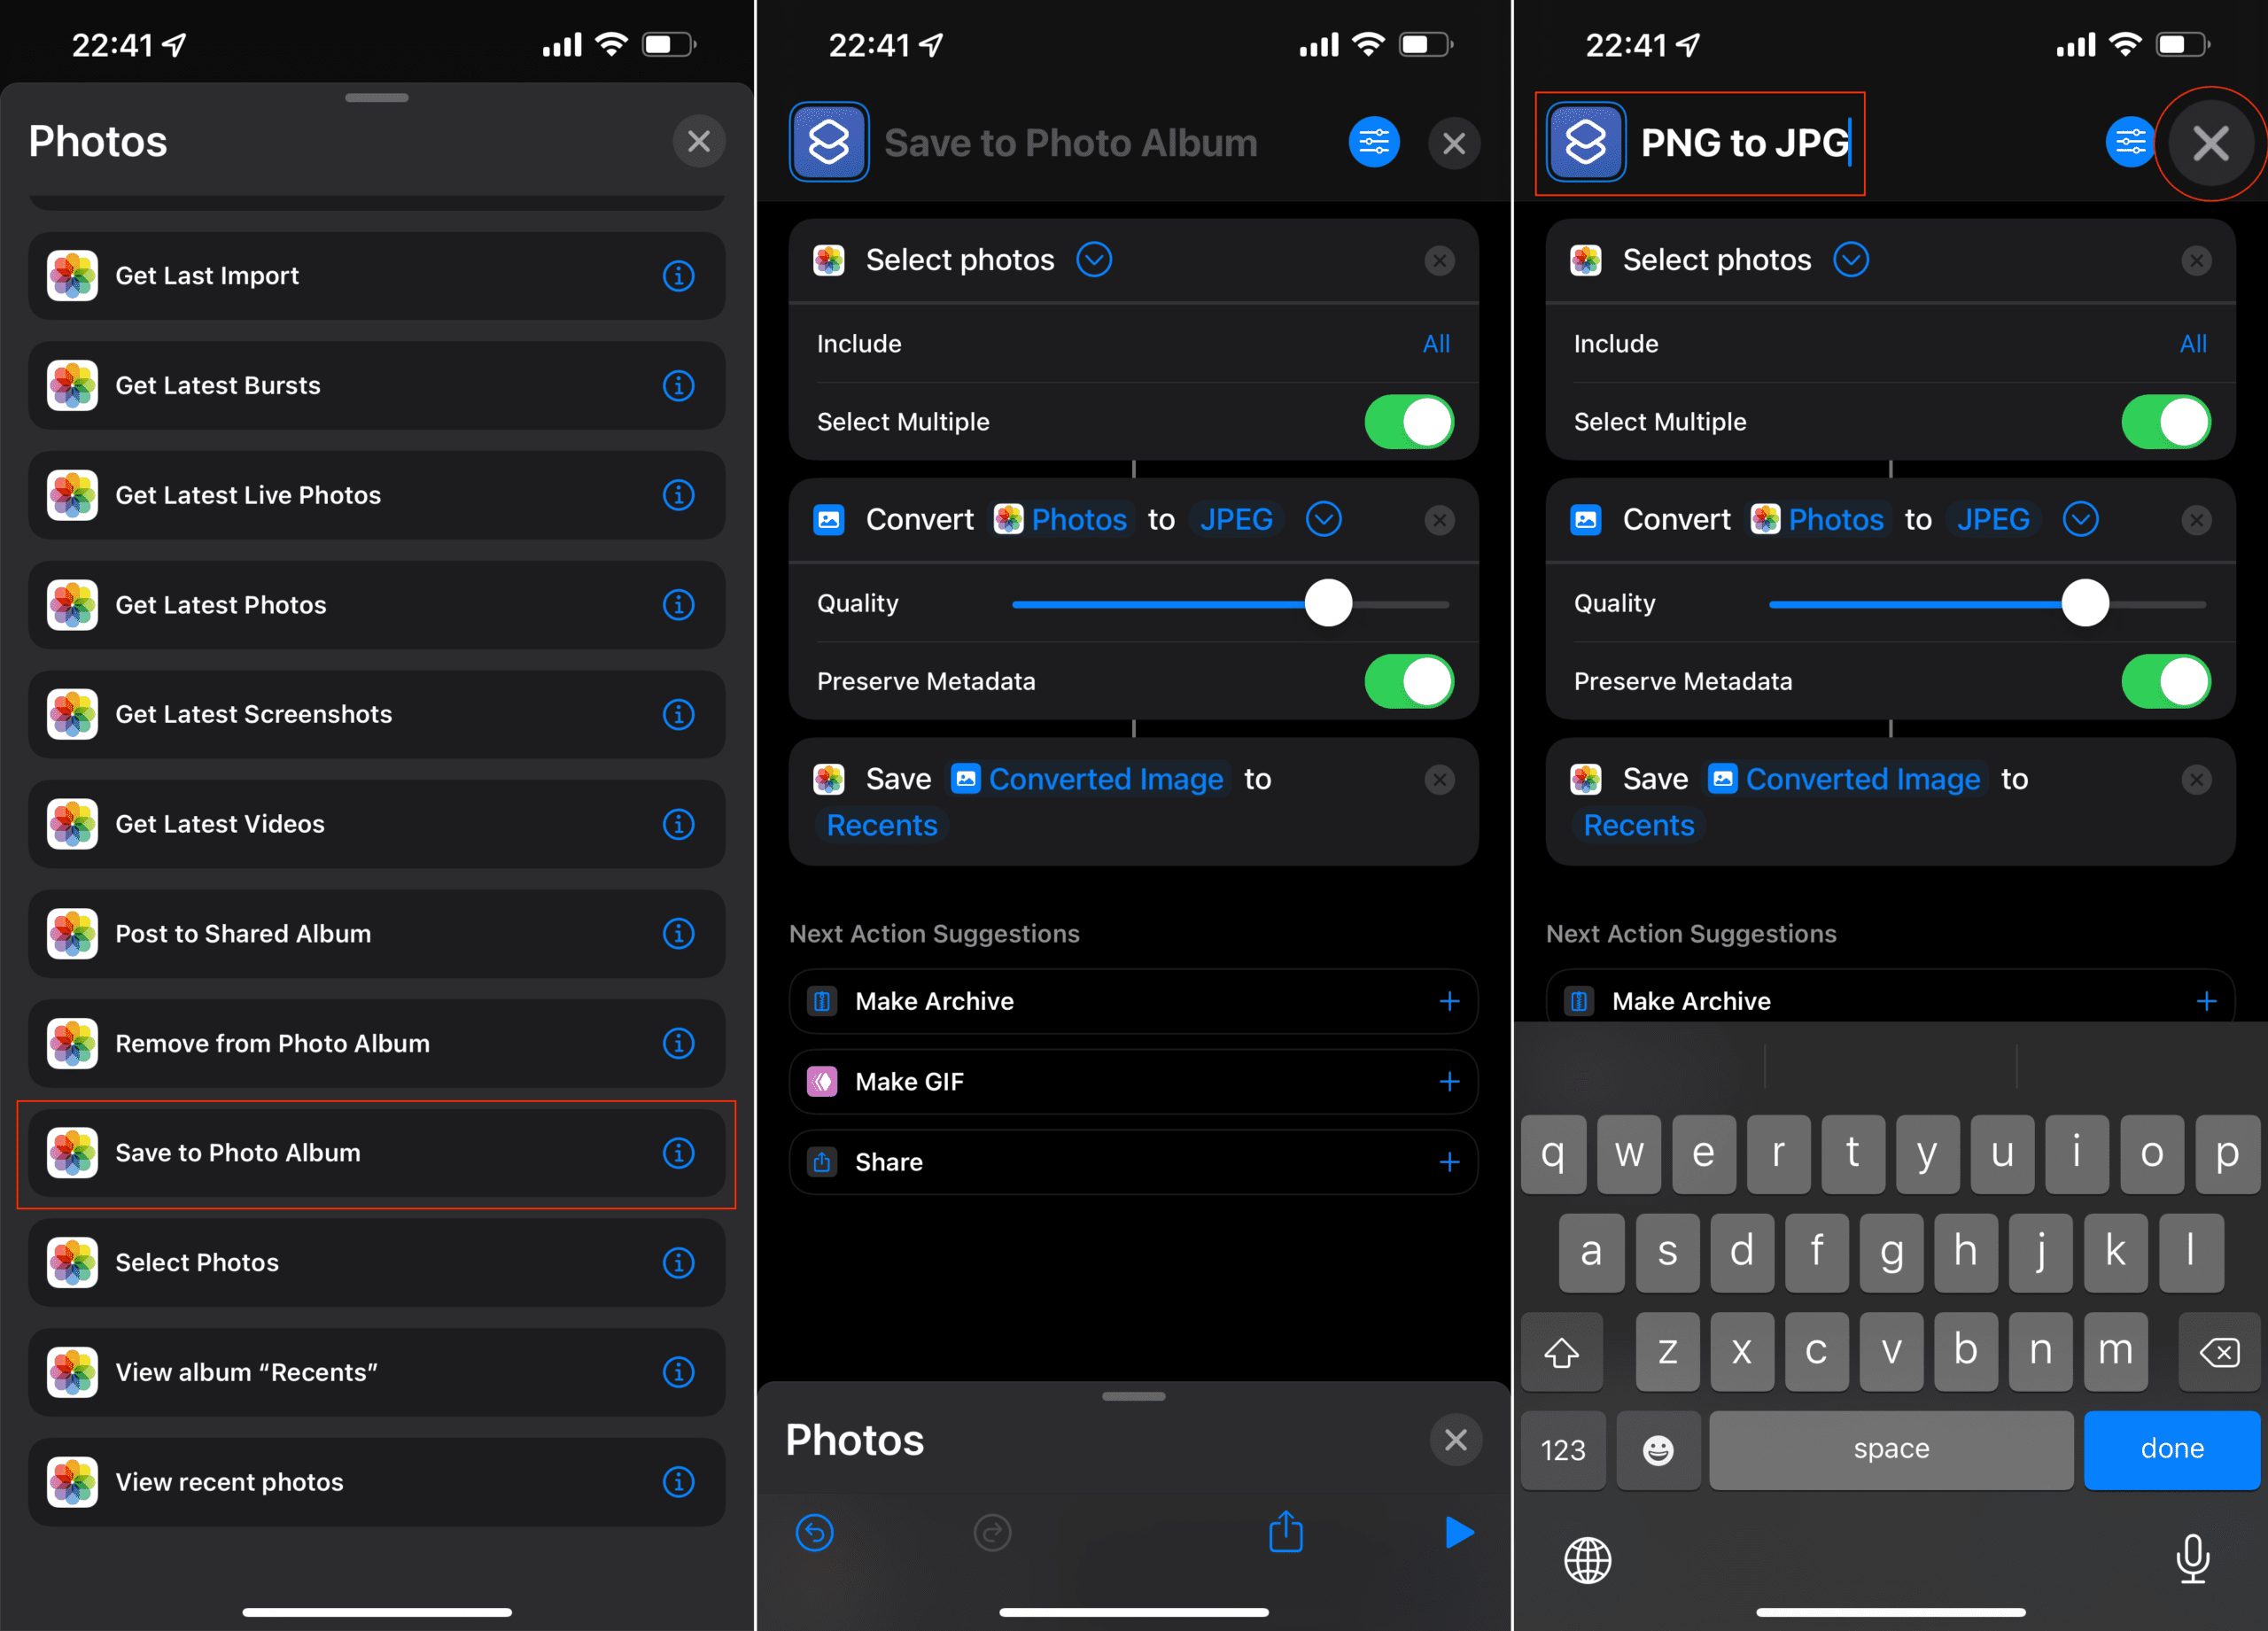
Scroll down again and tap Save to Photo Album.
Tap Next in the top right corner.
Enter a name and select an icon for the Shortcut.
Tap the Done button in the top right corner.
Now that the Shortcut has been created, you can activate it directly from the Shortcuts app. Once tapped, the photo picker UI will appear, allowing you to select any images that you want to convert to JPG. After you have finished selecting the necessary images, tap the Done button in the top right corner.
The Shortcut will work its magic, and once it’s complete, all of the images will be converted. You can also add this to your Share Sheet, so that it appears when you take a screenshot and convert it without manually running the Shortcut.
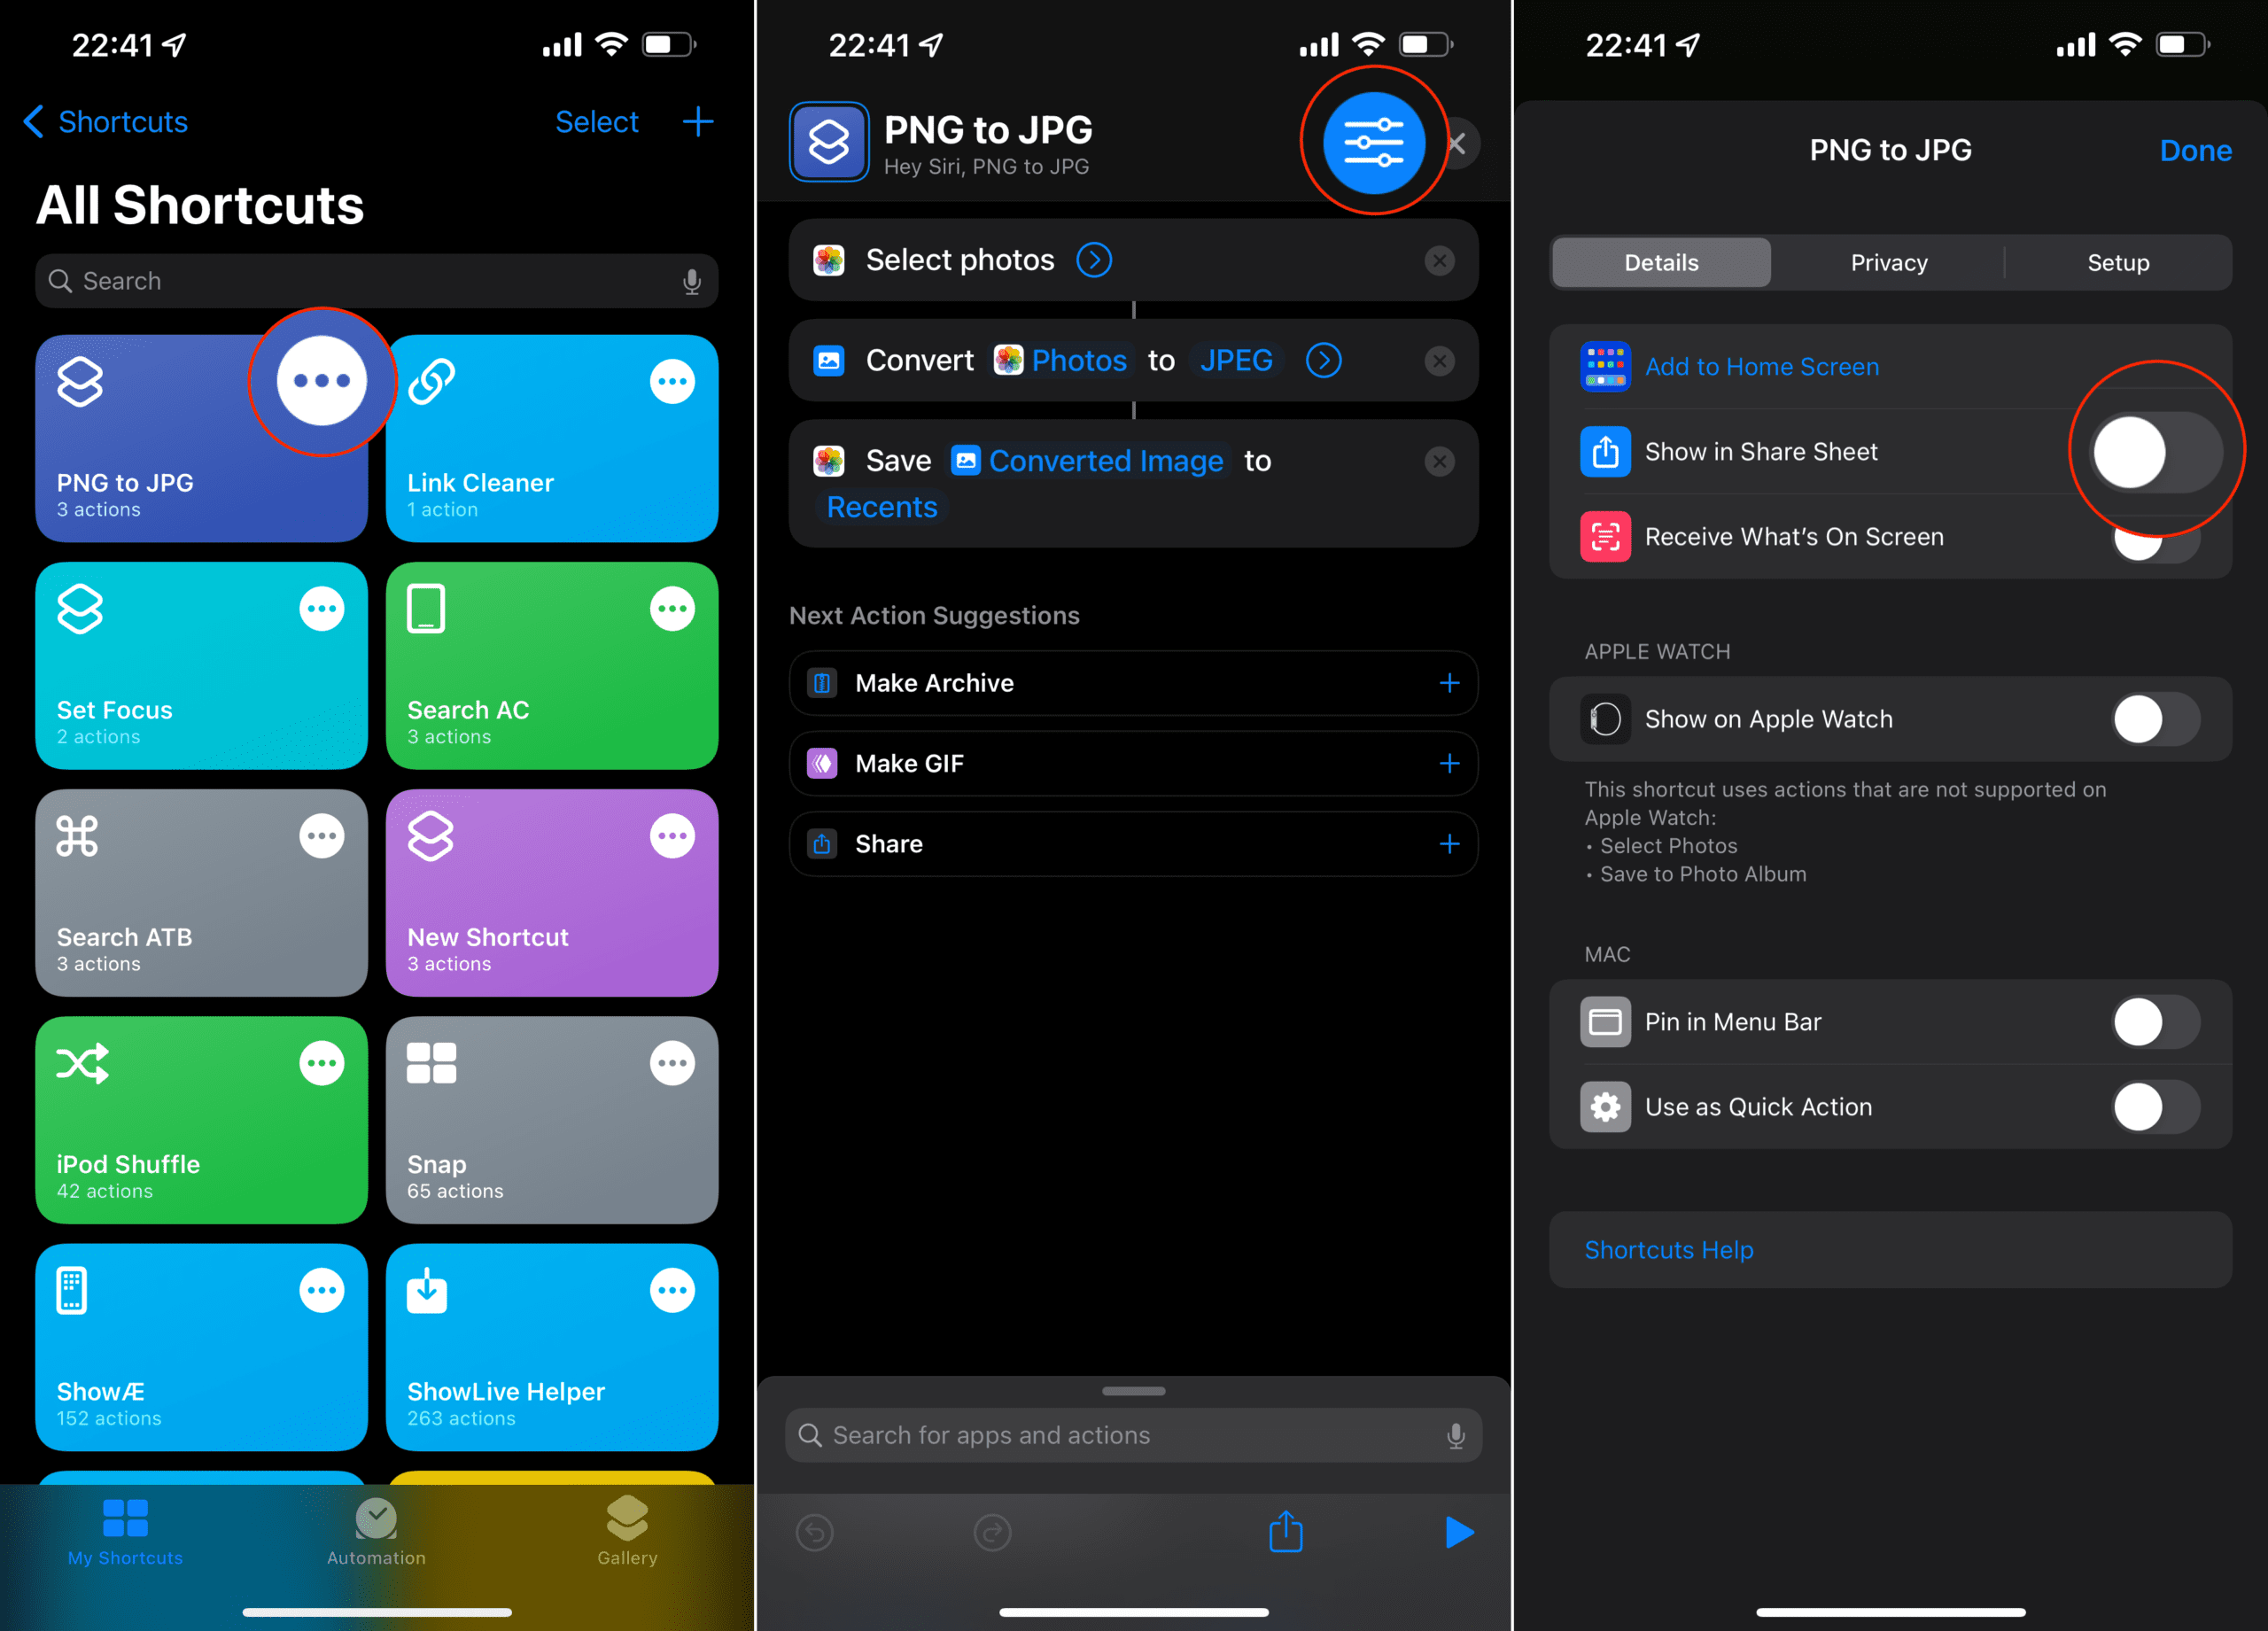
Open the Shortcuts app on your iPhone or iPad.
Locate the Shortcut that you just created.
Tap the three horizontal dots in the top right corner of the Shortcut button.
In the top right corner, tap the Settings icon (next to the X).
Tap the toggle next to Show in Share Sheet.
Tap Done.
With the option to have the Shortcut to convert PNG to JPG on iPhone appear in the Share Sheet, that’s it! Now, you can run the Shortcut whenever you save a PNG image or take a screenshot.
Take a screenshot on your iPhone or iPad.
Tap the screenshot preview in the bottom right corner.
In the top right corner, tap the Share button.
Swipe up to reveal the entire Share Sheet.
Select the Shortcut that you just created.
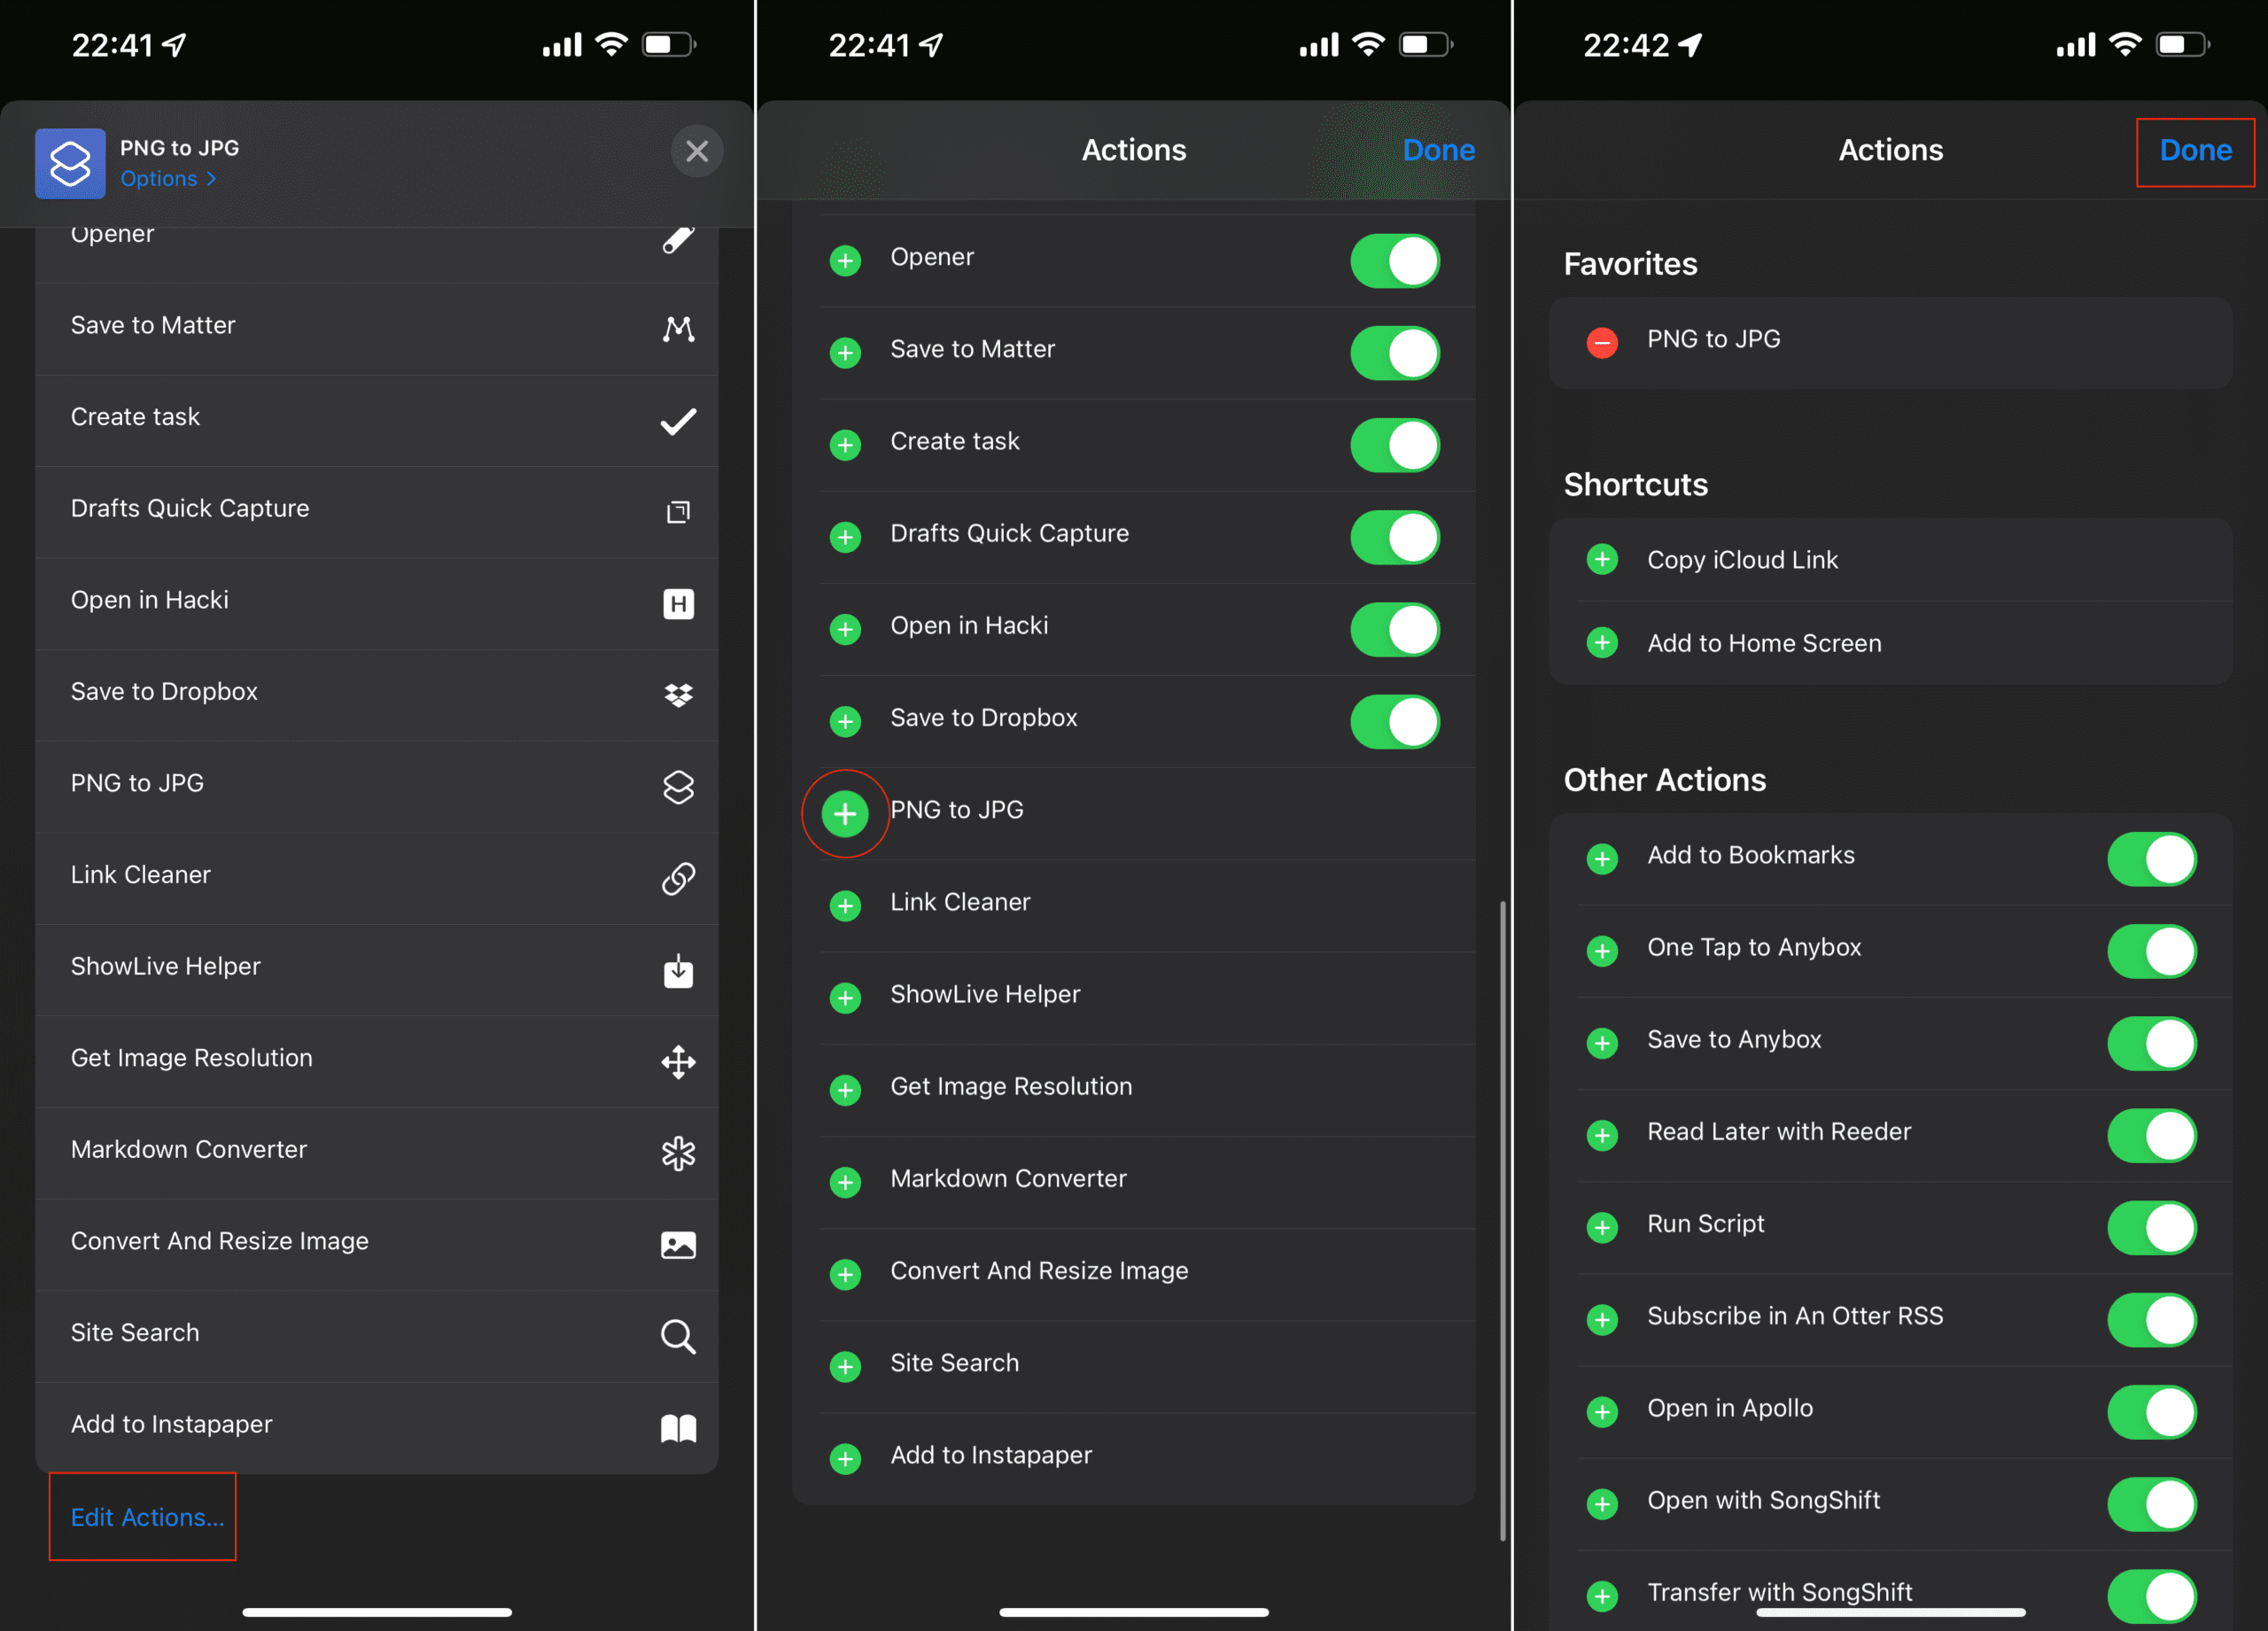
In the event that you don’t see the Shortcut, or you want to move it further up the list, you can do so.
Swipe up to reveal the entire Share Sheet.
If needed, scroll to the bottom of the list of actions.
Tap Edit Actions…
Tap toggle next to the name of your screenshot.
Then, tap the + button next to the name to add it to your Favorites.
Use the three vertical lines to drag and drop the Shortcut and place it where you want on the list.
That’s it! You no longer need to worry about uploading potentially private information to a third-party website. Now, you can convert PNG to JPG on iPhone and iPad without relying on other applications.
Andrew Myrick is a freelance writer based on the East Coast of the US. He enjoys everything to do with technology, including tablets, smartphones, and everything in between. Perhaps his favorite past-time is having a never-ending supply of different keyboards and gaming handhelds that end up collecting more dust than the consoles that are being emulated.
The first method is absolutely not true on iPad Pro (iPadOS 15.7). On the one hand, the preview is not on the bottom right but on the bottom left side, and on the other hand, it did not save jpeg, it still remains in png. The Apple ecosystem is one of the most complicated and unfriendly thing since the history of mobile OS’.


Nope – steps did not match my iPad!
The shortcut method worked great! Thank you very much.
Hi,
The first method is absolutely not true on iPad Pro (iPadOS 15.7). On the one hand, the preview is not on the bottom right but on the bottom left side, and on the other hand, it did not save jpeg, it still remains in png. The Apple ecosystem is one of the most complicated and unfriendly thing since the history of mobile OS’.