For whatever reason, Apple does not seem keen to let macOS play “nicely” with certain external monitors. Specifically, we’re talking about using 1440p monitors connected to your Mac, as the scaling options are limited. When going through the Display settings by default, the text may not look as crisp and the scaling is either comically large, or so small that you’ll feel the need to use a microscope just to see what’s on the screen. This has been an ongoing issue for quite a long time, despite the fact that 1440p doesn’t put as much strain on the processor or GPU compared to using a 4K or even 5K display. And that’s not even counting the associated cost with using an external monitor with a 4K or 5K resolution compared to what you can get from a 1440p monitor.
How to Enable 1440p Scaling on External Monitors on M1 and M2 Macs Using BetterDisplay
BetterDisplay is a relatively new app to become available for Mac owners, and the developer provides the following description:
It let’s you convert your displays to fully scalable screens, manage display configuration overrides, allows brightness and color control, provides XDR/HDR brightness upscaling (extra brightness beyond 100% for compatible displays with Apple Silicon Macs), full dimming to black, helps you create and manage virtual displays (dummies) for your Mac, create Picture in Picture windows of your displays and gives you a host of other features to manage your display’s settings easily from the menu bar.
And the best part about all of this is that BetterDisplay is completely free, so you’ll be able to get your 1440p monitor working just as you would want, without needing to pay even more money to do so. Here’s how you can set up and use BetterDisplay to enable 1440p scaling on external monitors on M1 and M2 Macs:
Download and install BetterDisplay on your Mac.
Once installed, open the app.
Click the BetterDisplay icon in the Menu Bar.
In the bottom right corner of the drop-down menu, click the Settings (gear) icon.
Click Displays in the top toolbar.
If needed, click the Set up Accessibility Permissions button.
Follow the on-screen steps to provide Accessibility Permissions to the BetterDisplay app.
Go back to the BetterDisplay Settings panel.
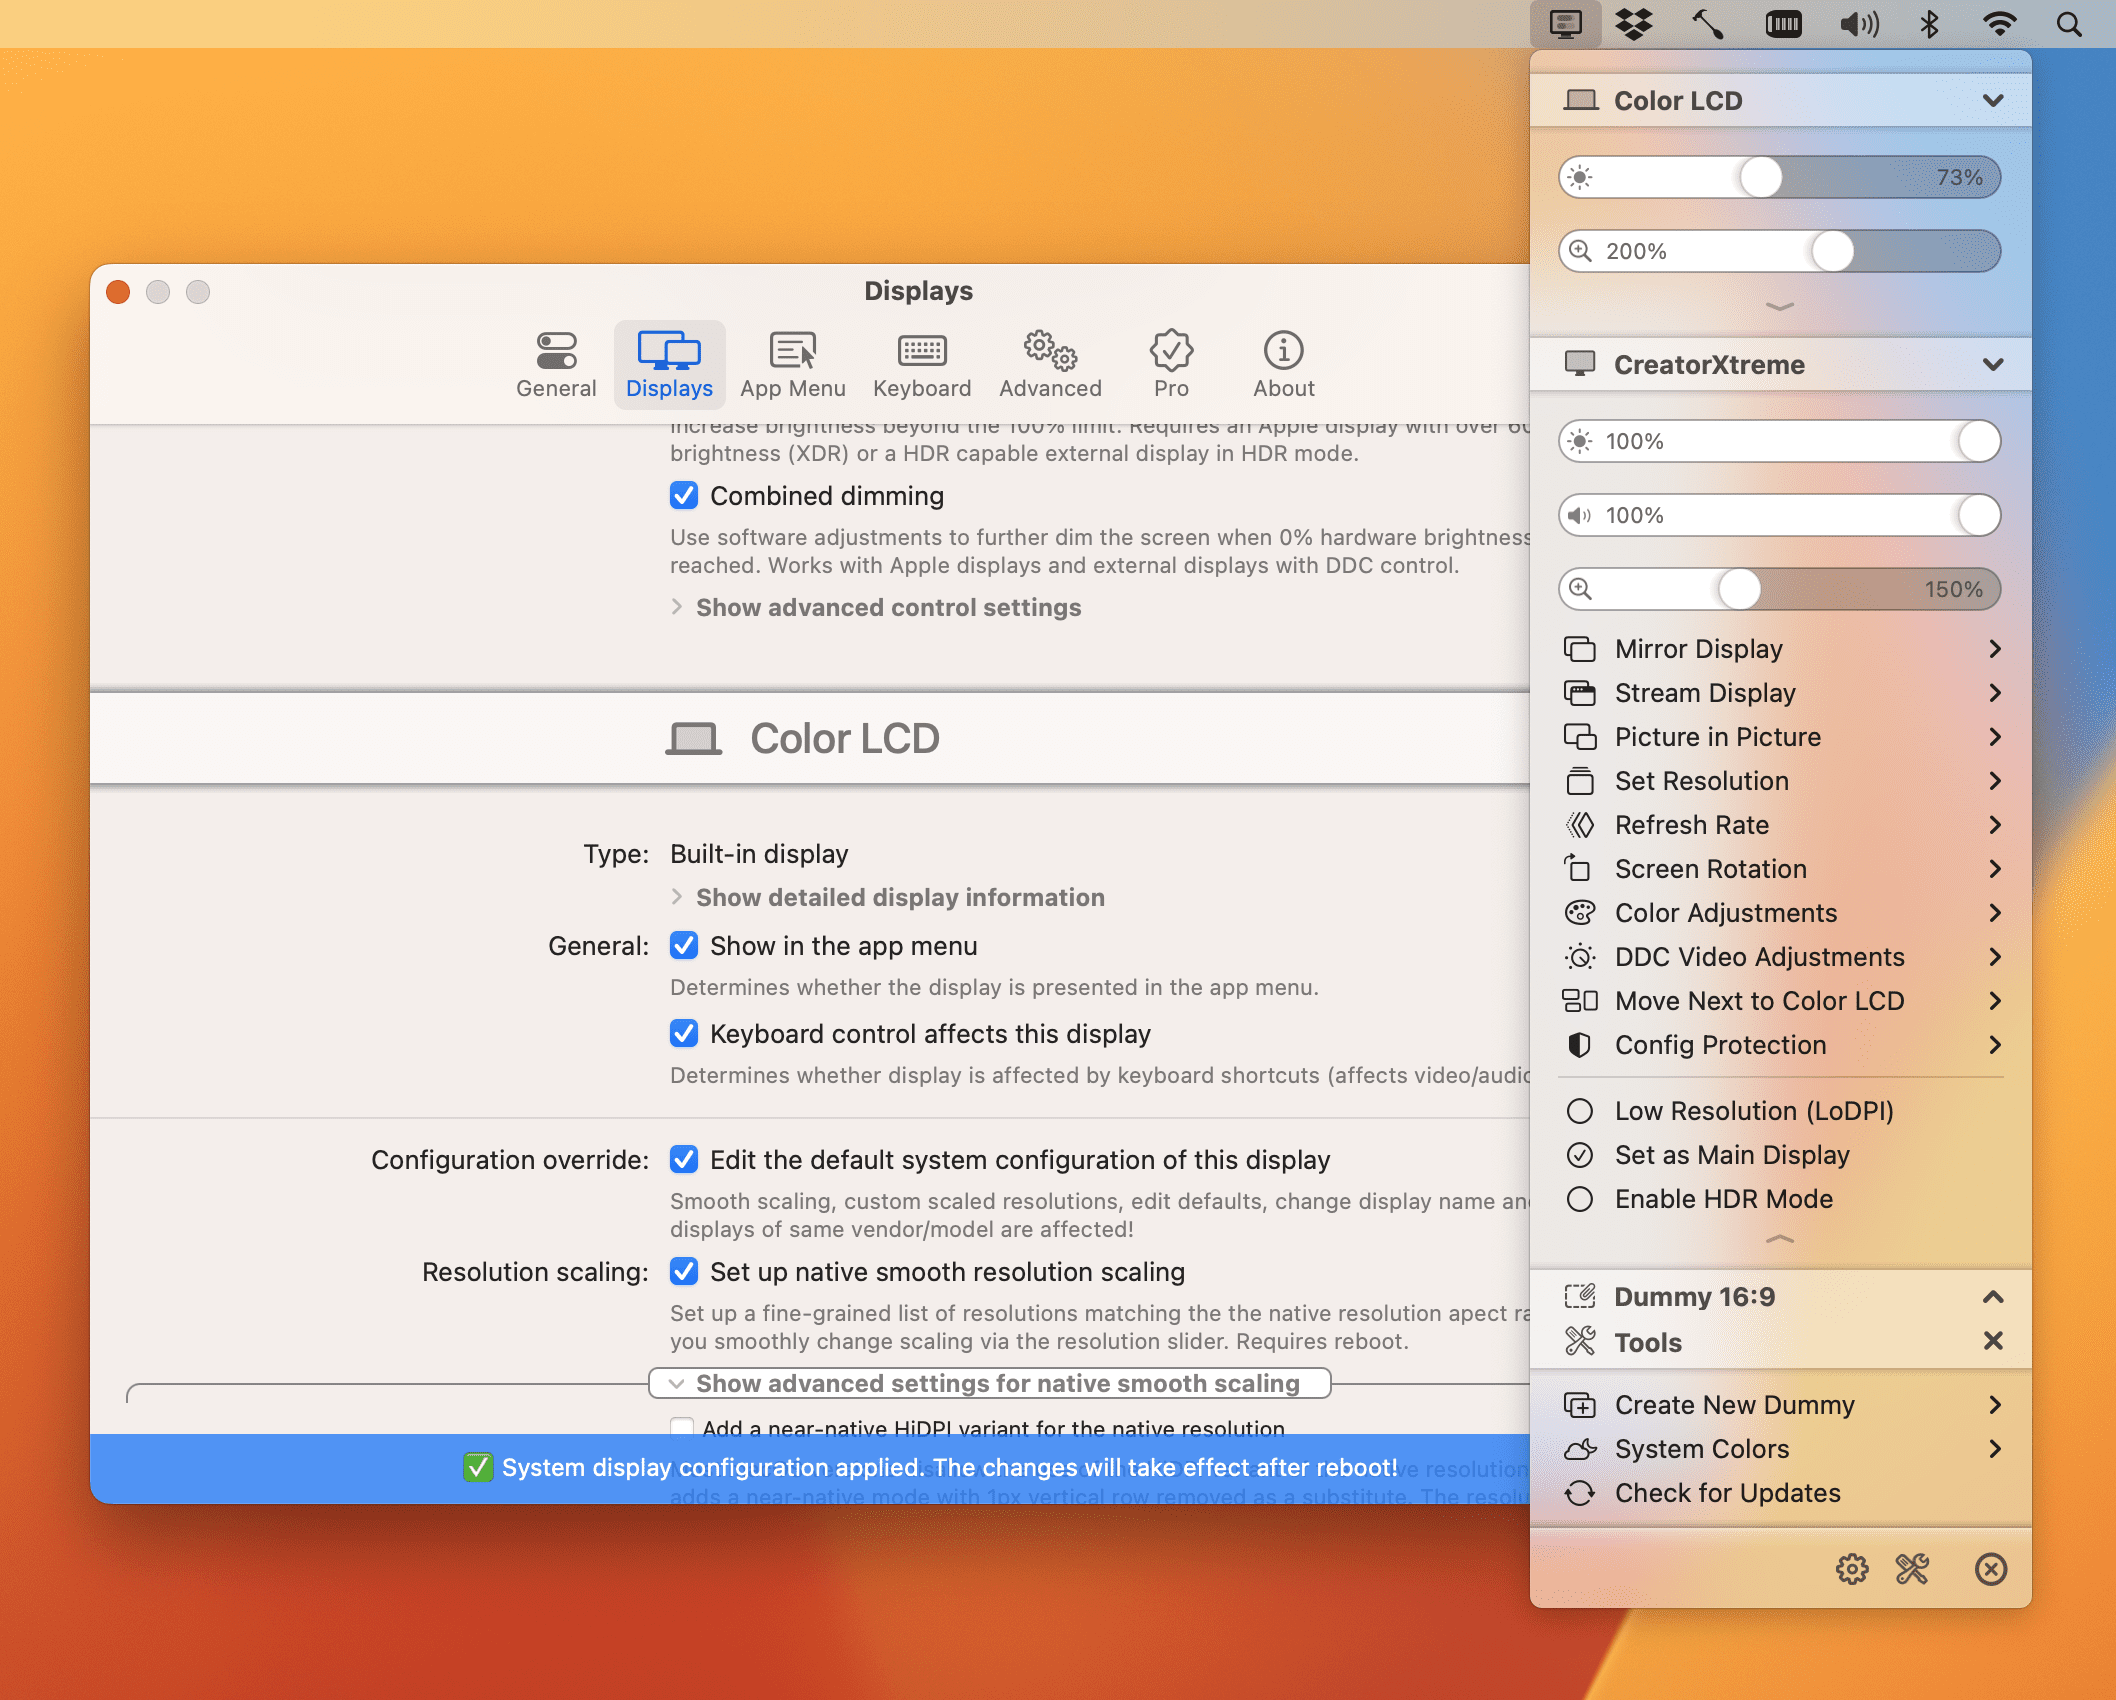
Enable the Edit the default system configuration of this display feature under the display that you want to make scalable.
Enable the Set up native smooth resolution scaling option.
You can also open Show advanced settings for native smooth scaling and enable Add a near-native HiDPI variant for the native resolution.
Once you’ve made the adjustments, click the Apply Changes button at the bottom of the window.
Enter your administrator password.
Restart your Mac.
Once your Mac is finished restarting, make sure that BetterDisplay is open.
Use the resolution sliders to scale the desktop to your liking.
It’s worth pointing out that there is a “Pro” version of BetterDisplay available, which enables things such as Picture-in-Picture, Mirror configuration, Advanced Custom Keyboard Shortcuts, and more. However, you don’t need to pay out of pocket first before trying out the app to see if it will work for you.
How to Enable 1440p Scaling on External Monitors on M1 and M2 Macs Using SwitchResX
SwitchResX is one of those Mac applications that has been around for quite a long time. Just to get an idea of how long SwitchResX has been available, you can go back and download versions of the app that are compatible with macOS 8, back when the app was named “switchRes2”. It has also been regularly updated over the years, covering new versions of macOS, even including when Apple began its transition from Intel to the Apple M1, and now Apple M2 chip.
As opposed to BetterDisplay, which essentially creates a “dummy” display that is then shown on your screen, SwitchResX actually allows you to make the necessary changes from within Apple’s System Settings or System Preferences app. However, in order to take full advantage of SwitchResX, you’ll need to disable System Integrity Protection (SIP). This was introduced with the release of macOS X El Capitan and “protects the entire system by preventing the execution of unauthorized code.”
If you are running OSX 10.11 or higher, SIP must be disabled. To disable SIP do the following:
Power off your Mac.
Power on your Mac.
As soon as you press the power button, press CMD + R on your Mac’s keyboard.
Once in Recovery Mode, open a Terminal window.
Type the following command:
csrutil disable
Press Enter.
Restart your Mac.
With System Integrity Protection (SIP) disabled, you’ll now be able to take full advantage of what SwitchResX has to offer. Here’s how you can make the necessary adjustments to enable 1440p scaling on external monitors on M1 and M2 Macs using SwitchResX:
After your Mac is finished restarting, open the SwitchResX app.
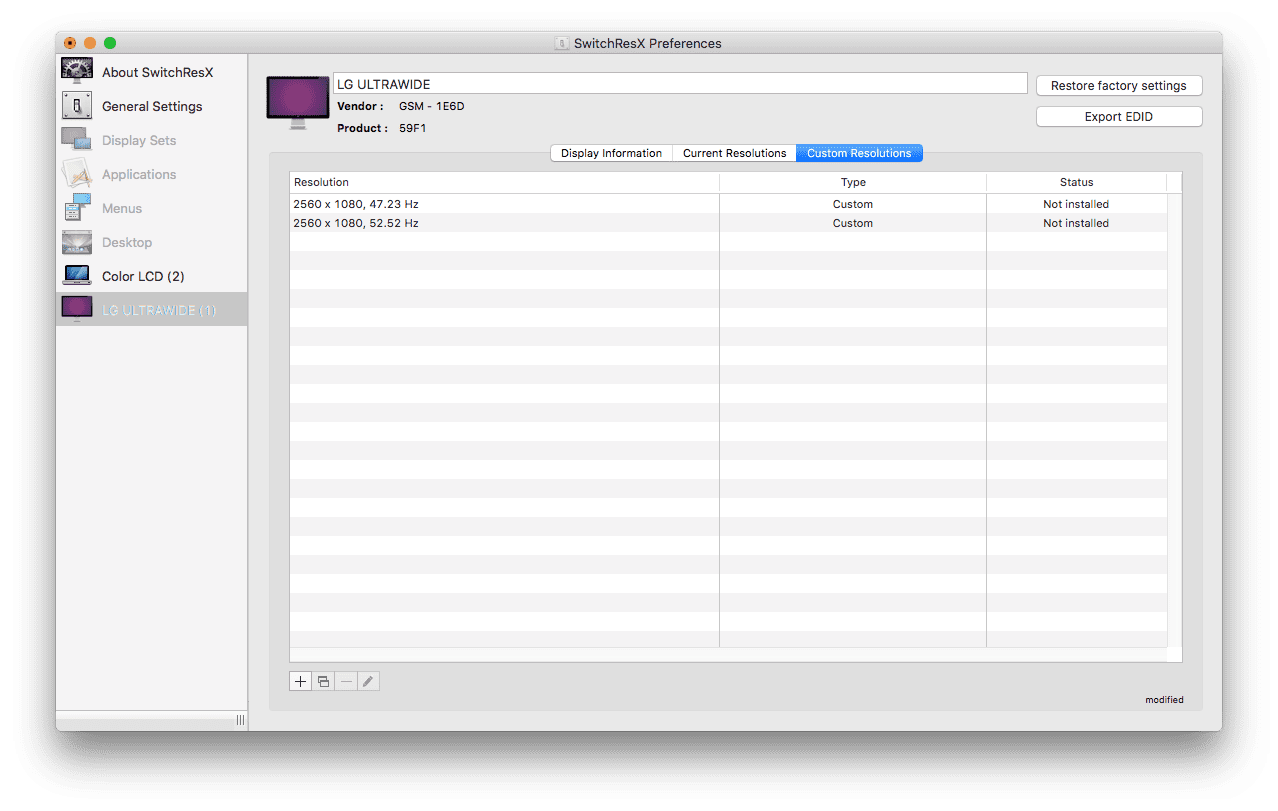
Select the Custom Resolutions tab.
Click the + button in the bottom right corner.
Adjust the settings based on the size of your monitor.
Click the OK button in the bottom right corner.
Close SwitchResX.
When prompted, save the changes that you’ve made.
Restart your Mac.
After your Mac is finished restarting again, you should be able to make any adjustments to the resolution of your external monitor from the Display settings within the System Settings (or System Preferences) app on your Mac.
How to Enable 1440p Scaling on External Monitors on M1 and M2 Macs Workaround
While it’s nice to be able to have third-party applications such as BetterDisplay and SwitchResX at our disposal, these aren’t the only ways that you can enable 1440p scaling on external monitors on M1 and M2 Macs. As it turns out, there’s a workaround that enables HiDPI mode, all without needing to download and configure either of those other apps. This is helpful for those who either don’t want to fiddle around with the settings of BetterDisplay, or if you don’t want to disable System Integrity Protection (SIP) in order to use SwitchResX.
Open the System Settings app on your Mac while connected to an external monitor.
In the left sidebar, click Displays.
On your keyboard, click and hold the Option key.
Select the 4K resolution option.
Click the pop-up menu next to Rotation.
Select 90-degrees for the rotation.
Your Mac will ask if you want to keep the settings, don’t click anything.
Wait a few seconds until the monitor reverts back to the “normal” rotation.
After your monitor is back to its “normal” rotation, it will be in HiDPI mode, and you are now able to adjust the text scaling, just like you would if you are using a MacBook’s screen, or connected to an Apple monitor like the Studio Display. The only two catches, according to this Reddit thread, are that your monitor needs to be equipped with HDMI 2.0 or higher, and if you are using a monitor with a higher refresh rate, it will then be capped at 60Hz as macOS only supports 4K/60Hz output.
Andrew Myrick is a freelance writer based on the East Coast of the US. He enjoys everything to do with technology, including tablets, smartphones, and everything in between. Perhaps his favorite past-time is having a never-ending supply of different keyboards and gaming handhelds that end up collecting more dust than the consoles that are being emulated.
Just bought a 2k 16 Inch portable monitor thank to this article i now have a very clean and crisp display i was also considering buying 4K now i can save my money !


Just bought a 2k 16 Inch portable monitor thank to this article i now have a very clean and crisp display i was also considering buying 4K now i can save my money !
This article saved me from spending $300+ on a new 4K monitor