Trading in or selling your old iPhone can help offset the cost of a new device. But before you do so, you’ll want to erase your old device.
Erasing an old iPhone seems pretty straightforward — and it is. But there are some additional steps you can and should take to make sure everything is actually deleted from your old iPhone and safely transferred to your new device.
We recommend setting up your new device before you erase your old one, if possible.
Before you start the process of actually erasing your old iPhone, it’s highly recommended that you setup your new device first.
This can save you a lot of hassle if your new device happens to be defective or broken in some way. At least you’ll have a working iPhone with all of your data if you refrain from erasing it beforehand.
It’s also a great way for you to double-check that all of your settings, preferences, apps and data was transferred over successfully before they’re potentially lost.
Of course, this isn’t always possible — depending on your specific trade-in or sale method.
Because of that, we recommend opting for trade-in methods that will allow you to have both devices simultaneously during the set-up process.
Back up your iPhone
First thing’s first: back up your device. This is a best practice for just about any situation — whether you’re downloading a new software update or going on a kayaking trip.
You can easily create an iOS backup using the baked-in iCloud Backup feature. Alternatively, you can also create an encrypted backup that will be able to save more sensitive information, like health data.
It doesn’t really matter what method you choose as long as you back up your device before moving on to the additional steps.
Once your back up your old device, it’s recommended that you go ahead and set up your new iPhone from your backup before proceeding with the rest of the article.
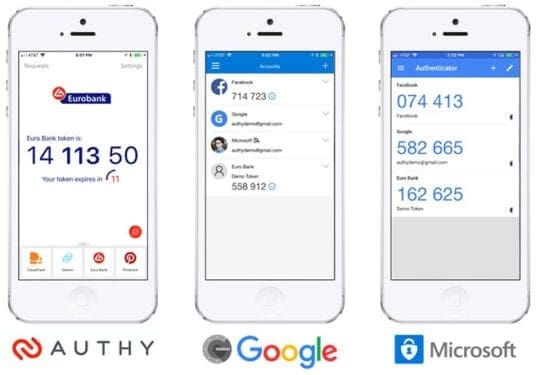
Switch your Authenticator apps over
Forgetting to switch your third-party authenticator apps to your new phone is fairly common. But it’s undoubtedly a headache if you do forget.
One of the most important-but-overlooked steps is to transfer your third-party authenticator apps to your new iPhone before erasing the old one.
Popular two-factor authentication platforms, like Google Authenticator, are attached to the phone that you set it up with. Because of that, erasing a device before transferring it over can result in problems accessing your accounts.
The exact method will vary depending on the authenticator platform you’re using. Transferring Google’s authenticator over involves scanning a QR code on a computer and switching your phones over, for example.
Make sure to look out the directions specific to your platform. The most important thing is to remember to do this before moving on.
Unpair your Apple Watch
Unpairing your Apple Watch before resetting it is a good idea.
Have an Apple Watch? It’s a good idea to unpair it from your iPhone before erasing it.
Make sure your iPhone and Apple Watch are in close proximity.
Open the Watch app on your iPhone.
Tap on My Watch.
Select the Apple Watch you’d like to unpair and then tap the “I” icon.
Tap Unpair Apple Watch.
You’ll need to tap again to confirm. You’ll also need to enter your Apple ID and password to disable Activation Lock.
Log out of services
Erasing an iPhone and deactivating Find My iPhone theoretically logs you out of Apple services. Things can go wrong, however.
Because of that, it’s probably smart to manually log yourself out of Apple’s baked-in services before proceeding.
Open the Settings app on your iPhone.
Tap the Apple ID card with your name at the top.
Scroll all the way down and tap Sign Out.
Finally, enter your Apple ID and password and tap Turn Off.
This will log you out of iCloud, Find My iPhone and various iTunes services.
It’s worth noting that it’s not necessary to manually delete or log out of your third-party apps or services.
Housekeeping tasks
At this point, your data should be backed up and all relevant services should be transferred over to the new device.
While this isn’t necessarily a required step, it’s a good idea to go through your settings and preferences on both devices to make sure everything was transferred over successfully.
Some ideas include:
Ensuring that your health data is on your new iPhone.
Making sure that alarms and Bedtime is set properly on your new device.
Going through and ensuring that locally stored photos and notes have been transferred to your new device.
If you’d like to keep SMS text messages, go ahead and see if those are transferred over as well.
Finally, erase your old iPhone
Once you’re absolutely certain all of your apps and data are in order, you can actually go about erasing your old iPhone.
Note: Do not perform these steps on your new iPhone, only your old one. You don’t want to erase all of the work you just did.
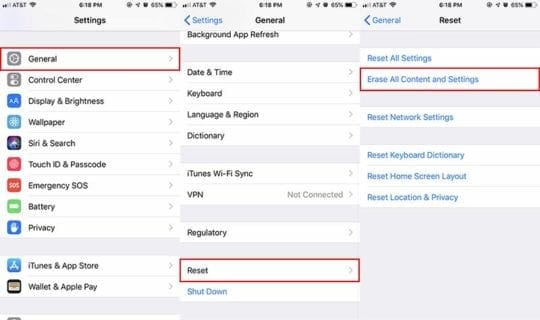
Now that all of the backup is done, you can go about actually erasing your iPhone and restoring it to its factory default settings. (This will also delete any eSIM profiles on your old device, just FYI.)
Unlock your old iPhone.
Launch the Settings app on your old iPhone.
Scroll to the bottom and tap Reset.
Tap Erase All Content and Settings. (Again, do not tap this on your new iPhone.)
Enter your iPhone’s passcode if prompted.
Now, enter your Apple ID and password to remove the iPhone from your account.
If you’re particularly concerned about your information security, you can set up your old device as a new iPhone, skip all of the login prompts and double-check to see if all of your data has been properly erased.
One way to do so is to check your iPhone Storage and ensure it’s empty. You can do that in Settings —> General —> iPhone Storage.
Once your iPhone is erased and restored, you can trade it in.
Mike is a freelance journalist from San Diego, California.
While he primarily covers Apple and consumer technology, he has past experience writing about public safety, local government, and education for a variety of publications.
He’s worn quite a few hats in the journalism field, including writer, editor, and news designer.
The only step missing is to: Use a needle/pin and push to eject the SIM card tray on the right of the of your iPhone. If a card is present, remove it (and store for safe keeping). That SIM card may be needed in your next device or maybe you’re switching carriers.
Slide the removed tray back in. Now you’re ready to sell or trade in your (old) iPhone.