Custom Ringtones have not seen much love from Apple over the last few releases of macOS and iOS. Now, with iTunes replaced in macOS Catalina, there is an easy way to move ringtones with drag and drop using Finder.
In this short guide, we explore a few different options on how you can transfer your own custom ringtones and use them on your iPhone in iOS 13.
No ‘Tones’ section in the Finder App on macOS Catalina
In macOS Catalina, the Sync feature in the Finder App does not have a section for Tones. Additionally, there is no ‘Tones’ folder anymore in your Music app either.
You can browse your Music and iTunes libraries on macOS Catalina by following these steps:
Open Finder App on your MacBook
Click on ‘Go’ at the top and choose ‘Go To Folder..’
Type ‘~/Music’ without the quotes to open the Music library on your Mac
Your GarageBand, iTunes and Music folders are located here.
Since iTunes has been replaced in macOS Catalina with the new Music app and sync features in the Finder app, the process of moving custom ringtones from your Mac to iPhone isn’t as obvious as in iTunes.
But the good news is that it’s simple!
Just Drag and Drop your ringtones in macOS Catalina+
Moving your ringtones from your Mac running macOS Catalina + is as easy as drag and drop!
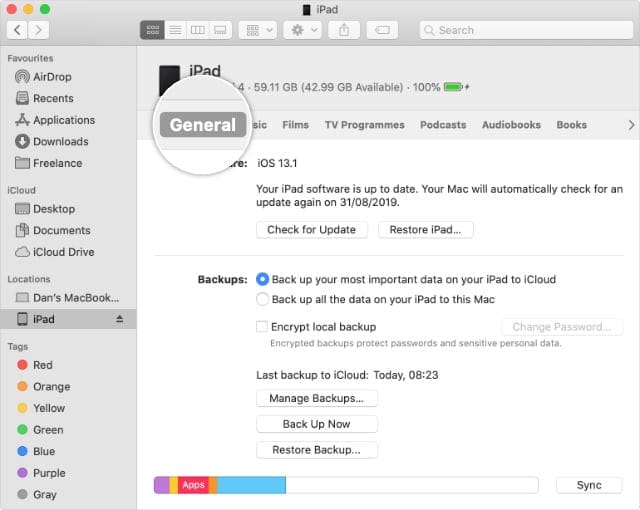
Connect your iPhone, iPad or iPod to your Mac
Open a new window in the Finder app on your Mac and tap on the General tab
Open another Finder window and locate the ringtone files (m4r formatted) that you want to copy to your iPhone
Drag those m4r files from your Mac
Drop it it on to your iPhone in the Finder app
If it’s not working, make sure you drag and drop your .m4r to the Finder’s General tab for your device.
If you use multiple iTunes libraries, be mindful that Apple recently provided a white paper in which they called out that multiple iTunes libraries are not currently supported in beta versions of macOS Catalina but the feature will be added later.
If the process of dragging a custom ringtone and dropping it to the iPhone in iTunes didn’t work, try the additional steps listed below.
Workaround to Transfer Custom Ring tones from your macOS Catalina
Some of our readers tried moving their custom ringtones from GarageBand on their Mac to their iPhones but we were not successful in syncing them.
The workaround that we used in order to transfer custom ringtones out of MacBook to iPhone is by leveraging the iCloud drive / Files app option along with GarageBand app for iOS. GarageBand app has been enabled to use iCloud in settings.
The basic idea is to share the custom ringtone from your MacBook with your iPhone running GarageBand. Once it is available in iOS GarageBand, we export it as Ringtone to the iPhone’s contact app.
Lets’ get started and put a little elbow grease to this workaround!
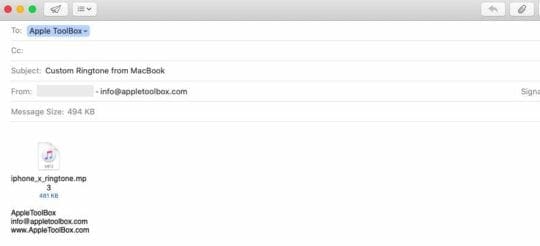
Send the custom ringtone file (.m4a , .m4r) from your MacBook to yourself via email or use the Finder app on your MacBook.
Sending it from Mac in order to access it on iPhone. You can use Finder as well instead of mail.
Please follow the steps below to transfer these custom ringtones onto your iPhone running iOS 13.
Tap on the ringtone attachment from your email
Tap on the Share icon at the bottom left of your screen
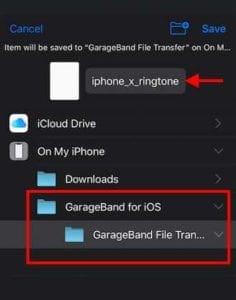
Choose ‘Save to Files’
Move the downloaded ringtone into the folder ‘GarageBand File Transfer’
Move the ringtone to GarageBand on iOS folder on your iPhone.
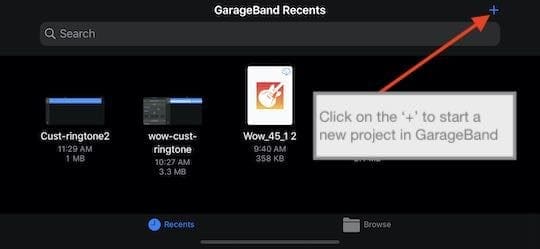
Next, Open GarageBand App on your iPhone and tap on the ‘+’ icon
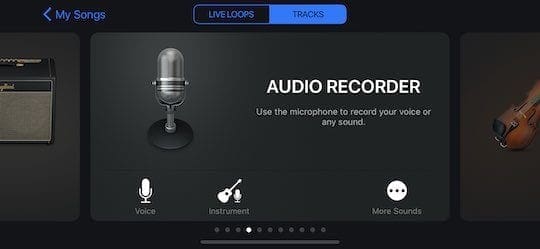
On the next screen, choose ‘Audio Recorder’ as the Tracks type
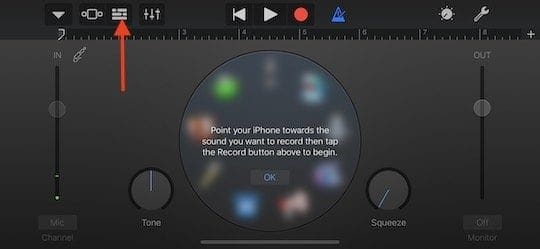
Tap on Tracks at the top of your screen
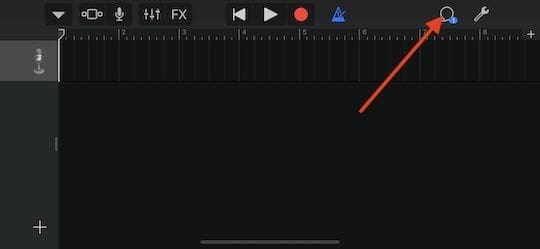
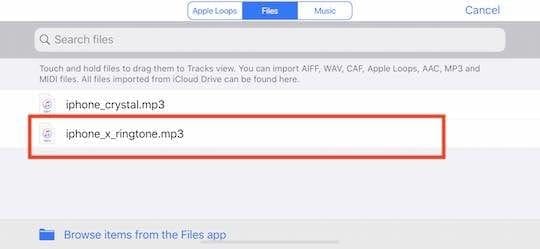
Next, Tap on the loop icon at the top right corner of your screen
The ringtone that you moved earlier via Files is now available here.
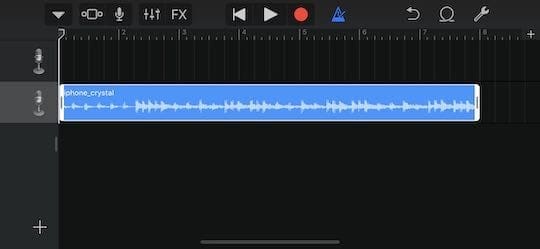
Touch and hold the ring tone and drag it as a track
Your Ringtone is imported in as a track
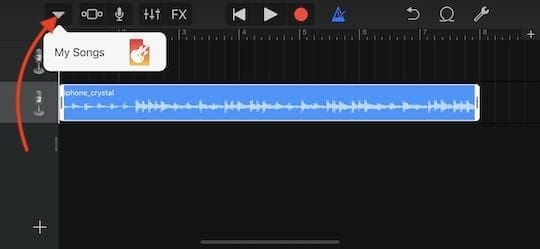
Tap on the downward arrow icon and select ‘My Songs’
Your ringtone is saved automatically as ‘My Song’
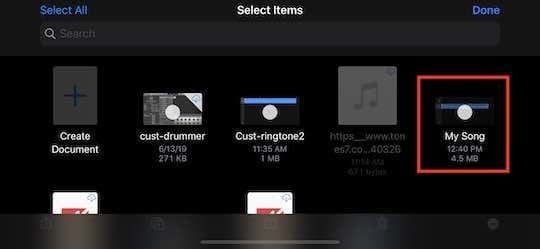
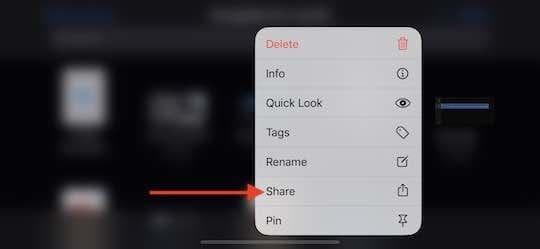
Tap on Select and then choose ‘My Song’
Choose ‘Share’ from the options
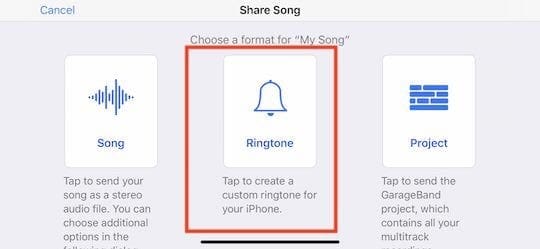
Here tap on ‘Ringtone’ and then choose ‘Export’
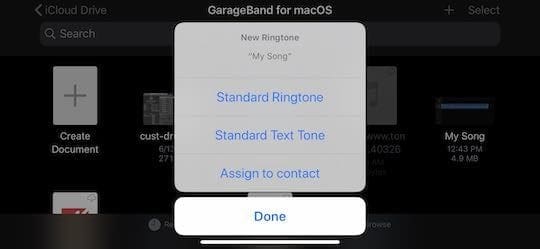
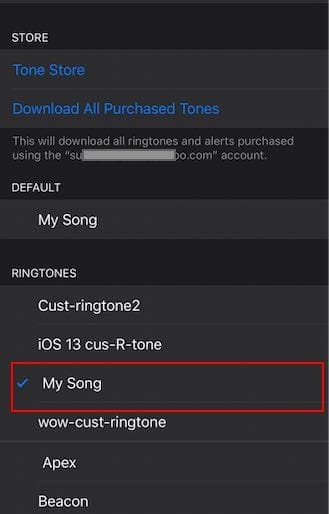
Select ‘Use Sound as..’ and choose the type of ringtone you would like and tap Done
Choose between standard Ringtone, Text or assign directly to Contact here.
Your Ringtone is now exported and you can access it from your Contacts App
How to assign custom Ringtone to a Contact in iOS 13
This process has not changed in iOS 13. Open your Contacts app on your iPhone and select the contact that you want the new custom ringtone to be assigned to.
Tap on ‘Edit’
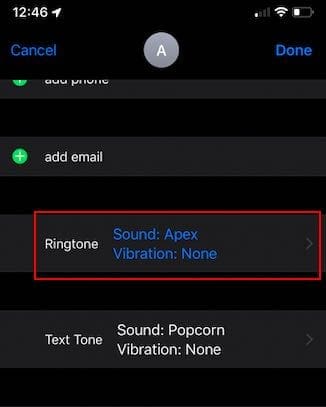
Scroll down to ‘Ringtone’ and tap there
Choose the custom ringtone that you exported from GarageBand
Tap on ‘Done’ at the top right corner of the screen
You can also use this process to change the default ‘text tone’ of any contact on your iPhone.
Use the project to GarageBand for iOS to transfer tunes from macOS Catalina.
Tip: If you are working to create your own custom ringtones in Garage Band on macOS Catalina, when you are ready to export the ringtone project out of macOS Catalina, click on Share > Project to GarageBand for iOS and the ring tone will be readily available on your iPhone when you open up GarageBand.
Can’t add new ringtones after updating your macOS?
The workaround is to first remove all existing tones from your iPhone, restart your phone, and then import your ringtone again using either the drag and drop method or the custom ringtone workaround mentioned in this article.
Summary
We hope that this step by step workaround was helpful to you. Although this process works great in transferring out custom ringtones from macOS Catalina or the ones you download from the web, it is probably not the ideal solution when it comes to transferring a batch full of custom ringtones.
Feel free to chime in with some of your favorite tips and tricks when it comes to transferring or syncing custom ringtones from your MacBook.
Obsessed with tech since the early arrival of A/UX on Apple, Sudz (SK) is responsible for the original editorial direction of AppleToolBox. He is based out of Los Angeles, CA.
Sudz specializes in covering all things macOS, having reviewed dozens of OS X and macOS developments over the years.
In a former life, Sudz worked helping Fortune 100 companies with their technology and business transformation aspirations.
This is so helpful! Searched for .m4r and found the ringtone on my iCloud Drive. Then, on my Catalina (10.15.7) machine dragged it into the General tab of the iPhone in the Finder window. Did a new sync and lo & behold it was in the list of ringtones on the iOS 14.2 phone. Thank you, you’re a genius.
I successfully imported a custom made ringtone in mr4 format into my iPhone running IOS 14.
I can see it and use it no problem as a “ringtone” but I cannot see it/use it in “Tones” to use as a text notification. It does not show up at all in Tones. Any thoughts on how to map it to the Tones menu when it’s already in the Ringtones menu? (all my store bought ringtones that are in “ringtone” are available in “tones”…just not my custom one.
Thanks for any assistance!
If you only need to transfer a ringtone, not create one, you can use QuickTime. Follow these steps:
1) Open QuickTime on your Mac
2) Open the audio file you want to make into a ringtone via File > Open File
3) Once opened, trim that file so your ringtone selection is 40 seconds or less using QuickTime’s trim function Edit > Trim. Grab the handles at either end to shorten your selection within the container
4) When ready with your selection, press Trim
5) Then go to Files > Export > Audio Only
6) Save that file somewhere where it’s easy to retrieve
7) Locate that just saved audio file and change the extension at the end from .m4a to .m4r
8) Confirm you want to save it as .m4r
9) Open Finder or the Music app and drag that audio .m4r file to your iPhone–you should see a green plus sign
10) Once dropped, open your iPhone to Settings > Sound & Haptics > Ringtone and look for your newly created ringtone
Apple, not so much these days 🙁
In the “not improved itunes store” — How do you search for anything ? And where are ringtones ? You certainly can’t search for them.
This is one of the major bugs in Catalina and despite hundreds of attempts it doesn’t work for me.
When I drag & drop non compatible (say if the file is too long) files it would give me error then I would drag&drop legit ringtone files and nothing happens, absolutely nothing. Those files are I’ve been using for my custom ringtones for last 10 years
OMG!!! Thank you SO MUCH!!! I’ve been searching for DAYS, trying to figure out how to get my personal ring/text tones back on my iPhone. You’re AWESOME!!!
Or, you can do it more easily!
Just get your m4r file, connect your iPhone do mac, and drag and drop it to the General tab on connected device window. You’re welcome!
I actually diverted from the process by simply recording my custom ringtones with the audio recorder function in Garageband, playing through the speakers of my mac pro.
voila. endless supply of ringtones – mine happens to be old star trek sounds that by virtue of what they are, already sound “old” so the room tone recording quality in my case did not bother me.
This also worked for me and it was super simple. Just drag drop m4r files to the iphone in finder, then press sync. They are already in your ringtones on your phone, and I had checked “managed music manually” in case it erased the older ones
Efectivamente…
1.- Ventana de Finder con iPhone seleccionado
(se ve la pantalla similar a el viejo iTunes)
2.- Se selecciona en otra ventana Finder el Tono de extension .m4r
3.- Se arrastra el Tono seleccionado sobre la Ventana tipo iTunes en cualquier parte de esta, donde aparezca el signo + (color verde) y se suelta el tono
4.- Se da click sobre la opción SINCRONIZAR
FIN DE EL PROCESO
Effectively…
1.- Finder window with iPhone selected
(screen looks similar to the old iTunes)
2.- Select in another Finder window the Extension tone .m4r
3.- The selected Ringtone is dragged over the iTunes Window in any part of it, where the + sign appears (green color) and the tone is released
4.- Click on the option SYNCHRONIZE
All you have to do is connect your iPhone/iPad to your Mac, open Finder, select your iPhone/iPad, then drag-and-drop ringtone files into the Finder window and they appear in your ringtones.
Yes it does, maybe it’s a recent update by Apple, but it is as easy as drag and drop.. Drag the m4r file from anywhere, and drop it on the iPhone in the Finder.. Works like Magic.. 😉
Actually I found out that if you have access to an .m4r file, you can just drag it onto the iTunes finder window and it’ll show up in the Tones section on your iPhone
Just drag and drop m4r file into the phone’s finder window (header section with your phone name) and click apply. It seems nothing happened but you can see ring is added when you check your phone.
Is this applicable for Catalina? i (somehow) was able to move one m4r file so that it appears as a ringtone…i’m trying to move another and it’s not working. My iphone finder window has tabs with info on each tab, is this where you’re dropping?
Yes it does, as of today 1/18. Whatever finder window whatever tab, as long as the plus appears when you hover over from dragging, then sync. It should show up in .your ringtones 🙂
Try Ringer – Ringtone Maker on Apple App store from pixelresearchlabs.com It’s super easy to use.
You no longer get direct export to iTunes but you can save the .m4r file to your desktop and drag it to your iPhone in Finder.
There is also a iOS version I just found out but you’ll have to Airdrop the file to a Mac to get it to the iPhone in Finder.


")


This is so helpful! Searched for .m4r and found the ringtone on my iCloud Drive. Then, on my Catalina (10.15.7) machine dragged it into the General tab of the iPhone in the Finder window. Did a new sync and lo & behold it was in the list of ringtones on the iOS 14.2 phone. Thank you, you’re a genius.
I successfully imported a custom made ringtone in mr4 format into my iPhone running IOS 14.
I can see it and use it no problem as a “ringtone” but I cannot see it/use it in “Tones” to use as a text notification. It does not show up at all in Tones. Any thoughts on how to map it to the Tones menu when it’s already in the Ringtones menu? (all my store bought ringtones that are in “ringtone” are available in “tones”…just not my custom one.
Thanks for any assistance!
Garage band is disabled in my version of mac and iphone…is there another way>?
Hi Rachel,
If you only need to transfer a ringtone, not create one, you can use QuickTime. Follow these steps:
1) Open QuickTime on your Mac
2) Open the audio file you want to make into a ringtone via File > Open File
3) Once opened, trim that file so your ringtone selection is 40 seconds or less using QuickTime’s trim function Edit > Trim. Grab the handles at either end to shorten your selection within the container
4) When ready with your selection, press Trim
5) Then go to Files > Export > Audio Only
6) Save that file somewhere where it’s easy to retrieve
7) Locate that just saved audio file and change the extension at the end from .m4a to .m4r
8) Confirm you want to save it as .m4r
9) Open Finder or the Music app and drag that audio .m4r file to your iPhone–you should see a green plus sign
10) Once dropped, open your iPhone to Settings > Sound & Haptics > Ringtone and look for your newly created ringtone
You guys are great.
Apple, not so much these days 🙁
In the “not improved itunes store” — How do you search for anything ? And where are ringtones ? You certainly can’t search for them.
Apple music is even worse !!! How do you search ?
I absolutely agree. It was perfect at some stage and someone just messed up the entire UI in Apple’s macOS Catalina!
This is one of the major bugs in Catalina and despite hundreds of attempts it doesn’t work for me.
When I drag & drop non compatible (say if the file is too long) files it would give me error then I would drag&drop legit ringtone files and nothing happens, absolutely nothing. Those files are I’ve been using for my custom ringtones for last 10 years
This is so stupid. I wish apple didn’t make everything require workarounds. I wish I could just drag the file in and would show up. I hate apple.
thats great thanks !
Great, Thanks!!
OMG!!! Thank you SO MUCH!!! I’ve been searching for DAYS, trying to figure out how to get my personal ring/text tones back on my iPhone. You’re AWESOME!!!
Or, you can do it more easily!
Just get your m4r file, connect your iPhone do mac, and drag and drop it to the General tab on connected device window. You’re welcome!
YUP, I second this – this is the BEST way to transfer ringtons to ur Apple device
It will sync it automatically to ur phone 100%
Or you can just download the iMazing app on MacOS and export/import m4r files very easily.
You are a legend!!!!!
I don’t see the share option!! when I click on step 15 it just opens up the track again and no options to share!!! I am on ios 12 still tho
It works, if it doesn’t work for you just try to follow the instructions.
hi guys – thank you so much.
I actually diverted from the process by simply recording my custom ringtones with the audio recorder function in Garageband, playing through the speakers of my mac pro.
voila. endless supply of ringtones – mine happens to be old star trek sounds that by virtue of what they are, already sound “old” so the room tone recording quality in my case did not bother me.
a great help – thanks again!
Just connect iPhone, open this iPhone in finder, and drag drop files to this window
OMG! I just tried this and it worked.
This also worked for me and it was super simple. Just drag drop m4r files to the iphone in finder, then press sync. They are already in your ringtones on your phone, and I had checked “managed music manually” in case it erased the older ones
Efectivamente…
1.- Ventana de Finder con iPhone seleccionado
(se ve la pantalla similar a el viejo iTunes)
2.- Se selecciona en otra ventana Finder el Tono de extension .m4r
3.- Se arrastra el Tono seleccionado sobre la Ventana tipo iTunes en cualquier parte de esta, donde aparezca el signo + (color verde) y se suelta el tono
4.- Se da click sobre la opción SINCRONIZAR
FIN DE EL PROCESO
Effectively…
1.- Finder window with iPhone selected
(screen looks similar to the old iTunes)
2.- Select in another Finder window the Extension tone .m4r
3.- The selected Ringtone is dragged over the iTunes Window in any part of it, where the + sign appears (green color) and the tone is released
4.- Click on the option SYNCHRONIZE
END OF PROCESS
thanks a lot. really helpful article
Excellent, thanks!
Just drag and drop into the Finder window doesn’t work for me, the songs (m4r) don’t appear in ringtones in my iPhone.
All you have to do is connect your iPhone/iPad to your Mac, open Finder, select your iPhone/iPad, then drag-and-drop ringtone files into the Finder window and they appear in your ringtones.
Uh, no. It doesn’t
Sorry!! Yes it does!!!
Yes it does, maybe it’s a recent update by Apple, but it is as easy as drag and drop.. Drag the m4r file from anywhere, and drop it on the iPhone in the Finder.. Works like Magic.. 😉
This was incredibly helpful. Thank you.
Actually I found out that if you have access to an .m4r file, you can just drag it onto the iTunes finder window and it’ll show up in the Tones section on your iPhone
Just drag and drop m4r file into the phone’s finder window (header section with your phone name) and click apply. It seems nothing happened but you can see ring is added when you check your phone.
Thx Thx Thx …. !!!!!!!
Is this applicable for Catalina? i (somehow) was able to move one m4r file so that it appears as a ringtone…i’m trying to move another and it’s not working. My iphone finder window has tabs with info on each tab, is this where you’re dropping?
Yes it does, as of today 1/18. Whatever finder window whatever tab, as long as the plus appears when you hover over from dragging, then sync. It should show up in .your ringtones 🙂
Try Ringer – Ringtone Maker on Apple App store from pixelresearchlabs.com It’s super easy to use.
You no longer get direct export to iTunes but you can save the .m4r file to your desktop and drag it to your iPhone in Finder.
There is also a iOS version I just found out but you’ll have to Airdrop the file to a Mac to get it to the iPhone in Finder.