Many iOS and macOS users opt for the native Mail application on both platforms. For most people, it’s not something they really give a second thought to. It just works. But like many things on Apple’s platforms, with a few tips and tricks, you can make it work better.
While there are plenty of third-party iOS mail clients, the default and native Mail app is likely the go-to for the average user. It’s extremely simple to use, but there are a few tricks hidden up its sleeve.
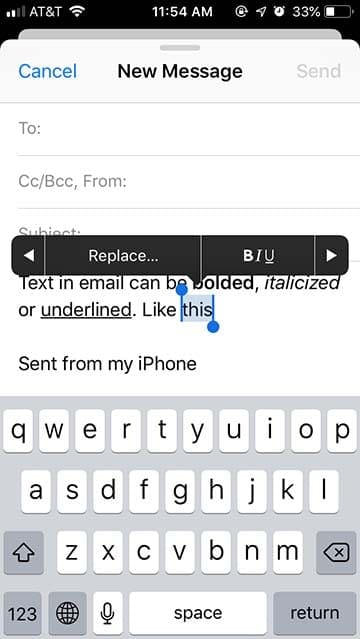
9. Add flair to your text
Text formatting is a bit hidden on the iOS version of Mail.
This is pretty basic functionality, which is why it’s surprising that so few people know about or use the baked-in formatting options in Mail. Still, to be fair, Mail’s text formatting (bold, italics, etc.) is not super obvious. But it is available in Mail.
Just tap out a message in the Mail app. Then, select the text you’d like to bold, italicize or underline. Tap the right-facing arrow icon and then the “BI U” icon to format your text.
8. Swipe down to Drafts
Swipe down from the gray bar to save your draft “underneath” an inbox.
The way drafts work in the iOS Mail app may seem a bit clunky and counterintuitive. After all, you have to hit Cancel on a message and Save Draft to get back to your mailbox, right? Technically, that’s one way to do it. But there is a much easier (and much less known) workaround.
Start typing a message in Mail. Then, look to the top of the message pane. See that small, rectangular gray bar above New Message? Swipe down from that and the message will be automatically saved underneath your bottom navigation bar. From here, you have easy access to your inbox — just tap on the New Message to retrieve your draft.
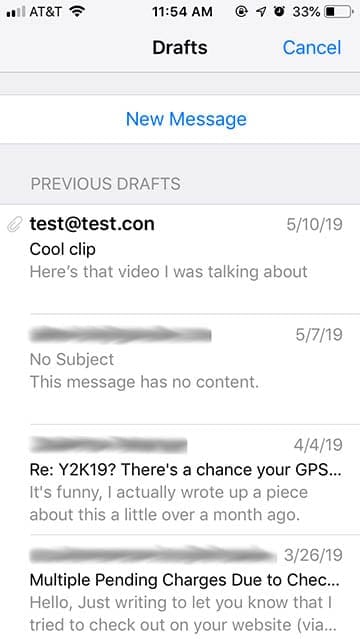
7. See all drafts
Hold down on the New Email icon — it’ll bring up a list of previous drafts.
While the previous tip is an easy way to keep a single draft handy, it doesn’t do much for your previously written drafts. But Mail also has a little trick for quickly getting to those messages, too.
When you’re viewing your inbox, just tap and hold on the New Email / Compose icon in the bottom-right corner of the screen. From there, you’ll see a list of all of your previous drafts.
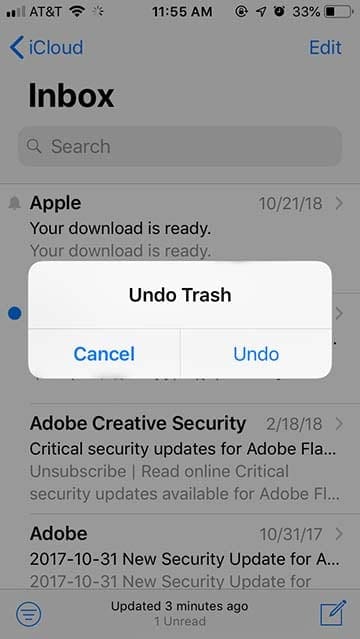
6. Shake to recover deleted messages
Delete an email accidentally? Shake your iPhone to quickly recover it.
Accidentally delete an important email? You don’t have to resort to digging through your Trash folder if you’re using an iOS device.
If you’ve deleted a message you didn’t intend to, just shake your iPhone. You will see an “Undo Trash” dialog box appear with the option to recover the trashed message. On the flip side, you can also shake after recovering the message to send it to the trash again.
5. Add attachments
Attaching files to emails in iOS isn’t obvious, but it is an option.
Like with text formatting, the iOS Mail app supports adding attachments to your emails — it just doesn’t make it very obvious that this is the case. The attachment menu is actually hidden within the same tap gesture.
In a message, just double-tap anywhere within the body of the email. Then, tap the right-facing arrow and tap the Add Attachment button. You’ll then see various obvious to add attachments from, including iCloud Drive, Dropbox and Google Drive.
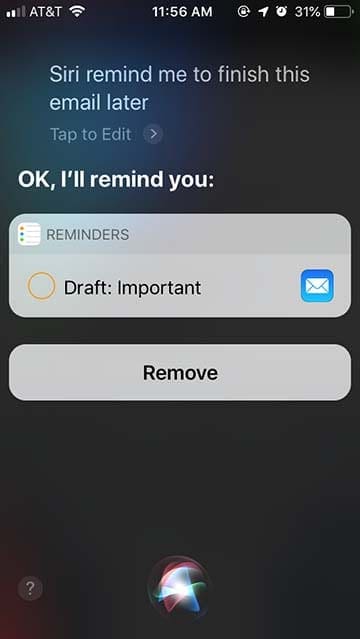
4. Use Siri to your advantage
Using Siri to manage your email is seriously underrated.
Siri may not be the smartest or most capable digital assistant, but if you’re using iOS, she’s always there when you need her. Because of the native integration, Siri actually has a few tricks up her sleeve when it comes to capabilities with the Mail app.
You can try it out yourself. Just invoke Siri and ask her to search for a message about a particular subject or from a specific contact. The next time you’re writing an email, you can also invoke Siri and say “Remind me to finish this later.”
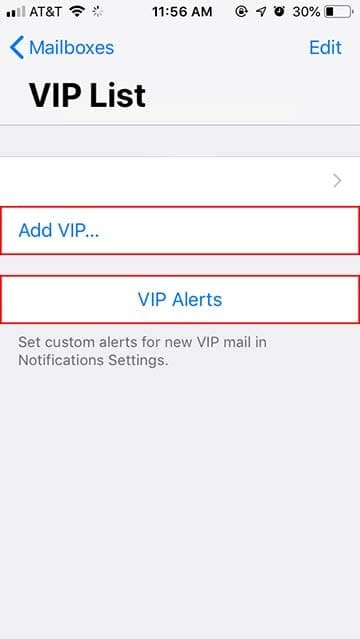
3. Get alerts for VIPs
Add some VIPs to Mail and set VIP alerts so you never miss an important message again.
Weeding out important emails from unimportant ones should be high on your email-organization priority list. Luckily, Mail makes it easy with a VIP list. Just go to your Mailboxes pane and then tap the VIP mailbox (or the “I” icon next to VIP). Add a couple of users from your contacts.
It’s also worth tapping on the VIP Alerts icon in this VIP List menu. From there, you can set a custom notification tone and vibration for when you receive VIP emails. That’s an incredibly useful way to know whether an email is worth looking at without pulling your phone out of your pocket.
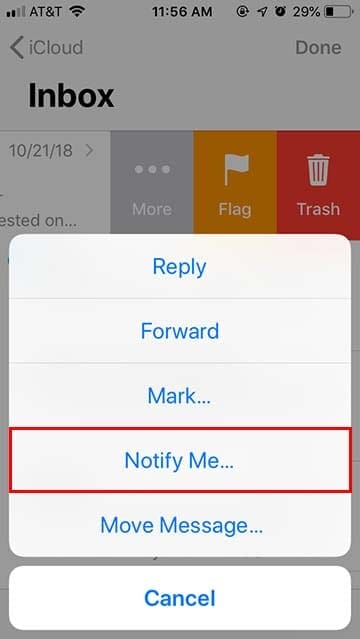
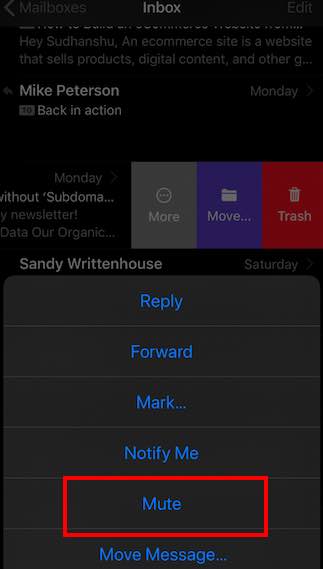
2. Get alerts for specific threads
Swipe right on an email, tap on More, and tap Notify Me to get alerts for that thread.
In other instances, you may want to keep track of a single important email thread without adding anyone to your VIP list permanently. Luckily, in Mail for iOS, there’s a way to do that, too.
Just go to any inbox. Swipe to the right on a message and tap on the three-dot More button. In the dropdown menu, tap on Notify Me… and then confirm. To undo this action, just swipe right again, tap More and tap on Stop Notifying.
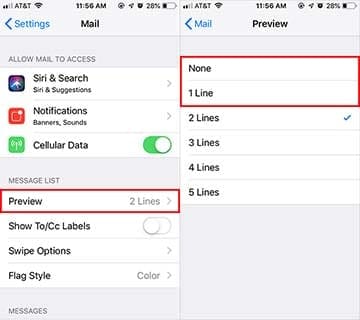
1. Get a larger inbox
Mailbox feeling cramped? You can fit more messages on your display by nixing text preview lines.
Working with email on a mobile device is typically a breeze. But the smaller displays on most smartphones can make your inbox feel a bit cramped compared to a web- or computer-based client.
You can actually squeeze a bit more inbox space out of your display by going to Settings —> Mail —> Preview. From there, just select 1 Line or None. This edits how much an email text preview Mail shows you. Without that text, you can fit a lot more emails onto your screen.
Bonus iOS 13 Mail Tips
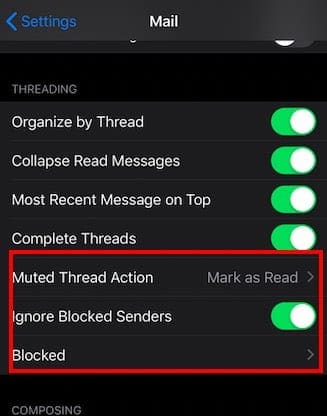
Starting with iOS 13, Apple has introduced new features that allow you to block, mute and ignore blocked senders all in an effort to reduce spam.
Mute email Thread. Tap on Settings > Mail > Muted Thread Action and you can choose from ‘Mark as Read’ or ‘Archive or delete’.
In your mail, now you can swipe and choose ‘More’ followed by ‘Mute’ and it will stop sending you new conversations on that email thread.
Mute email threads and block unknown senders
Ignore Blocked Senders – Similarly, Select ‘Ignore blocked Senders’ in your Mail settings and any emails coming from users in your blocked list will automatically be removed before reaching your inbox.
You can read up on all the new changes coming to iOS 13 around spam and robocall reduction.
Mail on macOS
The Mail app on macOS is actually a really powerful app for sending, receiving and organizing emails. There’s a lot more to the app than meets the eye, which inevitably means that there are probably tons of things you didn’t know Mail on macOS could do.
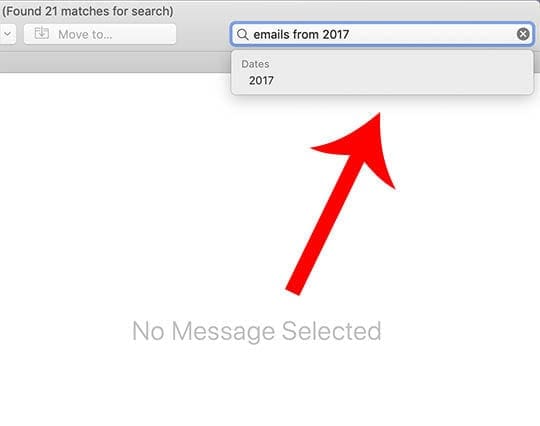
10. Take advantage of search
Don’t just use the search bar for simple tasks — it can perform quite a few complex or granular searches.
If you use the Mail app on macOS, you already know about the search bar in the upper-right corner. But you may not realize just how powerful that search bar can be. (You can easily invoke a search with Command + Option + F.)
For example, the search bar supports natural language — just typing in “emails from yesterday” or “emails with attachments.” The searches can get a lot more granular than that, trying typing two dates into the search bar with a dash in between to locate emails received within that timeframe.
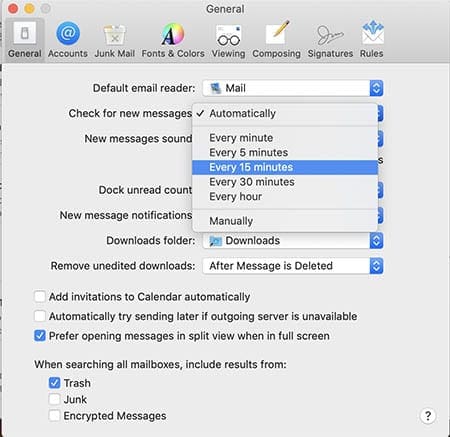
9. Get some peace and quiet
If you don’t need to know if an email comes in immediately, setting a longer interval between alerts can boost your productivity.
Notifications can get really annoying, really quickly. That’s especially true if you have emails coming in every few minutes or so. If your Mac is beeping at you at that rate and you need some peace and quiet, you can actually change how often Mail interrupts you.
By default, Mail is set to check for new messages automatically. That means it’ll ping you whenever it detects an email coming in. But you can edit that behavior in Mail —> Preferences. In the General tab, under Check for new messages, try a longer interval like 15 or 30 minutes.
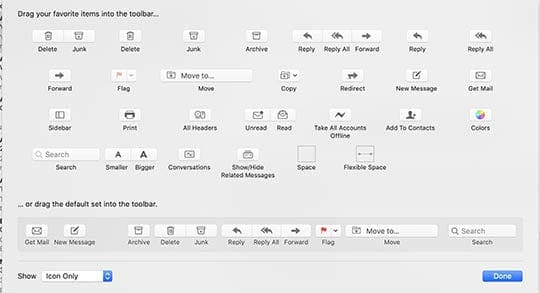
8. Customize your toolbar
The Mail Toolbar is surprisingly customizable in macOS.
The default toolbar in Mail probably works for most people who use it. But, as we mentioned, Mail often has another layer of capability and customization beneath the surface. That’s the case with the toolbar, which is actually incredibly customizable if you know where to look.
To customize your toolbar, just right-click on any blank area in the toolbar itself. Then, select Customize Toolbar from the dropdown menu. From there, you should see a new pane with a slew of different options. There are a ton of different buttons you can swap in and out, so experiment until you find a setup that you like.
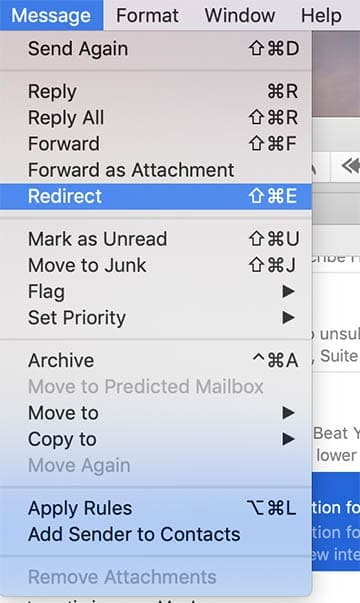
7. Redirect, don’t forward
Redirecting is a lot like forwarding, but you won’t get future updates from an email thread.
Most of us likely forward emails to another person in our day-to-day lives. That’s great for passing communication to someone else, but it can end up being annoying if the recipient hits Reply All and subsequent emails to go everyone else in the thread — including you.
The next time you get an email and you’d like to pass it off without the possibility of getting an email back, use a Redirect instead of a Forward. Select an email in Mail and then click the Message button in the top menu bar. Then, click Redirect, type in the email address and hit Send. You can also use Shift + Command + E.
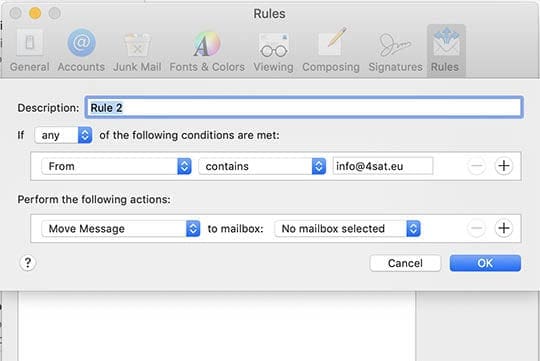
6. Set up some Mail Rules
Think of Mail Rules like ‘workflows’ or ‘shortcuts’ for email routing and organization.
One of the more powerful but little-used features of the macOS Mail app is Rules. Basically, Rules are predetermined “workflows” that can lets Mail automatically organize, block, delete or highlight certain messages depending on various settings that you input.
Just go to Mail —> Preferences —> Rules. From here, you can Add Rule. Then you’ll set certain parameters, such as where a message comes from or what type of content it contains. Finally, you’ll set an output rule. For example, you can have Mail automatically send all emails from a certain account to a separate folder. The possibilities are limitless.
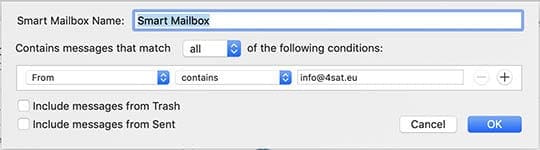
5. Create a Smart Mailbox
Like Rules, a Smart Mailbox is another option for email organization.
Like Rules, Smart Mailboxes are another powerful tool baked into Mail. Basically, a Smart Mailbox is a way to collect and organize all emails fitting certain criteria into one place. Create a Smart Mailbox for “Messages from Family,” and then add your family’s email addresses in and it’ll do the rest.
Of course, that’s just one usage of a Smart Mailbox — and the possibilities are pretty much up to you. To create a Smart Mailbox, select the Mailbox button in the top menu bar and select New Smart Mailbox. From here, you’ll input various criteria. Keep in mind that Smart Mailboxes will organize existing, read mail in your inbox as well as future mail.
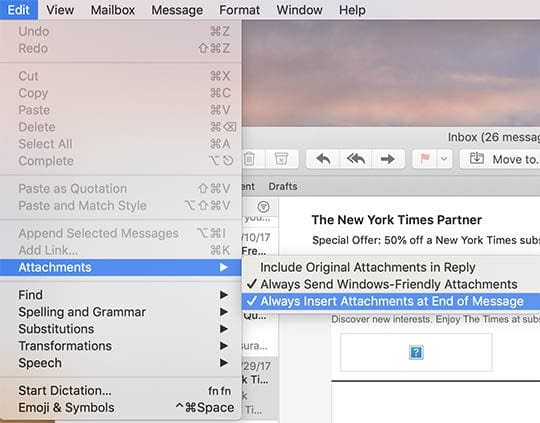
4. Avoid problems with attachments
Make sure these two options are checked if you’re running into problems sending attachments to your Windows friends.
While emailing someone on a Windows PC or Linux machine, you may run into attachment compatibility issues. Luckily, there are a few easy tricks you can do to avoid problems when sending messages from Mail to your Windows friends.
Use Mail Drop or Dropbox for sending larger images or attachments.
Go to Edit —> Attachments and make sure that these two options are enabled: Always Send Windows-Friendly Attachments and Always Insert Attachments at End of Message.
Check your file extensions. Windows machines need file extensions to function, so make sure you don’t delete them off of a file that you’re sending to a PC user.
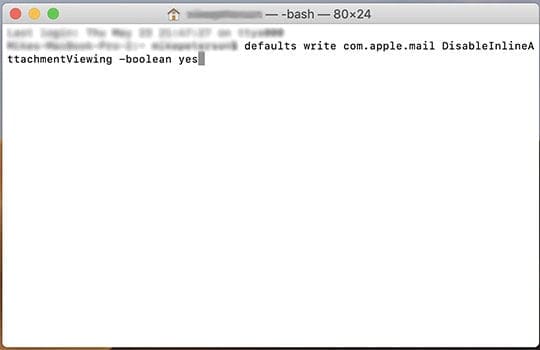
3. Enable or disable image preview
If you’re comfortable with the Terminal, you can edit whether Mail shows off file previews.
By default, Mail will show you a preview of PDF files or images automatically when you open a message. There are, however, a number of reasons why you’d want to disable it. One possible reason is speed, while security may be another.
You can edit this behavior, but not within the Mail app. Instead, you’ll need to open up the Terminal and paste in the following string.
To re-enable image previews in Mail down the line, open Terminal and copy/paste the same exact string but swap “yes” at the end with “no.”
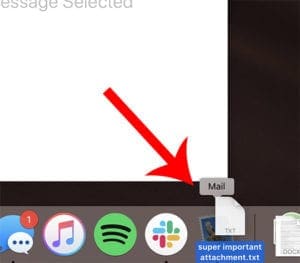
2. Send a file (really quickly)
Dragging and dropping a file onto an app in the Dock can be a real time-saver.
Have a file that you need to send to a contact in a hurry? macOS actually supports the ability to drag and down any kind of files onto apps in the Dock. This, of course, applies to the Mail app as well.
The next time you need to attach a file to an email, just drag and drop it onto the Mail icon in the bottom Dock. Mail will automatically open with a new message that has the file attached. It only saves a few seconds — but they can add up quickly if you send a lot of media or attachments on your Mac.
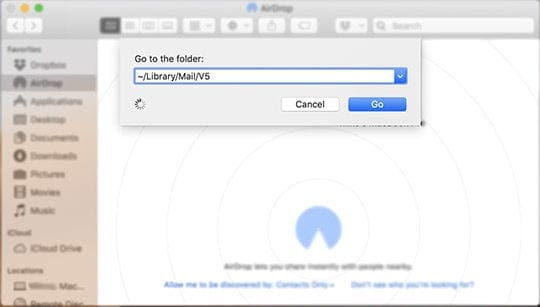
1. Find where macOS keeps your mail
Using the Finder Go to Folder option is a handy way to find where Mail keeps your emails.
Because of the way most email providers work, you probably don’t feel the need to physically back up your messages to a separate USB drive or SSD. But, of course, there are likely a slew of reasons why you may want or need to down the road.
It’s pretty easy to find where Mail actually stores your email messages on your device. Just open a Finder window and select Go —> Go to Folder… from the top menu bar. Then, copy and paste the string below and click OK.
~/Library/Mail/V5
Apple Mail on iOS and macOS is one of the most popular applications that is used by users worldwide. It may not have all the bells and whistles of a third party Mail app but it still has a lot of hidden tips and tricks that can effectively make you more productive while keeping you secured.
Is there a favorite tip that we didn’t cover here? Please let us know in the comments below.
Mike is a freelance journalist from San Diego, California.
While he primarily covers Apple and consumer technology, he has past experience writing about public safety, local government, and education for a variety of publications.
He’s worn quite a few hats in the journalism field, including writer, editor, and news designer.
I have just upgraded to Catalina and am so frustrated that the new mailbox no longer has the ability to manipulate the column widths, order, and worst of all, it no longer displays the number of attachments to an email. Instead there is a small paperclip icon right at the end of the email line (making it more difficult to quickly see the actual sender of the email) and when I need to identify a specific email which I know has multiple attachments, I can no longer do so. This is truly a step backwards and decreases user manipulation. If you have any influence at all, please lobby Apple to bring back the ability to change column widths, sequences and display of attachment numbers.
Many thanks, with slim hope of any Apple response on this …..
Drag mail to desktop then use Finder tags and Hazel to file Mail in Finder’s file system rather then Mail’s file system to have a more unified filing system.


Even with OS 12.4 there does not seem to be a ready way to retrieve accidentally deleted emails.
I have just upgraded to Catalina and am so frustrated that the new mailbox no longer has the ability to manipulate the column widths, order, and worst of all, it no longer displays the number of attachments to an email. Instead there is a small paperclip icon right at the end of the email line (making it more difficult to quickly see the actual sender of the email) and when I need to identify a specific email which I know has multiple attachments, I can no longer do so. This is truly a step backwards and decreases user manipulation. If you have any influence at all, please lobby Apple to bring back the ability to change column widths, sequences and display of attachment numbers.
Many thanks, with slim hope of any Apple response on this …..
Drag mail to desktop then use Finder tags and Hazel to file Mail in Finder’s file system rather then Mail’s file system to have a more unified filing system.