Apple’s stance on privacy and security is a big reason why the company continues to gain new users on a regular basis. The company has shown that it’s ready and willing to lead the way when it comes to keeping its user’s data private and secure. As another example of this Apple recently announced three major “advanced security features”, starting with Advanced Data Protection for iCloud.
When we talk about keeping your data safe and secure, we aren’t just talking about having a passcode or password on your device. This goes a long way in its own right but is more focused on someone getting ahold of your physical device and trying to access your information.
Because there so much of our lives rely on the cloud, namely iCloud, Apple is taking additional measures to keep your information as secure as possible. The introduction of Advanced Data Protection for iCloud comes following the release of Lockdown Mode with iOS 16, along with the various on-device security modules built into your iPhone. Here’s Apple’s official description of what this new feature is:
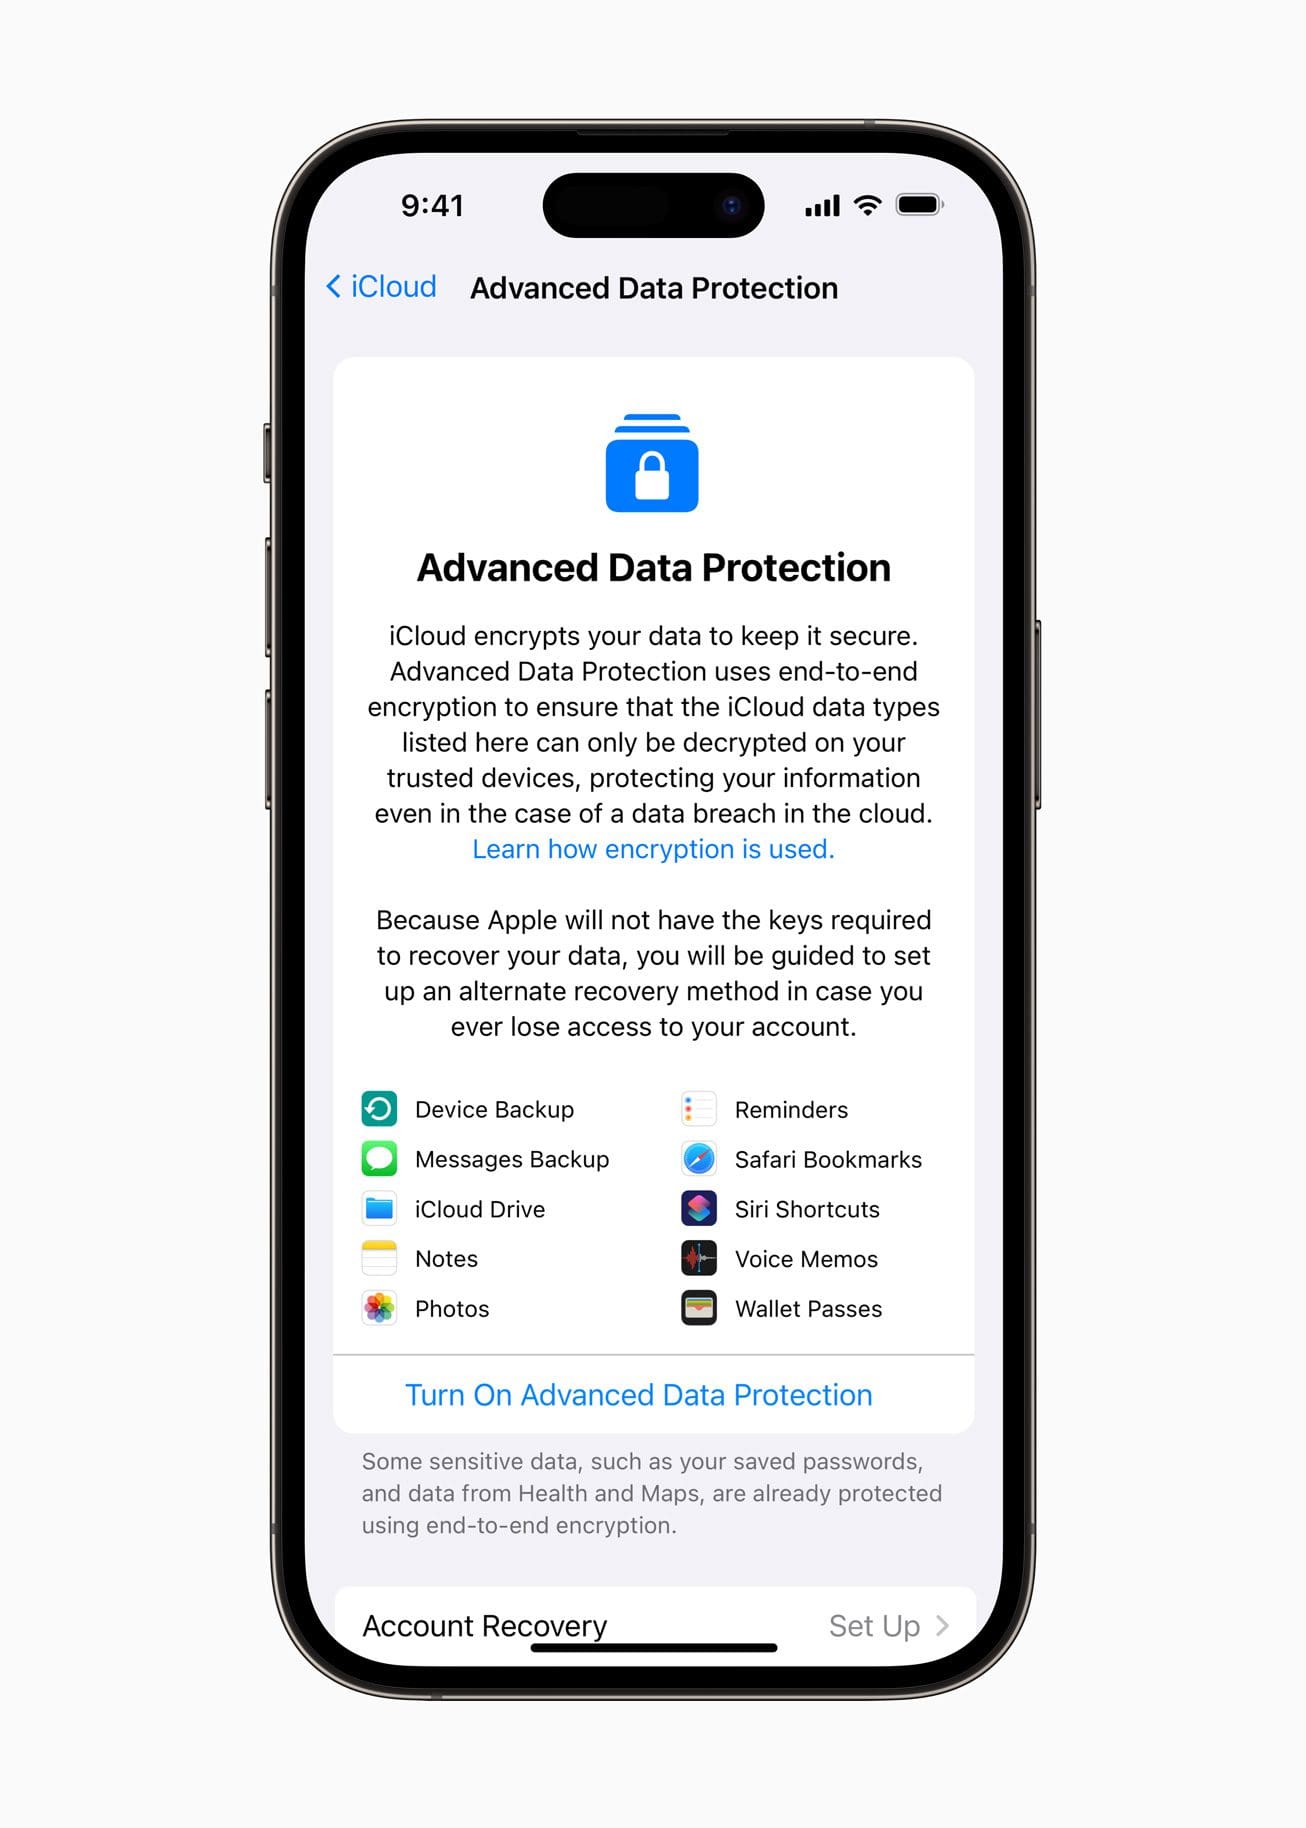
“Advanced Data Protection is Apple’s highest level of cloud data security, giving users the choice to protect the vast majority of their most sensitive iCloud data with end-to-end encryption so that it can only be decrypted on their trusted devices. For users who opt-in, Advanced Data Protection keeps most iCloud data protected even in the case of a data breach in the cloud.”
With Advanced Data Protection for iCloud enabled, here are the different categories that will be encrypted:
Device Backup
Messages Backup
iCloud Drive
Notes
Photos
Reminders
Safari Bookmarks
Siri Shortcuts
Voice Memos
Wallet Passes
The list above doesn’t include everything that Apple provides encryption for. There are other apps and pieces of information that are already encrypted, such as data from Health and Maps, along with passwords that are saved to your iCloud account through the iCloud Keychain.
According to Apple, with Advanced Data Protection for iCloud enabled, “the total number of data categories protected using end-to-end encryption rises to 23”. Apple also points out that iCloud Mail, Contacts, and Calendar are the only remaining “major iCloud data categories that are not covered” because “of the need to interoperate with the global email, contacts, and calendar systems.”
How to Turn on Apple’s Advanced Data Protection for iCloud on iPhone
As is the case with most of the new features offered by Apple, Advanced Data Protection for iCloud is not enabled by default. Instead, Apple is giving its users the opportunity to “opt-in” if they want the added security. Plus, if this feature is enabled, you’ll need to set up an alternative recovery method which involves selecting a specific contact or writing down your iCloud account’s Recovery Key.
Requirements To Use Advanced Data Protection
Two-factor authentication is activated and enabled on your iCloud account.
You must be signed in to your Apple ID.
Your devices must be updated to at least iOS 16.2, iPadOS 16.2, macOS 13.1, tvOS 16.2, watchOS 9.2, and the latest version available of iCloud for Windows.
You must set up an alternative recovery method. This is done when enabling Advanced Data Protection for iCloud.
Turn On Apple’s Advanced Data Protection for iCloud
If you decide that you want to turn on Apple’s Advanced Data Protection for iCloud, here are the steps that you need to take:
Open the Settings app on your iPhone.
Tap [Your Name] at the top of the page.
In the second section, tap iCloud.
Scroll down to the bottom of the page.
Tap Advanced Data Protection.
Tap Turn On Advanced Data Protection.
To begin the process, tap the Set Up Account Recovery button.
From the Account Recovery page, tap the Add Recovery Contact button.
Tap the Add Recovery Contact button.
Authenticate using Face ID, Touch ID, or your iPhone’s passcode.
Select a Recovery Contact.
Tap Next in the top right corner.
Tap the Send button to send a message to the Recovery Contact of your choosing. Apple provides a pre-populated message that will be sent, or you can edit the message yourself.
In the event that you would prefer to have a Recovery Key for your Apple account as opposed to a Recovery Contact, this is also possible. According to Apple, the Recovery Key is a “28-character code that you keep in a safe place. You can use it to recover your data if you lose access to your account.” Here’s how you can set up and create a Recovery Key for your Apple ID:
Open the Settings app on your iPhone.
Tap [Your Name] at the top of the page.
In the second section, tap iCloud.
Scroll down to the bottom of the page.
Tap Advanced Data Protection.
Tap Turn On Advanced Data Protection.
To begin the process, tap the Set Up Account Recovery button.
Tap Recovery Key.
Tap the toggle next to Recovery Key to the On position.
From the dialog box that appears, tap the Use Recovery Key button.
When prompted, enter your iPhone passcode.
From the Recovery Key screen, write down and make note of the Recovery Key provided. While you can keep this stored in a password manager (such as 1Password), it’s highly recommended to also have a physical copy available.
Once the Recovery Key has been saved, tap the Continue button.
Enter the Recovery Key for verification.
Tap Next in the top right corner.
I know we already touched on this, but it’s extremely important to point this out again. Make sure you write down and save your Recovery Key and keep it in a safe place. Without this, you won’t be able to access your Apple account in the event that you lose access to it. Also, Apple notes that the company will not have access to your Recovery Key and is unable to unlock your account without it.
How To Turn Off Advanced Data Protection for iCloud
If you make the decision to turn off Advanced Data Protection, this is also possible and can be done right from your iPhone.
Open the Settings app on your iPhone.
Tap [Your Name] at the top of the page.
In the second section, tap iCloud.
Scroll down to the bottom of the page.
Tap Advanced Data Protection.
Tap Turn Off Advanced Data Protection.
Follow the on-screen steps to turn this feature off.
While this feature will be available for anyone using the latest version of iOS, iPadOS, macOS, tvOS, and watchOS, Apple states that it will first be available to “US users by the end of the year.” The company has plans to begin rolling out Advanced Data Protection to more regions across the globe “in early 2023.”
How to Fix Can’t Use Advanced Data Protection Error on iPhone and iPad
Some users may encounter an error message stating “Can’t Use Advanced Data Protection” on their devices. This error can be frustrating, especially if you rely on this feature to keep your data secure. Fortunately, there are several troubleshooting steps you can take to resolve this issue. In this guide, we’ll walk you through the process to fix the “Can’t Use Advanced Data Protection” error on iPhone and iPad.
Make Sure Your iPhone or iPad Are Updated
Open ‘Settings’: Tap on the “Settings” app on your device.
Go to ‘General’: Scroll down and tap on “General.”
Tap ‘About’: Here, you can see your iOS version.
Update if Necessary: If you are not on the latest version, go back to “General” and tap “Software Update” to update your device. Some features may require the latest iOS version to function properly.
Remove Older Apple Devices
Due to the fact that you cannot use Advanced Data Protection on older devices, this could explain why you’re seeing the “Can’t Use Advanced Data Protection” error on your iPhone or iPad. Luckily, there aren’t too many hoops that you’ll need to jump through in order to remove older devices from your Apple ID. Here’s how you can do so from your Mac:
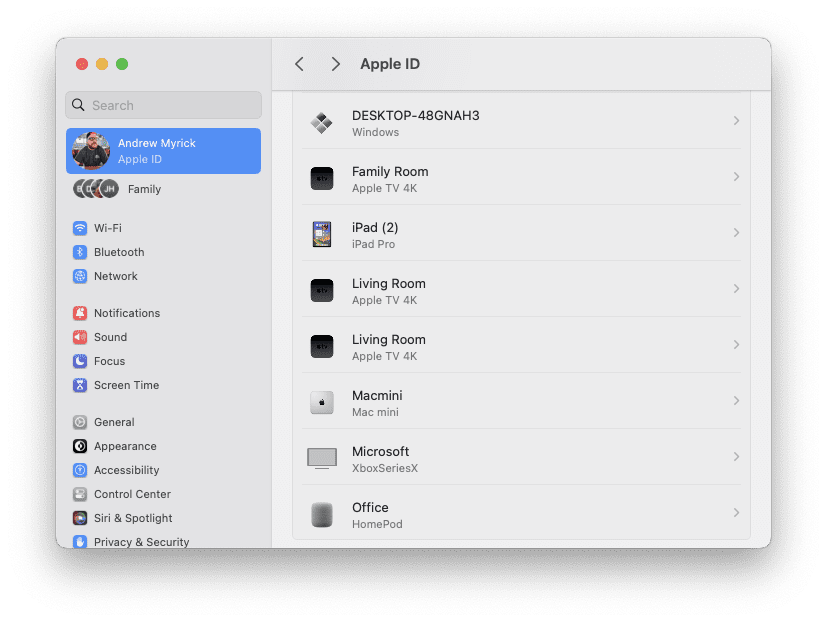
Open the System Settings app on your Mac.
Click your Apple ID in the top left corner of the window.
Scroll down until you reach the Devices section.
Select the Apple device that you want to remove.
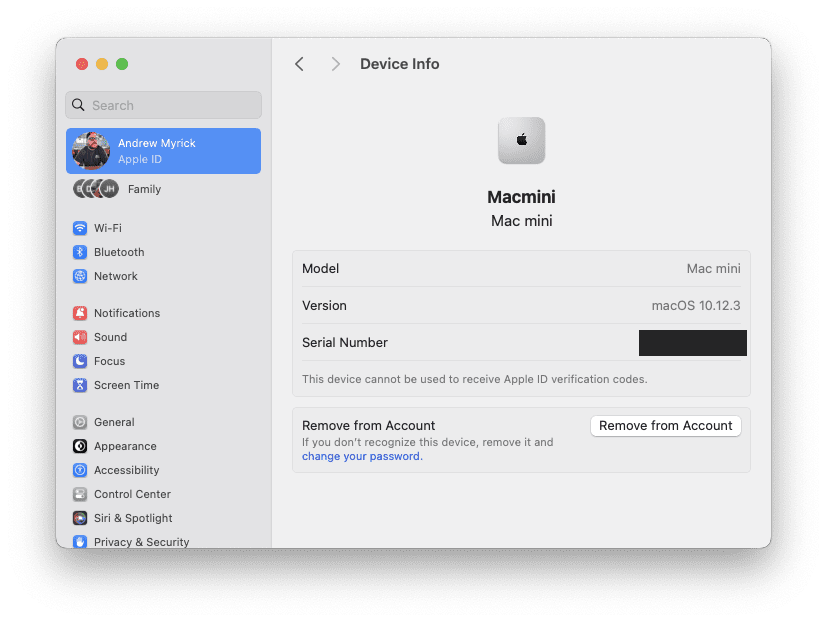
Wait for the Device Info window to finish loading.
Click the Remove from Account button.
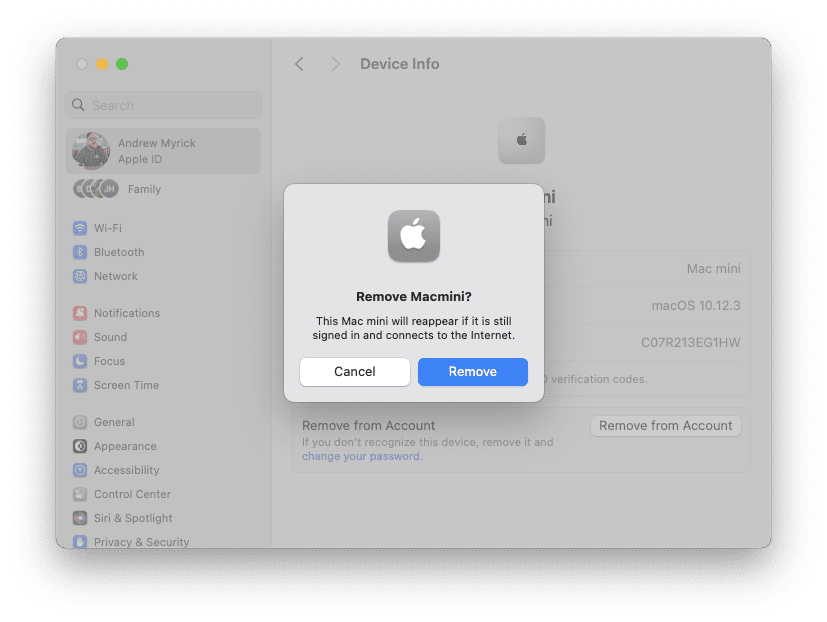
When prompted, click the Remove button to confirm.
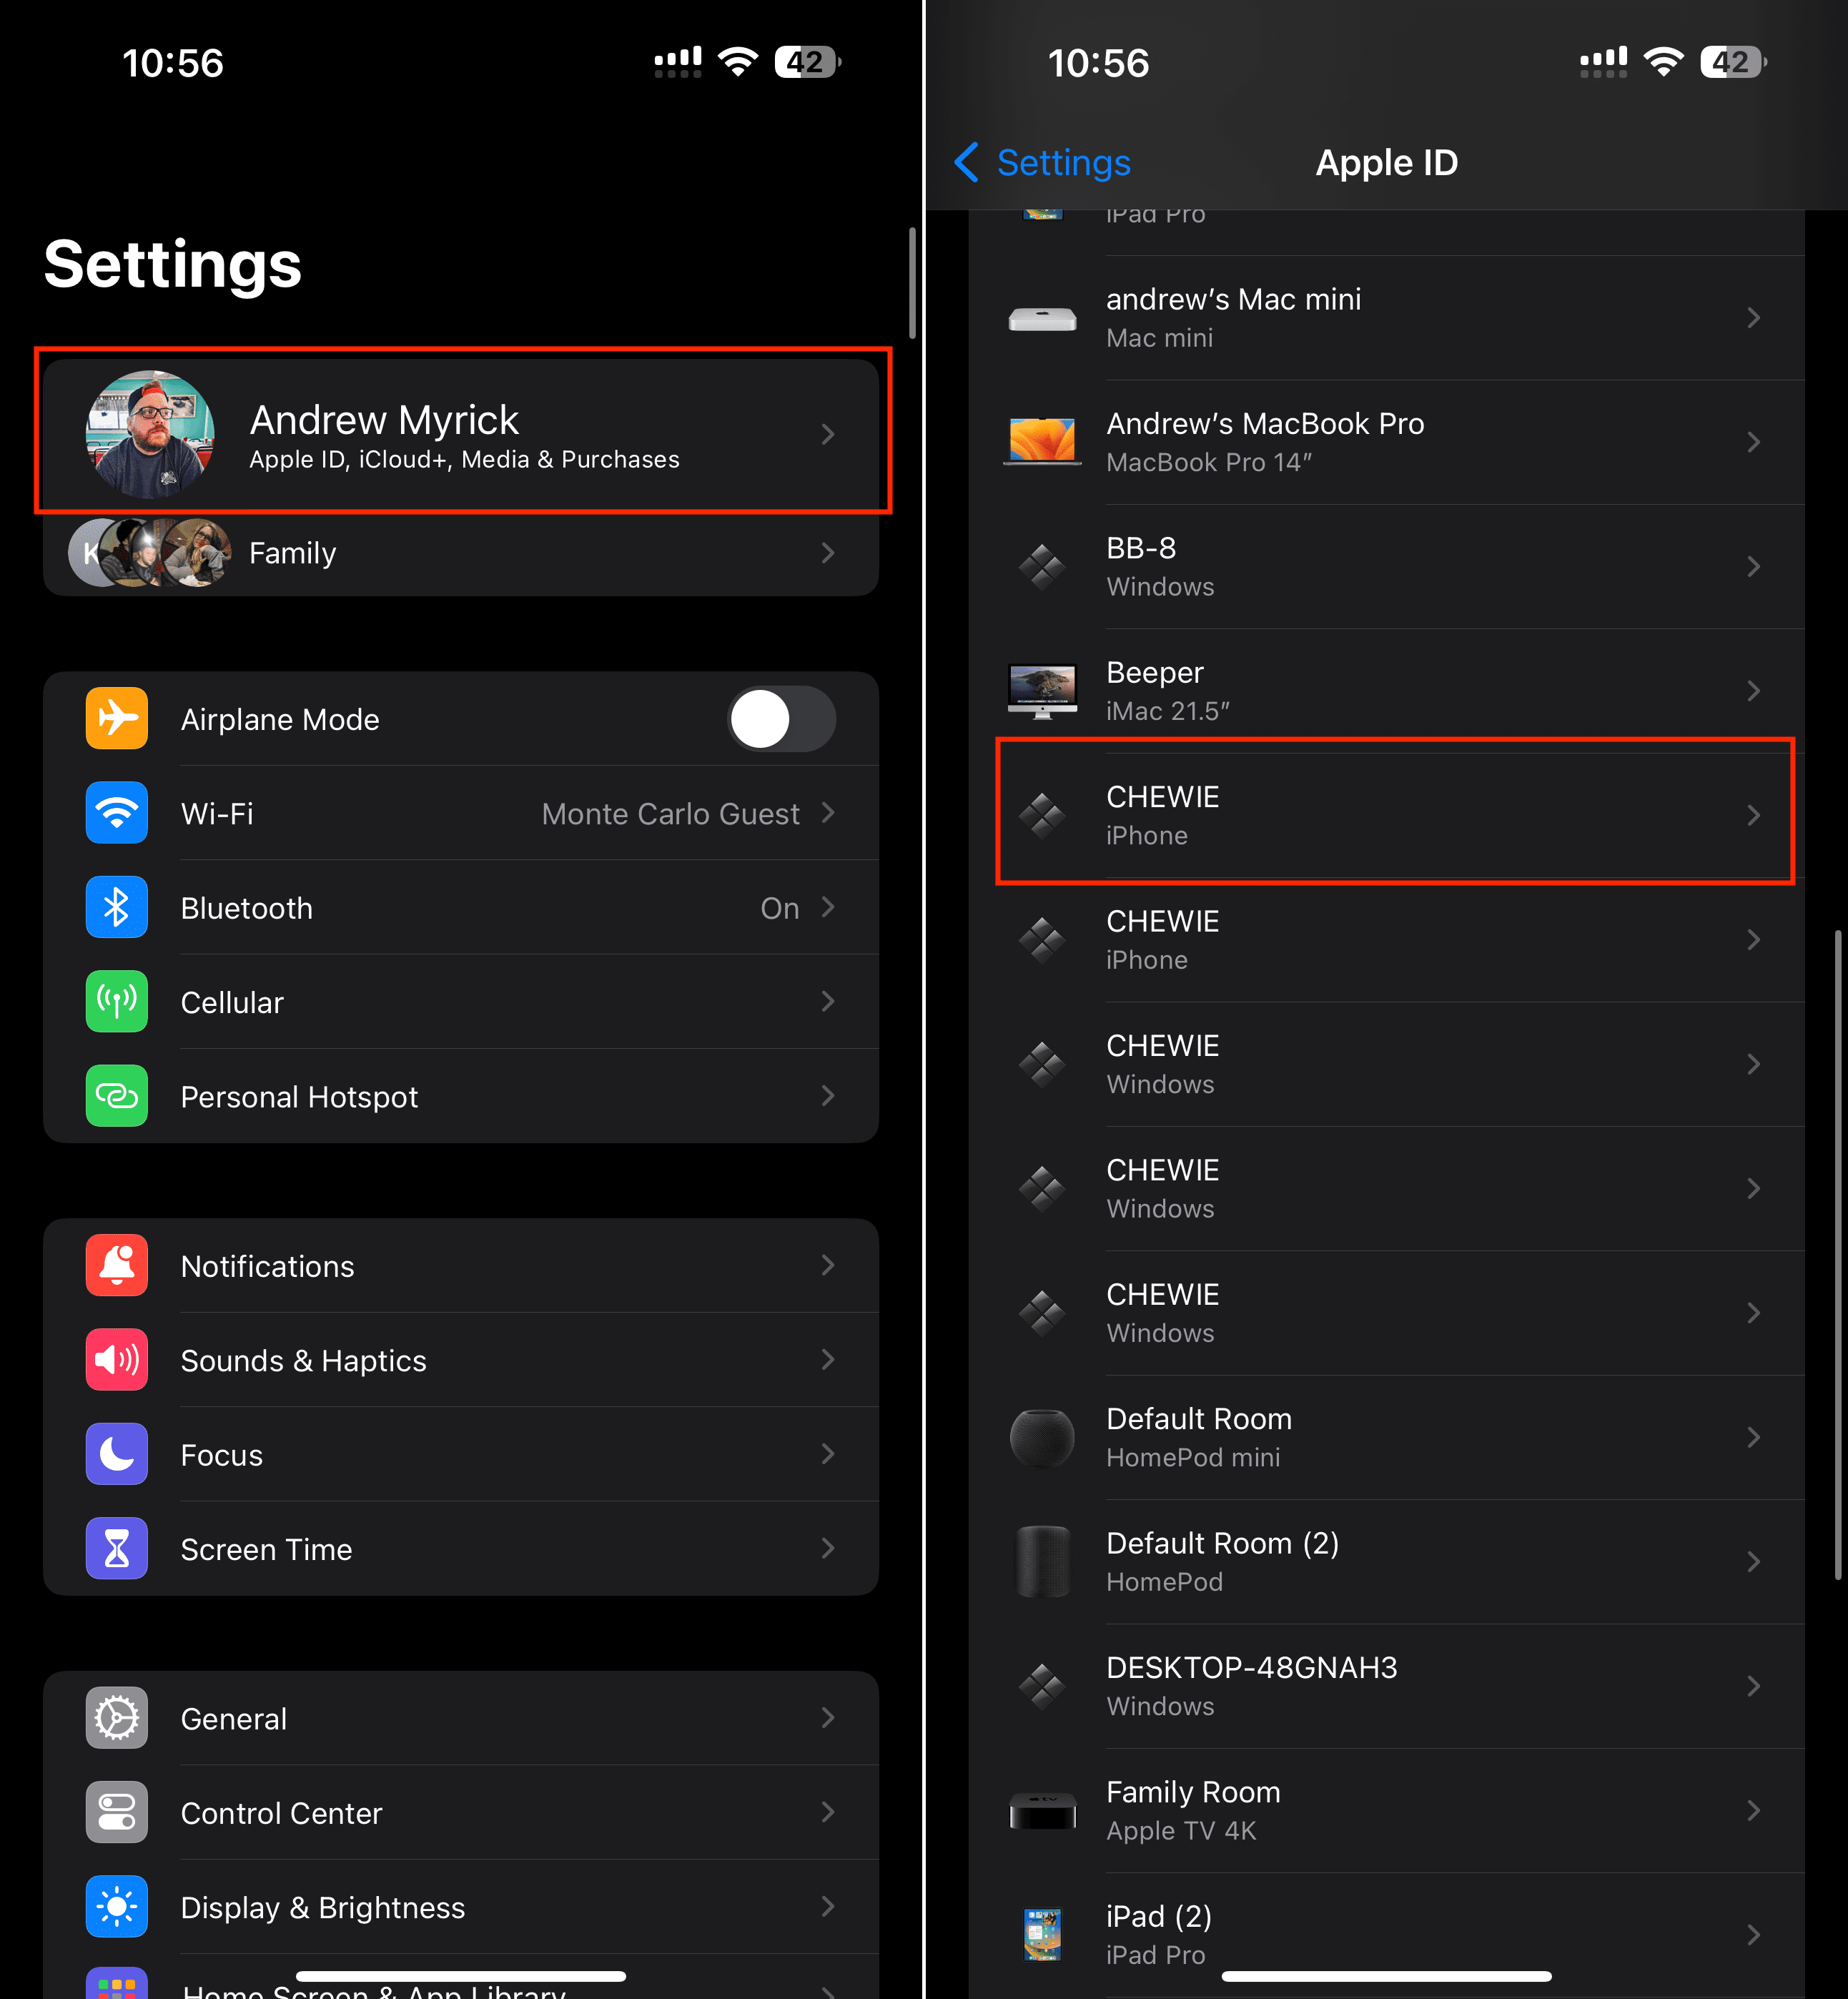
In the event that you don’t have a Mac, or aren’t near one, you’re in luck. Here are the steps to remove older devices from being associated with your Apple ID, from an iPhone or iPad:
Open the Settings app on your iPhone or iPad.
Tap Your Name at the top of the window.
Scroll down until you see the list of devices associated with your Apple ID.
Tap the device that you wish to remove.
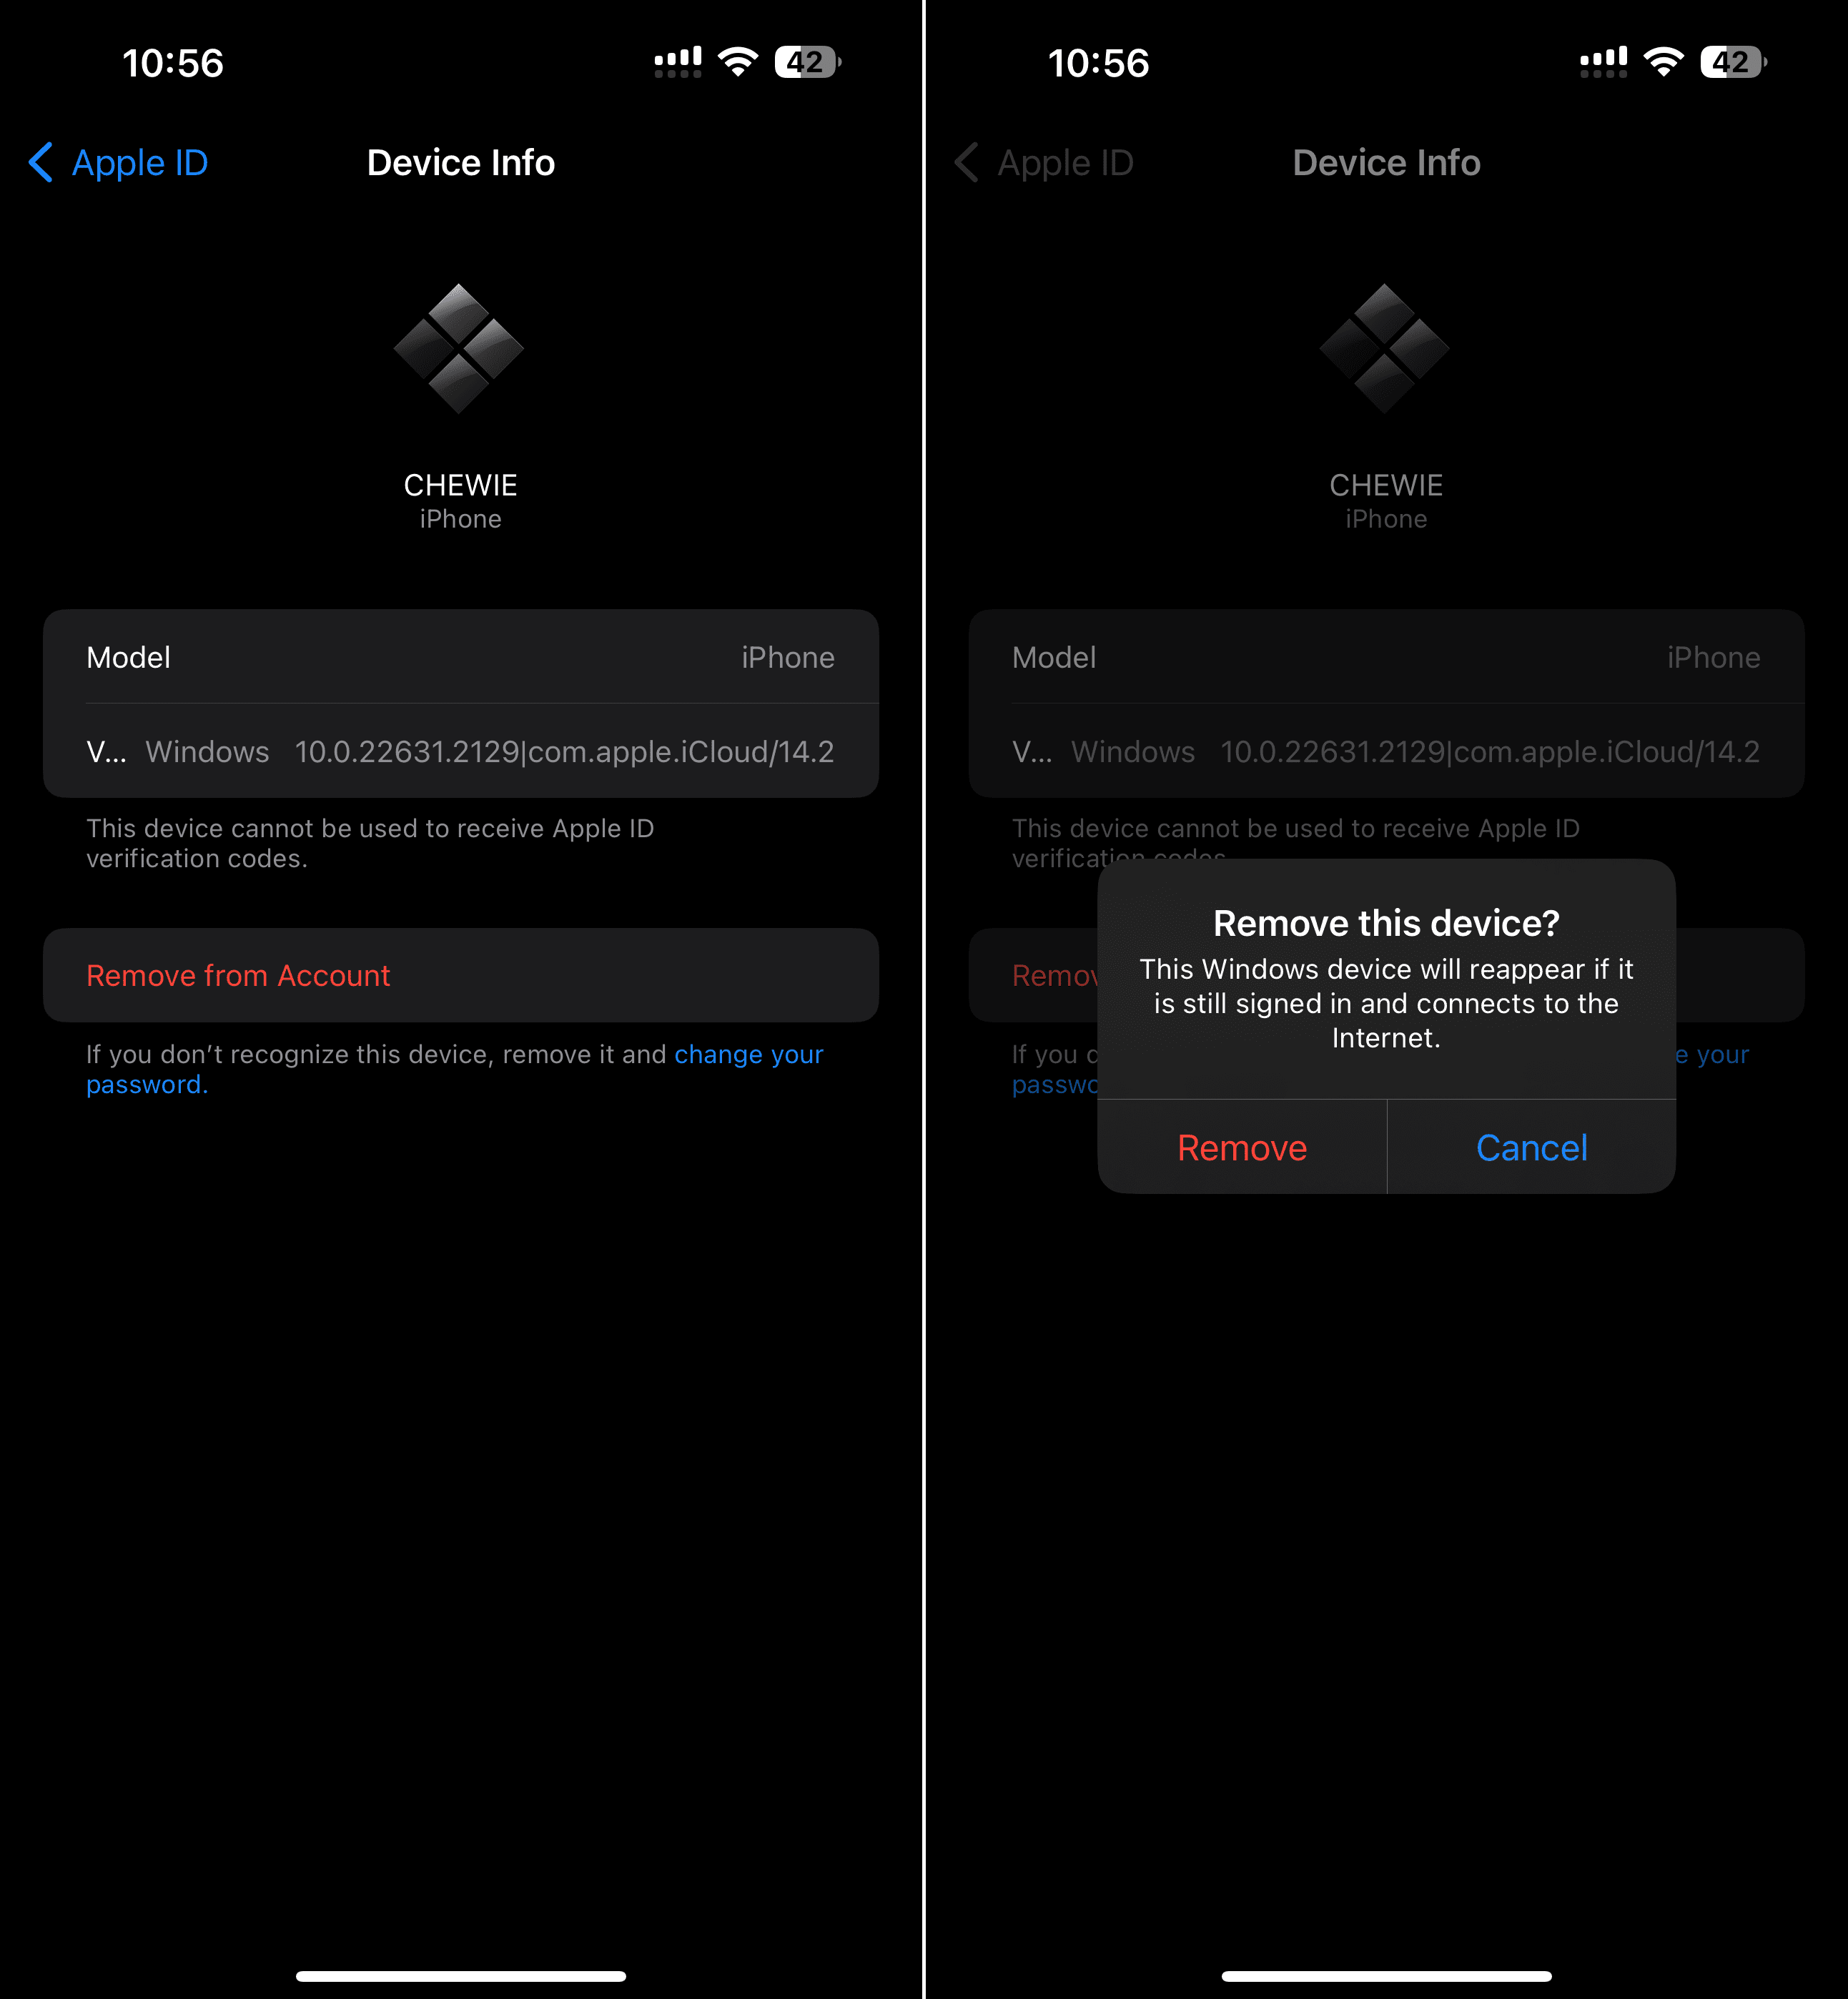
Wait for the Device Info panel to finish loading.
Tap the Remove from Account button.
When prompted, tap the Remove button to confirm.
Turn Off and On Advanced Data Protection
Go to ‘Settings’: Open the “Settings” app.
Tap ‘Privacy’: Scroll down and tap on “Privacy.”
Tap ‘Advanced Data Protection’: If available, toggle the switch off and then back on. This simple restart of the feature may resolve the error.
Reset Network Settings
By resetting the Network Settings, all of your saved Wi-Fi networks and VPN connections will be completely removed. But this also resets that cellular connection on your device, which may help to improve the overall network connectivity of your iPhone and iPad.
Open the Settings app on your iPhone or iPad.
Tap General.
Scroll to the bottom and tap Transfer or Reset iPhone (iPad).
Tap the Reset button at the bottom of the page.
Tap Reset Network Settings.
Enter your passcode if prompted.
Contact Apple Support
If the above steps do not resolve the issue, it may be a more complex problem that requires assistance from Apple Support.
Go to the Apple Support Website: Visit Apple Support.
Choose Your Device: Select iPhone or iPad.
Describe the Issue: Enter “Can’t Use Advanced Data Protection” in the search bar.
Follow the Prompts: Apple Support may provide additional troubleshooting steps or connect you with a support representative.
Conclusion
The “Can’t Use Advanced Data Protection” error on iPhone and iPad can be a concerning issue, especially for those who prioritize data security. However, by following the steps outlined in this guide, most users should be able to resolve the problem. Whether it’s a simple toggle of the feature, an iOS update, a network settings reset, or seeking professional assistance from Apple Support, these methods provide a pathway to restoring this essential security feature. Always remember to back up your device before making significant changes, and don’t hesitate to reach out to Apple Support if you need specialized help.
Andrew Myrick is a freelance writer based on the East Coast of the US. He enjoys everything to do with technology, including tablets, smartphones, and everything in between. Perhaps his favorite past-time is having a never-ending supply of different keyboards and gaming handhelds that end up collecting more dust than the consoles that are being emulated.


Write a Comment