iPhone cameras have come a long way since some of the earlier models. Taking high-quality pictures of your daily activities isn’t a huge problem, and some people have even used their devices for professional photography work.
The iPhone Pro often has more camera-related specs than the basic version released each year. But at the same time, you can capture excellent shots on pretty much every modern device.
If you want to do more to take great photos with your iPhone, we’ll help you out with the tips you see in this article.
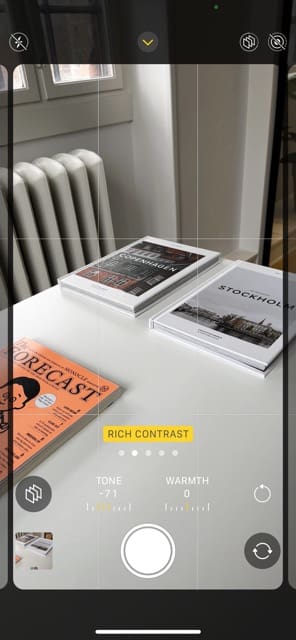
When you first buy an iPhone, you’ll see the default Standard filter when trying to take pictures on your device. But did you know that you can customize your iPhone and use one of Apple’s filters when capturing your shots?
Besides Standard, you can choose from four other filters: Rich Contrast, Vibrant, Warm, and Cool. To adjust your filter, you can follow these instructions.
Open the Camera app.
Go to the icon with three rhombuses in the top right.
Swipe along until you see the filter you want to use.
Swipe down on your iPhone screen and start taking photos.
Your filter will stay as your current selection until you adjust it again.
You can also choose from numerous other filters that you’re also able to add to your photos later. These include Vivid Warm, Dramatic, and many others. Access these by following along with these steps:
Swipe up on your screen when you’re on the Photo tab.
Swipe to the end. Here, you’ll see an icon with three circles; tap on this.
Pick the filter you want to add to your photo.
2. Customize Your Filters Before Taking Photos
In addition to changing the base filter for taking photos on your iPhone, you can customize each filter to meet your needs. You have the ability to change the tone and warmth.
To customize your filters, follow the steps listed below.
In the Camera app, go to the rhombus icon again.
When you see the filters appear, move the Tone and Warmth sliders to the left or right – depending on how you want to change them.
Like when picking a filter, your changes will remain in effect until you change them later.
3. Use a Tripod or Stable Surface for Longer-Exposure Shots
One of the nicest things about iPhone cameras is that they have the ability to take amazing long-exposure pictures. You can capture nighttime scenes in the place you live, and you can also experiment with different light trails.
But as many experienced photographers will tell you, longer-exposure shots are harder to get technically right. Even the slightest movement can result in a blurry photo.
On many iPhones, you can use exposures between three and 10 seconds long. When picking these, it’s wise in many scenarios to use a tripod or something else where you can keep your iPhone stable.
You can get a lot of cheaper tripods that will work with your iPhone, but it’s important to remember that these are often not as sturdy. And because of that, you may find that there’s more shake in your images than you want. So, it’s worth investing a little more money in something better.
4. Manually Adjust Your Exposure Before Taking Photos
Exposure is one of the most crucial aspects of taking a good photo on any camera, and that’s no different if you use an iPhone for your photography. While your device will automatically change the exposure for you, it’s worth taking this into your own hands. Doing so will give you a better chance of getting the exact levels that you’re looking for.
Changing the exposure in photos on an iPhone is incredibly simple. First, press and hold on to your screen in the Camera app. Then, when the light logo appears, move it up or down – depending on whether you want to increase or decrease your photo’s exposure.
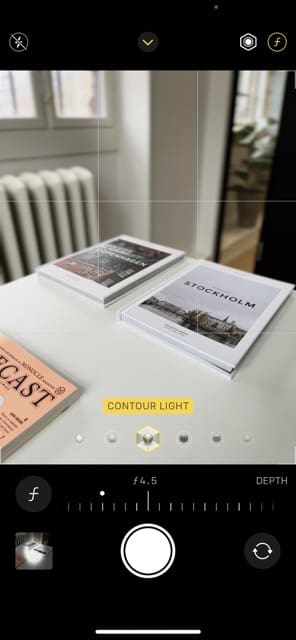
5. Change Your Aperture When Using Portrait Mode
Aperture is another crucial aspect in photography, and it controls how much depth of field you have in your image. The lower the number, the wider the depth of field.
When using your iPhone in Portrait Mode, you can choose between f/1.4 and f/16. Generally speaking, it’s worth sticking around the following figures when you use your device for photography:
f/2.8-f/5.6: Standard portraits of people
f/5.6-f/7.1: Street photography
f/8-f/11: Images of landscapes and city skylines
These rules aren’t hard and fast, but they’re good guidance if you’re a beginner and don’t know too much about photography terms.
To change the aperture in Portrait Mode on your camera, you can follow these steps:
Select the Portrait option.
At the top, you’ll see an italicized f icon with a number next to it. Click on this.
At the bottom, scroll to the left to use a wider depth of field. Alternatively, you can move your slider to the right if you want something narrower in this respect.
After taking a photo in Portrait Mode, you can adjust the aperture in the Photos app if you feel that doing so is necessary. However, it’s worth getting it right when taking the photo.
6. Bring Your Phone Close to Your Body When Taking Photos
Even if you don’t take longer-exposure photos with your iPhone, you can capture better shots by reducing the amount of shake in your images. The easiest way, apart from using a tripod, is to bring your phone closer to your body when taking your pictures.
Bring your iPhone as close to your body as possible, but make sure you can see the screen.
7. Avoid Using Flash in Most Scenarios
Flash is nice to have when a photo would otherwise be worthless, but using more natural light creates a much more pleasing image. Normally, using the camera flash will cause your subject to appear overexposed and washed out.
One of the few times where flash is beneficial is when you are shooting a photo of someone outside with the sun behind them. In this scenario using both HDR mode and flash is a good idea. The flash helps remove shadows from the subject rather than leaving them appearing as a silhouette.
Make the Most of the iPhone’s Amazing Photography Features
Ultimately, photography is all about exploring personal creativity and capturing memories. iPhones are excellent for beginner photography, and you can use them in a whole host of creative ways. But even if you only want to casually take pictures of your everyday life, you’ll find it easier to do so by following our steps.
Filters can help you achieve a consistent look in your pictures, which is particularly useful if you want to become a professional photographer or you’re posting your shots on Instagram. You can also improve your chances of getting better pictures by keeping your device stable, and adjusting your exposure is another wise idea.
Danny has been a professional writer since graduating from university in 2016, but he’s been writing online for over a decade. He has been intrigued by Apple products ever since getting an iPod Shuffle in 2008 and particularly enjoys writing about iPhones and iPads. Danny prides himself on making complex topics easy to understand. In his spare time, he’s a keen photographer.


Write a Comment