Several iPhone 11 or X Series users have recently found that after starting their iPhone, the device screen simply shows a white background color with the message ‘Swipe to Recover’. You are unable to do any operations beyond this point on the iPhone X/SX/XR. Swiping up to recover simply doesn’t do much as the iPhone gets stuck after a few attempts.
If you are experiencing this issue, please follow the steps below to fix your iPhone. You will need a computer running iTunes and a cable to connect your iPhone to your computer.
Before proceeding down the iTunes path to restore your device, try to hard reset your iPhone 11/X Series to see if that solves your problem.
A hard-reset requires you to press the Volume Up, Volume Down and then press and hold the side button until the Apple logo appears.
If after the hard reset, you still see the Swipe to Recover Message on your iPhone;s display, it is time to follow the steps below and do a restore using iTunes.
iTunes or Finder Does Not Recognize iPhone 11/X/XS/XR Using a Beta iOS?
For users who are using iOS developer beta on their devices and are having challenges connecting their iPhone 11/X Series to the MacBook, you need to download Xcode Beta in order for your iTunes to communicate with your iPhone.
Sometimes restarting your MacBook and then trying to connect your iPhone 11/X/XS/XR to iTunes can also help you when it won’t recognize your device.
Steps to Remove the Swipe To Recover Message on iPhone 11 or X Series device
Open iTunes Program or Finder on the computer that you are using
Connect your iPhone 11/X/XS/XR to the computer using the cable and follow the directions if it asks for passcode or ‘trust this computer’ steps
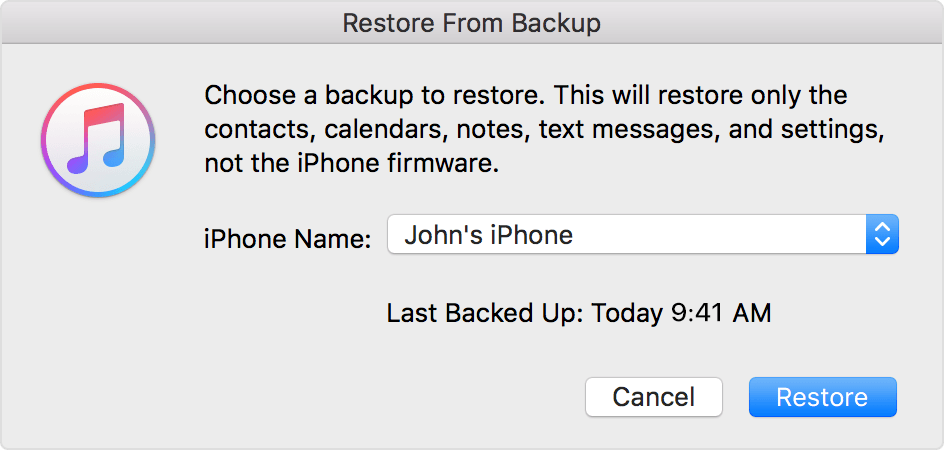
On the left pane of iTunes, click on Summary and choose your iPhone from the list of your devices (follow similar steps in Finder)
Once you select your iPhone, you should see the options for ‘Restore iPhone’ or ‘Restore Backup’ in the bottom half of the screen.
If the Restore options are missing or your device is not showing up on, press and hold the side button on your iPhone past the Apple Logo and the restore functionality should appear
Choose Restore from Backup and choose the most recent backup in order to restore your device
Keep your iPhone connected to the computer until the sync process is done. Once your iPhone has synced with your backup, you can remove the device
We are not sure what causes this error on the iPhone 11 or X Series phones. Many users have written to us about this issue particularly users who have been trying to use the new iOS betas on their iPhones.
We hope that you are able to successfully restore your iPhone and get rid of this annoying issue. Please let us know in the comments below if you have any questions or concerns.
Reader tips
Try this–it worked for me and I did not lose my data. Press and hold the volume down and the side button simultaneously until the screen is completely black. Wait for the device to reboot on its own. If after a few minutes, it still hasn’t rebooted, then power it on manually. Let the iPhone restart normally. For iPhones or iPads with a home button, press and hold the home button and power button simultaneously
It doesn’t mean for iPhone is currently erased but the process of recovering your data from a backup DOES erase your device. When you see this error message, it usually means that your iOS or iPadOS is somehow corrupted and consequently, it is not responding.
Before you go through those steps, try a forced restart: press and quickly release the Volume Up button. Press and quickly release the Volume Down button. Then press and hold the Side button until you see the Apple logo.
First, if you’re using a Windows machine, first install iTunes and iCloud for Windows (optional if you use iCloud or iCloud Photo Library.)
Try restarting both devices (the phone and the computer) and see if your computer recognizes your iPhone. If possible, use the cable that came with your iPhone to connect to the computer.
If that doesn’t work, unplug all USB accessories from your computer except for your phone. Then, try each USB port to see if one works. If that doesn’t work, try a different Apple USB cable to connect your phone to the PC.
And if still no joy, on your phone go to Settings > General > Reset > Reset Location & Privacy.
Then go to your Windows PC control panel.
Open Administrative Tools > Services > Select Apple Mobile Device > Stop the service. Once the service has stopped, click Start the service. Hopefully, your Apple Mobile Device service starts again.
Finally, open iTunes and connect your phone. See if it’s now recognized.


does this message mean that my iphone has been erased?
Hi Karla,
It doesn’t mean for iPhone is currently erased but the process of recovering your data from a backup DOES erase your device. When you see this error message, it usually means that your iOS or iPadOS is somehow corrupted and consequently, it is not responding.
Before you go through those steps, try a forced restart: press and quickly release the Volume Up button. Press and quickly release the Volume Down button. Then press and hold the Side button until you see the Apple logo.
my phone wont connect to my computer what do i do?
Hi Thomas,
First, if you’re using a Windows machine, first install iTunes and iCloud for Windows (optional if you use iCloud or iCloud Photo Library.)
Try restarting both devices (the phone and the computer) and see if your computer recognizes your iPhone. If possible, use the cable that came with your iPhone to connect to the computer.
If that doesn’t work, unplug all USB accessories from your computer except for your phone. Then, try each USB port to see if one works. If that doesn’t work, try a different Apple USB cable to connect your phone to the PC.
And if still no joy, on your phone go to Settings > General > Reset > Reset Location & Privacy.
Then go to your Windows PC control panel.
Open Administrative Tools > Services > Select Apple Mobile Device > Stop the service. Once the service has stopped, click Start the service. Hopefully, your Apple Mobile Device service starts again.
Finally, open iTunes and connect your phone. See if it’s now recognized.
Sam