Apple Notes is one of the best apps for taking notes on your iPad. First of all, it’s free to use. And because it’s already downloaded on your device, you can begin using the app as soon as you’ve set up your device.
You can use Apple Notes in numerous situations. It’s a great place to keep all of the random thoughts you have throughout the day, and you can also take notes from meetings and lectures. Moreover, Apple Notes is an ideal tool for creators looking to brainstorm ideas or script their content.
If you’ve been wondering how you can take smarter notes on your iPad, you’re in the right place. Today, you’ll learn how to do precisely that with our top tips. Let’s hop into things.
When you first use Notes on your iPad, you’ll notice a default toolbar. You’ll notice the option for fonts, one next to it for creating checklists, and another for making tables. On top of that, you’ll see a camera icon. Although many people won’t customize the toolbar, doing so might make it easier for you to take better notes.
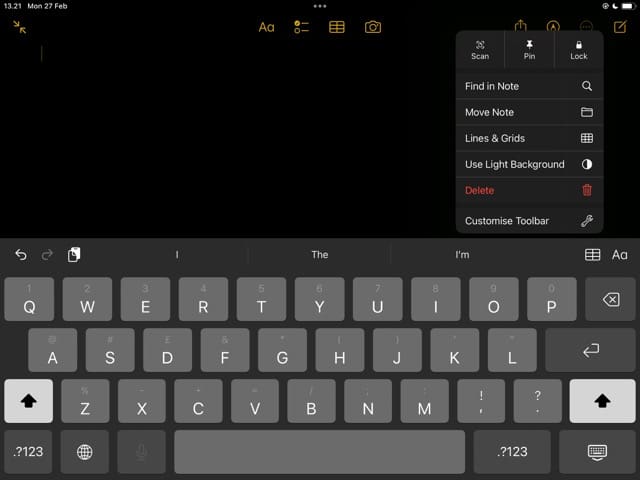
You can rearrange the positioning for each icon, and it’s also possible to remove them altogether if you don’t use some of them. To do either of these, go to the circle icon with three dots in the top right-hand corner. Then, select Customize Toolbar from the dropdown menu.
The toolbar will start shaking – in a similar way that you’d see if you rearrange apps on your home screen. Drag and drop the icons however you feel is necessary, before hitting the Done button.
2. Use Headers Where Possible
When using the Notes app on your iPad, it’s easy to freely write – without thinking about how you’ll organize everything. And while this might be fine in some instances, there are others where you’ll want to gain easy access to the things that you’ve jotted down.
Apple Notes lets you use headers, and you can choose from multiple kinds. Of course, you’ve got the H1s that you can use to title your notes. But on top of that, you can also pick H2s and H3s for those instances where you need to give sub-headings for your notes.
In addition to changing the size of your text for different headings and subheadings, you can also decide to underline them and add italics. Moreover, you can choose whether you want them to be bold or not.
To change your headers, all you need to do is click on the icon with an upper and lowercase A.
3. Include Links to Things That Are Important
Regardless of whether you use Notes or a different app like Evernote or OneNote, what you type might not always be enough. In some cases, you may need to include external links for things that are important.
One example might be if you’re studying and you have to link to articles you read online. Similarly, you may wish to make it easier for you to access your college portal for submitting assignments.
If you decide to add links to your note-taking strategy, doing so is pretty simple in Apple Notes. All you need to do is copy and paste the link, before going to your note and tapping on your screen. When the ribbon of options appears, select Paste.
4. Pin Important Notes
Are you a frequent user of the Notes app? If so, you’ve probably noticed that it gets more and more difficult to keep track of everything when you create more notes. Thankfully, Apple has made it easier to keep track of your most important pages with a simple – but powerful – feature.
When using Notes on your iPad, you can pin anything you want to the top of your left-hand toolbar. Doing so is incredibly simple; all you need to do is swipe to the right and wait for the orange pin icon to appear.
When you see the pin icon, click on it. Your note will feature at the top of your toolbar; it’s under the Pinned section.
You can choose whether you want your pinned notes to be visible by clicking on the downward-facing arrow.
5. Get a Magic Keyboard
It’s perfectly feasible that you could type all of your notes on your iPad by using the keyboard on your touchscreen. And in scenarios where you don’t need to write so much, you’ll probably find that this is more than good enough. However, if you want to take notes more efficiently, you may want to approach things from a different angle.
For many people that use their iPads for note-taking, getting a Magic Keyboard can serve as a game-changer. It works the same as a computer keyboard, and you’ll find it much easier to type what you need. Moreover, you can use it when you’re out and about.
You’ll find different Magic Keyboards for iPads of different screen sizes. Before purchasing one, make sure that you’ve picked the one that best fits your needs. Although these can be quite expensive, the investment is worthwhile.
6. Use Bullet Points Where Possible
You’re probably going to refer back to your notes at some point – and with this in mind, you’ll want to ensure that everything is readable. Using short sentences is a good starting point, but you should try to avoid large blocks of text where possible.
One of the easiest ways to take smarter notes on your iPad is by using bullet points where possible. You can use 1-2 sentences for each of these and summarize everything you need to within that word count. Later, you can expand on those in an article or essay if needed.
To create bullet points in the Notes app on your iPad, you can use the * or – keys on your keyboard. Press them and hit the spacebar; once you’ve done that, your device will create a new bullet point.
Taking Notes on Your iPad: There’s a Better Way to Do It
Knowing how to take notes can supercharge your productivity game. Writing the information you need is a good starting point, but you can do plenty of things in the Notes app on your iPad to approach your note-taking in a wiser manner. Using headers and bullet points are two potions, and pinning your notes is another.
If you’re going to use your iPads to frequently take notes, you should also consider purchasing a Magic Keyboard. Adding links to the things that would be useful is another handy way to take more efficient notes on your tablet.
Danny has been a professional writer since graduating from university in 2016, but he’s been writing online for over a decade. He has been intrigued by Apple products ever since getting an iPod Shuffle in 2008 and particularly enjoys writing about iPhones and iPads. Danny prides himself on making complex topics easy to understand. In his spare time, he’s a keen photographer.


Write a Comment