If you use the Apple Notes app, then you know it has some terrific features. One of those features includes the ability to lock notes you create using a password. And while we covered this topic briefly in our Notes on Mac user guide, there’s more to it that you should know. Plus, you might only be using the app on your iOS device and not on a Mac.
This tutorial shows you the ins and outs of working with locked Notes on your Apple devices.
Here are a few points to keep in mind if you plan to work with locked Notes.
Cross-device password: It’s important to remember that you’ll use the same password to access locked Notes on all of your devices. So whether you lock a note on iPhone, iPad, or Mac, you’ll use the same password to unlock your note on all devices.
Use Touch ID or Face ID: If you have a device that supports Touch ID or Face ID, you can use that feature to unlock your locked notes rather than typing in the password.
Unsupported: Notes accounts that you sync with Gmail, Yahoo, or another third-party service cannot be locked. The lock option will simply not appear.
Creating a Notes password
You can create a password to lock your notes ahead of time or when you want to lock a note. And on iOS, you can do it in two different places. Here’s how to create a Notes password on iOS and Mac.
Creating a password on iPhone and iPad
In your Settings
Open your Settings and select Notes.
Tap Password.
Select the account you want to use, if you have more than one.
Enter the password and optionally include a hint.
Enable Touch ID or Face ID if you like.
Tap Done.
In your Notes
Open a note that you want to lock.
Tap the Share button and choose Lock Note.
Enter the password you want to use and optionally include a hint.
Enable Touch ID or Face ID if you like.
Tap Done.
Set up a Notes password on iPhone
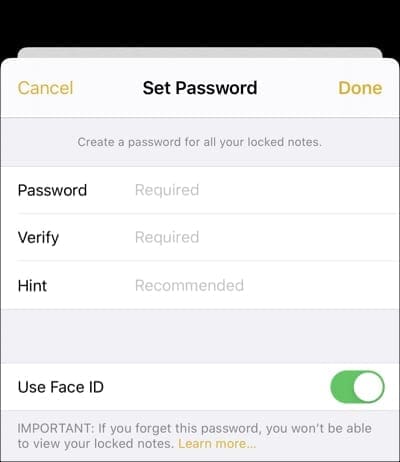
Creating a password on Mac
Open the Notes app and click Notes > Preferences from the menu bar.
Click Set Password.
Enter the password and select the account if you have more than one.
Optionally include a hint.
Click Done.
It’s strongly recommended that you include a hint for your password because you cannot gain access to a forgotten password. (See below.)
If you do not see the options above to set a password, that means you already have one that you created at some point.
Forgetting or resetting your password
It’s crucial to create a password that you can remember or make note of it somewhere. If you forget your password, Apple cannot provide it to you.
You do have an option to reset your password. However and unfortunately, this will not get you access to your already locked notes. The only way to access locked notes is with the original password you set for them.
Resetting your password merely allows you to set a new password to use moving forward.
Resetting your password on iPhone and iPad
Open your Settings and select Notes.
Tap Password.
Choose Reset Password and enter your Apple ID password.
Tap Reset Password again, enter your new password, and optionally include a hint.
Reset your password on iPhone
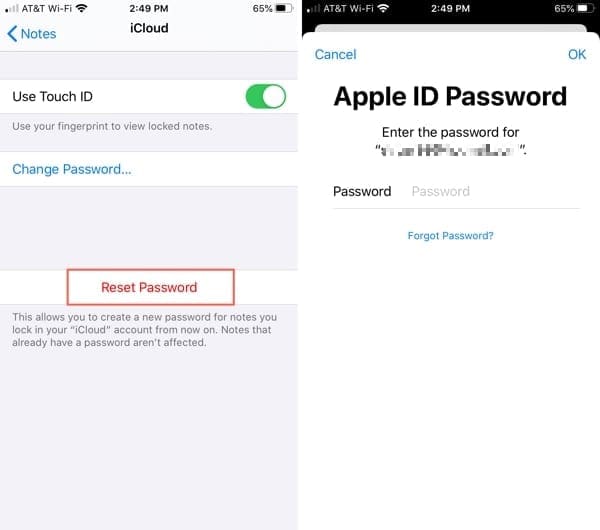
Resetting your password on Mac
Open the Notes app and click Notes > Preferences from the menu bar.
Click Reset Password and click OK.
Enter your Apple ID password and click Reset Password
Enter your new password and optionally include a hint.
Reset your password on Mac
Changing your password
If you want to change your password and do remember your current one, you can do this easily.
Changing your password on iPhone and iPad
Open your Settings and select Notes.
Tap Password.
Choose Change Password and enter your current password.
Enter your new password and optionally include a hint.
Change your password on iPhone
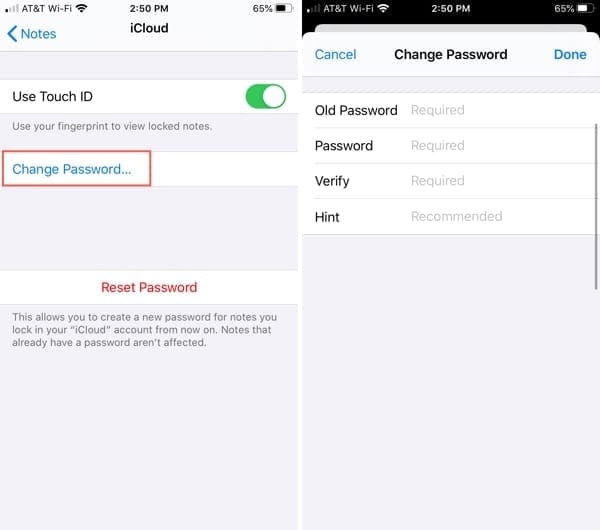
Changing your password on Mac
Open the Notes app and click Notes > Preferences from the menu bar.
Click Change Password.
Enter your current password.
Enter your new password and optionally include a hint.
Click Change Password.
Change your password on Mac
Locking, unlocking and removing locks in Notes
When you’re ready to lock a note, it’s super simple and unlocking or removing a lock is just as easy.
Locked notes on iPhone and iPad
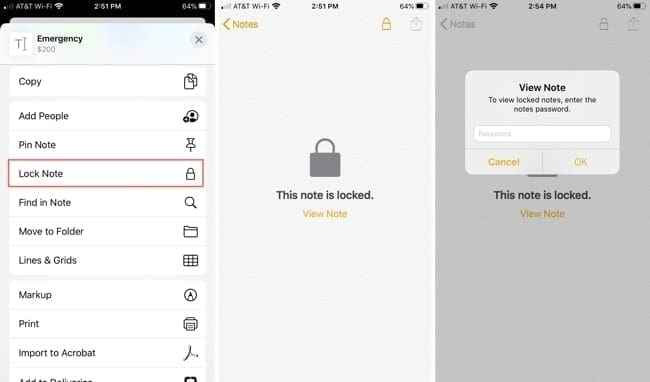
Lock: Select the note, tap the Share button, and pick Lock Note.
Close: After you add the Lock to the note (above), tap the padlock to close and lock the note.
Unlock: Select the note, tap View Note, and enter your password (or use Touch ID or Face ID).
Remove lock: Select the note, unlock it if necessary, tap the Share button, and pick Remove Lock.
Lock and view a locked note on iPhone
Locked notes on Mac
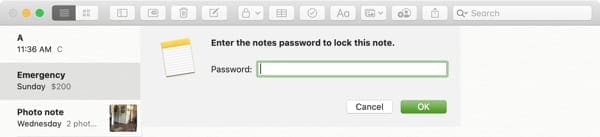
Lock: Select the note and then click the Padlock in the toolbar, click File from the menu bar, or right-click. Pick Lock Note.
Close: After you add the Lock to the note (above), click the padlock to close and lock all notes.
Unlock: Select the note and enter the password. If you use your Apple Watch for passwords on your Mac, you can also use it to unlock notes when prompted.
Remove lock: Select the note and then click the Padlock in the toolbar, click File from the menu bar, or right-click. Pick Remove Lock.
Lock a note on Mac
Protect your notes with a password
Surely not every note you create needs to be protected with a password. But for those you want to secure from others who might use your devices, this is a great security feature.
Now that you know how to work with locked notes on iPhone, iPad, and Mac, are you going to start using a password for them? Let us know in the comments below. And remember, you can visit us on Facebook and Twitter!
Sandy worked for many years in the IT industry as a project manager, department manager, and PMO Lead. She then decided to follow her dream and now writes about technology full-time. Sandy holds a Bachelors of Science in Information Technology.
She loves technology– specifically – terrific games and apps for iOS, software that makes your life easier, and productivity tools that you can use every day, in both work and home environments.
Her articles have regularly been featured at MakeUseOf, iDownloadBlog and many other leading tech publications.


Write a Comment