Arguably, the iPhone gives its users the best photo-taking experience on any mobile device. From using the stock Camera app, to using a third-party app like Halide, what you can do without a DSLR is crazy. But after the pictures have been taken, you want to send them off and share them.
Related Reading
- Where is Camera Roll in iOS 13 and iPadOS?
- Why does Photos say ‘Analyzing Library’ on my Apple devices?
- How to do red eye correction in Photos app on iOS 13
- How to backup your iPhone or iPad photos to an external drive with iOS 13 and iPadOS
- View your photo Metadata in iOS 13 and iPadOS
This can be through something like Instagram or Facebook, or maybe through iMessage. Ever since the release of iOS 13, some folks have been stating that images are showing up as blurry. This is obvious causing frustration, but there’s a good reason.
Contents
Why are my iPhone photos sent via iMessage blurry?
For years, Apple decided to stick to the old days and release devices with low storage capacities. Thankfully, the days of 16GB or even 8GB devices are gone, but there’s still no way to expand this storage.
However, another reason for this was due to the fact that carrier’s moved away from unlimited data. The newly-implemented data caps hindered users from being able to comfortably use their devices as intended.
Because of these reasons, Apple implemented a “low image quality” mode. This was designed to help save some storage space, while also sending the images to save your data.
How to fix blurry images
Even if it takes a few updated versions of iOS, Apple usually gives users ways to fix annoying problems. This is true with the new Low Quality Image mode, that was released with little to no fanfare. In fact, this may have been one of those software additions that Apple didn’t publicly make known.
Disable Low Quality Image Mode
Apple’s inclusion of this Low Quality Image Mode is extremely useful. Regardless of whether you are running out of storage or bumping a data cap. But if you don’t have concerns for either of those, here’s how you can turn it off.
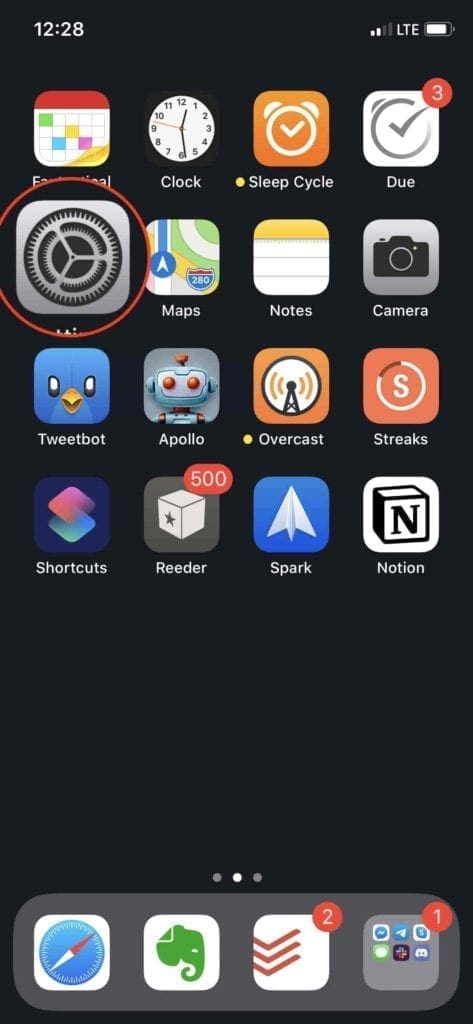
- Open the Settings app on your iPhone
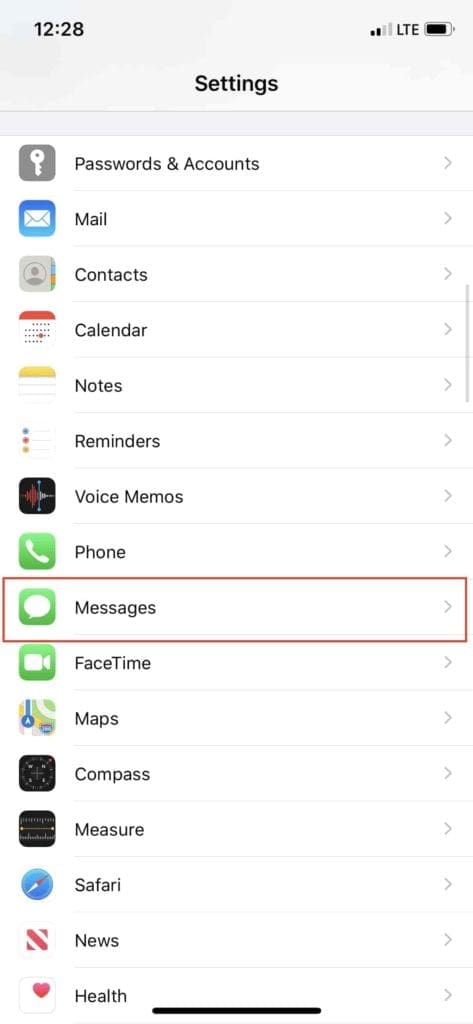
- Scroll down and tap on Messages
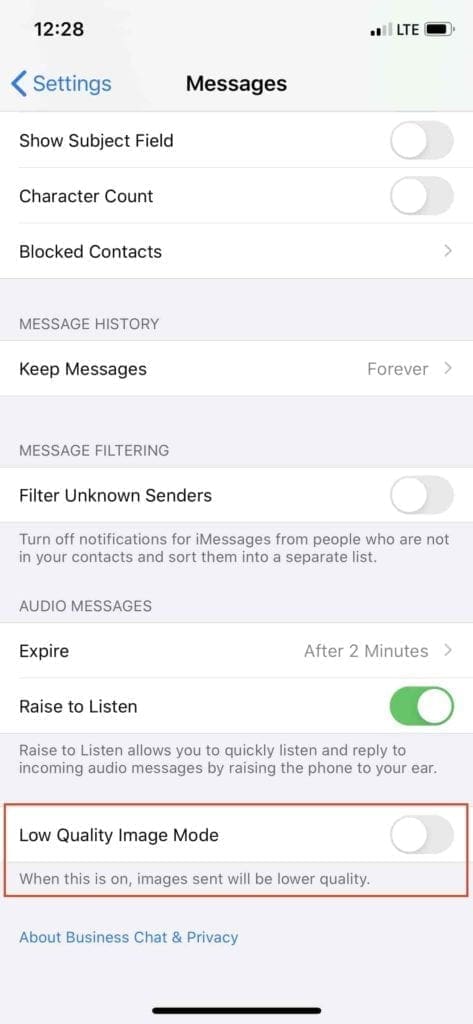
- Scroll all the way to the bottom
- Toggle Low Quality Image Mode to the Off position
In plain sight, Apple states “When this is on, images sent will be lower quality“. It would have been nice for there to be a bit more information provided to users, other than worrying that something is wrong with their messages.
After turning this off, your images should be sent and received in the same quality that they were taken. Plus, you won’t have to worry about your friends (or yourself) getting annoyed about low-quality pics.
Try cropping the image or screenshot
Until the option for Low Quality Image Mode was discovered, some folks found other ways to share better quality pics. The primary method was to just screenshot and crop the image and then send it to its destination.
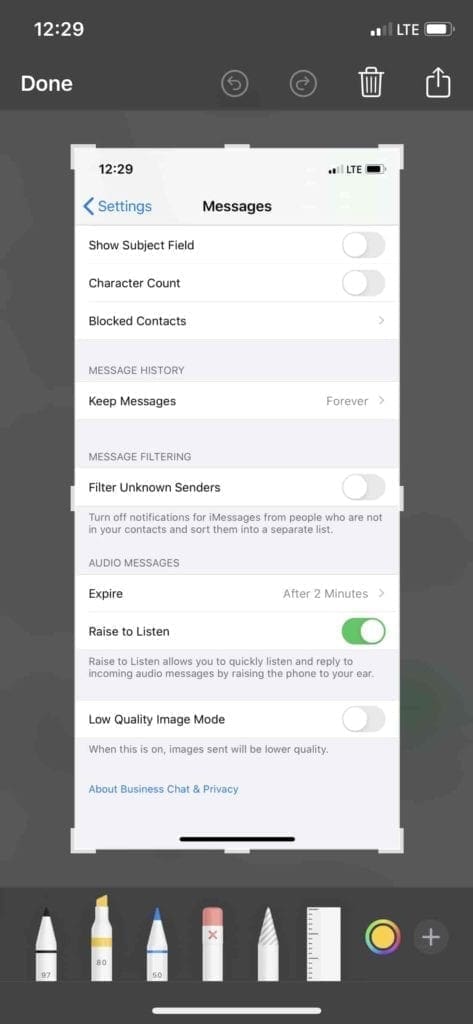
Here’s how you can screenshot and crop images on iOS 13 and iPadOS:
- When viewing content you want to screenshot, press the Power Button and Volume Up button.
- Tap the preview of the image in the bottom left-hand corner.
- On the edges and corners, there are some “hooks” that allow you to crop.
- Drag these to show the portion of the screen you wish to display.
- After set, the image preview will change, showing you the newly-cropped image.
- Tap Done in the top left-hand corner if you want to save it to Photos.
- If you want to share the screenshot, tap the share icon in the top right hand corner.
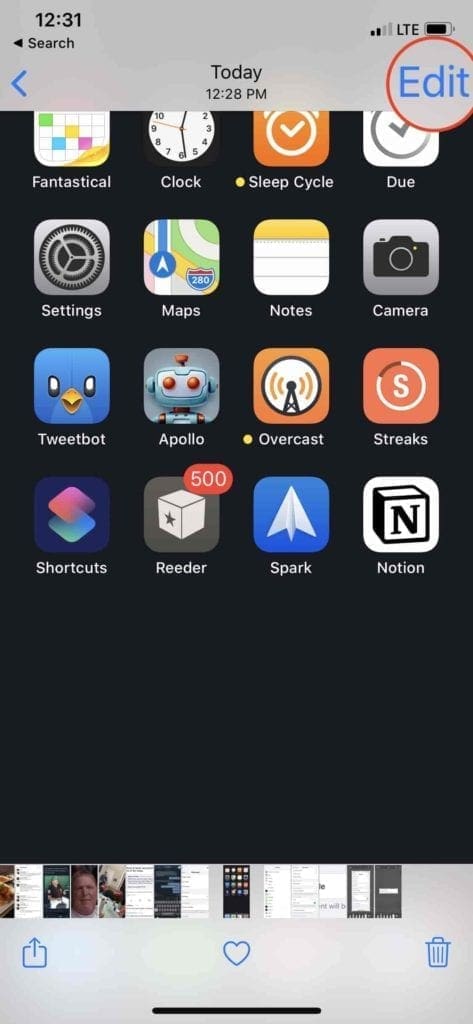
Now, if you have already taken a screenshot, but want to go back and crop it later, here’s what you need to do:
- Open the Photos app on your iPhone
- Locate the photo you wish to crop and open it.
- Tap Edit in the top right-hand corner
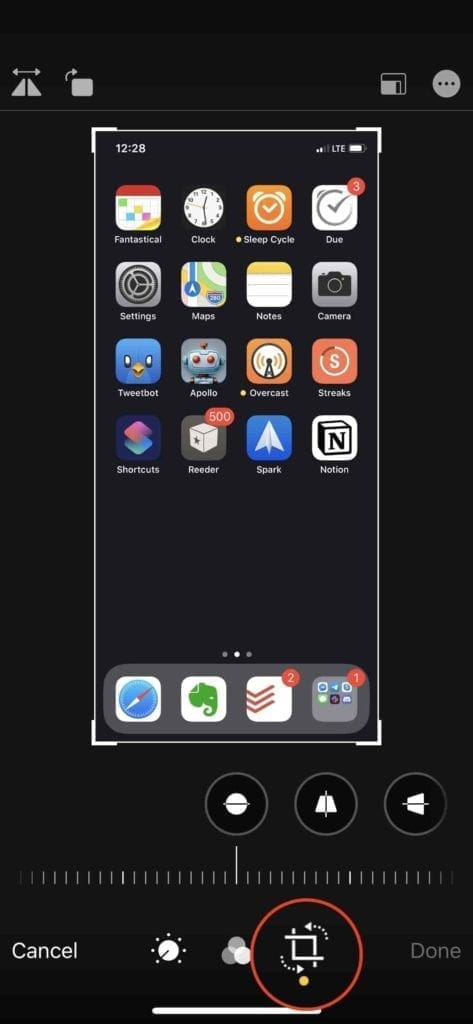
- At the bottom, there are three different adjustment options.
- Tap on the icon on the far-right with the square and arrows.
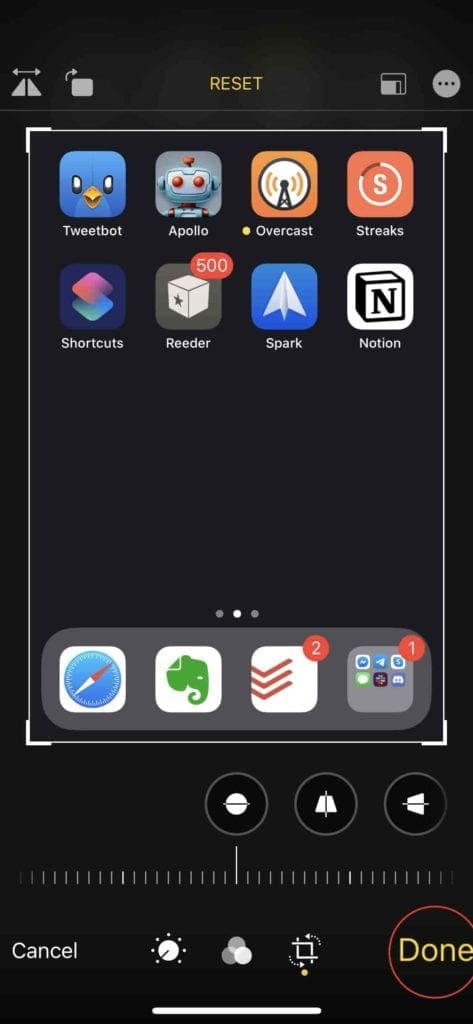
- Grab the aforementioned “hooks” to choose what you want the screenshot to show.
- Tap Done in the bottom right-hand corner.
Once completed, you’ll be taken back to the Image Preview in Photos, where you can tap the Share icon to send it. Otherwise, the cropped image will remain in Photos so that it can sent later on.
Conclusion
It’s really great to see Apple give users even more control over devices and settings. However, it would be nice to be given a notification that a new feature is turned on by default. Or even an extra explanation as to what this feature is and how to enable/disable it.
If you continue experiencing issues with blurry images and screenshots showing up, let us know. In the meantime, let us know what you think about the new iPhone 11 camera sensors and if they have replaced your traditional DSLR camera already.
Andrew Myrick is a freelance writer based on the East Coast of the US. He enjoys everything to do with technology, including tablets, smartphones, and everything in between. Perhaps his favorite past-time is having a never-ending supply of different keyboards and gaming handhelds that end up collecting more dust than the consoles that are being emulated.





I checked and the low quality image was deselected already.
Hi Andrew, Re: The issue with poor quality photos recieved/sent on iphone 11. My wife and I both have iphone 11’s and both take good quality photo’s however when I send photo’s from my phone to her’s using messages and signal messanger the images are nowhere near the quality of the original.
I’ve gone through the procedure you’ve suggested above ie; “low quality mode” and both phones are set to toogle off, do you have any further suggestions please.
I think transfer of the photos are of poorer quality when I send using Signal Messages
Regards
#Tom
I upgraded to the IPhone 14 and when sharing videos to social media it is terribly blurry and shaky compared to my original in my photos. I’ve updated my iPhone version this did not help and I’ve went through settings and made sure low quality photos is off. Even texting a photo to others is blurry. I’m going to have to down grade my iPhone if I can’t get this fixed. Please help
NONE of this does anything, it doesnt work. Everything still gets received blurred. Why does apple not fix this crap?
Turn off iMessage on BOTH sides (sending & receiving). Your carrier is compressing the hell out of the pictures.
My iphone continues to send blurry images to other iPhone users. If I send a group of 4+ pictures, they’ll send them blurry. And if I immediately (same battery life and everything) send them individually, they send fine with perfect resolution. Any ideas? I have the iPhone 13 pro
Images are received blurry weather sent through iMessage or email. None of the fixes that you recommend work. They always look clear to the sender, it’s the receiver that gets the blurry image.
Why screen shot a photo before sending, to avoid blur. Screenshot is low res. If you want to crop before sending. Hit edit then crop. If you want a crop and original hit duplicate then edit then crop.
I have an iphone 8p. when I take pictures with it ,they look great. When I load them to my computer, they look great. When I send them to my friends either from my computer or directly from my iphone , my friend say they are blurry, dark, and all out of focus. Low quality mode is off. HELP!!!! oh I’m running IOS14.
Same as the others, still crap when uploaded to social media or sent as a message. Even after changing settings. So frustrating!
Hi,
My photos are still blurry sending from my 11pro to a 10 iphone. Even when turning the quality off.
Help please!
Thanks
Kathy
I tried all of these on iphone11 and they still blur when emailing.help!
Hi Geoffrey,
Try tapping on the image to see if it downloads–you might be seeing a preview.
I’m on iOS 13:3:1 and still experiencing blurry images.
In my album they’re perfectly clear, some even HDR.
But as soon as forwarded via WhatsApp or social media, they blur.
Strangely if you go into WhatsApp for example, add a photo it’s slightly blurred. If I go into album first and forward to Whatsapp from there, it’s twice as blurred.
The only way I can get close to original is by saving as a file first. Which doesn’t help my social media from blurry images
I have checked all settings including the above with no success 🙁
iPhone X
same! my friends keep telling me that it’s blurry every time i send a screenshot
My iPhone XR still sends blurry messages and is also receiving them too.
I have tried all the steps above, called Apple and the best they could do was restart my phone.
I don’t want to restore to factory settings and lose everything because I’ve tried it and it still happens.
I’ve only had the phone for 9 months
Hi Monique,
Try temporarily turning the Messages app in iCloud setting off. See if that makes any difference