Imagine this: you’re about to send an important iMessage, and just when you need it the most, it fails to send. Perhaps, you’re on the receiving end, eagerly waiting for a message that never arrives. This scenario is more common than you might think, and it’s incredibly frustrating for iPhone and iPad users relying on the seamless communication iMessage promises. But before you consider sending a carrier pigeon or reverting to traditional SMS, take a deep breath.
The digital realm is not without its solutions, and your connectivity woes can often be remedied with a few troubleshooting steps. This comprehensive guide will walk you through 14 of the most helpful solutions to get your iMessage back up and running. From simple fixes to more complex troubleshooting techniques, we’ve got you covered. Let’s dive into the digital toolbox and bring back the magic of instant messaging.
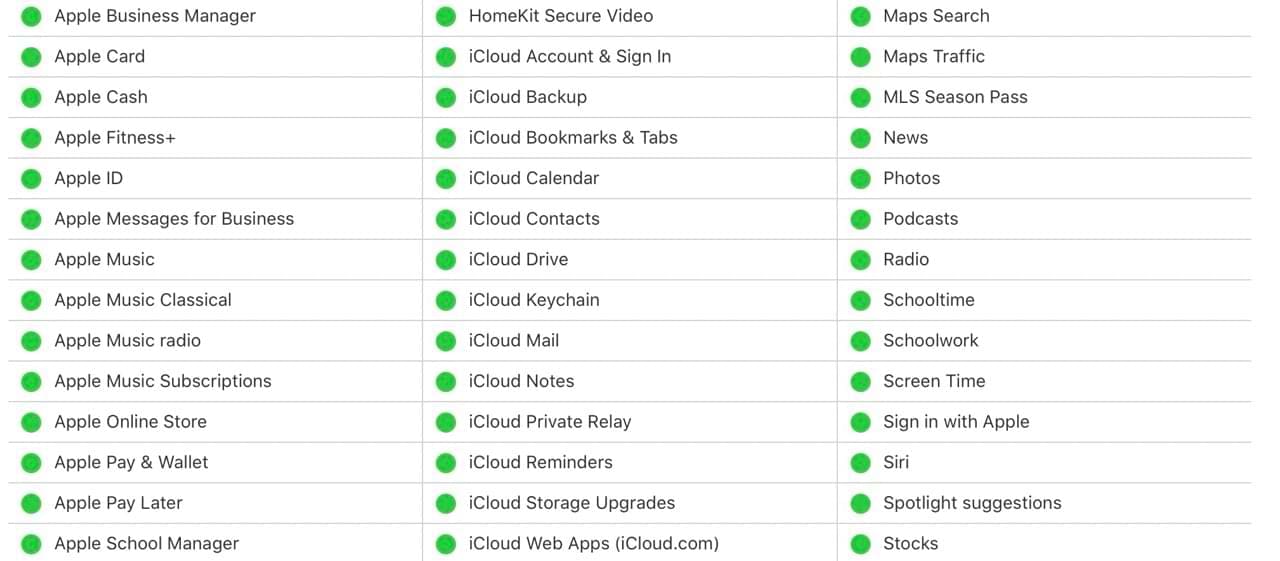
Before diving into complex troubleshooting, it’s wise to rule out the possibility of a service-wide issue with iMessage. Apple maintains a dedicated System Status page where you can check the current status of all their online services, including iMessage. Here’s how to find it:
Access the System Status Page: Visit the Apple System Status page directly, or search for “Apple System Status” in your favorite web browser.
Examine iMessage Status: Look for the iMessage service on the list. If there’s a green dot next to it, iMessage is operational. If you see a yellow or red indicator, Apple is experiencing issues with iMessage, and your problem might be related to that.
Toggle iMessage Off and On
If you’re experiencing unusual glitches or delays with iMessage, a quick reset can sometimes help clear things up. Here’s how to toggle iMessage off and back on:
Turning iMessage Off:
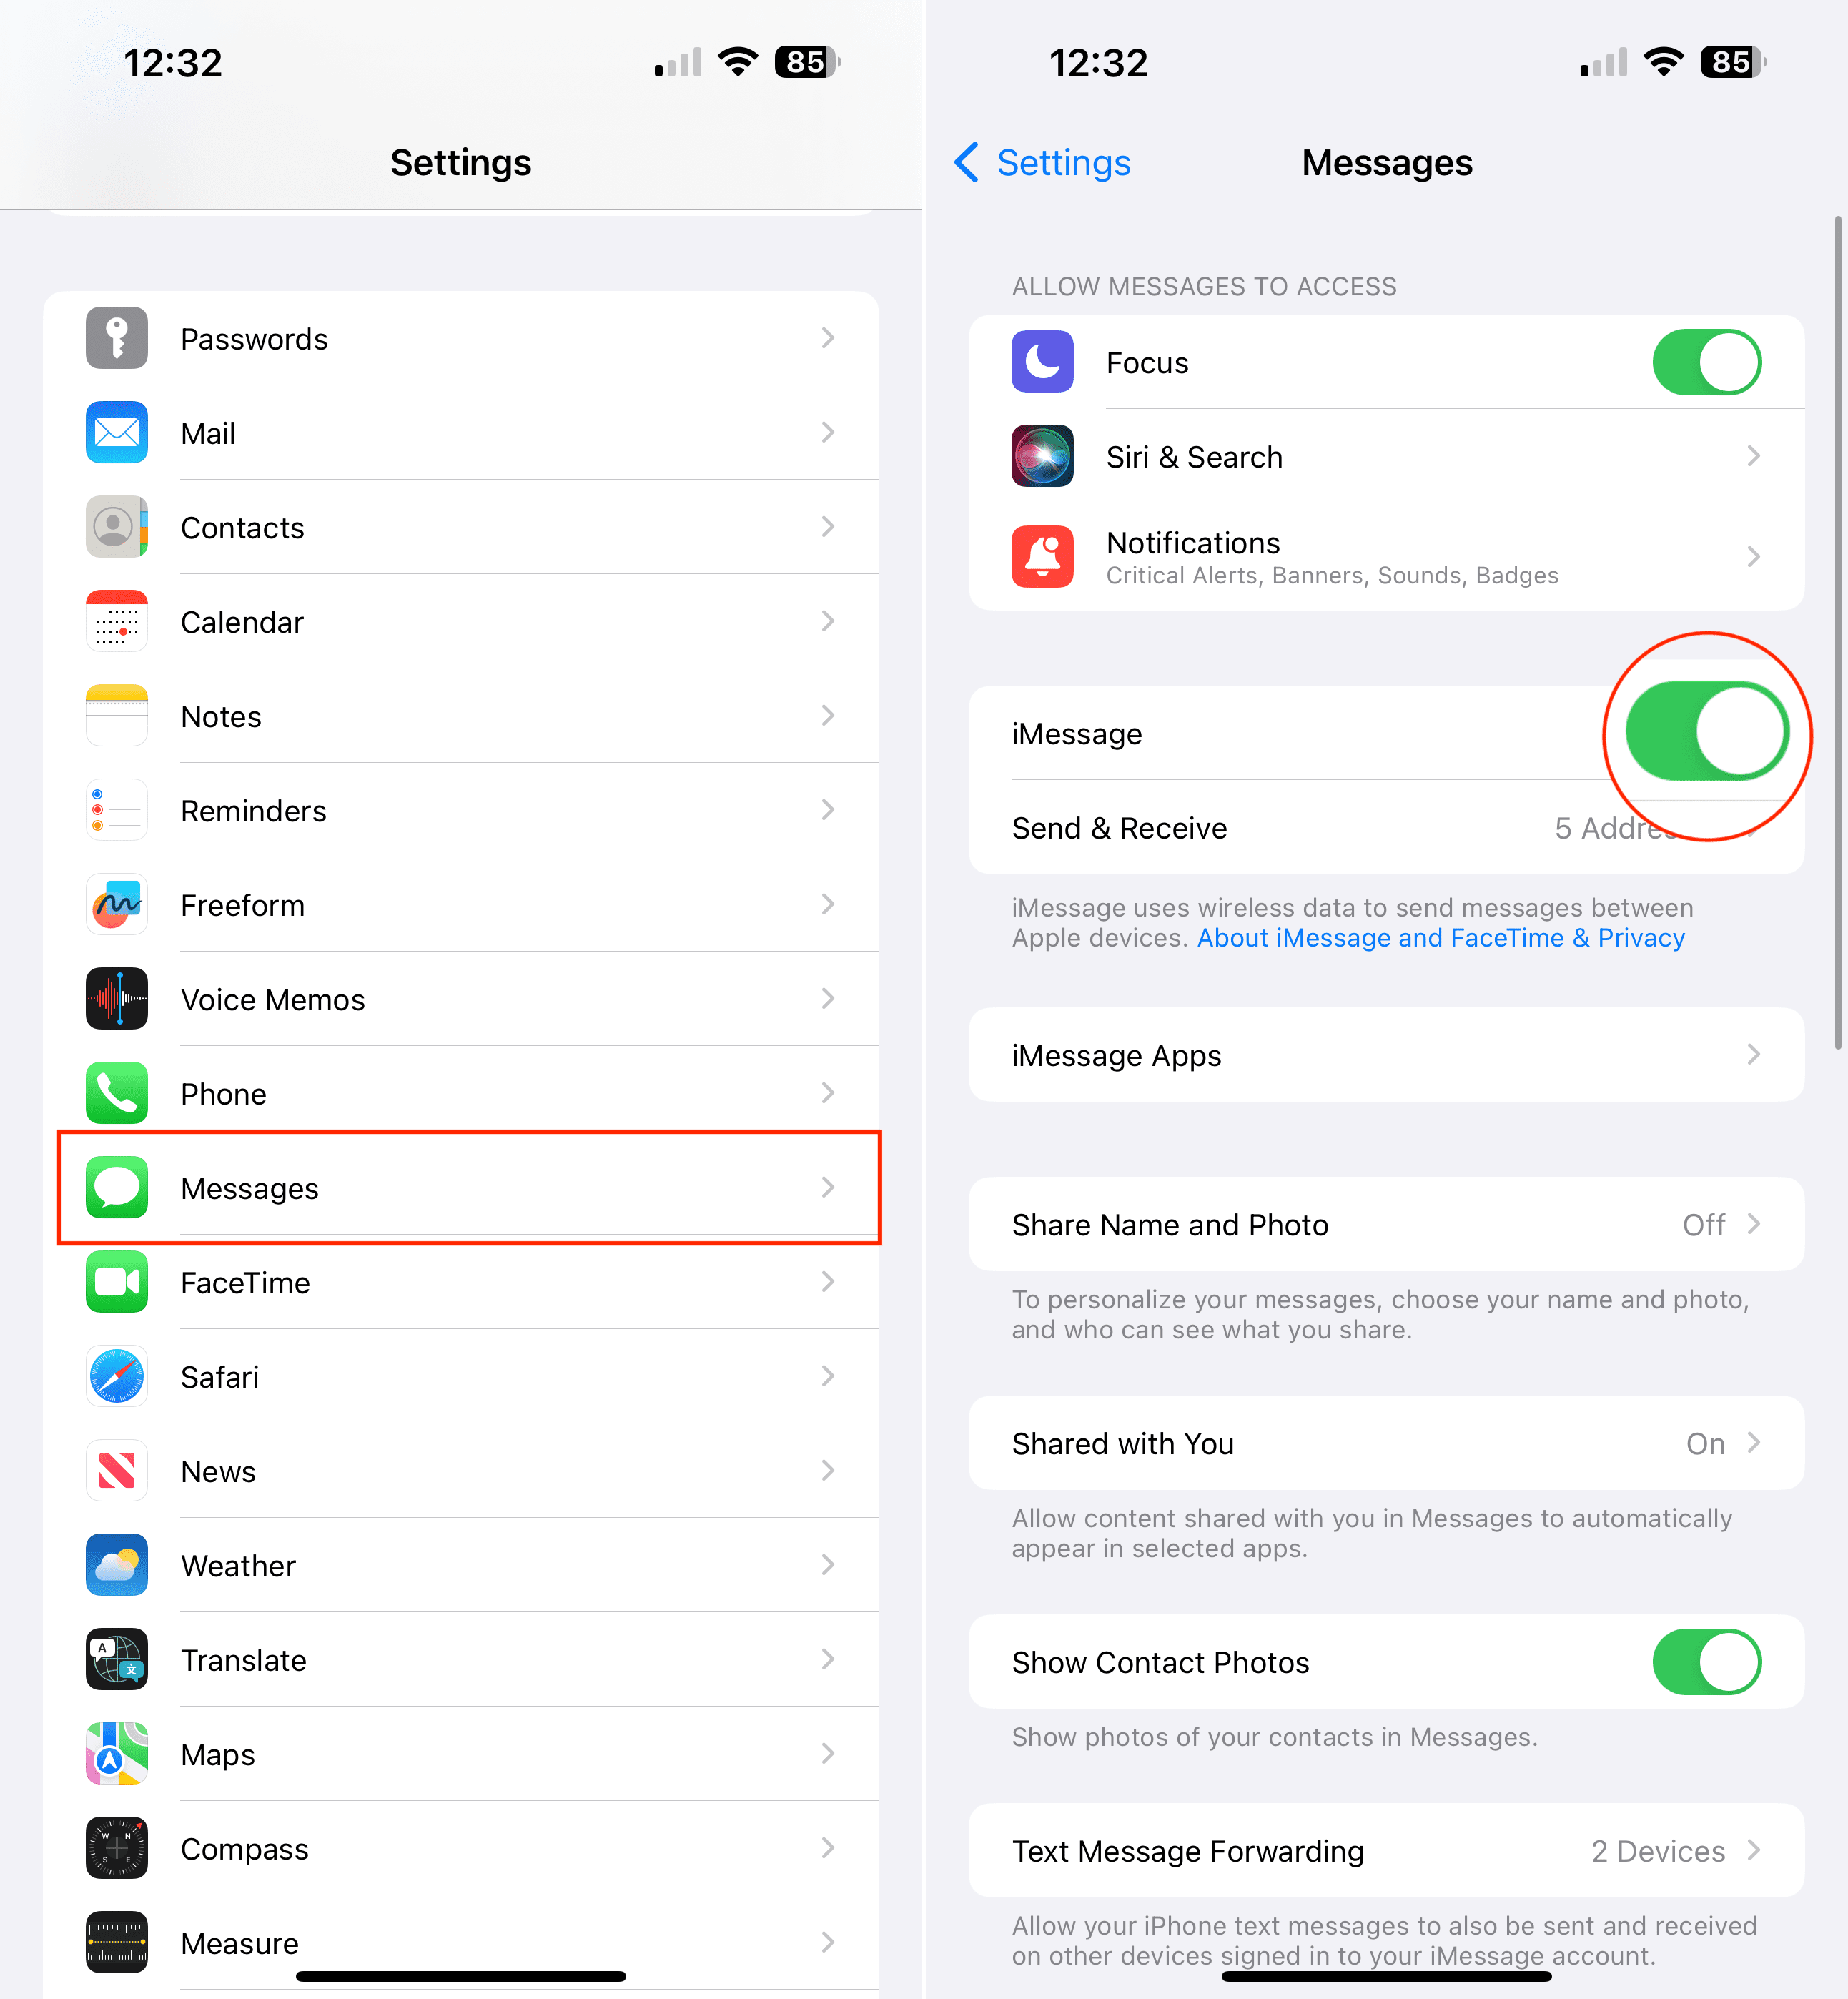
Open Settings: Locate and tap on the “Settings” app on your iPhone or iPad.
Tap Messages: Scroll down within the Settings menu and find the “Messages” option.
Toggle iMessage Off: Locate the “iMessage” toggle at the top of the screen and tap it to turn it off. The toggle will turn white to indicate iMessage is disabled.
Turning iMessage On:
Return to the Messages Settings: Navigate back to Settings > Messages.
Toggle iMessage On: Tap the “iMessage” toggle again. It will turn green, indicating iMessage is now active.
Wait for Activation: It may take a few moments for iMessage to reactivate.
Sign Out of Apple ID, Then Sign Back In
Occasionally, issues with your Apple ID account can disrupt iMessage functionality. Refreshing your sign-in can help resolve these problems. Here’s how to do it:
Signing Out:
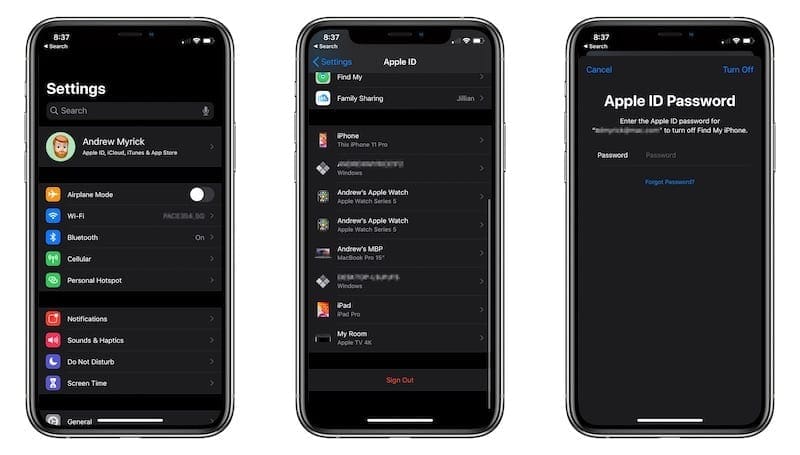
Go to Settings: Open the “Settings” app on your iPhone or iPad.
Tap Your Name: At the very top of the Settings menu, tap on your name/Apple ID.
Scroll and Tap ‘Sign Out’: Scroll to the bottom of the Apple ID screen and tap the red “Sign Out” option.
Enter Password: If prompted, enter your Apple ID password and follow any additional on-screen instructions.
Sign out of iCloud on iPhone
Signing Back In:
Return to Settings: Navigate back to the main Settings menu.
Tap ‘Sign in to your [device]’: This option will be at the top of the screen.
Enter Apple ID and Password: Provide your Apple ID login credentials.
Once you’ve signed back in, open the Messages app and try sending an iMessage to see if the issue is resolved.
Important Considerations:
Data Protection: Before signing out, ensure you are aware of any data that might be tied to your Apple ID, such as iCloud backups or purchased content.
Two-Factor Authentication You may need to go through Two-Factor Authentication when signing back in.
Are You Connected to a Network?
iMessage relies on an active internet connection to send and receive messages. Here’s how to ensure you are connected:
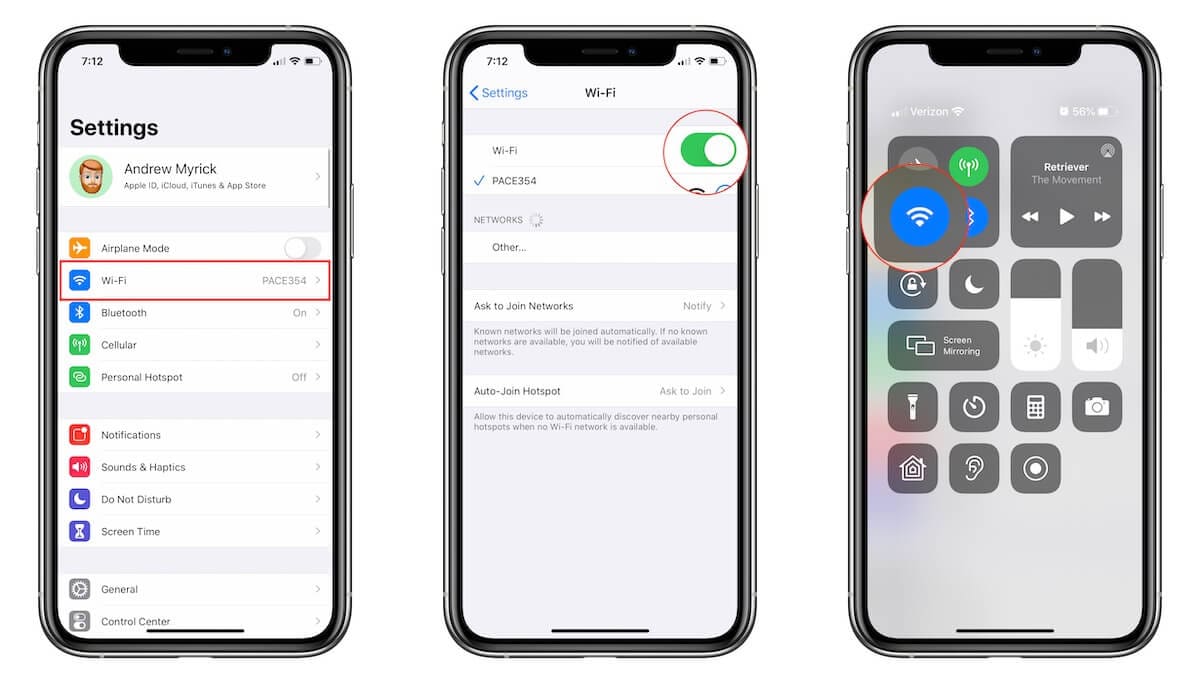
Check Your Wi-Fi:
Go to Settings > Wi-Fi.
Make sure the Wi-Fi toggle is switched on (green).
Verify that you are connected to the correct network (a blue checkmark will appear next to the network name).
Check Your Cellular Data:
Go to Settings > Cellular.
Ensure the Cellular Data toggle is switched on (green).
If you’re outside your coverage area or have low signal strength, it may impact iMessage.
In order to verify that you’re connected to the internet, try opening a web page in your browser or using another app that requires internet access to confirm that your connection is working.
If You Can’t Connect:
Try toggling Airplane Mode on and off to reset your network connections.
If you’re still unable to connect to Wi-Fi or cellular data, you may need to contact your internet service provider or mobile carrier for assistance.
Check for a Software Update
Outdated software can cause unexpected issues across various features of your iPhone or iPad, including iMessage. Here’s how to check for and install the latest version of iOS or iPadOS:
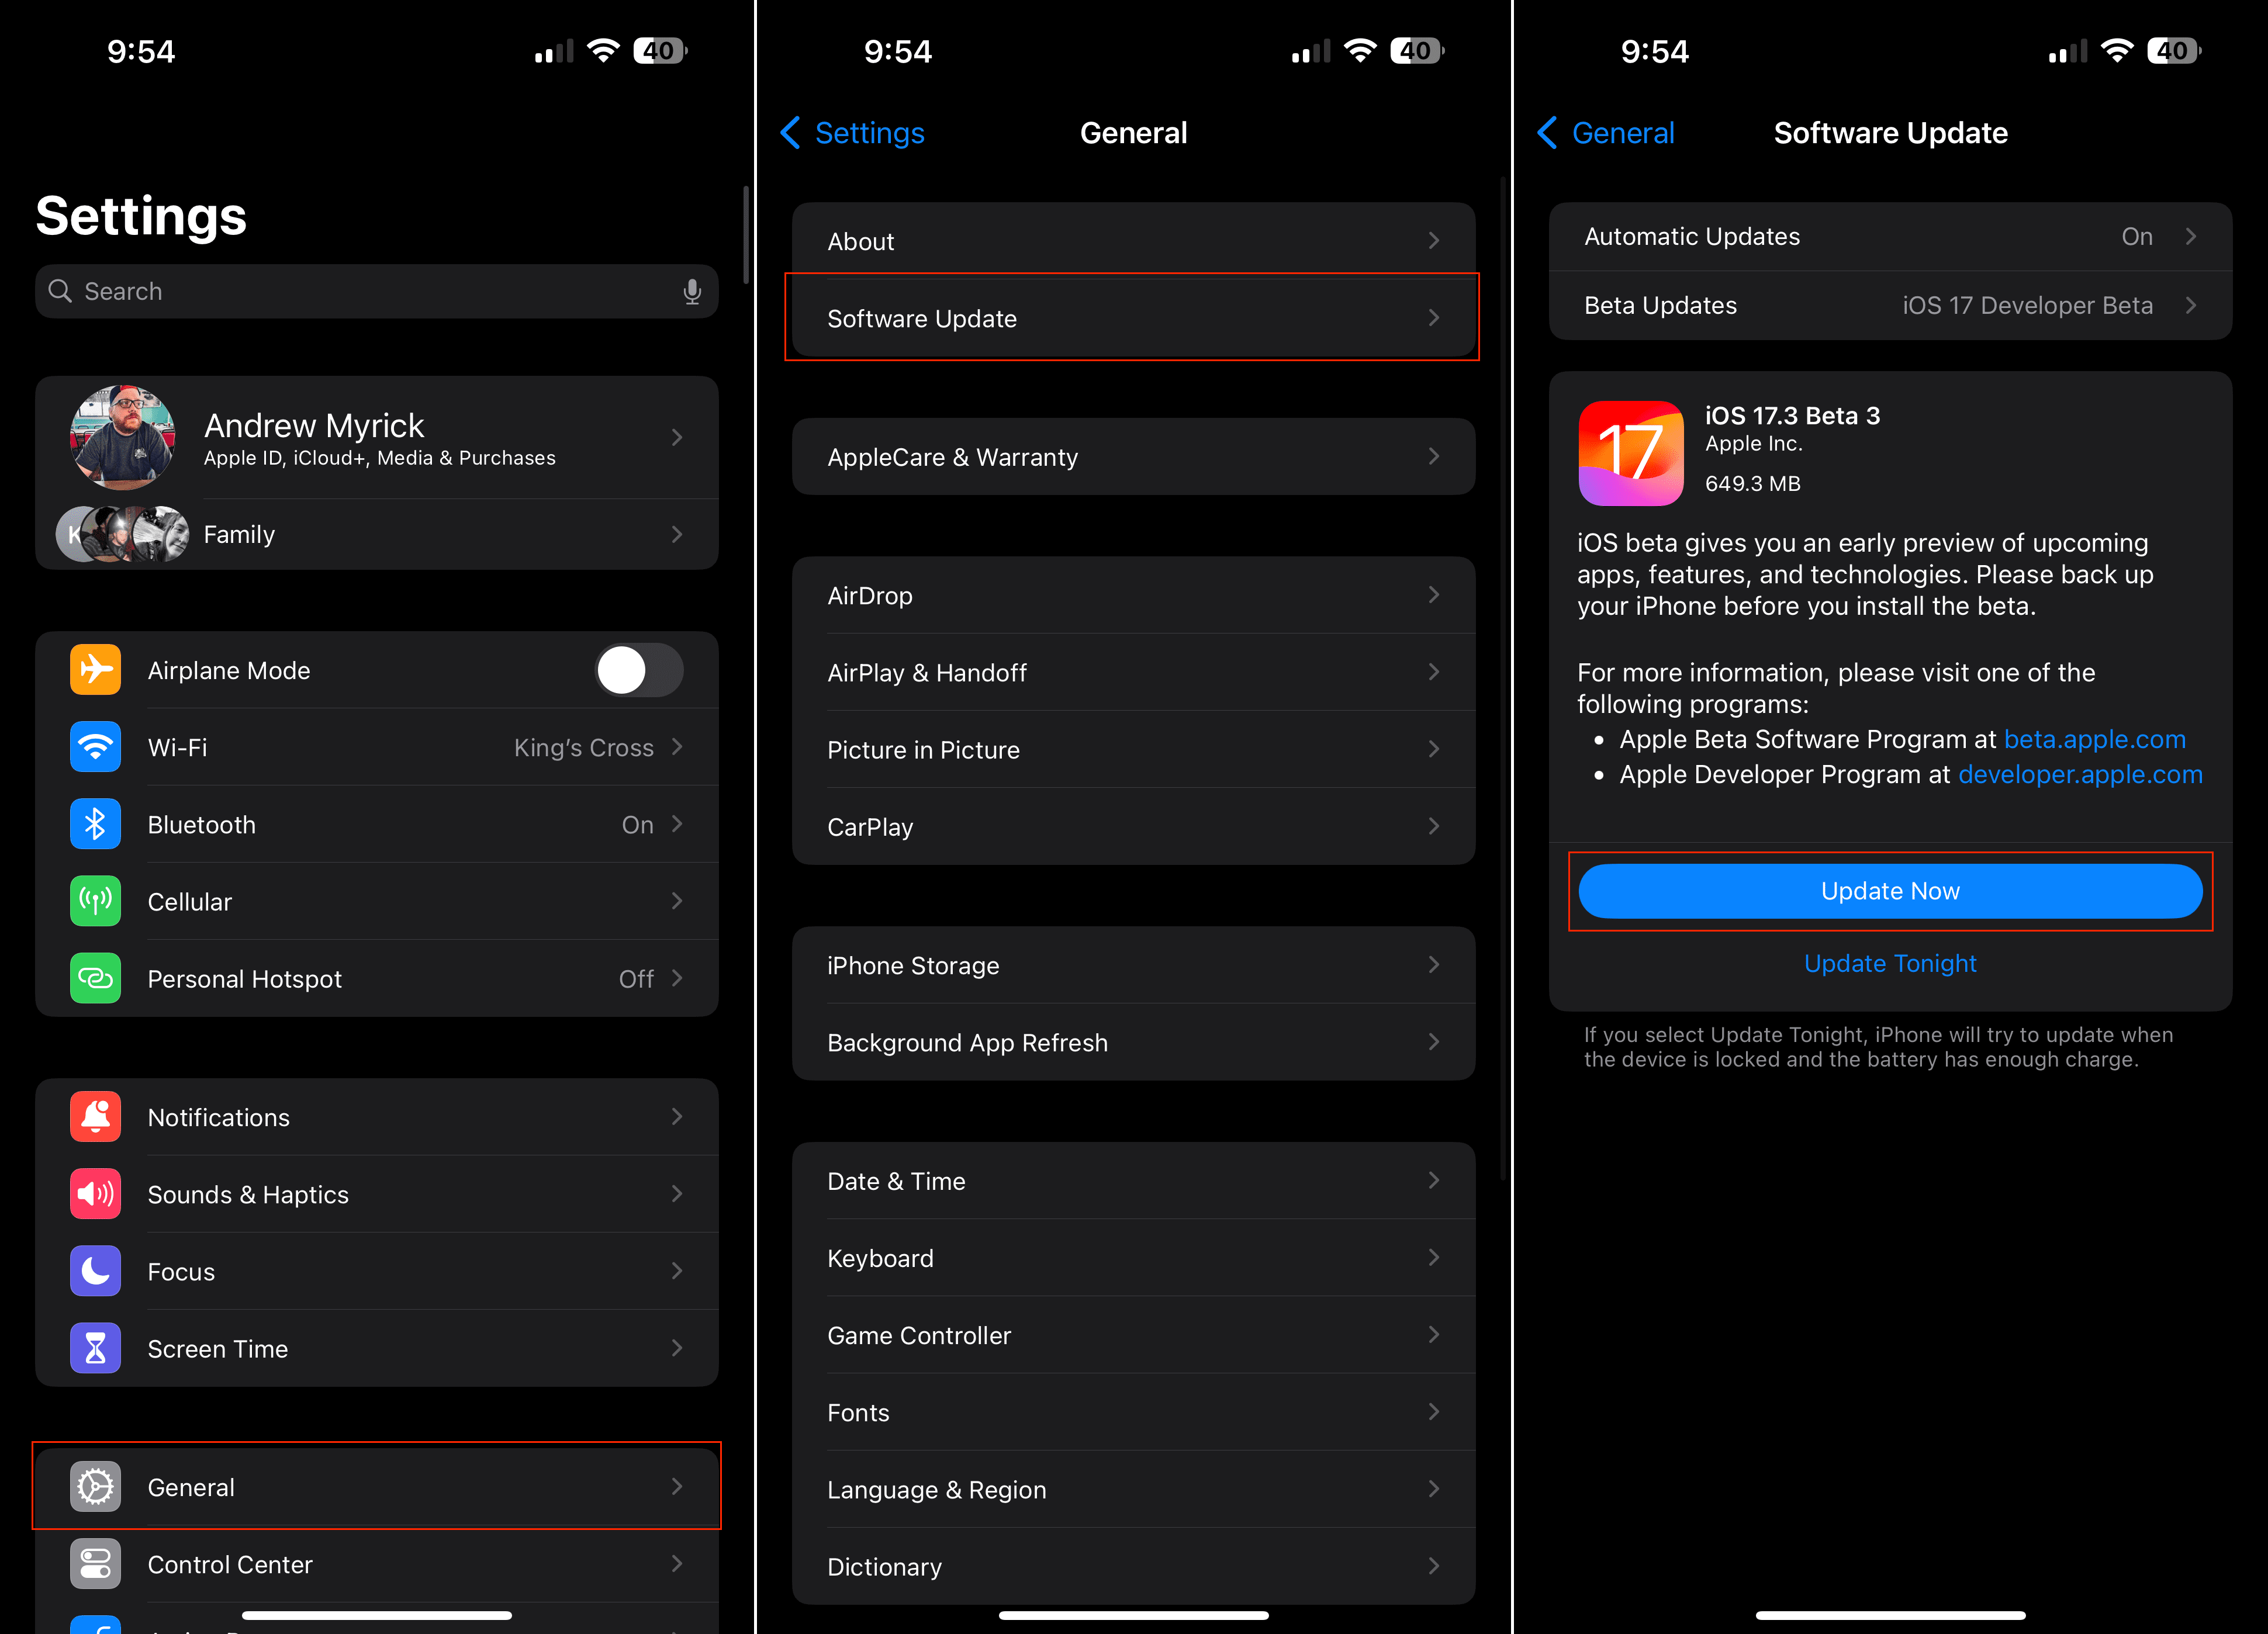
Open Settings: Go to the “Settings” app on your device.
Tap General: Find and select the “General” section within Settings.
Tap Software Update: Tap on the “Software Update” option.
Check for Updates and Install: Your device will automatically check for available updates. If an update is found, tap “Download and Install” and follow the on-screen prompts.
Before updating, ensure your device is backed up to avoid potential data loss. Updates frequently include bug fixes and patches that address iMessage malfunctions. If you’re already on the latest version of the software and iMessage still isn’t working, continue exploring other solutions within the article.
Reset Your iPhone or iPad Network Settings
Sometimes, a clean slate is all you need to get your iMessage back in working order. While a network reset might feel like a drastic step, it has the potential to fix a wide range of connectivity problems, including iMessage issues. Resetting your network settings can clear away any misconfigurations or glitches that might be causing those iMessage woes. Let’s dive into how to perform a reset and get things running smoothly again.
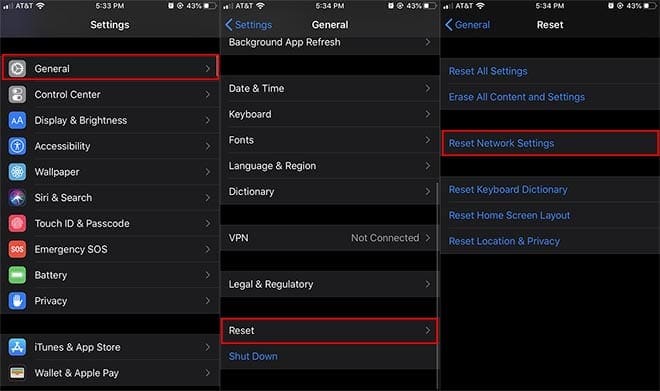
Open the Settings app on your iPhone or iPad.
Tap General.
Scroll to the bottom and tap Transfer or Reset iPhone (iPad).
Tap the Reset button at the bottom of the page.
Tap Reset Network Settings.
Enter your passcode if prompted.
Resetting your network settings is a foolproof way of solving a slew of connectivity-related problems.
Make Sure the Time and Date Are Correct
Believe it or not, incorrect time and date settings can disrupt iMessage functionality. This is because iMessage relies on accurate timestamps to synchronize sending and receiving messages. Follow these steps to check and fix your settings:
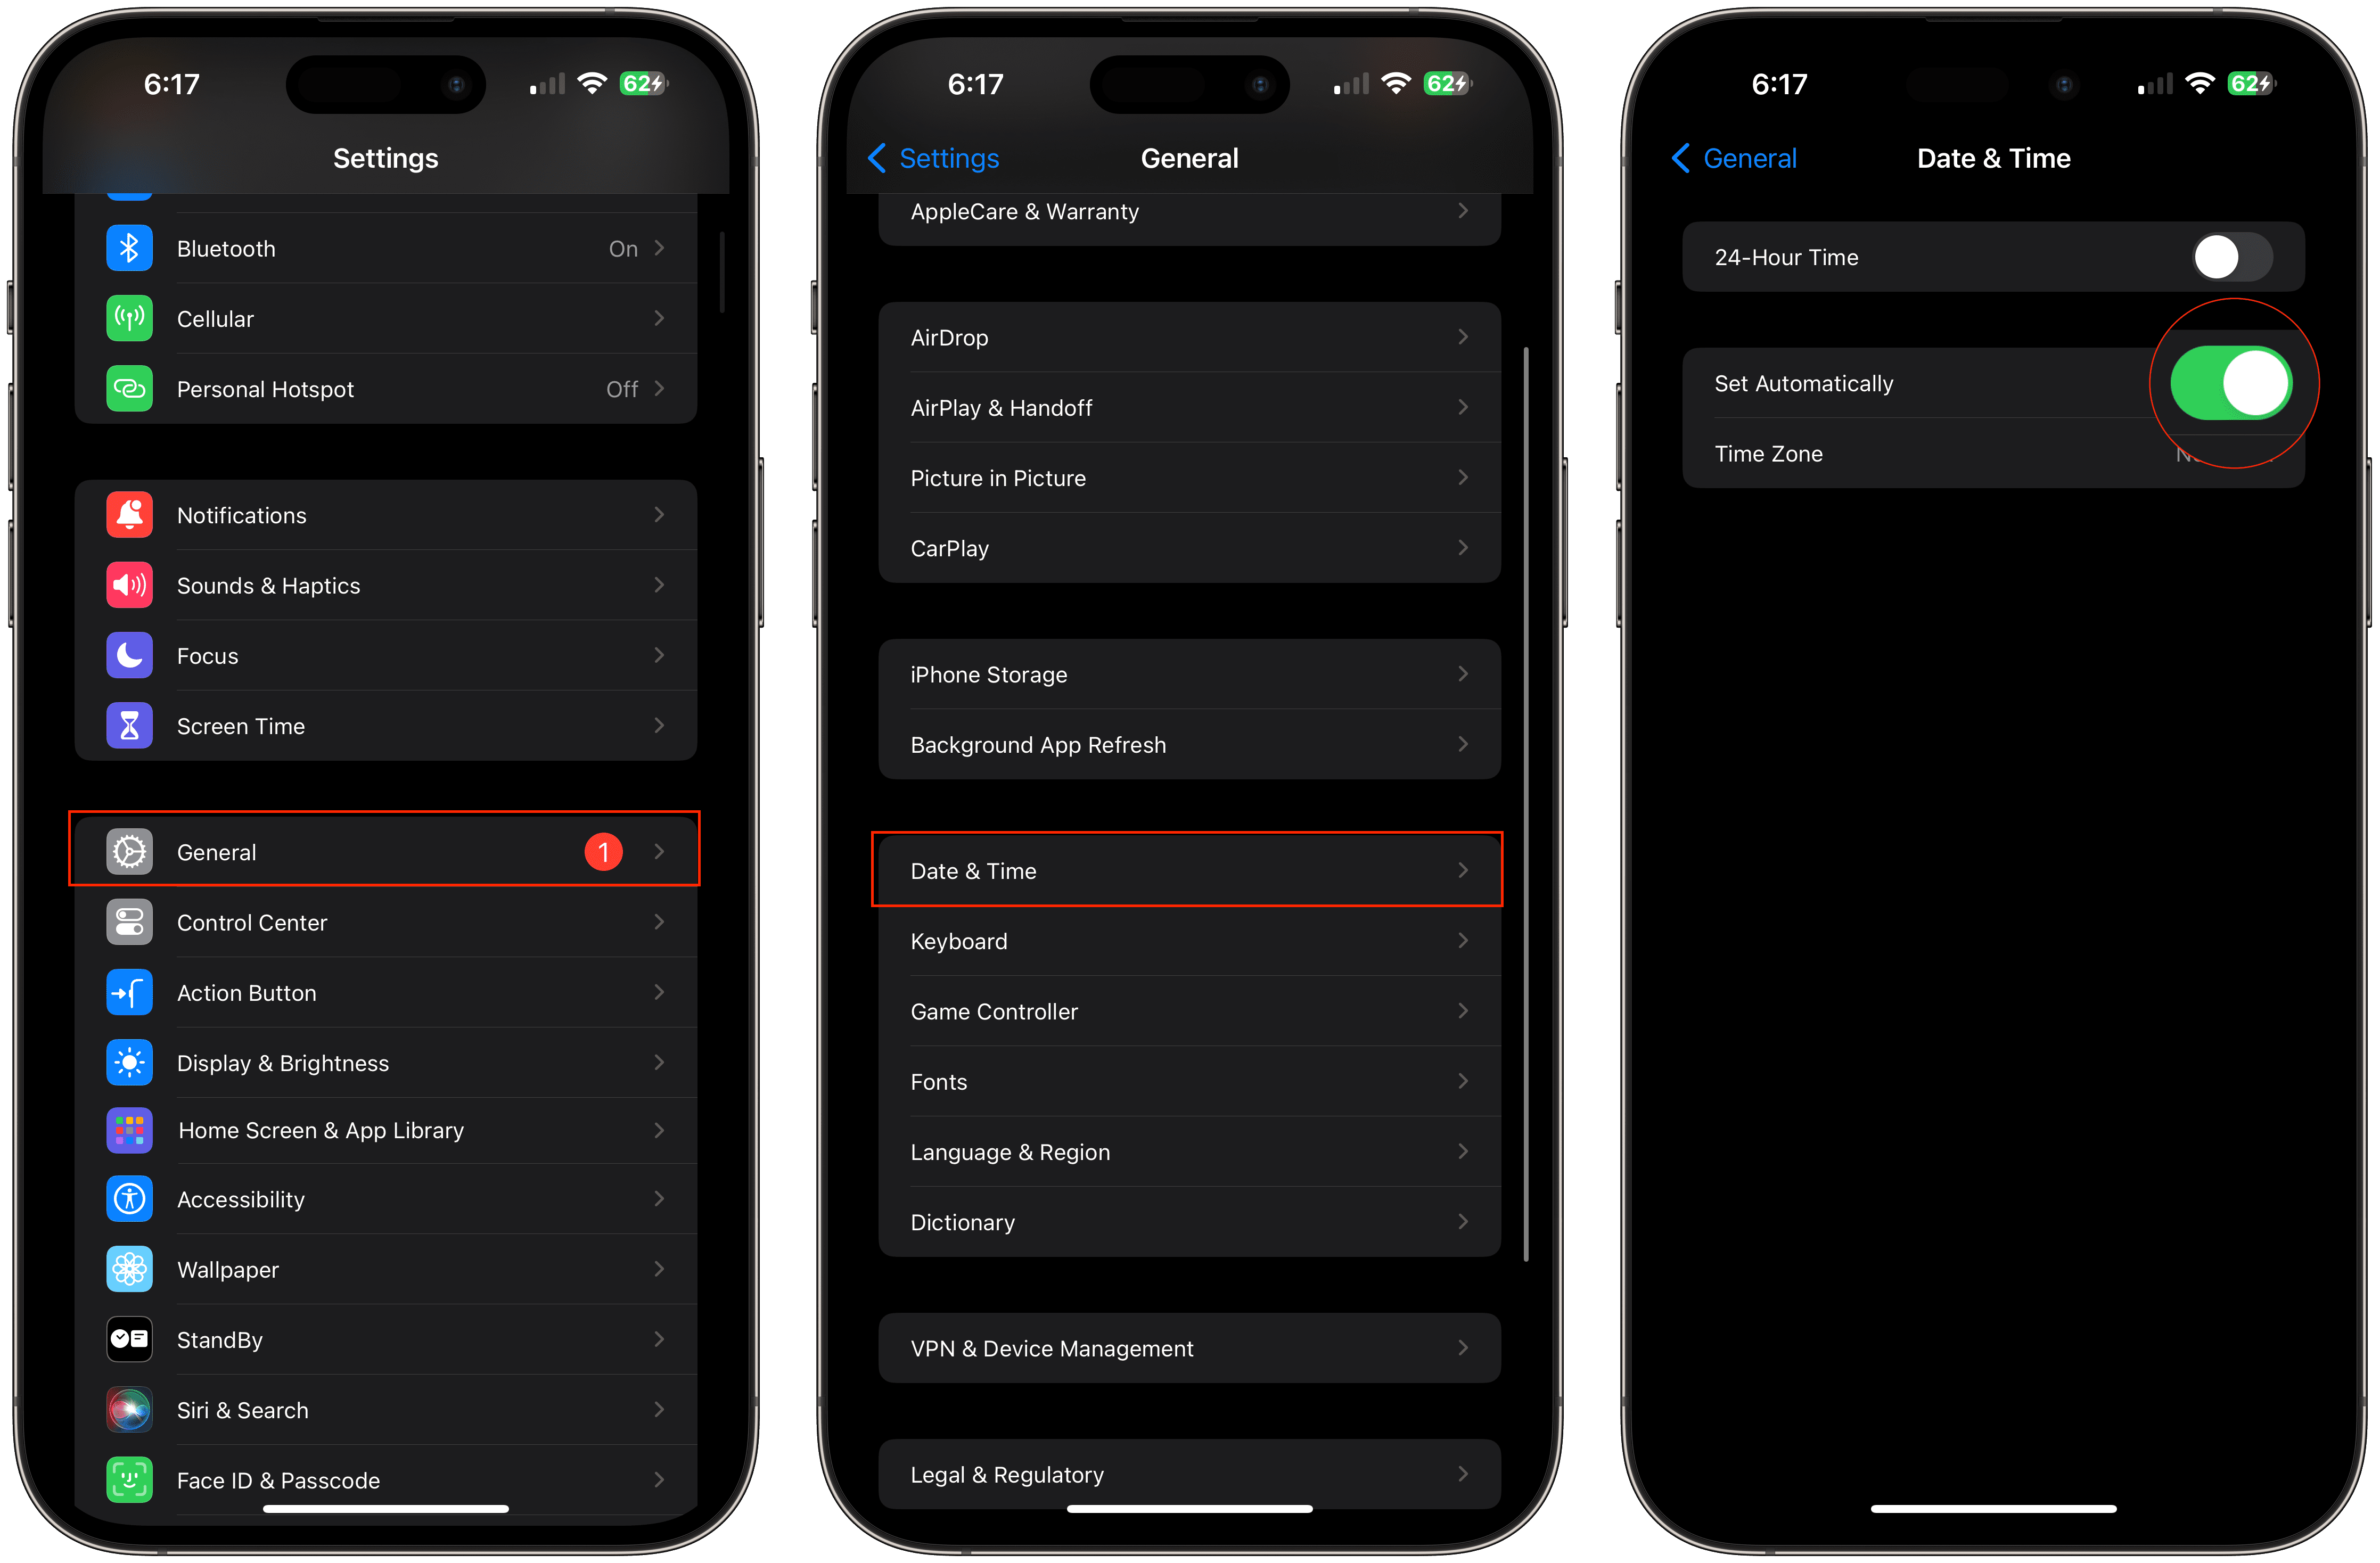
Go to Settings: Open your iPhone or iPad’s “Settings” app.
Select General: Locate the “General” section within the Settings list.
Tap Date & Time: Enter the “Date & Time” settings.
Enable Automatic: Make sure the toggle for “Set Automatically” is turned on (green). This lets your device pull the correct time and date from the internet.
Manual Adjustment (if needed): If “Set Automatically” is already on and the time/date are still wrong, you may need to manually adjust the settings.
If your time and date settings were significantly off, it might take a few minutes for iMessage to start working correctly after the adjustment.
Try Clearing Out Old Messages
While it might not seem immediately related, a cluttered iMessage history can sometimes impact the functionality of the app. If you’ve got years of old messages and attachments stored on your device, these can take up space and potentially slow down iMessage’s performance. Here’s how to clear out older messages:
Deleting Individual Conversations:
Open the Messages app: Launch the Messages app on your iPhone or iPad.
Select a Conversation: Locate the conversation you want to delete.
Swipe and Delete: Swipe left on the conversation and tap the red “Delete” button.
Automatically Delete Older Messages:
Open Settings: Go to the Settings app.
Navigate to Messages: Scroll down and tap on “Messages”.
Manage Message History: Tap on “Keep Messages” under the Message History section.
Choose a Duration: Select “30 Days” or “1 Year” to automatically delete messages older than the chosen timeframe.
Double-check Your Send & Receive Settings
Incorrect settings within the “Send & Receive” section of iMessage can cause delivery issues. Here’s how to make sure everything is configured correctly:
Access Settings: Open the “Settings” app on your iPhone or iPad.
Navigate to Messages: Scroll down and tap on “Messages”.
Tap Send & Receive: Locate the “Send & Receive” option and tap on it.
Verify Selection: Under the “YOU CAN BE REACHED BY IMESSAGE AT” section, ensure that your correct phone number and Apple ID email address are listed and have checkmarks next to them.
Make Changes if Needed: If you need to add or select a different address, tap on it.
If you have multiple Apple devices, ensure that the correct phone numbers and email addresses are associated with iMessage on each device. It may take some time for changes within “Send & Receive” to take effect.
Conclusion
Navigating through the maze of technology can sometimes feel like trying to solve a complex puzzle with missing pieces. However, when it comes to resolving issues like iMessage not working on your iPhone or iPad, the solution often lies in the simple steps and measures outlined in this article. By exploring these various fixes, you’re not just troubleshooting; you’re taking proactive steps towards ensuring a seamless and uninterrupted communication experience.
I tried everything to get iMessage working again on my Ipad Pro after getting the sign in error out of the blue. What finally worked was checking Find My. It turns out Find My had been turned off on the iPad. I turned it on, gave it a minute until the iPad showed up on Find My on iCloud, and then signed into iMessage on the iPad. No more error messages. A little bewildering because I have zero recollection of turning off Find My or getting anywhere near that setting, but glad to have everything working!


I tried everything to get iMessage working again on my Ipad Pro after getting the sign in error out of the blue. What finally worked was checking Find My. It turns out Find My had been turned off on the iPad. I turned it on, gave it a minute until the iPad showed up on Find My on iCloud, and then signed into iMessage on the iPad. No more error messages. A little bewildering because I have zero recollection of turning off Find My or getting anywhere near that setting, but glad to have everything working!