Is your Mac running low on space and you want to move your iPhone, iPad, or iPod backups to an external drive instead of your Mac’s internal drive? Are you wondering if it’s possible to back up iPhone to an external drive?
Well, the good news is that it is indeed possible. Learn how to change your storage location today using iTunes or Finder app!
For the Finder app in macOS Catalina+, use the same command for Terminal but add two spaces in between the word Backup and ~ (the tilde symbol for your user library), so it looks like this:
You can always back up to iCloud–and we recommend doing it. But we also think backing up to another location via iTunes or Finder is a good idea.
The chances are that your iPhone or other iDevice is larger than the paltry 5GB iCloud account Apple offers for free. You could upgrade your iCloud account to the larger plans starting at USD .99/month (USD 11.88/year) for 50GB.
But why not utilize all that free space you probably have on an external hard drive to backup your iPhone, iPad, or another iDevice instead? Or should I say, use an external drive in addition to that free or paid iCloud account!
At Apple ToolBox, we recommend always having multiple backups of your iDevices. Ideally, we all should have at least two backups minimum—1 on the cloud and one on an internal or external drive.
The best of all approach is to have two local and two clouds.
Why? Because you never know—like humans, things fall apart and fail, a crisis happens, disasters strike. So let’s be proactive and take an eyes-wide-open approach by backing up 2X2.
I always back up my iPhone and iPad locally via iTunes and with the Finder app for Macs running macOS Catalina+. But it drives me crazy that I don’t get to decide which folder to use for my backup.
And since I don’t get to control that, I don’t have the option to save it to an external drive. And that just darn buggers me!
You can, of course, manually back up your iTunes/Finder backup by finding the backup folder and dragging it to your external HD each time you back up.
But what a pain! If you find yourself annoyed enough, like I am, then Apple Terminal is here to the rescue.
This new process is due to Apple changing its level of security in macOS.
When you grant an App (or Utility like Terminal) Full Disk Access, your OS adds it to a “whitelist” of applications that you determine are safe to work with sensitive data and system data.
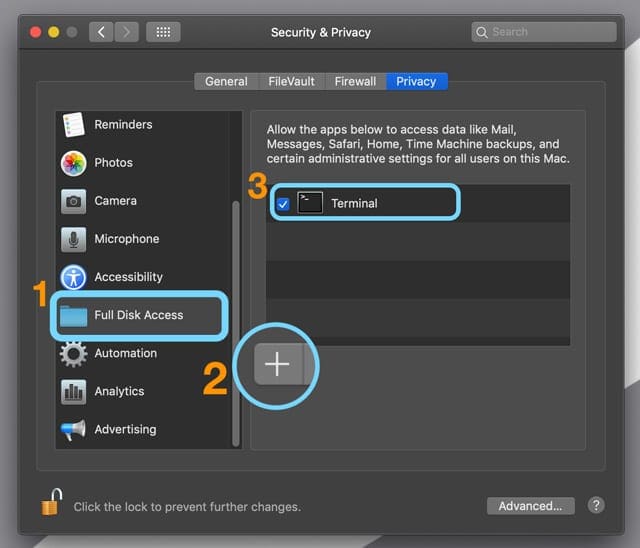
How to Grant Terminal Full Disk Access
Open System Preferences > Security & Privacy > Privacy Tab
Select Full Disk Access from the left sidebar
If you can’t make changes, unlock your disk and enter your admin password if needed
Tap the + symbol to add Terminal to your approved apps with Full Access
Once you grant Terminal Full Access, restart Terminal. You should good to go at this point!
How to Set Your iPhone Backup to an External Drive
1. Open your external drive and create a new folder for the backup. Name it MobileSync, or in a way you remember, such as “MyiPhoneBackUp.” Some macOS users found they HAD to name that folder MobileSync for this to work!
2. Open a new Finder window via File > New Finder Window or Command-N
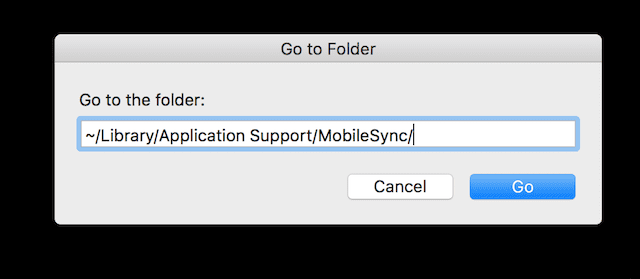
3. Select Go to Folder via Go > Go to Folder or Command+Shift+G
4. In the box that appears enter ~/Library/Application Support/MobileSync/ and select Go
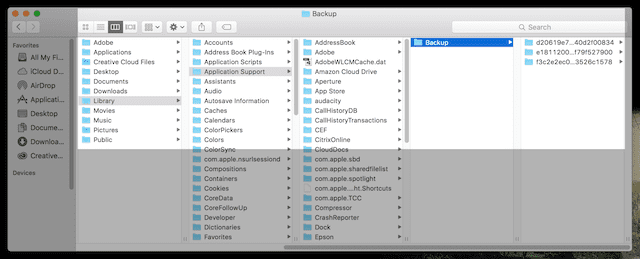
5. Locate the folder named “Backup.”
6. Drag the “Backup” folder to the folder on the external drive that you created in Step 1
7. Rename the original Backup folder (the one on your internal drive) to “BackupOld” (located here: ~/Library/Application Support/MobileSync/)
8. Launch Terminal (Applications>Utilities)
9. Type in this command, replacing the “ExternalDriveName” with the exact name of your external drive and replacing “MobileSync” or “MyiPhoneBackUp” with the name of the folder you created from step 1: ln -s /Volumes/ExternalDriveName/ MobileSync /Backup/ ~/Library/Application\ Support/MobileSync
For the Finder app in macOS Catalina+, use the same command for Terminal but add two spaces in between the word Backup and ~ (the tilde symbol for your user), so it looks like this:
10. Press Return
11. Verify that the link was established by
Select Go to Folder via Go > Go to Folder or Command+Shift+G
In the box that appears enter: ~/Library/Application Support/MobileSync/
You should see a shortcut (symbolic link) to the Backup folder in the Mobile Sync window letting you know that the link to the external drive’s Backup folder is established. You should also see the BackupOld folder you created in step 7. Click on the Backup shortcut to confirm it works!
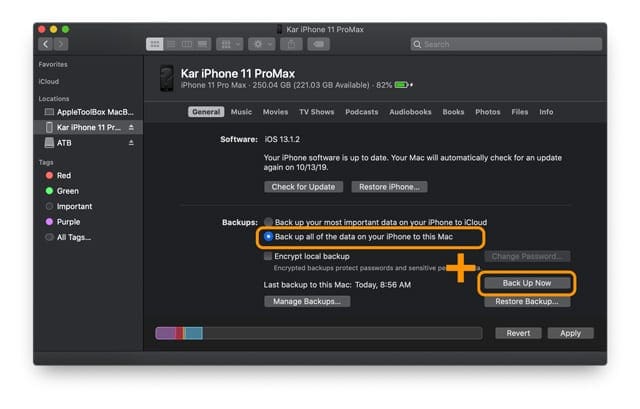
12. Open Finder or iTunes, connect your iOS device and back up normally selecting “This computer” as the backup location as you did previously
13. Select the Back Up Now button 14. If all goes well, the backup file should now be on your designated external drive. Verify it is indeed there.
It’s a good idea to test this several times. And if you have multiple iPhones, iPads, or iPods, try backing them all up to your external drive!
From now on, iTunes or Finder backs up your iDevice(s) to the external drive so remember to connect it to your computer before you do a backup.
If you do not have the external drive connected, the backup fails. And if you need to restore your device from the backup, you’ll need to connect this external drive.
When to Delete the Old Backup Folder
Once you confirm that Finder or iTunes is backing up your iDevice to that external drive, we suggest you wait a few days or weeks before deleting that “BackupOld” folder to ensure that everything is working as expected.
It’s crucial that you back up your iDevice(s) a few times and verify those backups before you delete that old backup folder. Once verified, go ahead and delete that BackupOld folder to save space on your Mac.
Remember your old backup folder is located in your user library: ~/Library/Application Support/MobileSync/
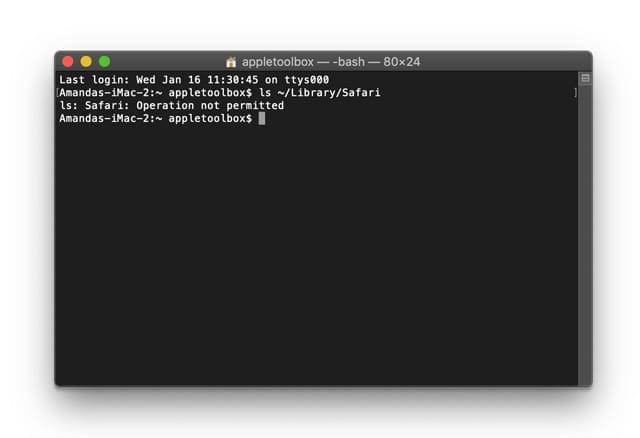
Seeing Error “Operation Not Permitted” in Terminal?
If your terminal commands are not working, you need to grant the Terminal app Full Disk Access. See the section above or this article on how to give Terminal this access.
How to Return Backup to the Internal Drive
If for some reason you want to go back to backing up on your internal drive, it’s a pretty straightforward process
1. Delete the Backup Shortcut (symbolic link)
2. Copy the Backup folder from the external drive back to the user library location: ~/Library/Application Support/MobileSync/
Backup to External Drive Not Working?
If you cannot modify where your iPhone or other iDevice backup saves, there is another option.
Instead of using Terminal, manually move your Finder or iTunes backup file to your external after iTunes creates it.
Remember, that when you move this backup file, iTunes and Finder do not see it and create an entirely new backup file each time.
Find your iTunes and Finder backup file in this location:/Users/yourusername/Library/Application Support/MobileSync
Summary
As always, at Apple ToolBox we recommend you retain a backup to the iCloud in addition to your Finder or iTunes backup, just in case something goes wrong. And preferably, you follow the 2X2 rule with 2 cloud backups and 2 local backups.
It feels like a lot of unnecessary storage I know, but should the day ever arrive when you need it; you’ll be thankful you have those backups at the ready. Remember, this is your insurance policy, and we want comprehensive coverage.
Reader Tips
Sami remind folks that if you name your external hard drive’s name with spaces between words, be sure to use the proper coding. So, if you name your external hard drive “My Passport,” make sure you use a backslash after My, then the space, then Passport. Like this: My\ Passport. And remember to capitalize when necessary
If the method above didn’t work for you, try redoing the process following reader Jingshao’s tips.
Remember to substitute your external drive’s name and the folder’s name (if you created a unique folder for the backup)
Open Terminal and type these commands (one-by-one with Return in between)
For most of her professional life, Amanda Elizabeth (Liz for short) trained all sorts of folks on how to use media as a tool to tell their own unique stories. She knows a thing or two about teaching others and creating how-to guides!
Her clients include Edutopia, Scribe Video Center, Third Path Institute, Bracket, The Philadelphia Museum of Art, and the Big Picture Alliance.
Elizabeth received her Master of Fine Arts degree in media making from Temple University, where she also taught undergrads as an adjunct faculty member in their department of Film and Media Arts.
For Windows: the command in the steps at the bottom didn’t work for me:
mklink /J “%APPDATA%\Apple Computer\MobileSync\Backup” “[Your External Drive]:\iTunes Backup”
What did work was using /D instead of /J and for target the full UNC of the shared folder, like:
“//SharedDevice/iTunes Backup”
(be sure to use the correct double quotes if you have spaces in the target path)
Thanks for the guide and I hope this helps some people as well!
I’ve done all I thought I needed to BUT when I go to open itunes I am told “the folder containing itunes library cannot be found” and asked to create or choose library (this is because usually my itunes I think is on a different external drive which is ‘out of action’ so I am trying to temporarily backup my phone to a different harddrive – the one I followed your instructions with). SO what do I do then? If I try to select the folder mobilesync or he folders inside it, it says “itunes library could not be found”. Do you think the library might be on my internal harddrive ( even though the music is on my ‘out of action’ drive?
Hi! I know this article is old, but I hope you can help me! I have successfully backed up my iPhone to my external drive in the past, but with the switch from backing up through iTunes to backing up through finder, I accidentally created too many symlinks and I think I have confused my computer too much to figure out how to set it up properly again, any advice would be much appreciated! Thank you so much!
Thank you! The only article I’ve read that identifies how you need to change the Terminal command when using macOS Catalina to include two spaces before the tilde AND also identifying that for some users (e.g. me) the new folder on the external drive has to also be in a ‘MobileSync’ path. No one else explained this and following the others’ instructions meant that this failed repeatedly… Until now!
As of 26 August 2020 this hasn’t been working for me. I’m getting stuck at the step where I type the command into terminal. I’ve double and triple-checked everything about the spelling and spacing, played around with the spacing between ln and -s, between ~ and the folder name before it. Nothing works. Terminal tells me no such file or directory exists (for the first half of the command, which is the external hard drive I believe) and I checked and I definitely have that folder in there with the name. I have updated iOS, updated macOS on a Macbook Pro from late 2015. Please help? Thanks!
Thank you so much for this, Elizabeth! I was able to move my backups to my external HD. I have 2 questions.
1: When I test run restoring a backup, it shows that there are no backups available “last backup on this Mac: unknown”. How will I go about backing up in the future?
2: The HD seems to be duplicating the backup folder for each new backup. So for example in my HD, originally I created the MobileSync folder (copied from internal drive) > Backup > [090u234002…(name of file)] (first backup). My most recent backup is in the HD under MobileSync > Backup > Backup > [090u234002….(name of file)]. So it seems to be duplicating the Backup folder inside the MobileSync folder on my HD. Which will likely make it hard to find the most recent backup after having muliple backups stored if it keeps nesting. Any suggesting?
Hello!
I found this very helpful. If I would like to re-name the backup folder (from Step1), must I also modify the terminal command (or create a new command) with the new folder name? Or will it still be found since it’s the same folder, just renamed?
Yes, you must run through the Terminal Command again with the new folder name. The old link, while present points to the old folder name, so iTunes/Finder will not be able to backup to it until you point to that updated folder.
Hi! Gosh I’m so grateful for this info! If ya’ll have a moment I would so appreciate some advise..
In sending the command to Terminal, I got an icon of my external and a blank page icon of ‘MobileSync’ which when clicked, says ‘original item cannot be found’. The original folder in indeed in the external root directory. Is this what I should now have?
I’m ok to test it out and hook up my phone, but I am terrified that all of my info will disappear (probably irrational fear..but was traumatized when this happened to me a decade ago and still have no idea why).
Can I just ask, what would happen if I deleted the original BackUp folder and then went to hook up my phone to iTunes? I guess my fear is that my computer would tell my phone it doesn’t exist, so it would wipe it clean.. I would seriously appreciate knowing what actually happens so I can once and for all be free from crippling fear! XD THANK YOU so much!
Rather than deleting the original backup folder, move it somewhere for temporary safekeeping–like your user’s downloads folder or even on your desktop. Just make sure you changed its name.
The links you mention you see after running the Terminal commands do not sound correct. Go through those steps again and make sure you check that the links actually point to your external drive and the backup folder that’s there.
Those links should open up the Backup folder inside your external drive.
If they don’t open to that external drive’s backup folder, something is not right.
You should not attempt to backup your device until you can confirm those links works as intended.
Once the symlink works, then go ahead and backup your iPhone using iTunes and your external drive.
If you are unable to get things to work, you can move that BackupOLD folder to its original location and rename it back to Backup–just make sure you delete the backup symlink. Then you can continue to backup to your internal drive, just like before.
Again, since you mention your fears (I have been there too!), please please backup your entire Mac system using Time Machine (or Super Duper, Carbon Copy Cloner, etc) before changing your iTunes backup location.
Liz – Thank you. I would like to delete my symlink to start this process over. What I’m understanding is that I should input the command: unlink /Library/Application\ Support/MobileSync or rm /Library/Application\ Support/MobileSync
Hope you might confirm this for me.
Have a great weekend and many thank yous to you
You don’t need to use Terminal to delete the symlink, you can remove it just like normal. However, if you are more comfortable, go ahead and use Terminal–those commands should work
The Tilda is for the user account so your command should be: ln -s/Volumes/SANYEE2TB_MAC/MobileSync/Backup/ ~/Library/Application\ Support/MobileSync
You may need to experiment with the number of spaces between Backup and the tilda (~)–for us, we needed 2 spaces but others found it worked with just 1.
The tilde symbol (~) in macOS/OS X command-line points to your home directory, so you don’t need to add that additional user information.
Then try the commands again. You may need to experiment with the number of blank spaces within the command–it seems that sometimes it works with 2 spaces and sometimes just 1.
Am I suppose to see three symbolic links in the internal Mobilesync folder? I get one for my external drive, one for the folder I created in my external (MobileSync), and one for the folder I put in the external MobileSync folder (backup).
If you see more than one symlink–test them out and see if they send you to your external drive. If so, run a backup test and see which folder the backups are sent to–keep the symlink to that folder and place the other two in the trash. Then run another backup test. If it works with no issues, you can delete those two additional symlinks.
I followed the steps and I the icon with the arrow in the corner appeared in the MobileSync folder, so it seems like everything should be in order.
However, when I go to back up in Finder, it says there’s not enough space on my Mac and keeps canceling the backup.
There’s plenty of space on my hard drive, which means it’s still trying to back up to my Mac even though the icon with the arrow is there and I followed the steps exactly — any advice?
I am having an odd issue, the shortcut is in mobile sync and when I click it, it does in fact take me to the external drive, however once the backup is done on itunes, the file does not show up on the drive. I see that the drive indicator flashes as the backup takes place and that it is indeed going to the drive because my mac did not have sufficient storage before making this change so it wouldn’t backup before. I’m just wondering where the backup is going and why it isn’t showing. I have tried a reboot and disconnect and even re-did an entire backup again but no luck. It seems I am stuck at step 14.
Nathan, did you ever solve this issue? I think I am having the same problem.
Trying to back up my iPhone to an external HD through my Mac. The HD is 2TB and i’ve partitioned 500GB for TimeMachine so have 1.5TB free for my back up. I created the symlink and it appears to all be correct, however when I attempt to back up the phone it eventually tells me I don’t have enough space.
The phone is using around 170GB and my mac only has around 25GB available so I can’t back up to my regular hard drive and copy the files over once they back up.
I have tried renaming the old folder and creating a new one, and restarting mac with no success.
{Could not back up the iPhone “MyPhone” because the backup was corrupt.}
I did all steps one by one correctly, but
I dont know why this message I receiving …
Please help if any one know the problem…or where I did mistake..
Hi,
I have set it all up as you describe. If I open iTunes, go to Preferences -> Devices, rightclick on the backups and choose “show in Finder”, I can see that they are located on my NAS (as desired). Then I start a new backup, and initially everything looks okay. iTunes says, that it is backing up, but nothing happens. iTunes never gets to step 2, where you see the status bar starting over. After several minutes, I have to cancel the process.
Any idea what could be wrong?
To clarify (I hope) there are now three folders in the Library/Application Support/Mobilesync: the original Backup folder that was renamed oldBackup, a new folder named “Backup” and a folder titled the same as the one in my external hard drive “Stephanieiphonebackup”
The Backup folder in that folder is actually in my external hard drive like it should be.
But I have checked my info on these folders and on my mac storage and the new “Backup” folder in my library also contains a backup of my iPhone on my computer.
I saw this response after I replied to your other response. Anyhow, that fixed it.
However, now that I have resolved many other storage issues, I was wondering if maybe I should do it the other way ending up with 2 backups one on the computer and one on an external hard drive.
Having two backups is always recommended, especially for your most important data.
I personally do an iCloud backup and now a Finder backup (previously iTunes) on my Mac. That way there is always a backup available–one local and one remote.
Did you rename the backup folder on your Mac to something like backup_old? The backup that’s on your mac should ONLY be a shortcut (alias) to the backup folder on your external drive.
You should see a little arrow in the bottom corner of that backup folder on your Mac–this alias must be there in order to make the link work!
The Alias is there it created a folder in the MobileSync Folder called “Stephanieiphonebackup” and then made an alias in that folder called Backup which is actually on my external harddrive.
The arrow is on the folder “Stephanieiphonebackup”.
But when I backed up my phone it also created another folder in Mobilesync/Backup which contains a second backup still in my computer’s hard drive.
I know it’s there cause I’ve checked the info and can see the data is on my computer.
I can also go to About Mac and look at the storage there and see that I have 30gb of ISO backup files stored on my computer.
Just out of curiosity to see if the issue would repeat itself.
I deleted the Backup folder that it created and then started again to back up my phone through iTunes and it create the extra Backup folder on my computer.
I use Catalina, I did the link successful but Mac keep saying not enough space as well when I backup my iPhone. My external Harddisk got 300 GB free and my iPhone only used 170GB. Any other reasons caused possible?
Unfortunately, we have not been able to figure out how to get this to work in Catalina (at least not yet!) And we aren’t alone. Many of the beta testers for macOS Catalina also tried and failed to come up with a workaround to be able to continue backing up to an external drive.
We suspect that it has to do with changes Apple made under the hood to protect its system software.
We’re still experimenting–and will update the article once we have a process that works every time.
So for now, if you depend on backing up to an external drive either hold off updating to macOS Catalina or manually move your backup files to an external drive (needs to be done each time you backup.)
Of course, in the meantime, you can also backup to iCloud.
For the Finder app in macOS Catalina, use the same command for Terminal but add two spaces in between the word Backup and ~ (the tilde symbol for your user library), so it looks like this:
I have tried the method listed above but I get an ‘Operation Not Permitted’ error.
I have created a folder on an external drive called MobileSync/Backup and have tried using ln -s to point at ~/Library/Application\ Support/MobileSync but have had no success.
I’ve renamed the Backup folder on my internal drive, as the instructions advised.
In the short term, I’ve copied over the Backup folder to the external drive, so I could always simply copy it back on the internal drive when the time comes to backup again/restore. But I’d really like to have a reliable external backup solution.
I’m running 10.15 on a MacMini (2018) 3.2 GHz 6-Core Intel Core i7 with 64GB of RAM, if that matters.
Any help you could give would be much appreciated.
Out of curiosity, did you need to add those two spaces before the tilde (~) or not? We’re hearing that some folks need and others don’t so it’s helpful to hear your experience.
Thanks and glad you got it working!
Liz
jason r meekssays
Ok maybe I’m just confused but when I try to create the symlink I type everything in the terminal and I press return and I get ln: /Users/jasonmeeks/Library/ApplicationSupport/MobileSync : no such file or directory
Please help
First, verify that you have a MobileSync folder in your User’s Application Support folder. (Use the Go > Go to Folder and type in ~/Library/Application Support/MobileSync/)
Once verified, make sure there is no folder inside MobileSync named Backup–if there is the symlink won’t work. Try renaming any folder named Backup to Backup_OLD or something like that.
Then, try opening Terminal again and enter the command (replacing the bold with your drive name and your folder name)
Thank you very much for responding and helping! I apparently left the space between application support out…but I did it and now I am currently backing it up to external hard drive!
I’ve done that same mistake myself–as have a lot of other people. We’re really glad it’s working for you! I just wish we could figure out how to get this working on macOS Catalina–nothing seems to do the trick to backup to an external drive using Catalina.
So if you are considering updating to macOS Catalina and still want to back up your iDevices to an external drive, hold off updating for now.
Hopefully, the wisdom of the masses will figure something out–cause we’re having no luck!
We think we’ve finally figured this one out–and of course, it was a simple but unexpected thing!
For the Finder app in macOS Catalina, use the same command for Terminal but add two spaces in between the word Backup and ~ (the tilde symbol for your user library), so it looks like this:
Hi,
Do these steps work for an external hard drive which is not physically plugged into the laptop – rather connected to an AirPort Extreme basestation? Could you help direct me on how to find the folder path for such an external HD?
Thanks for your help.
We don’t see why they wouldn’t work, but admittedly, we’ve never tried it.
To locate the path to your networked drive:
Open Finder and press Apple-K to view a dialog box to connect to a server (or use the Finder’s Go Menu and choose Connect to Server)
Type in the IP address or the name of your AirPort station, preceded by smb:// (for example, smb://192.168.1.1 or smb://NetworkDriveName)
Select the ‘+’ icon to add the drive to your favorites list
Enter the username and password
Choose Remember this password in my keychain so you don’t have to enter the login details every time
Select the icon to access the contents of the network drive and it should appear as a network hard drive on your Mac’s desktop
Then follow the instructions to create a folder on the network drive for your iDevice backups.
If you don’t know the IP or name of your networked drive, use the Browse function after you press Command+K.
And if you haven’t already done this, you may want to add the networked drive to your list of login items, so it’s always available when you log into your Mac. To do this open System Preferences > User & Groups > Login Items and drag the network drive’s icon into your login items list
Make sure you run a few tests before deleting any files!
Hi there,
So I do not actually have a folder named ‘Backup’ when I go command shift G and then ‘~/Library/Application Support/MobileSync/’
I was really hoping you could help me!!
But I want to do a backup without having to put everything on my MacBook.
It does not have enough storage to support everything from my phone, so I just want to be able to move my photos and videos from my iPhone straight onto my hard drive, without doing any internal backups, if possible.
Okay, then follow the directions in the article but instead of dragging the old backup folder, just create a new folder named Backup on your external drive, within the folder you originally created (in Step 1)
I’ve tested this using macOS Mojave and my MacBook and it worked.
First, backup your device to iCloud if you can, go to Settings > Apple ID Profile > iCloud > iCloud Backup > Backup Now.
Then restart both your computer and your device.
On your external drive, move the contents of the current backup folder to a new folder to archive it and then try to backup your device again–since there won’t be any older backups in that folder, it will take additional time to backup.
We also suggest that you archive a backup–just in case there are problems moving forward.
You can only archive backups on a Mac. Go to iTunes > Preferences > Devices > right-click on the current backup and select Archive.
Guys, I tried the same thing. If you use the AirPort Capsule Volume, it will always say it’s corrupt. Even granting all permissions and even not securing the access to the Airport Drive, the command will not create a known shortcut to the main folder and iTunes will always say it’s corrupt.
I have switched the command to point to an external SSD that I have and it works just fine.
For anyone getting the corrupt OR no backups on this computer issue, this worked for me – the KEY is starting over & creating a brand new folder on your external hard drive. The good news is you don’t need to recopy your backup. So:
Quit out of itunes
Delete all prior symbolic links on internal drive folder
Create new folder on external drive – a person in another forum suggested “iTunesBackupExternal”
Create a folder within that called “Backup”
Then drag your huge iphone backup that you copied from your internal drive into the backup folder.
Then do the symbolic link again in terminal – with this folder name it would be:
ln -s /Volumes/[EXTERNALDRIVENAME]/iTunesBackupExternal/Backup ~/Library/Application\ Support/MobileSync
You will see a new symbolic link on the internal drive
Quit out of terminal
Check permissions are all Read & Write for everyone on the external drive (Command-I)
Start itunes
Backup
That worked perfectly for me – the main issue was creating a new external hard drive clean folder
I’m having a hard time getting this to work with the macOS Catalina beta.
I had this set-up before, but now on Catalina; the back up fails (says error reading/writing to iPhone) but once I reverse the process, the iPhone will back up to the internal drive no problem.
We’re currently testing out how to backup to an external drive with macOS Catalina, now that iTunes is retired. We’ll update the article once we have a process that works!
This extra info may be useful to some:
Note: If your external hard drive’s name has a space, be sure to use the proper coding. For example, if your hard drive is named “My Passport” be sure to use a backslash after My, then the space, then Passport. Like this: My\ Passport. Don’t forget to capitalize when necessary.
Hi, I followed all the steps successfully, although my question now is, there was no step in this process where you delete the iPhone backups from the computers internal drive.
Can I delete the file called “BackupOld” on my internal drive to free up space on my internal drive?
Now that I copied the Backups folder to the external drive and created the symbolic link to my external drive, my understanding is that every time I connect my iPhone to my laptop, it automatically syncs to my external drive instead of my internal drive.
However, I, of course, want to delete the backups folder on my internal drive so I can have more storage on my internal drive.
We’re glad this is working for you. And yes, we missed that final step!
After you test that your iDevice is backing up to your external drive successfully–we recommend you backup the iDevice a few times and verify that the backup is working correctly and available–then you can indeed go ahead and delete that BackupOld folder to save space on your Mac.
We’ll add this into the article as well…thank you for pointing it out!
Hello, thank you for providing this information as backups to an external hard drive seems like the best option for our family of multiple IOS device users.
I’ve followed the steps and everything seems to be set up correctly, but now I’m getting an error message that the iTunes back up failed because there was a problem reading or writing to the iPhone.
I’m hoping that someone has some ideas on how to troubleshoot. Here’s what I’ve done –
1. Mac updated to latest Mojave and all iPhones have latest software.
2. Tried a different updated phone, same issue.
3. Restarted Mac and phones several times,
4. Tried a new USB lightning cable (brand new Apple brand),
5. External hard drive appears to otherwise be working fine, and
6. Switched USB ports.
Apple changed/added a layer of security in macOS 14.
You now have to grant Terminal “Full Disk Access” first. (Any program for that matter, if you want to change stuff within OS on a deeper level.)
So open System Preferences, then Security & Privacy, then Privacy Tab to the right, then navigate to Full Disk Access (you have to log in to make changes – see lock at the bottom)
At last you use the + to add Terminal Full Access.
Once you’ve granted access, restart Terminal and you’re set to go to change whatever you set out to change.
When i put ln -s /Volumes/ExternalDriveName/ MobileSync /Backup/ ~/Library/Application\ Support/MobileSync into terminal i get Operation not permitted?
I am having the same issue, but I am definitely in my admin account (I only have one account and it has admin status). I even tried creating a new account that has admin status to try to resolve the issue but “Operation not permitted” persists. Any thoughts?
Hi I got this same error: “no such file or directory” in terminal
And changing permissions makes no difference.
It seems like the problem is that if I follow the steps in order then I’ve just changed MobileSync/Backup to MobileSync/Backupold so of course that file wouldn’t exist.
Though I’ve changed it to Backupold in the terminal and I’m not sure that works either. It just says “file exists”
I tried the steps outlined in this article, but received the following error message form iTunes: “iTunes could not back up the iPhone “NAME” because the backup was corrupt.
It then says to “Delete the backup for this iPhone in Devices Preferences, then try again.”
But I’ve deleted all those backups.
So, I guess these steps no longer work with the current OS and iOS?
Jason found that he needed to update permissions on his external drive. Select the drive and then right-click and press “Get Info” (or use Command+I) and then change the permissions to Read & Write for everything.
I have run a bunch of tests to get this working and still not able to successfully back up to an external drive with macOS Catalina.
I have been able to create a symlink to the backup using this terminal command:
But even with that correct symlink, Finder is still failing on backing it up onto the external drive.
There are still a lot of issues with Catalina and in particular, with Finder restoring backups, so I’m hopeful that by the time Catalina releases publically sometimes in mid to late Septemeber, that we will have a way to successfully and routinely back up to an external drive using Finder instead of iTunes.
Liz
Jingshaosays
After you did the `ln -s…` command as in the instruction, in a terminal window, type this command and return:
cd ~/Library/Application\ Support/MobileSync/Backup
You shouldn’t see any error. If you see errors such as “Too many levels of symbolic links”, then your `ln -s …` command before somehow was typed wrong. Probably had an extra / at the end or something.
To redo the procedure, do these in a terminal window: (I am using a Seagate5T, so my command has that name, but yours should be whatever your external disk be)
cd ~/Library/Application\ Support/MobileSync/
rm Backup
mkdir /Volumes/Seagate5T/Backup
ln -s /Volumes/Seagate5T/Backup
Now, try do:
cd ~/Library/Application\ Support/MobileSync/Backup
It should not complain, and it should be ready for iTunes to use.
I followed all the steps and the symbolic link is setup however when i go to backup via iTunes it appears to want to work but gives the error message “iTunes could not back up the iPhone because an error occurred.” Any suggestions? Running version 11.4
I follow all of the steps and it seems to work, however, it keeps telling me that the back is corrupt and to delete it, however, I am trying to create a new back up. What should I do?
Some readers found that placing the backup files temporarily on their internal hard drive worked faster and more reliably.
Follow the instructions in the article with the heading How to Return Backup to the Internal Drive
1. Delete the Backup Shortcut (symbolic link)
2. Copy the Backup folder from the external drive back to the user library location: ~/Library/Application Support/MobileSync/
This process worked great for me and I can see that backups are now going to my external drive. However, iTunes now says that the my iPhone has never been backed up, and I have no way to restore from backup. Any ideas?
Sorry, you’re having issues with backing up your iOS to an external drive. We actually ran some tests here to see if we encountered the same problems. Interestingly, our iMac worked fine but our MacBook showed similar issues. So here’s what we did to get the MacBook working:
1) Close All Open Apps and Restart the Mac
2) Trash the current Backup symbolic link in your user library’s Library/MobileSync folder
3) Open Terminal and recreate that symlink again:
Remember to substitute the name of your external drive for “Storage” and the name of your backup folder for “iOSBackup”
We also discovered that keeping the names of your external drive and backup folder simple leads to fewer issues.
4) Check and see if Terminal created the Backup symlink ( ~/Library/Application\ Support/MobileSync)
5) If so, open connect your iPhone (or another iDevice) and launch iTunes
6) Open iTunes Preferences (Command+Comman) and tap the Devices tab–see if your backups are now showing
7) Run a test by backing up using iTunes using This Computer and BackUp Now buttons
8) Check the backup folder on your external drive and see if it updated
I have the same problem. This solution no longer works on the latest iOS/OSX updates… It actually crashes and restarts my computer when trying to backup to external HD…
Sorry that these steps aren’t working for you on the latest macOS/iOS updates. We’re looking into this problem and we’ll update the article (and let you know) when we find some solutions that work! Thanks for bringing this to our attention.
is there any news about it ? im having the same problem …
SKsays
Hi berk,
Still looking into this problem. trying to figure out workarounds with no luck thus far.
Jasonsays
I look forward to the solution!
I do not have room on my computer to backup my entire iPhone. That’s why I need to backup to an external hard drive.
Is there an app out there that will do this?
BruedTacosays
I’ve tried this multiple times. Every time I try it, Terminal responds with “file exists,” and there is no “symbolic link” in the Mobile Sync folder. I have hidden files turned on.
Sorry that the steps aren’t guiding you through the process. Please let us know what version of macOS or Mac OS X you’re running on your MacBook. With that info, we’ll provide you OS specific directions.
Had something like this working fine for 1+ years until a week ago or so. Since the latest macOS and iOS updates about a week ago, it broke. Have spent literally hours trying to repeat the steps to get the backup recognised and working off the external disc, all to no avail. Am convinced the latest OS changes have caused the symlink / iTunes relationship to break, but it’s pure guess-work at the moment. Have ru Disk Utility and Techtool Pro across everything, in case there are under-lying disc issues causing problems, but nothing has been identified. Either way, I now have no way of saving iPhone backups to anywhere other than the MacBook Pro hard-drive, and it’s running out of space fast :-/


 14. If all goes well, the backup file should now be on your designated external drive. Verify it is indeed there.
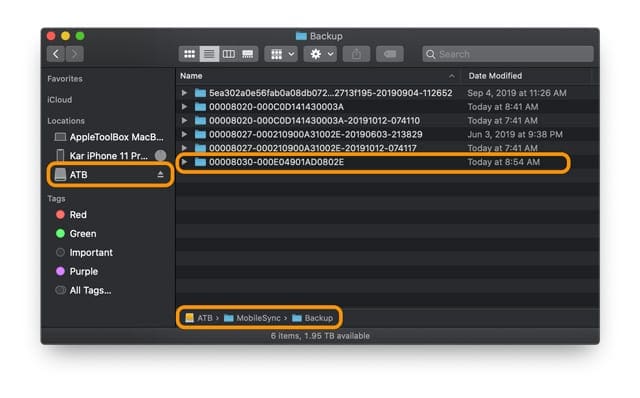


For Windows: the command in the steps at the bottom didn’t work for me:
mklink /J “%APPDATA%\Apple Computer\MobileSync\Backup” “[Your External Drive]:\iTunes Backup”
What did work was using /D instead of /J and for target the full UNC of the shared folder, like:
“//SharedDevice/iTunes Backup”
(be sure to use the correct double quotes if you have spaces in the target path)
Thanks for the guide and I hope this helps some people as well!
I never backup my iphone before, can i backup my iphone first time to an external hard drive by itunes.
Thanks for this –
I’ve done all I thought I needed to BUT when I go to open itunes I am told “the folder containing itunes library cannot be found” and asked to create or choose library (this is because usually my itunes I think is on a different external drive which is ‘out of action’ so I am trying to temporarily backup my phone to a different harddrive – the one I followed your instructions with). SO what do I do then? If I try to select the folder mobilesync or he folders inside it, it says “itunes library could not be found”. Do you think the library might be on my internal harddrive ( even though the music is on my ‘out of action’ drive?
Hi! I know this article is old, but I hope you can help me! I have successfully backed up my iPhone to my external drive in the past, but with the switch from backing up through iTunes to backing up through finder, I accidentally created too many symlinks and I think I have confused my computer too much to figure out how to set it up properly again, any advice would be much appreciated! Thank you so much!
Thank you! The only article I’ve read that identifies how you need to change the Terminal command when using macOS Catalina to include two spaces before the tilde AND also identifying that for some users (e.g. me) the new folder on the external drive has to also be in a ‘MobileSync’ path. No one else explained this and following the others’ instructions meant that this failed repeatedly… Until now!
As of 26 August 2020 this hasn’t been working for me. I’m getting stuck at the step where I type the command into terminal. I’ve double and triple-checked everything about the spelling and spacing, played around with the spacing between ln and -s, between ~ and the folder name before it. Nothing works. Terminal tells me no such file or directory exists (for the first half of the command, which is the external hard drive I believe) and I checked and I definitely have that folder in there with the name. I have updated iOS, updated macOS on a Macbook Pro from late 2015. Please help? Thanks!
Thank you so much for this, Elizabeth! I was able to move my backups to my external HD. I have 2 questions.
1: When I test run restoring a backup, it shows that there are no backups available “last backup on this Mac: unknown”. How will I go about backing up in the future?
2: The HD seems to be duplicating the backup folder for each new backup. So for example in my HD, originally I created the MobileSync folder (copied from internal drive) > Backup > [090u234002…(name of file)] (first backup). My most recent backup is in the HD under MobileSync > Backup > Backup > [090u234002….(name of file)]. So it seems to be duplicating the Backup folder inside the MobileSync folder on my HD. Which will likely make it hard to find the most recent backup after having muliple backups stored if it keeps nesting. Any suggesting?
Hello!
I found this very helpful. If I would like to re-name the backup folder (from Step1), must I also modify the terminal command (or create a new command) with the new folder name? Or will it still be found since it’s the same folder, just renamed?
Thank you!
Andrea
Hi Andrea,
Yes, you must run through the Terminal Command again with the new folder name. The old link, while present points to the old folder name, so iTunes/Finder will not be able to backup to it until you point to that updated folder.
Hi! Gosh I’m so grateful for this info! If ya’ll have a moment I would so appreciate some advise..
In sending the command to Terminal, I got an icon of my external and a blank page icon of ‘MobileSync’ which when clicked, says ‘original item cannot be found’. The original folder in indeed in the external root directory. Is this what I should now have?
I’m ok to test it out and hook up my phone, but I am terrified that all of my info will disappear (probably irrational fear..but was traumatized when this happened to me a decade ago and still have no idea why).
Can I just ask, what would happen if I deleted the original BackUp folder and then went to hook up my phone to iTunes? I guess my fear is that my computer would tell my phone it doesn’t exist, so it would wipe it clean.. I would seriously appreciate knowing what actually happens so I can once and for all be free from crippling fear! XD THANK YOU so much!
Hi Jessica,
Rather than deleting the original backup folder, move it somewhere for temporary safekeeping–like your user’s downloads folder or even on your desktop. Just make sure you changed its name.
The links you mention you see after running the Terminal commands do not sound correct. Go through those steps again and make sure you check that the links actually point to your external drive and the backup folder that’s there.
Those links should open up the Backup folder inside your external drive.
If they don’t open to that external drive’s backup folder, something is not right.
You should not attempt to backup your device until you can confirm those links works as intended.
Once the symlink works, then go ahead and backup your iPhone using iTunes and your external drive.
If you are unable to get things to work, you can move that BackupOLD folder to its original location and rename it back to Backup–just make sure you delete the backup symlink. Then you can continue to backup to your internal drive, just like before.
Again, since you mention your fears (I have been there too!), please please backup your entire Mac system using Time Machine (or Super Duper, Carbon Copy Cloner, etc) before changing your iTunes backup location.
Good luck.
Liz
Liz – Thank you. I would like to delete my symlink to start this process over. What I’m understanding is that I should input the command: unlink /Library/Application\ Support/MobileSync or rm /Library/Application\ Support/MobileSync
Hope you might confirm this for me.
Have a great weekend and many thank yous to you
Jessica
Hi Jessica,
You don’t need to use Terminal to delete the symlink, you can remove it just like normal. However, if you are more comfortable, go ahead and use Terminal–those commands should work
I keep getting this message that says : -bash: In: command not found
Any suggestions what’s the problem because I cant create a link. any adv will be greatly appreciated, thank you.
In -s/Volumes/SANYEE2TB_MAC/MobileSync/Backup/ ~/Users/Kimy/Library/Application\ Support/MobileSync
(this is how I entered the HD location and old path, but just keep getting command not found.
thank you in advance
Hi again Sanyee,
The Tilda is for the user account so your command should be: ln -s/Volumes/SANYEE2TB_MAC/MobileSync/Backup/ ~/Library/Application\ Support/MobileSync
You may need to experiment with the number of spaces between Backup and the tilda (~)–for us, we needed 2 spaces but others found it worked with just 1.
The tilde symbol (~) in macOS/OS X command-line points to your home directory, so you don’t need to add that additional user information.
Hi Sanyee,
Make sure you give Terminal full disk access
Then try the commands again. You may need to experiment with the number of blank spaces within the command–it seems that sometimes it works with 2 spaces and sometimes just 1.
Am I suppose to see three symbolic links in the internal Mobilesync folder? I get one for my external drive, one for the folder I created in my external (MobileSync), and one for the folder I put in the external MobileSync folder (backup).
Hi Adrian,
If you see more than one symlink–test them out and see if they send you to your external drive. If so, run a backup test and see which folder the backups are sent to–keep the symlink to that folder and place the other two in the trash. Then run another backup test. If it works with no issues, you can delete those two additional symlinks.
I followed the steps and I the icon with the arrow in the corner appeared in the MobileSync folder, so it seems like everything should be in order.
However, when I go to back up in Finder, it says there’s not enough space on my Mac and keeps canceling the backup.
There’s plenty of space on my hard drive, which means it’s still trying to back up to my Mac even though the icon with the arrow is there and I followed the steps exactly — any advice?
HI Nathan,
After making that change, did you restart your Mac?
Also, click on that shortcut (icon with the arrow) and confirm that it does indeed point to your external drive.
I am having an odd issue, the shortcut is in mobile sync and when I click it, it does in fact take me to the external drive, however once the backup is done on itunes, the file does not show up on the drive. I see that the drive indicator flashes as the backup takes place and that it is indeed going to the drive because my mac did not have sufficient storage before making this change so it wouldn’t backup before. I’m just wondering where the backup is going and why it isn’t showing. I have tried a reboot and disconnect and even re-did an entire backup again but no luck. It seems I am stuck at step 14.
Nathan, did you ever solve this issue? I think I am having the same problem.
Trying to back up my iPhone to an external HD through my Mac. The HD is 2TB and i’ve partitioned 500GB for TimeMachine so have 1.5TB free for my back up. I created the symlink and it appears to all be correct, however when I attempt to back up the phone it eventually tells me I don’t have enough space.
The phone is using around 170GB and my mac only has around 25GB available so I can’t back up to my regular hard drive and copy the files over once they back up.
I have tried renaming the old folder and creating a new one, and restarting mac with no success.
Any suggestions?
{Could not back up the iPhone “MyPhone” because the backup was corrupt.}
I did all steps one by one correctly, but
I dont know why this message I receiving …
Please help if any one know the problem…or where I did mistake..
Why do I have to keep a copy of the back up on my internal drive? Can i just drag the entire backup folder to the external HD?
Hi,
I have set it all up as you describe. If I open iTunes, go to Preferences -> Devices, rightclick on the backups and choose “show in Finder”, I can see that they are located on my NAS (as desired). Then I start a new backup, and initially everything looks okay. iTunes says, that it is backing up, but nothing happens. iTunes never gets to step 2, where you see the status bar starting over. After several minutes, I have to cancel the process.
Any idea what could be wrong?
I did this on macOS Catalina and it seems it made two backups, one in the original folder in my library and one in the external hard drive.
ln -s /Volumes/MyPassportBackup/Stephanieiphonebackup/ ~/Library/Application\ Support/MobileSync
I was trying to just make one backup on my external drive and save room on my computer. What did I do different?
To clarify (I hope) there are now three folders in the Library/Application Support/Mobilesync: the original Backup folder that was renamed oldBackup, a new folder named “Backup” and a folder titled the same as the one in my external hard drive “Stephanieiphonebackup”
The Backup folder in that folder is actually in my external hard drive like it should be.
But I have checked my info on these folders and on my mac storage and the new “Backup” folder in my library also contains a backup of my iPhone on my computer.
Hi Stephanie,
Try naming that folder on the external drive just as Backup instead of Stephanieiphonebackup.
You will need to follow the steps again–but this should do the trick
I saw this response after I replied to your other response. Anyhow, that fixed it.
However, now that I have resolved many other storage issues, I was wondering if maybe I should do it the other way ending up with 2 backups one on the computer and one on an external hard drive.
Do you see any issues with that?
Nope.
Having two backups is always recommended, especially for your most important data.
I personally do an iCloud backup and now a Finder backup (previously iTunes) on my Mac. That way there is always a backup available–one local and one remote.
Liz
Hi Stephanie,
Did you rename the backup folder on your Mac to something like backup_old? The backup that’s on your mac should ONLY be a shortcut (alias) to the backup folder on your external drive.
You should see a little arrow in the bottom corner of that backup folder on your Mac–this alias must be there in order to make the link work!
Yes I relabeled the old Backup: “oldBackup”.
The Alias is there it created a folder in the MobileSync Folder called “Stephanieiphonebackup” and then made an alias in that folder called Backup which is actually on my external harddrive.
The arrow is on the folder “Stephanieiphonebackup”.
But when I backed up my phone it also created another folder in Mobilesync/Backup which contains a second backup still in my computer’s hard drive.
I know it’s there cause I’ve checked the info and can see the data is on my computer.
I can also go to About Mac and look at the storage there and see that I have 30gb of ISO backup files stored on my computer.
Just out of curiosity to see if the issue would repeat itself.
I deleted the Backup folder that it created and then started again to back up my phone through iTunes and it create the extra Backup folder on my computer.
Hi:
I use Catalina, I did the link successful but Mac keep saying not enough space as well when I backup my iPhone. My external Harddisk got 300 GB free and my iPhone only used 170GB. Any other reasons caused possible?
how does this change in Catalina, now that Finder, not Itunes does the backup?
Hi JT,
Unfortunately, we have not been able to figure out how to get this to work in Catalina (at least not yet!) And we aren’t alone. Many of the beta testers for macOS Catalina also tried and failed to come up with a workaround to be able to continue backing up to an external drive.
We suspect that it has to do with changes Apple made under the hood to protect its system software.
We’re still experimenting–and will update the article once we have a process that works every time.
So for now, if you depend on backing up to an external drive either hold off updating to macOS Catalina or manually move your backup files to an external drive (needs to be done each time you backup.)
Of course, in the meantime, you can also backup to iCloud.
Liz
HI JT,
I think we found it! Try this:
For the Finder app in macOS Catalina, use the same command for Terminal but add two spaces in between the word Backup and ~ (the tilde symbol for your user library), so it looks like this:
ln -s /Volumes/[Your External Drive’s Name]/MobileSync/Backup/ ~/Library/Application\ Support/MobileSync
We tested it out using 3 different iDevices and two different Macs with macOS Catalina–and it worked each time!
Give it a try and let us know.
Liz
Hi Elizabeth,
I have tried the method listed above but I get an ‘Operation Not Permitted’ error.
I have created a folder on an external drive called MobileSync/Backup and have tried using ln -s to point at ~/Library/Application\ Support/MobileSync but have had no success.
I’ve renamed the Backup folder on my internal drive, as the instructions advised.
In the short term, I’ve copied over the Backup folder to the external drive, so I could always simply copy it back on the internal drive when the time comes to backup again/restore. But I’d really like to have a reliable external backup solution.
I’m running 10.15 on a MacMini (2018) 3.2 GHz 6-Core Intel Core i7 with 64GB of RAM, if that matters.
Any help you could give would be much appreciated.
HI CD,
You usually see this error when you have not granted the Terminal app Full Disk Access. See these directions within the article How To Back Up iPhone to an External Drive Using iTunes or Finder and Terminal
What worked for me was making sure that I add two spaces before that tilde symbol: using this command
ln -s /Volumes/(BackupDrive Name)/MobileSync/Backup/ ~/Library/Application\ Support/MobileSync
If that doesn’t work, let me know
Liz
Success!
I granted the Terminal app Full Disk Access as you suggested and I was able to create the link no problem. I
Thanks again.
Awesome!
Out of curiosity, did you need to add those two spaces before the tilde (~) or not? We’re hearing that some folks need and others don’t so it’s helpful to hear your experience.
Thanks and glad you got it working!
Liz
Ok maybe I’m just confused but when I try to create the symlink I type everything in the terminal and I press return and I get ln: /Users/jasonmeeks/Library/ApplicationSupport/MobileSync : no such file or directory
Please help
Hi Jason,
First, verify that you have a MobileSync folder in your User’s Application Support folder. (Use the Go > Go to Folder and type in ~/Library/Application Support/MobileSync/)
Once verified, make sure there is no folder inside MobileSync named Backup–if there is the symlink won’t work. Try renaming any folder named Backup to Backup_OLD or something like that.
Then, try opening Terminal again and enter the command (replacing the bold with your drive name and your folder name)
ln -s /Volumes/ExternalDriveName/ MobileSync /Backup/ ~/Library/Application\ Support/MobileSync
Make sure you place a space and a \ in Application Support, so it reads Application\ Support
I hope that this now works. If not, let us know.
Liz
Thank you very much for responding and helping! I apparently left the space between application support out…but I did it and now I am currently backing it up to external hard drive!
Awesome Jason!
I’ve done that same mistake myself–as have a lot of other people. We’re really glad it’s working for you! I just wish we could figure out how to get this working on macOS Catalina–nothing seems to do the trick to backup to an external drive using Catalina.
So if you are considering updating to macOS Catalina and still want to back up your iDevices to an external drive, hold off updating for now.
Hopefully, the wisdom of the masses will figure something out–cause we’re having no luck!
Great! but what about MacOs Catalina, where Finder backs up, not iTunes?
thanks
Hi Julian,
We’re still trying to figure this one out for macOS Catalina. We will update the article when we get a process in place that works.
Liz
Hi Julian.
We think we’ve finally figured this one out–and of course, it was a simple but unexpected thing!
For the Finder app in macOS Catalina, use the same command for Terminal but add two spaces in between the word Backup and ~ (the tilde symbol for your user library), so it looks like this:
ln -s /Volumes/[Your External Drive’s Name]/MobileSync/Backup/ ~/Library/Application\ Support/MobileSync
Test it out and let us know if that’s working for you or not.
We tried this on 2 different Macs backing up 3 different devices–it worked every time to backup to external drive
Hi,
Do these steps work for an external hard drive which is not physically plugged into the laptop – rather connected to an AirPort Extreme basestation? Could you help direct me on how to find the folder path for such an external HD?
Thanks for your help.
HI Elle,
We don’t see why they wouldn’t work, but admittedly, we’ve never tried it.
To locate the path to your networked drive:
Open Finder and press Apple-K to view a dialog box to connect to a server (or use the Finder’s Go Menu and choose Connect to Server)
Type in the IP address or the name of your AirPort station, preceded by smb:// (for example, smb://192.168.1.1 or smb://NetworkDriveName)
Select the ‘+’ icon to add the drive to your favorites list
Enter the username and password
Choose Remember this password in my keychain so you don’t have to enter the login details every time
Select the icon to access the contents of the network drive and it should appear as a network hard drive on your Mac’s desktop
Then follow the instructions to create a folder on the network drive for your iDevice backups.
If you don’t know the IP or name of your networked drive, use the Browse function after you press Command+K.
And if you haven’t already done this, you may want to add the networked drive to your list of login items, so it’s always available when you log into your Mac. To do this open System Preferences > User & Groups > Login Items and drag the network drive’s icon into your login items list
Make sure you run a few tests before deleting any files!
Let us know if it works…or not!
Liz
Hi there,
So I do not actually have a folder named ‘Backup’ when I go command shift G and then ‘~/Library/Application Support/MobileSync/’
I was really hoping you could help me!!
Hi tulsi,
Have you backed up using iTunes yet? If you haven’t yet backed up, you won’t find that folder.
So before trying to move it to an external drive, perform a backup to your internal drive and then follow the steps to move the folder.
This works for macOS Sierra-Mojave. It is not working in macOS Catalina (currently in beta testing)
Liz
But I want to do a backup without having to put everything on my MacBook.
It does not have enough storage to support everything from my phone, so I just want to be able to move my photos and videos from my iPhone straight onto my hard drive, without doing any internal backups, if possible.
Tulsi
Hi Tulsi,
Okay, then follow the directions in the article but instead of dragging the old backup folder, just create a new folder named Backup on your external drive, within the folder you originally created (in Step 1)
I’ve tested this using macOS Mojave and my MacBook and it worked.
Keep us posted.
Liz
I got the syntax to work in Terminal; however, when I try to back up, iTunes says it can’t back up due to the existing backup being corrupt?
Hi Dawn,
First, backup your device to iCloud if you can, go to Settings > Apple ID Profile > iCloud > iCloud Backup > Backup Now.
Then restart both your computer and your device.
On your external drive, move the contents of the current backup folder to a new folder to archive it and then try to backup your device again–since there won’t be any older backups in that folder, it will take additional time to backup.
We also suggest that you archive a backup–just in case there are problems moving forward.
You can only archive backups on a Mac. Go to iTunes > Preferences > Devices > right-click on the current backup and select Archive.
Guys, I tried the same thing. If you use the AirPort Capsule Volume, it will always say it’s corrupt. Even granting all permissions and even not securing the access to the Airport Drive, the command will not create a known shortcut to the main folder and iTunes will always say it’s corrupt.
I have switched the command to point to an external SSD that I have and it works just fine.
Cheers!
For anyone getting the corrupt OR no backups on this computer issue, this worked for me – the KEY is starting over & creating a brand new folder on your external hard drive. The good news is you don’t need to recopy your backup. So:
Quit out of itunes
Delete all prior symbolic links on internal drive folder
Create new folder on external drive – a person in another forum suggested “iTunesBackupExternal”
Create a folder within that called “Backup”
Then drag your huge iphone backup that you copied from your internal drive into the backup folder.
Then do the symbolic link again in terminal – with this folder name it would be:
ln -s /Volumes/[EXTERNALDRIVENAME]/iTunesBackupExternal/Backup ~/Library/Application\ Support/MobileSync
You will see a new symbolic link on the internal drive
Quit out of terminal
Check permissions are all Read & Write for everyone on the external drive (Command-I)
Start itunes
Backup
That worked perfectly for me – the main issue was creating a new external hard drive clean folder
Hey buddy, this unfortunately hasn’t worked for me, not exactly sure how to troubleshoot.
Any ideas would be great.
Thanks!
Your tip for “Granting ‘Terminal’ Full Disk Access” saved my day. It’s awesome!
I’m having a hard time getting this to work with the macOS Catalina beta.
I had this set-up before, but now on Catalina; the back up fails (says error reading/writing to iPhone) but once I reverse the process, the iPhone will back up to the internal drive no problem.
Hi Matt,
We’re currently testing out how to backup to an external drive with macOS Catalina, now that iTunes is retired. We’ll update the article once we have a process that works!
Thanks for flagging this.
Liz
No! Thank YOU for all your hard work. This method helped me before!
Looking forward to a solution without resorting to third-party software.
Again, thank you!
This extra info may be useful to some:
Note: If your external hard drive’s name has a space, be sure to use the proper coding. For example, if your hard drive is named “My Passport” be sure to use a backslash after My, then the space, then Passport. Like this: My\ Passport. Don’t forget to capitalize when necessary.
HI Sami,
Yes, that’s an awesome tip! Thank you for sharing and paying it forward.
We appreciate your insights!
Cheers,
Sam
Hi, I followed all the steps successfully, although my question now is, there was no step in this process where you delete the iPhone backups from the computers internal drive.
Can I delete the file called “BackupOld” on my internal drive to free up space on my internal drive?
Now that I copied the Backups folder to the external drive and created the symbolic link to my external drive, my understanding is that every time I connect my iPhone to my laptop, it automatically syncs to my external drive instead of my internal drive.
However, I, of course, want to delete the backups folder on my internal drive so I can have more storage on my internal drive.
Can you clarify this?
Hi DM,
We’re glad this is working for you. And yes, we missed that final step!
After you test that your iDevice is backing up to your external drive successfully–we recommend you backup the iDevice a few times and verify that the backup is working correctly and available–then you can indeed go ahead and delete that BackupOld folder to save space on your Mac.
We’ll add this into the article as well…thank you for pointing it out!
Cheers,
Liz
Hi Liz!
Thank you so much for this awesome tip. It worked with my MAC using Mojave 🙂 after trying everywhere and spending some 3h.
Hello, thank you for providing this information as backups to an external hard drive seems like the best option for our family of multiple IOS device users.
I’ve followed the steps and everything seems to be set up correctly, but now I’m getting an error message that the iTunes back up failed because there was a problem reading or writing to the iPhone.
I’m hoping that someone has some ideas on how to troubleshoot. Here’s what I’ve done –
1. Mac updated to latest Mojave and all iPhones have latest software.
2. Tried a different updated phone, same issue.
3. Restarted Mac and phones several times,
4. Tried a new USB lightning cable (brand new Apple brand),
5. External hard drive appears to otherwise be working fine, and
6. Switched USB ports.
Thanks in advance,
Mark
Apple changed/added a layer of security in macOS 14.
You now have to grant Terminal “Full Disk Access” first. (Any program for that matter, if you want to change stuff within OS on a deeper level.)
So open System Preferences, then Security & Privacy, then Privacy Tab to the right, then navigate to Full Disk Access (you have to log in to make changes – see lock at the bottom)
At last you use the + to add Terminal Full Access.
Once you’ve granted access, restart Terminal and you’re set to go to change whatever you set out to change.
Thanks, Helga for the update to security settings in macOS Mojave.
Appreciate letting us know.
Sam
When i put ln -s /Volumes/ExternalDriveName/ MobileSync /Backup/ ~/Library/Application\ Support/MobileSync into terminal i get Operation not permitted?
Hi Markos,
Make sure you use an admin user account. Check your user settings in System Preferences > Users & Groups.
It may be useful to shut down your Mac and then log in to an admin account and try terminal again.
Sam
I’m on the admin account?
with the command mkdir /Volumes/ExternalDriveName/ MyiPhoneBackUp /Backup is says file exists but permission denied
I am having the same issue, but I am definitely in my admin account (I only have one account and it has admin status). I even tried creating a new account that has admin status to try to resolve the issue but “Operation not permitted” persists. Any thoughts?
Everything else seems to work fine!
got error terminal “no such file or directory”
Please see Jason’s comment regarding updating the permission settings.
Hi I got this same error: “no such file or directory” in terminal
And changing permissions makes no difference.
It seems like the problem is that if I follow the steps in order then I’ve just changed MobileSync/Backup to MobileSync/Backupold so of course that file wouldn’t exist.
Though I’ve changed it to Backupold in the terminal and I’m not sure that works either. It just says “file exists”
Hi Edalia,
The folder backupOLD should only be used to store all your old data–not anything new.
iTunes only recognizes a folder named Backup contained within MobileSync (or whatever you named the folder.)
If you did name your external drive’s folder something other than MobileSync, try naming it that and see if it works following these steps.
Update. It looks like I got this to work!
It was a permissions thing. For my external hard drive I needed to press “Get Info” and then change the permissions to Read & Write for everything .
Isn’t another option just to move your entire iTunes folder to an external drive?
I tried the steps outlined in this article, but received the following error message form iTunes: “iTunes could not back up the iPhone “NAME” because the backup was corrupt.
It then says to “Delete the backup for this iPhone in Devices Preferences, then try again.”
But I’ve deleted all those backups.
So, I guess these steps no longer work with the current OS and iOS?
This happend to me too. Was there a solution to the BACKUP WAS CORRUPT? Tks!
Hi,
I get this error too. Was there a proposed solution?
DJ
Hi DJ,
Jason found that he needed to update permissions on his external drive. Select the drive and then right-click and press “Get Info” (or use Command+I) and then change the permissions to Read & Write for everything.
Hi, everyone!
Getting the same error message even if I changed the permissions to read & write everything on my external HD. Any updated solution to this problem?
Thanks in advance!
Hi Ezra and everyone!
I have run a bunch of tests to get this working and still not able to successfully back up to an external drive with macOS Catalina.
I have been able to create a symlink to the backup using this terminal command:
sudo ln -s /Volumes/(External Drive Name)/MobileSync ~/Library/Application\ Support/MobileSyncBackup
But even with that correct symlink, Finder is still failing on backing it up onto the external drive.
There are still a lot of issues with Catalina and in particular, with Finder restoring backups, so I’m hopeful that by the time Catalina releases publically sometimes in mid to late Septemeber, that we will have a way to successfully and routinely back up to an external drive using Finder instead of iTunes.
Liz
After you did the `ln -s…` command as in the instruction, in a terminal window, type this command and return:
cd ~/Library/Application\ Support/MobileSync/Backup
You shouldn’t see any error. If you see errors such as “Too many levels of symbolic links”, then your `ln -s …` command before somehow was typed wrong. Probably had an extra / at the end or something.
To redo the procedure, do these in a terminal window: (I am using a Seagate5T, so my command has that name, but yours should be whatever your external disk be)
cd ~/Library/Application\ Support/MobileSync/
rm Backup
mkdir /Volumes/Seagate5T/Backup
ln -s /Volumes/Seagate5T/Backup
Now, try do:
cd ~/Library/Application\ Support/MobileSync/Backup
It should not complain, and it should be ready for iTunes to use.
Thank you so much! This worked for me after always getting the ‘backup is corrupt’ error!
Thank you very much, I finally got the shortcut folder by your steps.
I followed all the steps and the symbolic link is setup however when i go to backup via iTunes it appears to want to work but gives the error message “iTunes could not back up the iPhone because an error occurred.” Any suggestions? Running version 11.4
I follow all of the steps and it seems to work, however, it keeps telling me that the back is corrupt and to delete it, however, I am trying to create a new back up. What should I do?
What if I get a new iPhone and need to restore to it. Will it work to RESTORE from the external hard drive?
I ask bc I am having trouble backing up to the Cloud and I want to make sure I have 1 hard backup.
Thank you!
Kristin
Hi Kristin,
Yes, it should work.
Some readers found that placing the backup files temporarily on their internal hard drive worked faster and more reliably.
Follow the instructions in the article with the heading How to Return Backup to the Internal Drive
1. Delete the Backup Shortcut (symbolic link)
2. Copy the Backup folder from the external drive back to the user library location: ~/Library/Application Support/MobileSync/
SK
This process worked great for me and I can see that backups are now going to my external drive. However, iTunes now says that the my iPhone has never been backed up, and I have no way to restore from backup. Any ideas?
Hi TJS,
Sorry, you’re having issues with backing up your iOS to an external drive. We actually ran some tests here to see if we encountered the same problems. Interestingly, our iMac worked fine but our MacBook showed similar issues. So here’s what we did to get the MacBook working:
1) Close All Open Apps and Restart the Mac
2) Trash the current Backup symbolic link in your user library’s Library/MobileSync folder
3) Open Terminal and recreate that symlink again:
ln -s /Volumes/Storage/iOSBackups/Backup/ ~/Library/Application\ Support/MobileSync/Backup
Remember to substitute the name of your external drive for “Storage” and the name of your backup folder for “iOSBackup”
We also discovered that keeping the names of your external drive and backup folder simple leads to fewer issues.
4) Check and see if Terminal created the Backup symlink ( ~/Library/Application\ Support/MobileSync)
5) If so, open connect your iPhone (or another iDevice) and launch iTunes
6) Open iTunes Preferences (Command+Comman) and tap the Devices tab–see if your backups are now showing
7) Run a test by backing up using iTunes using This Computer and BackUp Now buttons
8) Check the backup folder on your external drive and see if it updated
If your problem persists, let us know
SK
I have the same problem. This solution no longer works on the latest iOS/OSX updates… It actually crashes and restarts my computer when trying to backup to external HD…
Hi KR,
Sorry that these steps aren’t working for you on the latest macOS/iOS updates. We’re looking into this problem and we’ll update the article (and let you know) when we find some solutions that work! Thanks for bringing this to our attention.
SK
is there any news about it ? im having the same problem …
Hi berk,
Still looking into this problem. trying to figure out workarounds with no luck thus far.
I look forward to the solution!
I do not have room on my computer to backup my entire iPhone. That’s why I need to backup to an external hard drive.
Is there an app out there that will do this?
I’ve tried this multiple times. Every time I try it, Terminal responds with “file exists,” and there is no “symbolic link” in the Mobile Sync folder. I have hidden files turned on.
Hi BT,
What version of macOS or Mac OS X are you running? Also, when you say you have hidden files turned on, do you mean you are showing all hidden files?
SK
I’m having the same issue… I’ve spent hours doing the same steps, and it’s not working. I don’t have enough space on my MacBook… please help
Hi KP,
Sorry that the steps aren’t guiding you through the process. Please let us know what version of macOS or Mac OS X you’re running on your MacBook. With that info, we’ll provide you OS specific directions.
Liz
Had something like this working fine for 1+ years until a week ago or so. Since the latest macOS and iOS updates about a week ago, it broke. Have spent literally hours trying to repeat the steps to get the backup recognised and working off the external disc, all to no avail. Am convinced the latest OS changes have caused the symlink / iTunes relationship to break, but it’s pure guess-work at the moment. Have ru Disk Utility and Techtool Pro across everything, in case there are under-lying disc issues causing problems, but nothing has been identified. Either way, I now have no way of saving iPhone backups to anywhere other than the MacBook Pro hard-drive, and it’s running out of space fast :-/
Anyone got a solution or work-around ?
I HAVE TRIED EVERYTHING. FINALLY DOWN TO THIS
ln- s /Volumes/mac1tb\ 1/Backup /Library/Application\ Support/MobileSync/Backup
IT IS SAYING “No Such FileOr Directory”
HELP!