Macs are very stable computers with a rock solid environment and rarely have problems. When occasional problems happen, it takes a little bit of Sleuthing to find out the pressing issues and resolve them. Macs have also evolved over time. With a wide variety of Apps, third party software and browser extensions available it sometimes becomes a little daunting to discover the root cause of the issues.
So, if you have apps and software on your Mac that are complaining about not having an online connection, we will attempt at providing you with a step by step method to approach the issue via this article. We have also written about some of the general issues pertaining to Mac troubleshooting that you can check.
Step-> 1 Evaluate if this is related to a particular App or a Site
In order to make sure that the problem is not related to that website, or App, try opening another site and check. Try launching Apple’s home page www.Apple.com and check if you are able to connect to the website. You can also try to find out if the problem is localized to you or if it is a more widespread outage related to the website by checking out www.isup.me. In order to rule out Browser related issues, try opening the site using Chrome or Firefox or another browser.
Step-> 2 Is the problem unique to this device?
If you are still having the issues, we have established that it is not related to web-sites but the problem is related to your computer. In this step, we want to make sure that the problem is not happening on other devices but it limited to your Mac. In order to confirm this, please use your iPad or another computer to connect to the same Wi-Fi network and see if it launches the website. If you are able to get on the internet using other devices on this same network, this would imply that the problem is limited to your computer otherwise it may mean that you are experiencing router problems. If the problem is limited alone to your Mac, then go to Step X and by pass the other steps.
Step-> 3 Network Diagnostics
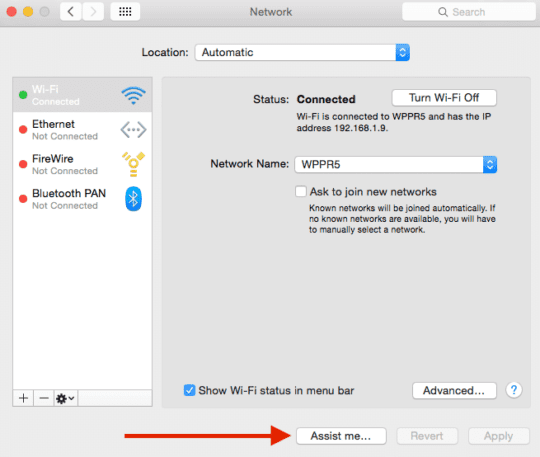
Network Diagnostics on your Mac is a very handy tool. You can launch the network diagnostics by going to
> System Preferences > Network > Click on “Assist Me” and then choose Diagnostics
This Utility will guide you through a sequence of tests verifying your Ethernet as well as wi-fi configurations that you are using on this Mac.
Step-> 4 Reset Router
If you have established from the preceding step, that the connection problem is happening on all computers or devices, You can reset your router and then try again. If that does not solve your issue, sometimes removing the power to the router unit for 30 seconds by unplugging it and then re-plugging it back can solve the issue. Please remember to wait for the network device to power on completely before attempting to connect again. In the case that you have multiple routers, you will have to do this one by one starting at the router that is closest to the internet connection and then resetting the other Airport express modules that you may have.
Step-> 5 Diagnosing the Computer
If you have established via the steps above that the problem is only happening on your Mac and the other devices are working appropriately, check the Wi-Fi status on the top right hand section of your screen.
If you notice an exclamation mark on the Wi-Fi icon, this would indicate that the Internet connection via Wi-Fi is not working on your computer.
Right Click on the Wi-Fi symbol and Turn it off. Wait for a minute and then choose “Turn Wi-Fi On”. Sometimes by switching on and off can resolve the connection issue. You can also restart your Mac to see if the problem goes away.
Step-> 6 Whacky DNS Settings
The DNS allows your machine to convert web-site domain names into appropriate IP addresses that computer can understand. When you type in Apple.com the DNS translates that into appropriate IP addresses for your machine. If the DNS Server that you Mac uses is faulty, or slow you may not be able to connect to any website using a name.
One easy way to confirm this issue is to open your browser and type http://74.125.230.243 . Once you type this and press enter it should bring up the Google’s website. If it does, then you know that your internet connection is functioning ok, but your issues are directly related to your DNS settings.
To Fix this problem, Click on > System Preferences > Network.
Select the network connection in the list that appears on the left. Once you have chosen the network on the left, Click on “Advanced” and then Click “DNS” on the Top tab. You should see one or more IP addresses listed here.
By default, the IP addresses listed here are the one that are coming from your online service provider. If you have standard DSL, cable, or fiber Internet access, your router connects to your ISP’s DNS server. If you see the IP addresses grayed-out that might indicate a problem. Either way, by using other DNS servers instead of the default one, you will be able to get a faster connection.
Select the existing IP addresses that you see one by one and then click on the minus (-) button to remove them. Once you have removed the IP addresses, Click on the plus(+) button and enter 208.67.222.222 followed by (+) and 208.67.220.220. Click OK and then press Apply.
These free DNS servers are also faster than the ones provided by your ISP. You can choose to use the free OpenDNS service or Google’s own public DNS servers.
Click the plus (+) button and enter one or two IP addresses for a new DNS server. To use OpenDNS, enter 208.67.222.222 and 208.67.220.220; to use Google DNS, enter 8.8.8.8 and 8.8.4.4.
Now that you have entered the DNS settings, you can try connecting again to see if the problem is resolved. Most issues that we have seen are related to the inactive/faulty DNS settings.
Although you may follow all the steps above, sometimes the problems are beyond your control. It may reside in your ISP’s networks or could be other hardware issues. If you have attempted all the steps and you still have no luck with the connection on any of your device, you may want to reach out to your ISP provider. Your ISP may be able to help you with the problem. If it is just impacting your Mac, you may want to consider running a hardware check before you take the computer to Apple Support.
Obsessed with tech since the early arrival of A/UX on Apple, Sudz (SK) is responsible for the original editorial direction of AppleToolBox. He is based out of Los Angeles, CA.
Sudz specializes in covering all things macOS, having reviewed dozens of OS X and macOS developments over the years.
In a former life, Sudz worked helping Fortune 100 companies with their technology and business transformation aspirations.
Either my iMac or your information is outdated. Nothing you show as examples are listed on my computer. As with step 3. My information does not appear the way you show. “Assist Me”, does not appear anywhere. My IP addresses are grayed out, but you don’t address what to do about it.


Either my iMac or your information is outdated. Nothing you show as examples are listed on my computer. As with step 3. My information does not appear the way you show. “Assist Me”, does not appear anywhere. My IP addresses are grayed out, but you don’t address what to do about it.