Whether you’re heading on a long vacation or short getaway, it’s good to let people know you’ll be away from your email. This way, they won’t be waiting and wondering why they aren’t receiving a reply from you.
You can easily set up an out of office message or similar automatic reply in the Mail app. This tutorial shows you how to do it on your Mac as well as provides you with an option for your iPhone and iPad.
How to set up an out of office in Apple Mail on Mac
To get started with your automatic reply on Mac, you’ll be setting up a rule. So, open the Mail app and then follow these steps.
Click Mail > Preferences from the menu bar.
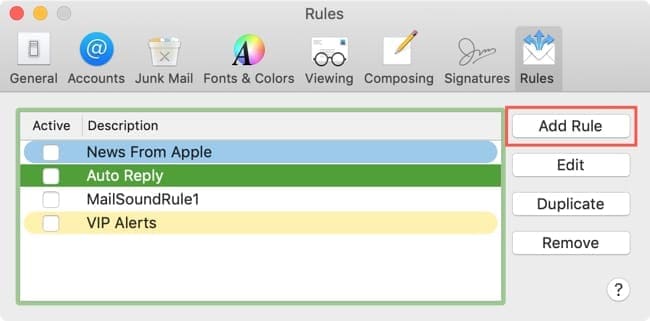
In the pop-up window, select the Rules
Click Add Rule.
Click Add Rule to set up your out of office reply
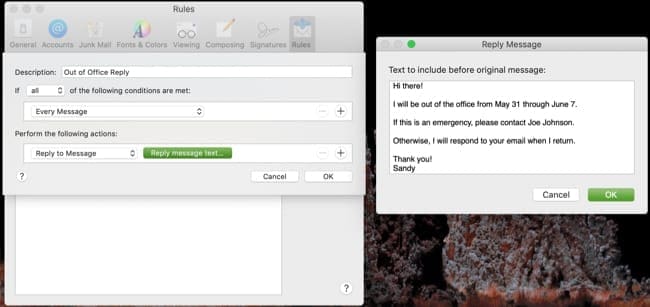
Next, you’ll complete the information for your reply in the Rules box.
Enter a Description for the rule, which is basically the name. We’ll use “Out of Office Reply.”
In the If drop-down box, select All.
Below that, choose Every Message in the From drop-down box. This means that every single incoming email will receive the automatic reply.
Under Perform the following actions, select Reply to Message in the drop-down box.
Click the Reply message text button to the right.
Enter the automatic reply text you want in the box that pops open.
Click OK and then in the Rules box click OK.
Enter your out of office details and create your reply message.
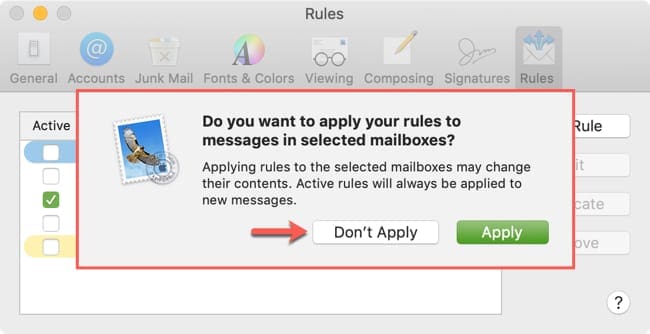
You will then receive a prompt asking if you would like to apply this rule to the selected messages in your inbox. Click Don’t Apply because you only want to use the automatic reply once you are away and not for currently selected emails.
Click Don’t Apply for the rule and your selected emails.
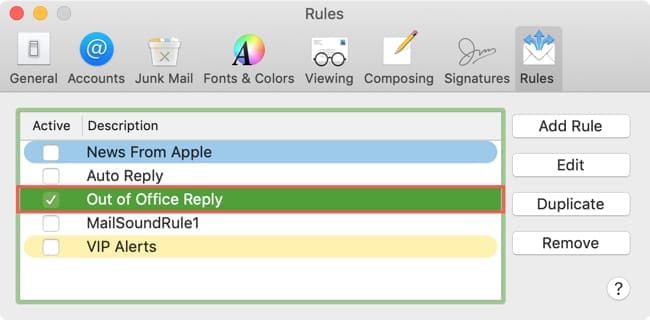
When you are ready to head out and want to begin using your out of office message, just go back to the Mail Rules and check the box next to the rule you created. And remember, when you return from your trip, just pop back into that same section and uncheck the box next to your rule.
Mark the box next to your automatic reply rule to start using it.
How to set up an out of office in Apple Mail on iOS
While it’s easy to create an automatic reply in the Mail app on iOS, it will only work with certain types of email accounts. So, if you have a Mac and can do it there, that’s the preferred method because you can apply it to all of your email accounts.
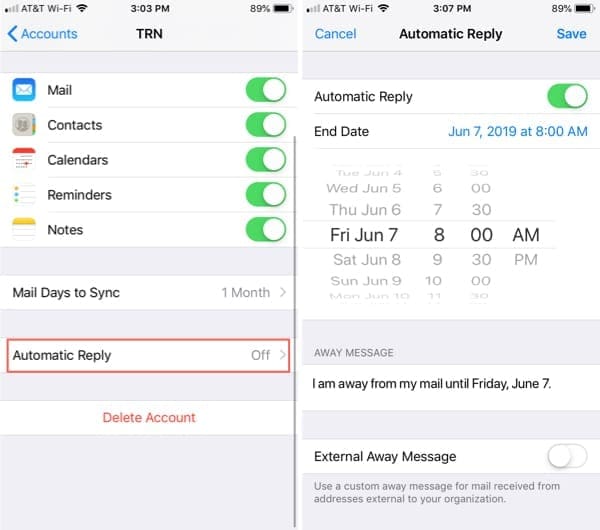
Open the Settings on your device and then do the following to create an automatic reply.
On the main Settings screen, select Passwords & Accounts.
Under Accounts, tap the email account you want the automatic reply set for.
Toward the bottom, tap Automatic Reply.
Move the slider to enable Automatic Reply.
If you want the automatic reply to stop on a certain date and time, tap End Date and enter it.
Under Away Message, type in the text for your reply.
Optionally, you can enable External Away Message. This lets you create a different message for your contacts if you like.
Tap Save at the top.
Create an automatic reply on your iPhone.
Notes on your automatic reply on iOS
Keep in mind that once you enter the information above and tap Save, your automatic reply will begin. So, if you aren’t quite ready to leave the office yet, you should hold off.
As mentioned, you will not see the Automatic Reply option for all types of email accounts. For instance, if you have a Gmail or Outlook account set up in Mail, this feature is not available. But, if you have an Exchange account, you should see the option.
If you do not set an End Date for your automatic reply as explained in Step 5 above, remember to head back to your Settings and turn off the reply when you return.
Don’t let your recipients wait and wonder
Setting up an out of office for business emails or automatic reply for person messages is a convenient way to let your important people that know you’re away.
Are you planning to set up an out of office in Apple Mail? Let us know if you do and find the feature helpful!
Sandy worked for many years in the IT industry as a project manager, department manager, and PMO Lead. She then decided to follow her dream and now writes about technology full-time. Sandy holds a Bachelors of Science in Information Technology.
She loves technology– specifically – terrific games and apps for iOS, software that makes your life easier, and productivity tools that you can use every day, in both work and home environments.
Her articles have regularly been featured at MakeUseOf, iDownloadBlog and many other leading tech publications.
When I followed these instructions my computer started sending out repeated messages to everyone on my contact list for several minutes (so 30-60 emails each) until I removed the rule and restarted my computer. HOW DID THAT HAPPEN????!!!!????!!!!????
Hi, the instructions here are wrong. Do not make “every message” the condition. My mailbox just sent unprompted blank messages to every message in my inbox.
I did everything according to the steps but I didn’t receive the prompt asking if I would like to apply this rule to the selected messages in my inbox. I am concerned that this message will go to all emails in my inbox.
Thanks for this post. I followed your instructions for Apple Mail but I am having a problem. I like using the c.c to myself feature. When I use the out of office function I get infinite messages sent to myself. When I turn off the cc feature it does not solve my problem. Any suggestions. Thanks.
You can enter in mobile in vk.com, fb.com, Instagram and other using Touch ID, Face ID for social sites. I think that if we will have it, we do not need to use profile.
Thank you.


When I followed these instructions my computer started sending out repeated messages to everyone on my contact list for several minutes (so 30-60 emails each) until I removed the rule and restarted my computer. HOW DID THAT HAPPEN????!!!!????!!!!????
Hi, the instructions here are wrong. Do not make “every message” the condition. My mailbox just sent unprompted blank messages to every message in my inbox.
SAME! How do I make it stop sending them? It’s going to thousands of people – every email I have!
I did everything according to the steps but I didn’t receive the prompt asking if I would like to apply this rule to the selected messages in my inbox. I am concerned that this message will go to all emails in my inbox.
Any advice?
Thanks for this post. I followed your instructions for Apple Mail but I am having a problem. I like using the c.c to myself feature. When I use the out of office function I get infinite messages sent to myself. When I turn off the cc feature it does not solve my problem. Any suggestions. Thanks.
Hello, I have an idea.
You can enter in mobile in vk.com, fb.com, Instagram and other using Touch ID, Face ID for social sites. I think that if we will have it, we do not need to use profile.
Thank you.
With regards,Elena