There are a variety of reasons why you’d want to copy your content from one Mac to another.
Maybe you simply want to transfer files. Or perhaps you got a new Mac and you’d like to transfer your user account from your old machine.
Luckily, in the latter case, Apple has a built-in system that allows for users to easily migrate user accounts from one Mac to another. It’s called Migration Assistant. Here’s how to use it.
Note: Migrating a user account using this method requires OS X Snow Leopard v10.6.8 or later. You’ll also want to make sure your old Mac has a computer name.
Completing the actual migration process is slightly different depending on which route you take. But for the purposes of this article, we’ll assume that you have both Macs next to each other.
If you have macOS Sierra or later, simply place both Macs next to each other and make sure Wi-Fi is turned on. If either Mac is running OS X El Capitan, you’ll want to connect both Macs to the same Wi-Fi (or Ethernet) network.
You’ll also need to have the new Mac set up with at least one user to continue.
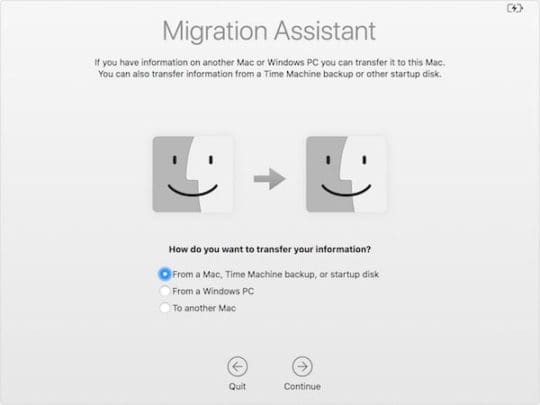
How to Use Migration Assistant
Launch Migration Assistant on both Macs. It should be located in the Utilities folder of your Applications section.
Click Continue on both Macs.
On your new Mac, select From a Mac, Time Machine backup, or startup disk.
Select Continue.
On your old Mac, select the option to transfer information To a Mac.
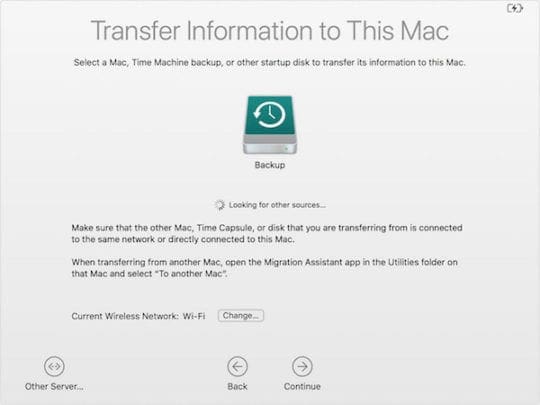
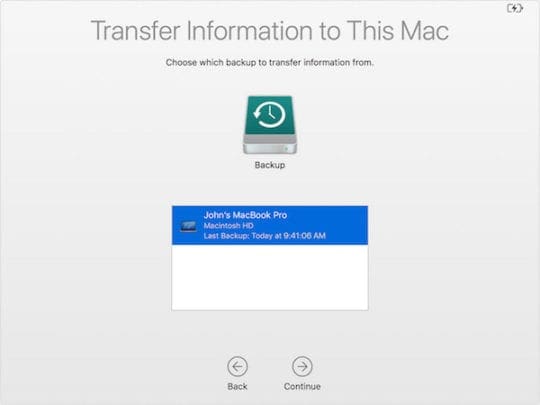
On your new Mac, you should see a list of “sources” — essentially, things that can be migrated from. Choose the Mac with the user account that you’d like to transfer.
At this point, you may see a security code appear on both screens. This is meant to mitigate the possibility of any bad actors intercepting your data. Simply make sure the code is the same on both Macs.
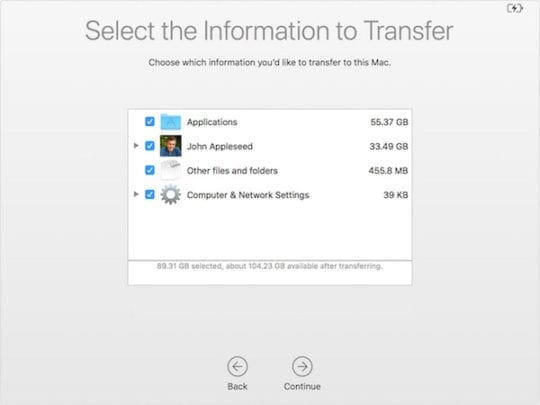
On your new Mac, you should see a new list of transferable items appear. Simply select the items that you’d like to transfer over. Generally, you should everything checked unless there is another user you don’t want to migrate over.
Click on Continue. At this point, the migration process will take place. Just wait it out — it could take some time.
Once it’s all done, double-check to see if all of your data and settings are in order.
Finally, make a full backup on your new Mac.
A Few Additional Considerations
Even though that’s the entire migration process, there are still a few additional things that are useful to keep in mind.
What if My Macs Can’t Be Next to Each Other?
If for, whatever reason, you can’t have both Mac computers next to each other with Wi-Fi turned on, there is an alternative that relies on Time Machine.
Basically, you’ll want to make a full backup to a Time Machine drive. Then, just take the drive with you to your new Mac and plug it in.
From there, you’ll use Migration Assistant. The steps above are identical except you don’t need to do anything on your old Mac.
When you are choosing a source to migrate from, you’ll select the specific backup on your Time Machine drive when it appears.
What About These Applications?
Applications can be migrated over as part of the Migration Assistant process, but you’ll want to be mindful of the licenses.
Like on iOS, the original user account that downloaded an app may “own” that app. This can be problematic if there are multiple Apple IDs on a single Mac.
Whenever you go to update the app on the new Mac, you’ll need to input the Apple ID and password of the original downloaded. If that’s you, it’s fine. But if it isn’t, there can be a problem.
Deleting User Account on Old Mac
But what if you’re giving your old Mac away, or simply setting it up as a “family” computer? In these cases, you’ll want to delete the user account that you migrated over.
Just make sure that you’re logged into an administrator account before proceeding.
On your old Mac, open System Preferences.
Click on Users & Groups.
Click the lock in the lower-left corner and enter the password.
Select the account that you migrated.
Click the – icon at the bottom.
You should see a new prompt pop up. Pick the option that makes the most sense to you (more on these below)
Click on Delete User.
If you’re unsure about which deletion option to choose, here’s what you need to know about them.
Save the home folder in a disk image deletes the user account and home directory, but saves the contents in a Deleted Users folder.
Don’t change the home folder deletes user account information, but leaves user files intact.
Delete the home folder deletes system information and files.
We hope that you found this article helpful. Please let us know if you have any questions using the comments below.
Mike is a freelance journalist from San Diego, California.
While he primarily covers Apple and consumer technology, he has past experience writing about public safety, local government, and education for a variety of publications.
He’s worn quite a few hats in the journalism field, including writer, editor, and news designer.
Well presented. My old IMac asks me to log out in Migration Assistant so I never get to the page “ to a new IMac” I log out and then of course can do nothing. Am I missing something ?
Thanks
Howard
What if my new Mac (M1 Mac mini) does not have enough rom for my old (iMac) backup? I went through this yesterday and could only restore network and applications! How do I restore the rest of what I have to another hard drive? does that hard drive need to be clean? I have 8TB of a 16TB drive available. I am desperate to see what I can glean so I can send my old iMac hard drive out for dat recovery :<(
Hi Mike,
Great article about Migration Assistant.
I used it two times to transfer files and photos from my old PC to my iMac (Catalina)
Each time I did this, it created another user account in my name.
Now I have 3 accounts.
How can I delete the two I do not use or need. I assume all the files and photos went into my main (original) user account .
Thank you so much,
Rich
Meh, 10.6.8 is too old for Catalina to use Migration Assistant, even though it is included in that OS. And it started to bring over the Lion account with a its old, generic name, which I hate. So it looks like this will be manual.
I have a very old iMac (2006?) that boots either Mac OS 10.6.8 (Snow Leopard) or 10.7 (Lion) from one of two external hard disks. [I had kept 10.6.8 for app compatibility, and hoped (incorrectly) that Lion would enable iTunes to continue syncing with my constantly-updated iPhone.]
Now I have a newer used MacBook, and I want to migrate everything from the two boot disks. About all I need from Lion are iTunes and a few miscellaneous files. I haven’t tried anything yet, cut I’m a little apprehensive about how this would work.
If Migration Assistant can’t handle both by default, and maybe it can, my instinct is to migration from Snow Leopard first, and then migrate again (is that possible?) from Lion, choosing only iTunes. Has anyone tried this?
Depending on the model of your MacBook and iPad, you may need an adapter to connect them together. If your MacBook only has the USB-C port and your iPad uses the lightning connection, then you need an adapter from USB to USB-C.
If you don’t want to purchase an adapter, you can move some files using both iCloud syncing AND the Files app and the iCloud Drive app on your Mac–as long as you sign in with the same Apple ID on both devices.
You could also AirDrop files to your Mac from your iPad, if you don’t use the same Apple ID.
Other options include emailing files or using a cloud sharing app like Google Drive or Dropbox on both machines.


Well presented. My old IMac asks me to log out in Migration Assistant so I never get to the page “ to a new IMac” I log out and then of course can do nothing. Am I missing something ?
Thanks
Howard
What if my new Mac (M1 Mac mini) does not have enough rom for my old (iMac) backup? I went through this yesterday and could only restore network and applications! How do I restore the rest of what I have to another hard drive? does that hard drive need to be clean? I have 8TB of a 16TB drive available. I am desperate to see what I can glean so I can send my old iMac hard drive out for dat recovery :<(
The migration assistant got stuck. How do I exit?
Hi Mike,
Great article about Migration Assistant.
I used it two times to transfer files and photos from my old PC to my iMac (Catalina)
Each time I did this, it created another user account in my name.
Now I have 3 accounts.
How can I delete the two I do not use or need. I assume all the files and photos went into my main (original) user account .
Thank you so much,
Rich
Meh, 10.6.8 is too old for Catalina to use Migration Assistant, even though it is included in that OS. And it started to bring over the Lion account with a its old, generic name, which I hate. So it looks like this will be manual.
I have a very old iMac (2006?) that boots either Mac OS 10.6.8 (Snow Leopard) or 10.7 (Lion) from one of two external hard disks. [I had kept 10.6.8 for app compatibility, and hoped (incorrectly) that Lion would enable iTunes to continue syncing with my constantly-updated iPhone.]
Now I have a newer used MacBook, and I want to migrate everything from the two boot disks. About all I need from Lion are iTunes and a few miscellaneous files. I haven’t tried anything yet, cut I’m a little apprehensive about how this would work.
If Migration Assistant can’t handle both by default, and maybe it can, my instinct is to migration from Snow Leopard first, and then migrate again (is that possible?) from Lion, choosing only iTunes. Has anyone tried this?
How do I transfer everything from an iPad to a MacBook?
There is no utilities folder containing Migration assistant on the iPad.
The lightning connector is not compatible with the MacBook nor is the cord from the MacBook compatible with the iPad.
That eliminates direct connection.
Hi Louis,
Depending on the model of your MacBook and iPad, you may need an adapter to connect them together. If your MacBook only has the USB-C port and your iPad uses the lightning connection, then you need an adapter from USB to USB-C.
If you don’t want to purchase an adapter, you can move some files using both iCloud syncing AND the Files app and the iCloud Drive app on your Mac–as long as you sign in with the same Apple ID on both devices.
You could also AirDrop files to your Mac from your iPad, if you don’t use the same Apple ID.
Other options include emailing files or using a cloud sharing app like Google Drive or Dropbox on both machines.