Generally speaking, there are two reasons you might want to transfer files between user accounts on your Mac. The first is when you need to share a file with someone else who uses the same computer. The second is when you need to create a new account for yourself because of a problem with the old one.
After creating a new user account on your Mac, you also need to transfer files to merge the information from the old one. That way, you won’t lose any data.
Transfer files between two user accounts on the same Mac
There are three separate folders on your Mac that you can use to transfer files between user accounts. Each of these folders serves a different purpose, letting you stop other people from editing your shared files if you need to.
To transfer a file between two user accounts on your Mac, all you need to do is move it to one of the three folders below. When another user logs in, they should be able to see the shared files from their own account.
Drop Box
Placing a file in another user’s Drop Box is the best way to share files without adding any restrictions to them. When you do this, the user you transfer the file to can edit, move, or delete it.
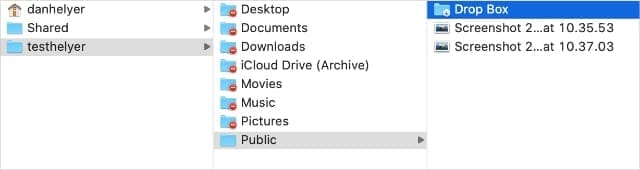
Open Finder and press Shift + Cmd + C to view your Computer. Go into Macintosh HD, then Users. Double-click on the user account you want to transfer a file to, then open their Public folder.
Drag-and-drop files or folders into the Drop Box folder to transfer them.
You can’t view files again after moving them to someone’s Drop Box.
When the other user wants to access these files, they need to log in and open Finder in their account. Press Shift + Cmd + H to view their Home folder, then open the Public folder and go into the Drop Box.
Shared and Public folders
If you want to make a file or folder available to multiple different users, you need to move it to the Shared or Public folder. When you do this, the file remains locked to your user account so other people can’t make changes to it. However, you can change file permissions later if you need to.
To find the Shared folder, open Finder and press Shift + Cmd + C to view your Computer. Go into the Macintosh HD, then Users. You should find the Shared folder alongside your other user accounts.
Anyone can view files in the Shared folder.
To find your Public folder, open Finder and press Shift + Cmd + H to view your Home folder. The Public folder is available here, with your Drop Box inside it.
After you move a file to the Shared or Public folder, other users can navigate to the same place in Finder to access it. The Shared folder is always accessible to other users, whereas your personal Public folder is only available if you turn on File Sharing in the System Preferences.
To do so, open the Apple menu and go to System Preferences > Sharing. Then enable File Sharing in the sidebar and choose which users you want to share your Public folder with.
Choose who can read or write to your Public folder.
Change the read and write permissions on shared files
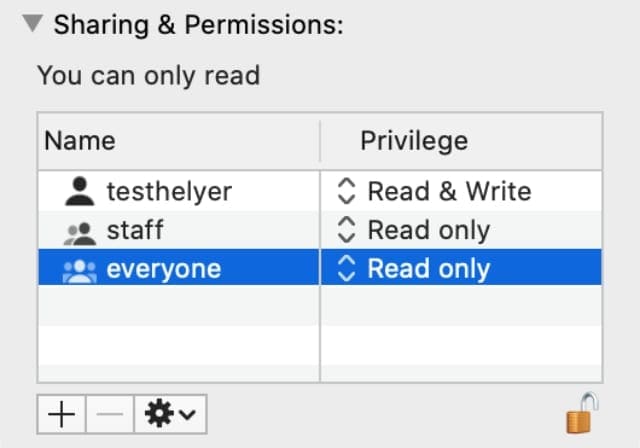
If you use the Shared or Public folders to share files, you might find that other users can’t make changes to them. This is because the files are set to Read Only; you need to change the permission to Read & Write to fix it.
Log in to the original user account to change file permissions.
Select the file or folder you want to share in Finder, then press Cmd + I to get more information. Scroll to the bottom of the information window and expand the Sharing & Permissions section, then click the padlock and enter your password to unlock changes.
Use the drop-down menu to change the permissions to Read & Write for any user account you want to allow to make changes.
Use the Add (+) button to add specific user permissions.
Merge account information between two different users
You can fix a lot of software problems on your Mac by creating a new user account. Unfortunately, when you do this, there’s no easy way to merge all the information between both accounts on your Mac.
Instead, you need to manually transfer the files you want to keep from one account to the other. These files usually include everything in your Documents, Desktop, and Downloads folders.
You can transfer files manually using the methods listed above: Move the files you want to keep into the Drop Box for your new user account. Then log in to the new user account and move them from the Drop Box to wherever you want to keep them.
Alternatively, you can automate the process by syncing your Desktop and Documents folders over iCloud. We’ve explained how to do this below. But first we’ll explain some other crucial information about creating a replacement user account.
Create a new administrator account
If you created a new user account to replace your old one, you need to make sure you give yourself administrator privileges. If you forget to do this, you can’t use that account to change System Preferences, uninstall applications, or edit system files.
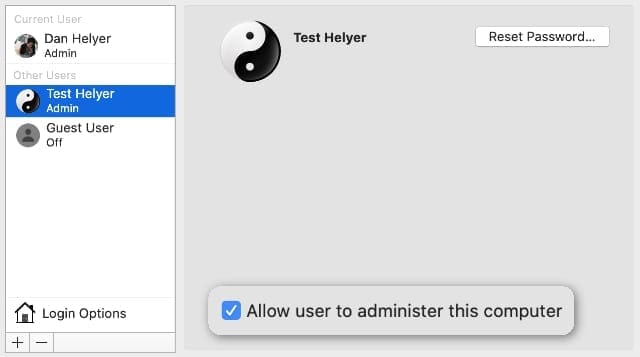
From your existing admin account, open the Apple menu and go to System Preferences > Users & Groups. Click the padlock and enter your administrator password to Unlock changes. Then select your new user account from the sidebar.
Turn on the option to Allow user to administer this computer. Then restart your Mac from the Apple menu to enable those changes.
Give other users administrator privileges from the Users & Groups Preferences.
If you haven’t created a second user account yet, now is a good chance to do so. Click the Add (+) button in the bottom-left corner, then fill in the details for your new account. Make sure you select Administrator from the drop-down menu at the top of the screen.
Move apps out of your user account
If certain apps aren’t available in your new user account, you may have installed them in a private Applications folder on your old account. To fix this, you need to move them to the main Applications folder instead.
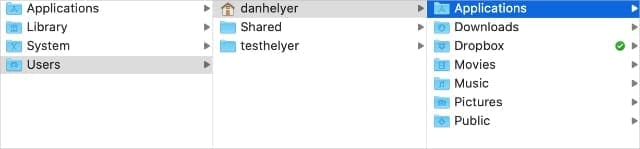
Log in to the original user account on your Mac, then open a new Finder window. Press Shift + Cmd + H and open your private Applications folder.
Apps in your User account aren’t available to other accounts on your Mac.
Now open a second Finder window and press Shift + Cmd + A to view the public Applications folder. Drag-and-drop apps from your private folder to the public folder to make them available for every user account on your Mac.
Library files and System Preferences
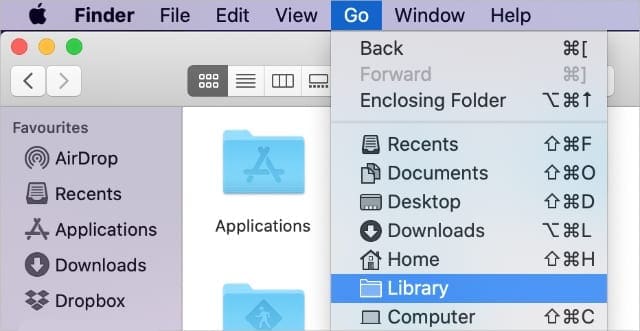
Your Mac saves various system files and preferences in the Library, a hidden folder in your user account. You can access the Library by holding Option and selecting Go > Library from Finder.
However, Library files from one user account on your Mac don’t work if you transfer them to another.
Although you can access the Library, you can’t transfer it to another account.
This means you can’t transfer your System Preferences or app settings to a new account. You need to set them up again manually instead.
Sync your Desktop and Documents folders using iCloud Drive
You can choose to sync your Desktop and Documents folders using iCloud Drive. This feature uploads all the content from those folders to iCloud, making it available from other computers or other user accounts on your Mac.
For this to work you may need to get more iCloud storage to have enough space for all your files. Apple only gives you 5GB for free, and most people have more than data than that in their Desktop and Documents folders.
You also need to use the exact same Apple ID for both user accounts on your Mac. Otherwise they won’t connect to the same iCloud Drive.
Upload files from your original user account
First you need to upload your Desktop and Documents folders from the original user account on your Mac. This might take several hours depending on how much data you have and how fast your Internet connection is.
Open the Apple menu and go to System Preferences > Apple ID > iCloud. Click the Options button next to iCloud Drive. Then turn on the Desktop & Documents Folders option and click Done.
Turn on the Desktop & Documents Folders to sync your content to iCloud.
Open a new Finder window to view the upload progress. You should see a circle filling up next to iCloud Drive in the sidebar. When the circle is full, the upload is complete.
Download files to your new user account
After uploading your Desktop and Documents folders to iCloud Drive, switch users to the new account on your Mac. Open the Apple menu and go to System Preferences > Apple ID.
Make sure you’re using the exact same Apple ID from the original user account on your Mac. If it’s different, go to Overview in the sidebar to Sign Out. Then sign in again using the correct account.
Now select iCloud from the sidebar and click Options next to iCloud Drive. Turn on the Desktop & Documents Folders option and click Done.
You should now be able to access and download all your Desktop and Documents files from iCloud Drive.
Make it easier to switch user accounts
Turn on an option to switch accounts from the menu bar.
If you couldn’t transfer all your files from one user account to another on your Mac, you should make it easier to switch between the two accounts instead.
Open the Apple menu and go to System Preferences > Users & Groups. Click the padlock and enter your administrator’s password to unlock changes. Then click Login Options in the sidebar and turn on the option to Show fast user switching menu.
Now you can click your name in the top-right corner of the menu bar to quickly switch users. If that still isn’t fast enough for you, find out how to remove passwords from your user accounts to switch users instantly.
Dan writes tutorials and troubleshooting guides to help people make the most of their technology. Before becoming a writer, he earned a BSc in Sound Technology, supervised repairs at an Apple Store, and even taught English in China.
Running Catalina: transferring files, via Dropbox, from Admin user profile to a non-admin profile doesn’t work. From either side, one cannot access the others Dropbox because you don’t have permission to view that folder. E.g. from the Admin side I can navigate to users, admin, documents, select file, scroll down to the non admin user, public, Drop box and Red Ink. You cannot view this folder because you do not have permission.
Thanks for your help ! I just spent a few hours working on this because my job wants us to have a separate account for work on our computer. Just a question … once it’s on Dropbox, the other person can edit as they want and the file is not sync to the other account, as I can see. If I want it to sync the file, the best way would be the share the file and give permission “Write and Read” to both accounts right ?
REALLY! Really, do you read much Jim? DROP BOX is a cloud based storage solution (one that costs money and is not that impressive). And Dropbox is also a “folder” name on your Mac which has nothing to do with the cloud based company and using it won’t sync files between your Mac and the cloud. So perhaps Apple’s choice of name was poor (what’s new), but your reading comprehension is poorer.


")


Running Catalina: transferring files, via Dropbox, from Admin user profile to a non-admin profile doesn’t work. From either side, one cannot access the others Dropbox because you don’t have permission to view that folder. E.g. from the Admin side I can navigate to users, admin, documents, select file, scroll down to the non admin user, public, Drop box and Red Ink. You cannot view this folder because you do not have permission.
Thanks for your help ! I just spent a few hours working on this because my job wants us to have a separate account for work on our computer. Just a question … once it’s on Dropbox, the other person can edit as they want and the file is not sync to the other account, as I can see. If I want it to sync the file, the best way would be the share the file and give permission “Write and Read” to both accounts right ?
REALLY? Drop Box? DROP BOX? Should I transfer all my files to my Blackberry first? I can’t believe this article was published this year.
REALLY! Really, do you read much Jim? DROP BOX is a cloud based storage solution (one that costs money and is not that impressive). And Dropbox is also a “folder” name on your Mac which has nothing to do with the cloud based company and using it won’t sync files between your Mac and the cloud. So perhaps Apple’s choice of name was poor (what’s new), but your reading comprehension is poorer.
I think apple got there first, didn’t they? And Dropbox the cloud service just used the same name?