If your Mac user account has disappeared you’re probably cursing the machine while fearing for your data. Have no fear, we’ve got the data-saving solution you need.
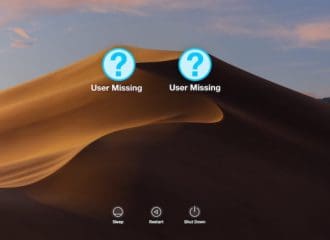
Some users have returned to their Macs after a well-deserved screen break only to discover their user account has vanished. It could be one account or several that have gone AWOL, but the bottom line is the same: The user can’t log in to access their data.
If your Mac user account has disappeared, we’ve got two solutions.
The first is to restore your Mac to factory settings. However, this option is potentially time-consuming and will delete all the data from your Mac, so you should only do it if you have a Time Machine backup to recover from.
The second solution is to follow the steps below and hopefully regain access to your account without sacrificing any data. You will need to type out three computer commands, but by following the steps closely you shouldn’t have any problems.
1. Turn off your Mac and wait
For this solution to work properly, you need to shut down your Mac and wait five minutes. I’m serious. Wait for your Mac to power off completely (the screen will go totallyblack) and set a timer for five minutes. Only once that time has passed should you continue.
2. Boot your Mac into the Unix shell using Single user or Verbose mode (not valid for Macs with a T2 chip)
After five minutes have passed, you need to press the power button and then hold the following two keys:
Command + V for macOS Mojave and above
Command + S for macOS High Sierra and below
(If you use a firmware password, you must turn off the password before you can start up in verbose mode)
If a small white rectangle flashes on the screen, release the keys. And DON’T PANIC.
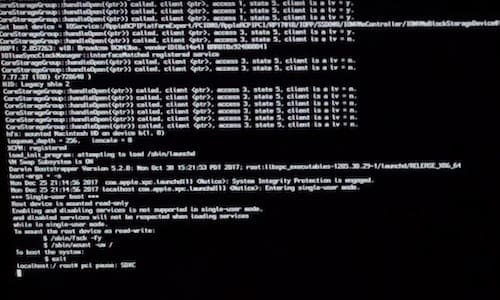
You should see a lot of confusing white code appear over a black background. This is the Unix shell of your Mac and it’s completely normal.
Your Unix Shell should look something like this. Image: Hokoonho, YouTube
3. Enter your first key command
The bottom line of the Unix code should read something similar to:
localhost:/ root# pci pause: SDXC
You need to press the enter key, creating a new line that will only read:
localhost:/ root#
Now type the following key command — taking care to preserve all the spaces — into that new line:
/sbin/mount -uw /
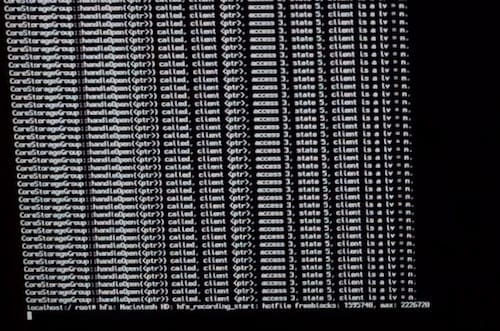
Press enter again and you will see numerous lines of code appear on the screen. This command should mount your Mac’s hard drive’s file system.
You’ll see many lines of code, like this. Image: Hokoonho, YouTube
4. Enter your second key command
The last line should be different from all those above it. That’s how you can tell your computer is ready for the next command.
Press enter again to create a new line, which should read:
localhost:/ root#
Now on this line type your second key command, as follows, ensuring that the spaces and capital letters are exactly the same:
rm /var/db/.AppleSetupDone
Press enter. You just deleted a config file in your Mac that will allow you to go through the initial setup to create a new user again, without sacrificing the data on your machine.
5. Enter your third key command
After pressing enter that last time you should have found yourself with yet another new line that reads:
localhost:/ root#
Not type your final key command, which will restart your Mac, and type enter:
reboot
That was a simpler one, eh?
6. Go through the Set-Up
After entering that last key command your Mac will restart itself and appear on the initial set-up screen, as though it were brand new. Don’t worry, you shouldn’t have lost any data, we’ve just tricked your Mac into thinking that you never did this setup.
Follow the onscreen prompts to choose your language, region, WiFi setting, etc.
However, do not transfer any data from a backup or connect to your Apple ID. Doing so will take up a lot of time and you really don’t need to.
When asked to do so, create a new Admin user account and password. If all goes well, you’ll be deleting this account — however, there’s a chance you’ll instead need to copy all your old data across and use this new account going forward. So name it accordingly.
7. Unlock your old account through Users & Groups
Once your new account has been created and signed in, open the System Preferences app from the dock or from the Apple icon in the menu bar.
Click Users & Groups and marvel at your old user account(s) in the sidebar. To access those accounts, you first need to click the Padlock button and enter your new Administrator password.
With the padlock unlocked, select your old account in the sidebar and click the Reset Password button that appears. Create a new, memorable password for your old account.
Reset the password of your old accounts.
8. Sign in to your old account (if you can)
With a new password created for your old account, you can hopefully see it and sign in again from the login screen. To test it, click the Apple icon in the menu bar and log out. Then click your old user account from the login page and enter your newly created password.
Et voila! You’re back in your old account with all your old data. Feel free to go back into Users & Groups to delete the Admin account we created in this guide.
9. If your account is still missing, open Finder App
Unfortunately, for some of you, that last step won’t work. If your old account is still missing from the Mac login page we can still recover your data by copying it across to the new Admin account.
To do that, start by signing back into the new Admin account, then open Finder.
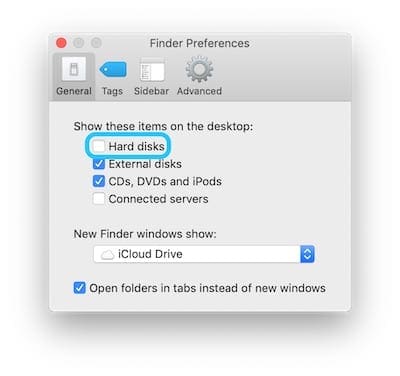
We need to access your Mac’s Hard Disk, and to ensure we can do that you need to open Finder’s Preferences from the menu bar. Under the General heading, tick the box to show your Hard Disk on the Desktop.
Tick this box in the Finder Preferences
10. Copy your data to your new account
Double click the Hard Disk icon that has appeared on your Desktop to open a new Finder window.
Navigate to the Users folder and then go into your old user account.
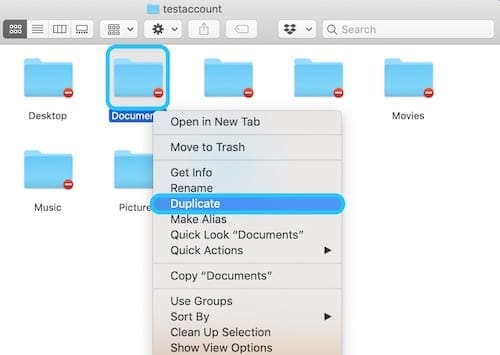
Here are all your old data, if there are no red block icons on the folders, you can go into them and copy whatever data you want to recover. Otherwise, control-click any folder with a red block icon and click Duplicate.
Enter your new Admin password and click continue. A duplicate version of that folder and all the data within it will appear, which you can access and move to your new account.
Do this for all the data you want to recover, and when you’re sure you have everything you can delete your old user account from the Users & Groups Preferences to free up space on your Hard Disk.
Use your new Admin account to duplicate blocked folders in your old account
Hopefully after all that you’re back into your account with your data safe and secure. If these tips didn’t help, it could be that your only remaining option is a factory reset and recovering data from a backup. Let us know in the comments how this guide worked for you!
Dan writes tutorials and troubleshooting guides to help people make the most of their technology. Before becoming a writer, he earned a BSc in Sound Technology, supervised repairs at an Apple Store, and even taught English in China.
Just wanted to show my gratitude for the very good information. I tried what seemed like everything else including countless other suggestions and after a second try with your step by step guide I was able to successfully create a new admin account (BTW-your included images really helped as a visual confirmation that I was doing things right). And even though the user accounts were all still missing as you pointed out they might be, I could create new user accounts for each of them and copy their files over to new account home folders. Thanks again, much appreciate the time you spent to do this and share it with all of us!
Many thanks for the info, it has been incredibly helpful!!
I have a question, though. Most of my recovered files (mainly photos) won’t open (info showing: “It may me damaged or use a file format that Preview doesn’t recognise”). The files still take the same amount of space as regular files, but when I tried to transfer them to an external drive (to them try to open them on a different device), they only take up around 160 bytes and, of course, won’t open elsewhere, either… Any advice would be massively appreciated, thank you!
Thanks for the life-saver advice.. I tried everything and contacted apple support which couldn’t solve the problem..before deleting everything found this page with just googling..
many thanks again
Great tutorial and I’m hopeful it will solve my problem. However, I’m on Big Sur and encountering a problem with the first step (shutdown, wait 5 mins then startup while holding Command+V. When I do it I get all of the unix code scrolling by as anticipated but when it finishes it immediately jumps to a startup mode and presents me once again with the login screen that shows the Guest account as the only available user account. I kept holding Command+V all the way through the startup process but didn’t end up where I could start entering the terminal commands. Wondering if there are any different steps I need to undertake with Big Sur?
When I enter this key command:
/sbin/mount -uw /
I get this message:
updating mount from /dev/disk1s5 to read/write mode is not allowed
mount_apfs: volume couln not be mounted: Operation not permitted
mount: / failed with 77
I’m testing a new OS on an external hard drive. It was working perfectly fine until on one restart the main user disappeared. It now asks for a username and password but nothing happens when I type them in.
I’ve read your article but when I take this route the terminal commands apply to my internal hard drive, not to the external. Any ideas?
What version of macOS or Mac OS X are you using and what model Mac?
To get rid of this current issue, we suggest you restart in recovery mode (Command+R at startup) if your Mac supports it. Then send us those details for your system so we can cater our response to your specific Mac
I have went through so many website trying to find the answer to my Mac problem that I could no longer sign into because some how our main user account was deleted.
I tried the code on other sites and it told me it was not a valid command, but not this website.
Worked as it was written and helped me get back into my computer. Very well written article. Thank you!
MacBook Pro 2012 just got it, reset on me and came back to the login screen with no username and not working to login.
When I restart and login holding ‘command + v’ as I have Mojave running (I’m certain it’s Mojave as I’ve seen), it just goes back to the username screen on start up. I cannot get to the code. When I use ‘command + s’, the code pops up, but not with the character listed above..
All the commands worked great and led my back to my user data. But then I got to step 10 about copying the data from the old file to the new account. I don’t have red block icons on any of them. But how do I “copy the data to the new account”?
This article sounds very promising for the problem I have – acting as the repair man for the computers in the immediate family 😉 I’m successful in executing the Terminal commands and upon rebooting, am brought to the setup process. However it halts at the “Sign in With Your Apple ID”-screen: I see the headline with a short description (“Sign to use iCloud, iTunes, App Store… and more”, but the rest of the screen is blank. I’m unable to back out of that screen, too: the Back-button is enabled but doesn’t respond to clicking, and the Continue-button is deactivated..
I’ve tried out a few things:
– Rebooted and in the setup process, chosen not to connect the iMac to the Internet at all. This still brings me to the “Sign In”-screen, which sounds counterintuitive as there’s explicitly is no Internet connect available.
– Rebooted and gone through the process using the defaults (English, USA, all the recommended settings)
– Rebooted and chosen just how I’d like the settings to be.
But everything brings me to the Apple ID screen, and I can’t find a way around it.
Note that I haven’t created a user account at this point: I haven’t filled in a name or a password yet.
Didn’t work for me, I am stuck at apple logo loading screen after the ‘reboot’ command. The progress bar fills up to 3/4 and then nothing happens. I then reboot my Mac by holding the power button for 10 seconds and everything repeats again.
Thanks for the tutorial! It really helped me out today. I began to panic when my accounts started disappearing. Granted, my Mac is rather old and I am transitioning to a new one. Perfect timing!
I cannot thank you enough for posting this tutorial, it really saved me from setting up my Mac again. After applying a security update, the main account was locked and I could no longer access the system. Only with your help, it was possible to get into macOS again and migrate the old account. What a relief, thanks again.
It has happened to me 4 times in the past year or so, I learnt my lesson to never let my iMac to go to sleep, but a couple of times I have accidentally fallen asleep waiting for my mac to export pictures. Then the mac falls asleep and forgets about me.
First time it happened a new admin account had to be created, and I thankfully kept it because it happened again!
I login as the test admin user, in my case my disappeared user account does not appear in the Users & Groups sidebar list, but I can see the data in the Users folder.
I make a new admin account, exact same details as the one that disappeared, same account name.
It says something like this folder already exists, it matches up, I restart and my user name has reappeared, I login and everything is back to normal.
Once I have a day off between jobs (which I use my mac for) I’m going to reinstall the OS and see if that cures this odd bug once and for all! It’s a pain.
Hi Dan! Thank you for writing and publishing these steps! My user was just disappeared last night and gladly I found your article! Was a bit skeptical at first because I feared it wouldn’t work but it really works and I got all my data & docs {{especially my thesis}} back!
Command+S starts up a Mac into a single-user mode for Mac’s with macOS High Sierra or earlier.
For Macs running macOS Mojave and above, user Verbose Mode instead by pressing Command + V. If you’re using a firmware password, you must turn off the password before you can start up in verbose mode.
Hold those keys until you see white text on the screen
For Macs with FileVault, release the keys when you see the login window and log in to continue
Enter any UNIX commands
To exit, type reboot and press Return
My iMac had similar problems–turned out the hard drive had gone bad.
If you can boot into your iMac’s Recovery Partition by using Command + R keys at startup, give that a try and run disk utility to check your hard drive.
Another suggestion is to start-up in Apple Diagnostics by pressing the D key when starting up–this automatically runs a series of checks on your hardware. Before running diagnostics, unplug all accessories and devices, leaving only your power cable, Mouse, Ethernet (if applicable), and keyboard.
Hope it is able to find something and fix it, without needing a new hard drive.
Hi there, trying these steps after booting up my MacBook Air 2015 for it not recognize my password, I restarted for it to come to a screen which only had an option to enter a name and a password didn’t have my user account (I only used the admin as I didn’t see a reason to make a new one or change the name)
I’ve tried command s and getting into the terminal but can’t get past /sbin/mount -uw / nothing pops up and won’t let me do the other steps.
I’m having the exact same issue on my iMac. I’m on High Sierra.
I literally left the room for 20 minutes to come back to my computer asleep, not uncommon, but we I tried to login it wouldn’t accept my password and when I switched to guest I lost my username completely.


Just wanted to show my gratitude for the very good information. I tried what seemed like everything else including countless other suggestions and after a second try with your step by step guide I was able to successfully create a new admin account (BTW-your included images really helped as a visual confirmation that I was doing things right). And even though the user accounts were all still missing as you pointed out they might be, I could create new user accounts for each of them and copy their files over to new account home folders. Thanks again, much appreciate the time you spent to do this and share it with all of us!
Many thanks for the info, it has been incredibly helpful!!
I have a question, though. Most of my recovered files (mainly photos) won’t open (info showing: “It may me damaged or use a file format that Preview doesn’t recognise”). The files still take the same amount of space as regular files, but when I tried to transfer them to an external drive (to them try to open them on a different device), they only take up around 160 bytes and, of course, won’t open elsewhere, either… Any advice would be massively appreciated, thank you!
Thanks for the life-saver advice.. I tried everything and contacted apple support which couldn’t solve the problem..before deleting everything found this page with just googling..
many thanks again
Esra
Many thanks.
But how to delete old user files ? Old User not visible in Users & Groups, only in finder.
Worked great for a friend of mine who otherwise lost all his data, thank you so much for this info!
Thanks: this worked a treat! I almost lost it when I couldn’t even see my login… You’re a life saver 🙂
You are a life-saver.
Thanks.
Same issue as Tim Richards here (though I’m on Catalina) – any other suggestions?
Great tutorial and I’m hopeful it will solve my problem. However, I’m on Big Sur and encountering a problem with the first step (shutdown, wait 5 mins then startup while holding Command+V. When I do it I get all of the unix code scrolling by as anticipated but when it finishes it immediately jumps to a startup mode and presents me once again with the login screen that shows the Guest account as the only available user account. I kept holding Command+V all the way through the startup process but didn’t end up where I could start entering the terminal commands. Wondering if there are any different steps I need to undertake with Big Sur?
I’m also hading the same issue. Were you able to solve this?
Im almost crying of joy!!! I thought I lost everything!!! Thank you soooooooooooo much!!!
You are a savior!!!! I love you all!!!
Thanks so much!! You saved me a lot of money.
When I enter this key command:
/sbin/mount -uw /
I get this message:
updating mount from /dev/disk1s5 to read/write mode is not allowed
mount_apfs: volume couln not be mounted: Operation not permitted
mount: / failed with 77
Any Ideas?
I’m experiencing the same thing. Were you able to solve this issue?
Same here, with Catalina. If I understood correctly, Catalina does not allow changing root to read-write, it is permanently read-only?
When I enter the first command key /sbin/mount -uw / nothing happens it just gives me another empty line after local host root
I have the same issue.
I type “/sbin/mount = uw /”
and then press enter and nothing happens.
Anyone know how to work around this? I think I’m on 10.12?
The exact same thing happens to me when I put the first key in /sbin/mount -uw /
it then just comes up with a new line starting localhost:/ root#
From what I’ve read and seen it should fetch up more code to put the second key in.
Has anyone found a way around this?
Thanks a lot. You saved our computer.
I’m testing a new OS on an external hard drive. It was working perfectly fine until on one restart the main user disappeared. It now asks for a username and password but nothing happens when I type them in.
I’ve read your article but when I take this route the terminal commands apply to my internal hard drive, not to the external. Any ideas?
Tried your fix and after typing in first lie, message line said mount failed. How can I fix that
Hi Norm,
What version of macOS or Mac OS X are you using and what model Mac?
To get rid of this current issue, we suggest you restart in recovery mode (Command+R at startup) if your Mac supports it. Then send us those details for your system so we can cater our response to your specific Mac
I have went through so many website trying to find the answer to my Mac problem that I could no longer sign into because some how our main user account was deleted.
I tried the code on other sites and it told me it was not a valid command, but not this website.
Worked as it was written and helped me get back into my computer. Very well written article. Thank you!
Help please!!
MacBook Pro 2012 just got it, reset on me and came back to the login screen with no username and not working to login.
When I restart and login holding ‘command + v’ as I have Mojave running (I’m certain it’s Mojave as I’ve seen), it just goes back to the username screen on start up. I cannot get to the code. When I use ‘command + s’, the code pops up, but not with the character listed above..
Help please.
Me too, Com + V shows white rectangular but still goes login window…
All the commands worked great and led my back to my user data. But then I got to step 10 about copying the data from the old file to the new account. I don’t have red block icons on any of them. But how do I “copy the data to the new account”?
This article sounds very promising for the problem I have – acting as the repair man for the computers in the immediate family 😉 I’m successful in executing the Terminal commands and upon rebooting, am brought to the setup process. However it halts at the “Sign in With Your Apple ID”-screen: I see the headline with a short description (“Sign to use iCloud, iTunes, App Store… and more”, but the rest of the screen is blank. I’m unable to back out of that screen, too: the Back-button is enabled but doesn’t respond to clicking, and the Continue-button is deactivated..
I’ve tried out a few things:
– Rebooted and in the setup process, chosen not to connect the iMac to the Internet at all. This still brings me to the “Sign In”-screen, which sounds counterintuitive as there’s explicitly is no Internet connect available.
– Rebooted and gone through the process using the defaults (English, USA, all the recommended settings)
– Rebooted and chosen just how I’d like the settings to be.
But everything brings me to the Apple ID screen, and I can’t find a way around it.
Note that I haven’t created a user account at this point: I haven’t filled in a name or a password yet.
Any bright ideas? 🙂
Didn’t work for me, I am stuck at apple logo loading screen after the ‘reboot’ command. The progress bar fills up to 3/4 and then nothing happens. I then reboot my Mac by holding the power button for 10 seconds and everything repeats again.
THANK YOU!!!!
Thanks for the tutorial! It really helped me out today. I began to panic when my accounts started disappearing. Granted, my Mac is rather old and I am transitioning to a new one. Perfect timing!
I cannot thank you enough for posting this tutorial, it really saved me from setting up my Mac again. After applying a security update, the main account was locked and I could no longer access the system. Only with your help, it was possible to get into macOS again and migrate the old account. What a relief, thanks again.
It has happened to me 4 times in the past year or so, I learnt my lesson to never let my iMac to go to sleep, but a couple of times I have accidentally fallen asleep waiting for my mac to export pictures. Then the mac falls asleep and forgets about me.
First time it happened a new admin account had to be created, and I thankfully kept it because it happened again!
I login as the test admin user, in my case my disappeared user account does not appear in the Users & Groups sidebar list, but I can see the data in the Users folder.
I make a new admin account, exact same details as the one that disappeared, same account name.
It says something like this folder already exists, it matches up, I restart and my user name has reappeared, I login and everything is back to normal.
Once I have a day off between jobs (which I use my mac for) I’m going to reinstall the OS and see if that cures this odd bug once and for all! It’s a pain.
Hi Dan! Thank you for writing and publishing these steps! My user was just disappeared last night and gladly I found your article! Was a bit skeptical at first because I feared it wouldn’t work but it really works and I got all my data & docs {{especially my thesis}} back!
pressing command+s does not do anything
Hi Salma,
Command+S starts up a Mac into a single-user mode for Mac’s with macOS High Sierra or earlier.
For Macs running macOS Mojave and above, user Verbose Mode instead by pressing Command + V. If you’re using a firmware password, you must turn off the password before you can start up in verbose mode.
Hold those keys until you see white text on the screen
For Macs with FileVault, release the keys when you see the login window and log in to continue
Enter any UNIX commands
To exit, type reboot and press Return
Another option is to use Single User Mode with the following commands:
1) /sbin/mount –wu /
2) /sbin/SystemStarter
3) passwd root
4) enter a new password and confirm this new password
5) shutdown –h now (or use the reboot command)
Once your Mac boots, enter that new password (that you just created in Single User Mode)
worked for me on macOS Mojave
I started following your guide and typed sbin/mount -uw / and I’ve been waiting for quite some time now!
Are you sure it shouldn’t be /sbin/mount -uw / (with a / in the beginning)?
Hi Sotiris,
You are correct, you should add that slash before sbin (as in /sbin.) Thank you for bringing this error to your attention and sorry for the mistake.
We’re surprised it didn’t kick back the message “Command Not Found.”
Liz
Thank u very much, this was the best tips and advice ever.
Hi,
I tried these steps and was brought to the language selection page after reboot.
However, after selecting the language everything turns grey and that’s about it.
I can never get past that grey screen.
Now every time I forcefully shut down (holding the power button) and restart I run into the same problem.
Language selection page and then grey screen after selecting the language.
Any idea what must I do. I am using an iMac 2012, running El Capitan.
HI Deep,
My iMac had similar problems–turned out the hard drive had gone bad.
If you can boot into your iMac’s Recovery Partition by using Command + R keys at startup, give that a try and run disk utility to check your hard drive.
Another suggestion is to start-up in Apple Diagnostics by pressing the D key when starting up–this automatically runs a series of checks on your hardware. Before running diagnostics, unplug all accessories and devices, leaving only your power cable, Mouse, Ethernet (if applicable), and keyboard.
Hope it is able to find something and fix it, without needing a new hard drive.
Liz
Hi there, trying these steps after booting up my MacBook Air 2015 for it not recognize my password, I restarted for it to come to a screen which only had an option to enter a name and a password didn’t have my user account (I only used the admin as I didn’t see a reason to make a new one or change the name)
I’ve tried command s and getting into the terminal but can’t get past /sbin/mount -uw / nothing pops up and won’t let me do the other steps.
Any advice?
Hi Calam,
Sorry to hear about these issues with your MacBook Air.
What version of macOS or Mac OS X does your MacBook use?
I’m having the exact same issue on my iMac. I’m on High Sierra.
I literally left the room for 20 minutes to come back to my computer asleep, not uncommon, but we I tried to login it wouldn’t accept my password and when I switched to guest I lost my username completely.
Now, I cannot get past the /sbin
Any advice??
Hi Jamie,
Wr’re not sure why it’s not getting past the terminal command–is it showing any error message like command not found?
Try rebooting in Recovery Mode (press Command + R at startup) and then run Disk Utility’s First Aid and see if it locates and fixes any errors.
Once done, shut down, wait a few minutes, and power back on–see if it picks up your user account.
If not, go back to Recovery Mode and try reinstalling macOS.
Hi Jamie,
this is what exactly happened to me today.
Did you managed to fix it without reinstalling macOS and to lose all the data?
Thanks!