There’s a lesser-known feature of most email services that let you essentially set up separate email addresses that connect to your primary mailbox. They’re called aliases.
But while email aliases have been around forever, they’re commonly underused. If you use an iCloud email address as your primary account, you can set up multiple aliases that connect to it. Here’s how, as well as why you might want to.
Related Reading
- How to use the new iCloud.com features on your iPhone or iPad
- Restore Your iCloud Content With This Step-by-Step Guide
- How to Change an Apple ID Email You No Longer Have Access To
Contents
Why you may want to use an iCloud email alias
You can probably already guess some of the benefits of having an email address that isn’t your primary one. Want to sign up for a service or newsletter but don’t want to give out your actual address? Use an alias.
It’s also handy to use iCloud aliases in public-facing posts or websites, so you can post an email address without getting a deluge of spam emails.
This is especially useful because aliases are easily deletable. Apple’s iCloud service lets you create and delete these additional identities at will. That’s a bit harder to do — if not impossible — with your primary email account.
Aliases are also useful for filtering, since you can actually separate messages sent to these emails into different mailboxes.
Of course, there’s also identity. If you have a less professional-sounding email address, you can set up an alias with your full name and use that for business correspondence.
So, why not just use multiple email accounts? Well, you could. But then you’d have to remember the passwords and login credentials to access each of them separately. With iCloud aliases, all of your addresses are accessible in one account. It’s a lot more convenient.
How to set up iCloud aliases
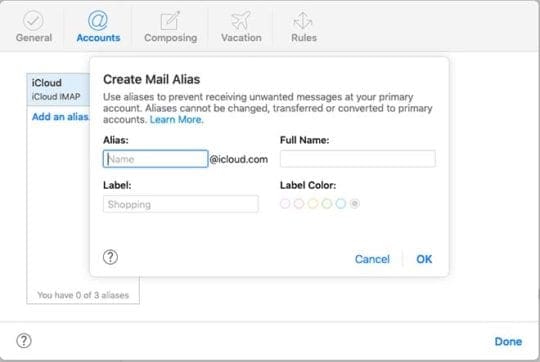
For some reason, you can only set up iCloud email aliases as Apple’s iCloud.com website. So you’ll need a device with a web browser.
Do keep in mind that mobile devices, like smartphones or tablets, may not get the full iCloud.com experience. Similarly, some of the web apps may run a bit buggier on a mobile device. In other words, try to use a browser on a computer.
- Head to iCloud.com and login with your Apple ID credentials.
- Click on the Mail icon to open the Mail web app.
- Click the gear icon in the lower-left corner of the screen.
- In the dropdown menu, select Preferences.
- Click on Account.
- Finally, just click on Add an Alias.
- Name your alias. You can also add a label and label color to help differentiate it from your other aliases or accounts.
You can have up to three aliases connected to your primary iCloud.com account. And, as we mentioned, you can delete them at will. (If you do device to do so, keep in mind that you may not be able to get the same address back.)
In the Accounts tab, you can also disable select aliases. That effectively “turns them off” but keeps them associated with your iCloud.com so you can easily reenable them later.
How to use an iCloud alias
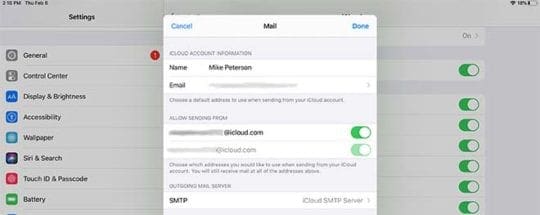
As we mentioned, emails sent to one of your iCloud aliases are effectively just sent to your primary mailbox. In the From line, you’ll see an email tagged with its particular alias. You can set up a filter, which we’ll get to later.
You can, of course, send emails from your alias, too. The process can be a bit tricky, however.
For example, on Apple’s mobile devices, you’ll need to enable and disable individual addresses in the Allow Sending From list in Settings —> Password & Accounts —> (Your iCloud Account) —> iCloud — Mail. This is because users can’t choose which alias to use directly in the Mail app.
On macOS, you’ll want to head to Mail —> Preferences —> Accounts. Click the iCloud entry and select your default “send from” address in the Email Address list.
How to filter iCloud aliases
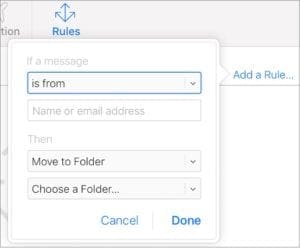
It’s also helpful to filter out emails sent to specific iCloud aliases. This isn’t baked-in functionality, so you’ll need to set up a Mail rule to do so. But it’s incredibly handy for spam and website sign-up purposes.
As an example, we’ll set up a rule that sends all emails to an alias straight to the trash.
- Log into iCloud.com.
- Click the Mail icon and then Preferences.
- Click the Accounts button.
- Then, click on Preferences.
- Click on the Rule pane and then Add a Rule.
- Under the If a message, select is addressed to and enter the alias that you don’t want to see messages from. Under the Then heading, select Move to Trash and Mark as Read.
- Click on Done when you’re finished.
Please let us know if you have any questions around setting up and using iCloud email account aliases. If you have not tried yet, go ahead and follow this step-by-step guide and try it out today!

Mike is a freelance journalist from San Diego, California.
While he primarily covers Apple and consumer technology, he has past experience writing about public safety, local government, and education for a variety of publications.
He’s worn quite a few hats in the journalism field, including writer, editor, and news designer.




Hi – I set up an alias today as you recommended.
I would like the emails from that alias to go to a separate folder and I created one with a filter for messages from that address to go to the folder but it is not working.
Any suggestions? I haven’t updated my software for a while so that might be it.
Another question: i have been using Time machine to back up to a hard drive and now it is not working. DO you suggest a better way to do back-ups? Or should I just delete some stuff off my computer so the back-up drive doesn’t fill up.
Thank you!
Thanks for this! I created my alias with rule to new folder! Think it will work great! Just wish could create separate box on my Mac but this works!!
How long does it take for a change of alias to take effect?
JB
Suppose I set up an alias and receive a message addressed to that alias. Now if I reply to that message, will the recipient of my reply see it coming from the alias or from my main iCloud email address?