iOS 16 has proven to be one of Apple’s most extensive and exciting recent updates. From customizing lock screens to editing messages, the Silicon Valley giant has listened to what many users have been talking about for years.
One of the coolest new features, however, is the ability to schedule your emails from the Mail app. Doing so is pretty simple, and this article will give you all the information you need to get started.
While you can schedule emails in Outlook on your computer, you cannot do so on the iOS app at the time of writing. If you use a Microsoft email account, the Mail app is the easiest way to delay your correspondences for another time.
If you use Gmail, however, you’re in luck. The Gmail iPhone app lets you choose the time you want to send your emails without too many issues. And since the Mail app connects Google accounts, you can choose whichever you feel is more convenient for you.
Which Devices Can I Schedule Emails On With the Mail App?
If your device supports iOS 16, you can schedule emails on the Mail app. Apple’s new software is available on all devices from the iPhone 8 and 8 Plus onwards.
Are you still yet to download iOS 16? No problem. Go to Settings > General > Software Update and follow the instructions from there.
How to Schedule Emails in iOS 16
Once you’ve downloaded iOS 16 on your iPhone, scheduling emails takes very little effort. After signing into the Mail app with your preferred email address, follow the instructions listed below.
Go to the new email icon in the bottom right-hand corner of your screen.
Enter your email recipient and fill in the subject line, along with composing the message you wish to send.
Hold onto the send message icon; a menu will appear soon after.
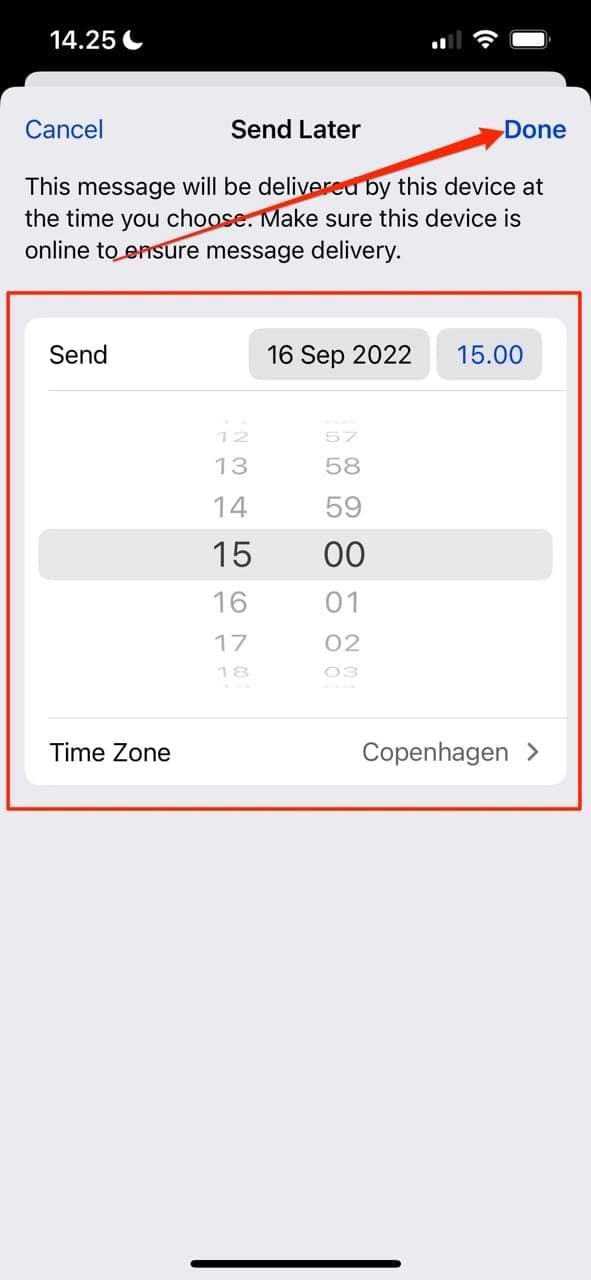
Choose your preferred sending method. If you pick Send Later at the bottom, you can choose exactly when you want the message to go out. Hit Done when you’re finished.
When scheduling emails on iOS 16, note that your device will need to have an internet connection at the time you set.
How to Undo a Scheduled Email in iOS 16
Scheduling your email can help you decide whether you actually want it to go out. If you change your mind later, you can undo your action from within the Mail app. Removing a scheduled email is simple; follow the instructions listed below.
Go to the Send Later tab. If you can’t see this, go to Edit in the top right-hand corner of the main screen and select it from the dropdown menu and press Done.
Slide your finger to the left until the Trash button appears and select it. Your iPhone will delete the message straight away.
Scheduling Emails in iOS 16: An Incredibly Useful Tool
Scheduling emails in iOS 16 is incredibly useful in multiple scenarios. You can send it at a specific time to ensure you appear at the top of someone else’s inbox, and it’s also ideal if you don’t wish to disturb another person. Setting up your messages in this respect is simple.
If you later decide that you want to unschedule your email, you can similarly do so without too many problems. So, if your email carrier doesn’t support scheduled mailing on iOS, you now have a solution.
Danny has been a professional writer since graduating from university in 2016, but he’s been writing online for over a decade. He has been intrigued by Apple products ever since getting an iPod Shuffle in 2008 and particularly enjoys writing about iPhones and iPads. Danny prides himself on making complex topics easy to understand. In his spare time, he’s a keen photographer.


Write a Comment