It might surprise you how easy it is to share your screen with another Mac. This is great for collaborating on projects or getting technical support while keeping your Mac secure. And you can do it all without installing third-party software!
We’ve explained everything you need to know about sharing your Mac screen below. Including a couple of alternative ways to do it and some troubleshooting suggestions in case it doesn’t work.
We’ve also touched on the exciting Sidecar feature for macOS Catalina+ and iPadOS that lets you use your iPad as a second display for your Mac!
A Screen Sharing app is hidden within the system files on your Mac.
Apple built Screen Sharing into the operating software on your Mac, known as macOS. It allows you to securely view or control another Mac on the same network. Or you can use it to let another user securely view or control your Mac.
When sharing with another computer, that computer sees everything on your screen. Depending on the settings, they can also control your Mac: installing apps, copying files, or restarting the machine entirely.
In order to access your Mac, users must sign in to an existing account on your computer or in your network. You can choose which accounts are and aren’t allowed to share your screen. Other users can sometimes request permission from you through a notification.
The only exception to this is when both computers are signed in to the same Apple ID account. In this situation, screen sharing begins without needing to sign in again.
How do I share my Mac’s screen with another computer?
By default, Screen Sharing is turned off on your Mac. You should only turn it on if you plan to use it, and you should only use it if you fully trust the other users.
How do I turn on Screen Sharing for my Mac?
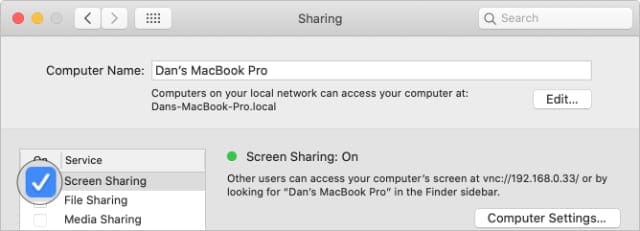
From the menu bar on your Mac, go to > System Preferences… > Sharing.
In the sidebar, check the box next to Screen Sharing to turn it on.
Select Screen Sharing from the sidebar and you should see a green light to show it’s switched on.
The Screen Sharing light goes green when you turn it on.
Choose who can share your screen
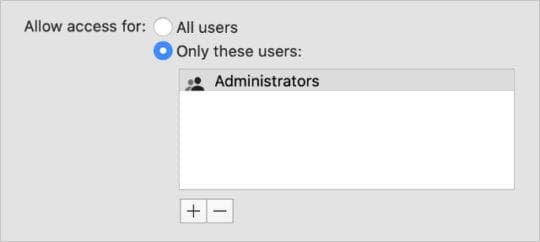
Beneath the Screen Sharing light is an option to allow access for All users or Only these users. This decides who can access your Mac. It refers to the user accounts on your Mac or on your network.
If you select All users, anyone with a user account on your Mac or in your network can enter their name and password to access your Mac. This doesn’t include guest accounts or sharing-only accounts.
If you select Only these users, you can choose the specific users or groups of users who can gain access. Do this by adding or removing users with the plus (+) and minus (-) buttons. You can select any users from your Mac or on your network.
With this setup, anyone with an administrator account on this Mac can access Screen Sharing.
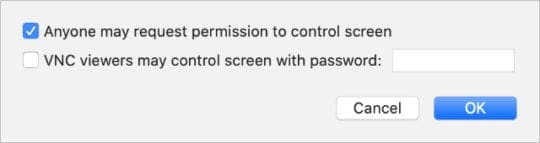
VNC Computer Settings
Screen Sharing on your Mac uses Virtual Network Computing (VNC) to link systems together. This allows users without a Mac to request access to your computer by visiting the VNC address.
Click the Computer Settings… button to edit how people can connect to your Mac using VNC. In the window that appears, you can choose to let anyone request permission to control your screen or create a password they need to use.
If you allow it, users without an authorized account can still request permission to share your screen. When they do this, a notification appears on your screen for you to approve or deny permission.
The Computer Settings button lets you change who can control your screen using VNC.
How do I stop someone from sharing my Mac screen?
When your Mac is sharing its screen a new icon appears in the menu bar, it looks like two overlapping squares. You know your Mac is sharing its screen whenever this icon appears.
Here is the Screen Sharing icon
Stop sharing your screen at any time by clicking the icon and choosing to Disconnect. It also provides a shortcut to your Sharing Preferences, where you can turn off Screen Sharing entirely.
Use the Disconnect button when you want to stop sharing your screen with someone.
If another user is already sharing the screen of your target Mac, you can choose to share it with them or view a second, virtual screen.
The shared screen appears in a separate window on your Mac. The toolbar at the top of the window lets you change how you control, scale, or copy data from the shared screen.
You can drag-and-drop to transfer files from the Screen Sharing window.
Access another Mac using Finder
The easiest way to access the screen of another Mac is by using Finder. Open a new Finder window and click on Network, under Locations in the sidebar. You should see every computer in your network, select each one to see a Share Screen option.
Find the computer you want to connect to in Finder, then request permission to share its screen.
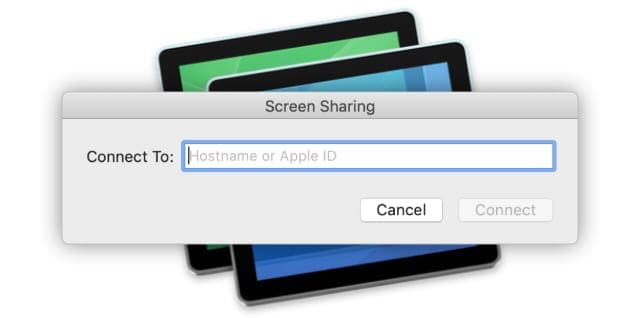
Access another Mac from its VNC address
Alternatively, if you don’t want to use Finder you can use the VNC address of the Mac you want to connect to. Find this address beneath the Screen Sharing light in the Sharing Preferences. It’s in the format vnc://[VNC Address]/.
The VNC address is different for every computer on your network.
Enter the VNC address exactly as it appears in any web browser. It should present you with the option to open a Screen Sharing app. Or, from Finder select Go > Connect to Server… and enter the VNC address there.
A screen sharing pop-up appears in Safari when you enter a VNC address.
Access another Mac from the Screen Sharing app
When you share the screen of another computer, it opens in a Screen Sharing app on your Mac. You also can use this Screen Sharing app to start new connections to other computers.
Open Spotlight search for ‘Screen Sharing’ to find the app. Then search for a VNC address or select one of your contacts to connect to.
Open the Screen Sharing app from Spotlight.
Why can’t I share my Mac screen?
A few things can go wrong when trying to share the screen from your Mac or connect to someone else’s. We’ve put together a brief troubleshooting guide to work out how to fix it.
Update the software on both machines
Out-of-date software causes all manner of problems for computers, it might be the cause of your Screen Sharing problems. Make sure you’re running the latest version of macOS on both computers.
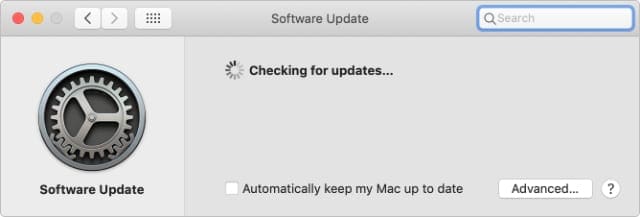
To update the software on your Mac, connect it to the Internet and select Software Update from the System Preferences. Wait for your Mac to check for new updates, then download and install any that are available.
Update your computer to the latest available version of macOS.
Check what network each Mac is using
Visit the System Preferences to check your network.
For screen sharing in macOS, both computers need to be on the same network. Open System Preferences and click Network to see what each Mac is connected to. If you want to share the screen remotely, you need to use third-party software instead.
Make sure your Mac doesn’t go to sleep
Another common problem is that the Mac you want to screen share with keeps going to sleep. This happens a lot if it isn’t connected to power, but you can fix it from the Energy Saver option in System Preferences.
Uncheck the button to Put hard disks to sleep when possible and lengthen the amount of time it takes for the display to turn off. You may want to revert these settings after sharing your screen to preserve battery life.
Adjust the Energy Saver preferences to make sure the target Mac doesn’t go to sleep.
If it’s on, turn off Remote Management as you can’t use this with Screen Sharing.
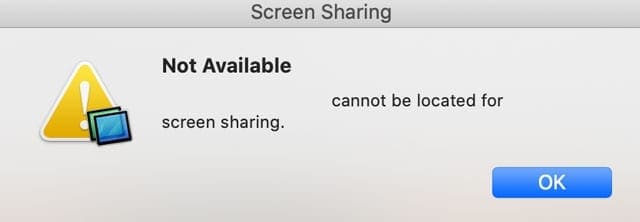
Getting an error “not available. cannot be located for screen sharing?”
Confirm that the Macs are on the same subnetwork of the IP network
Make sure screen sharing is enabled and that you have allowed access for all users (or each user name)
Remove the option to restrict screen sharing access with a password
Check that your firewall is not blocking incoming connections
Enter the VNC address in Go > Connect to Server…
Make sure Remote Management is deselected. You can’t have both Screen Sharing and Remote Management on at the same time.
Does the screen share window keep resizing?
If so, try unplugging any external monitors you use with a MacBook. Just use your MacBook’s internal screen.
Can you or the other party view but not control the screen?
Go to System Preferences > Sharing > Screen Sharing > Computer Settings
Tick the box for Anyone may request permission to control the screen
Test if you can control the screen
Other ways to share the screen on your Mac
If you find yourself unsatisfied by the built-in Screen Sharing functionality of your Mac, take a look at these alternative ways to share screens.
Share screens using iMessage
You can share screens with people outside your network using iMessage on your Mac. To do this, the other user must have Internet access and an Apple ID account.
Start a new conversation with the target user in iMessage. At the top of the window, click Details, then click the overlapping squares to see your screen-sharing options. You can offer to share your screen or request permission to view theirs.
iMessage makes it easy to share your screen with contacts.
Share screens using FaceTime
It’s not very elegant, but some people share screens using FaceTime. For this method, you need a second Apple device you can use to film your computer screen. You also need something to prop it up with.
It’s easiest to start the FaceTime call from an iPhone or iPad. Once the call starts, move that device to film the screen of your Mac allowing the other person to see it.
A wide range of third-party apps are available that offer more screen sharing features than Apple provides. The most popular of these apps is TeamViewer, which lets you access and control computers remotely over the Internet.
How do I share my Mac’s screen with an iPad?
That’s everything about Screen Sharing for your Mac, but we also wanted to tell you about the new Sidecar feature in macOS Catalina and iPadOS.
Sidecar allows you to connect an iPad to your Mac for use as a second display. You can link them using a cable or over Wi-Fi, allowing you to expand your screen and boost productivity while out and about.
Sidecar lets you take advantage of the screens on both devices at once.
Turn Sidecar on from the System Preferences in macOS Catalina, then connect to your iPad from the new icon in the menu bar. Your iPad automatically changes to reflect your Mac screen with a range of different viewing options.
Dan writes tutorials and troubleshooting guides to help people make the most of their technology. Before becoming a writer, he earned a BSc in Sound Technology, supervised repairs at an Apple Store, and even taught English in China.


Write a Comment