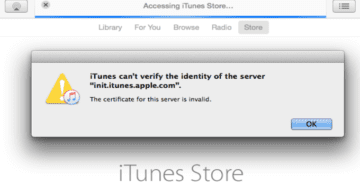
When you connect your iPhone to your Windows or Mac computer, iTunes may sometimes fail to verify the identity of the server. As a result, you can’t connect to iTunes and access the App Store or cloud storage. If you already restarted your device but the issue persists, pursue the troubleshooting solutions below.
What to Do if iTunes Can’t Verify the Server Identity
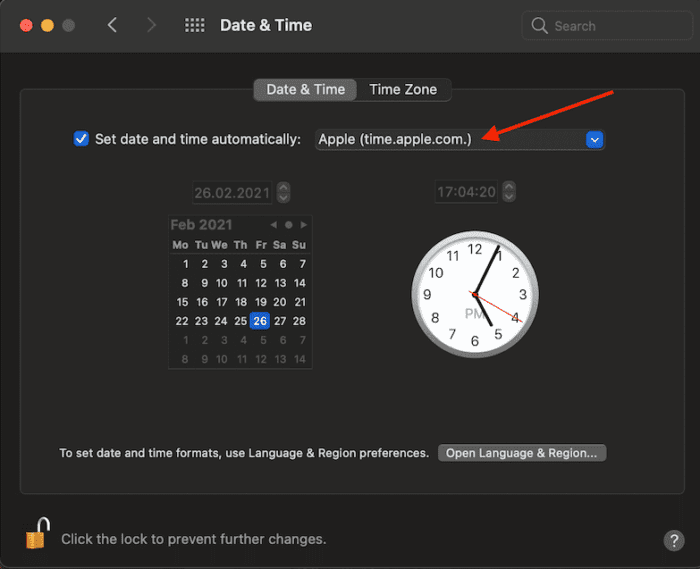
Check Your Date and Time Settings
If your computer’s date and time settings are incorrect, Apple’s servers will block the connection request. Check your date and time settings, and make sure they’re correct.
On macOS, click on the Apple menu, go to System Preferences, and then click on Date and Time. Select time.apple.com from the drop-down menu and let your Mac set the date and time automatically.
On your iPhone, go to Settings, tap General, and select Date and Time. Let your device set the date and time automatically.
If you use a Windows computer, navigate to Settings, click on Time and Language, and select Set time automatically, and then Set time zone automatically.
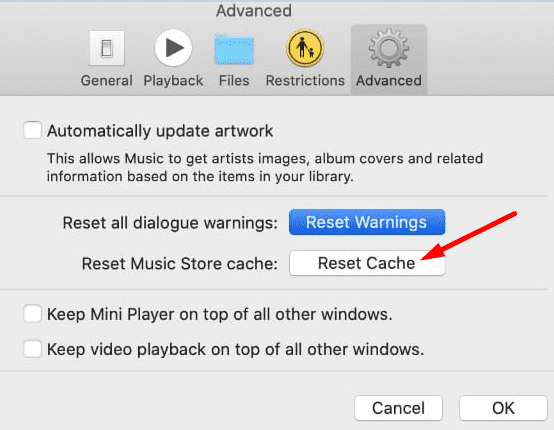
Reset the iTunes Store Cache
Launch iTunes and then click on the Edit option. Select Preferences, and click on the Advanced tab. Select the Reset cache option and hit OK.
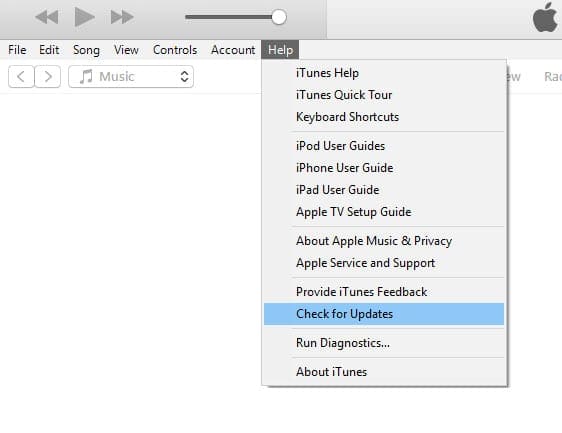
Check for OS and iTunes Updates
Install the latest iTunes version on your computer, and check for OS updates as well. On your Mac, launch the App Store, click on Updates, and hit the Update button next to iTunes.
If you’re on Windows and you downloaded iTunes from the Microsoft Store, check for updates through the Microsoft Store. If you downloaded the app from Apple’s official website, launch iTunes, click on Help, and select Check for Updates.
Don’t forget to check for iOS updates as well. Go to Settings, tap General, and select Software Update.
Flush DNS
Flush your DNS to clear any IP address and DNS information from your computer’s cache. This quick workaround can help you fix a long list of common Internet connectivity issues.
If you’re running macOS Sierra and later, launch Terminal and run the following command: sudo killall -HUP mDNSResponder;sudo killall mDNSResponderHelper;sudo dscacheutil -flushcache.
On Windows, launch Command Prompt with admin rights, and run the ipconfig /flushdns command.
Disable Security Software
Try disabling your security programs (antivirus, antimalware) and check if iTunes manages to verify the identity of the server. Third-party security programs may sometimes block certain iTunes features. Turn off your antivirus and antimalware protection and check the results.
Delete Verisign Certificates From Keychain Access
Many users confirmed that removing the Verisign certificates from Keychain access solved the problem.
Go to Applications, select Utilities, and then click on Keychain Access. Locate your Verisign certificates and export them. You can now remove the certificates. Check if iTunes can now successfully verify the identity of the server.
Confirm you want to delete VeriSign certificates in the pop-up alert.
If you’re still getting the same error, go to ~/Library/Keychains, and delete all the files from that folder to repair keychain errors. Restart your computer, launch iTunes again, and check the results.
Reinstall iTunes
If the problem persists, uninstall iTunes and restart your computer and iPhone. Install a fresh copy of iTunes, and connect your iPhone to your device again. Check if the error persists.
Conclusion
If iTunes can’t verify the identity of the server, ensure your date and time settings are correct. Then reset the iTunes store cache, check for OS and iTunes updates, and flush your DNS. If the issue persists, disable your security software, delete Verisign certificates from Keychain Access, and reinstall iTunes. Did you manage to get rid of the error? Let us know in the comments below.
Madalina has been a Windows fan ever since she got her hands on her first Windows XP computer. She is interested in all things technology, especially emerging technologies — AI and DNA computing in particular.


Write a Comment